How to find the Internal name of columns in SharePoint Online?
The internal name of a SharePoint column is a unique name that is automatically generated by SharePoint when a column is created. It is used by SharePoint internally to reference and retrieve the value of a particular column associated with an item or document. The internal name is generated based on the display name you provide but all special characters and spaces will be replaced with Unicode’s by SharePoint. Internal name is generated only once while creating a new column and it cannot be changed even if you change the display name of SharePoint column.
The internal name is not visible to users in the SharePoint user interface by default, but it is commonly used in various scenarios, such as in SharePoint REST APIs, Power Automate flow expressions, Power Apps formulas, PowerShell, etc. to interact with column data programmatically.
Where are Internal names of SharePoint columns used?
- Custom Scripts: When creating custom scripts, such as JavaScript or PowerShell, the internal names of columns are required to reference and manipulate the values of the columns while interacting with SharePoint data.
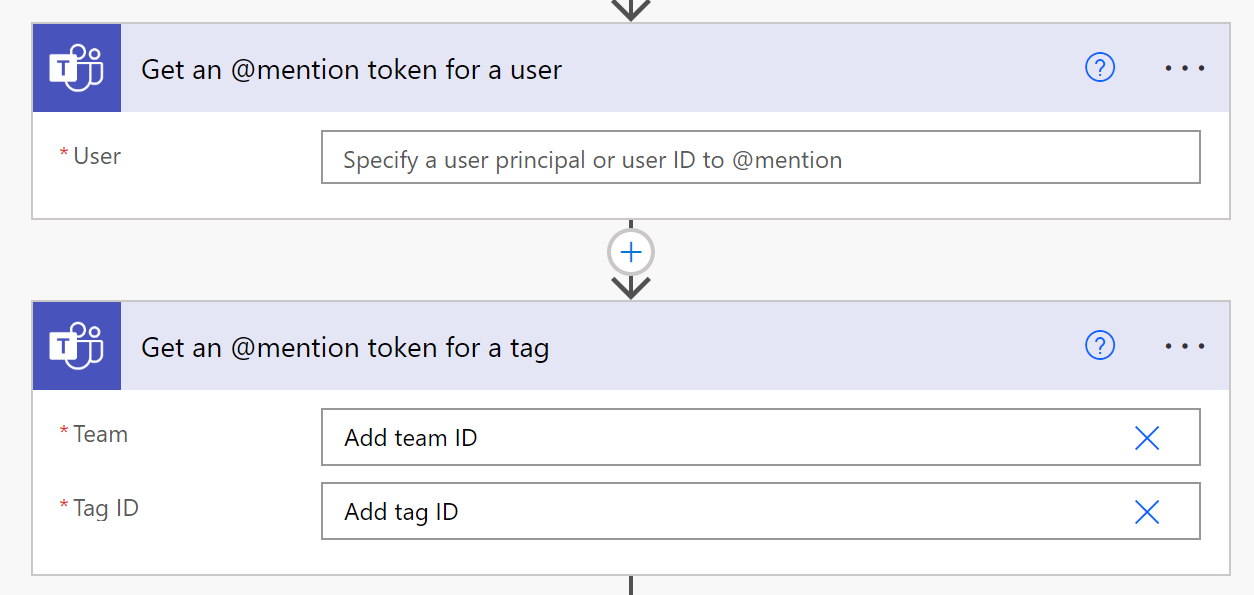
- Workflows: In SharePoint Designer workflows or Microsoft Power Automate (formerly known as Microsoft Flow), the internal names of columns are used to reference the values of the columns as inputs or outputs in the workflow actions and in expressions.
- Custom Solutions: When building custom solutions, such as SharePoint apps, SharePoint framework (SPFx) web parts, or custom code, the internal names of columns are required to interact with the columns programmatically.
- Power Apps: Few of the Power Apps functions like
ShowColumns,SortByColumns, etc. requires using internal names of SharePoint columns in formula. - JSON Formatting: Internal name of SharePoint column is required in JSON formatting to reference the column value with
[$InternalNameOfColumn]syntax.
How to find the Internal name of a SharePoint column?
Using Modern experience list view
You can use sorting or filtering options from SharePoint online modern experience list view to find the internal name of a SharePoint column. Sort by and Filter by options are supported by most of the column types in SharePoint like Single line of text, Choice, Number, Date and Time, Yes/No (Boolean), Person or Group (single selection), etc.
For this afticle, we will use sorting based on SharePoint choice column as an example:
1. Go to the SharePoint online list for which you want to check the internal name of a column.
2. Click on column name/header from the list view and select either Ascending (A to Z) or Descending (Z to A) option from the popup menu:
3. SharePoint will sort the list view based on selection and the browser URL will be changed like:
https://contoso.sharepoint.com/sites/wlive/Lists/InternalNames/AllItems.aspx?sortField=ChoiceColumn&isAscending=falseWhere column name (ChoiceColumn) after sortField= is the internal name of your SharePoint choice column.
4. Similarly, when you use Filter by option in SharePoint modern experience to filter the list view based on Date and Time column (named as Start Date), SharePoint changes browser URL like:
https://contoso.sharepoint.com/sites/wlive/Lists/InternalNames/AllItems.aspx?FilterField1=Start_x0020_Date&FilterValue1=2023-04-05&FilterType1=DateTimeWhere column name (Start_x0020_Date) after FilterField1= is the internal name of your SharePoint date and time column. Notice _x0020_ in internal column name which is an Unicode encoding of the space character in the display name of date and time column (Start Date).
Using Classic experience List settings page
Few of the SharePoint column types like Multiple lines of text, Hyperlink or Picture, Image, etc. does not support sorting or filtering from SharePoint modern experience list views. So, you have to use the classic experience list settings page to find the internal name for such SharePoint columns.
Follow below steps to find the internal name of multiple lines of text column using SharePoint classic experience list settings page:
1. Go to the SharePoint online list for which you want to check the internal name of a column.
2. Click on Settings (gear) icon from the top right corner and select List settings:
3. From list settings page, scroll down to the Columns section and click on the column name for which you want to find the internal name:
4. SharePoint will open column settings page for the respective column with browser URL like:
https://contoso.sharepoint.com/sites/wlive/_layouts/15/FldEdit.aspx?List=%7B6FBA7FAE-AFC0-45D6-99EE-0AB20629EE41%7D&Field=MultilineTextColWhere column name (MultilineTextCol) after Field= is the internal name of your SharePoint online multiple lines of text column.
Note: You can use this classic experience method to find out the internal name of SharePoint columns for all column types.
Using SharePoint REST API
You can use SharePoint REST API endpoint like below to get the internal name of SharePoint column based on it’s display name. Open URL in below format directly from browser tab:
https://contoso.sharepoint.com/sites/SPConnect/_api/web/lists/getbytitle('InternalNames')/fields?$select=Title,InternalName&$filter=Title eq 'Multiline Text Column'Using PnP PowerShell
You can use below PnP PowerShell script to find the internal name of SharePoint online list column using PnP PowerShell:
# SharePoint online site URL
$siteUrl = "https://contoso.sharepoint.com/sites/wlive"

# Display name of SharePoint list
$listName = "InternalNames"

# Display name of SharePoint list column
$columnName = "Multiline Text Column"

# Connect to SharePoint online site
Connect-PnPOnline -Url $siteUrl -Interactive

# Get internal name of SharePoint list column
Get-PnPField -Identity $columnName -List $listName | Select Title,InternalNameUsing CLI for Microsoft 365
You can use below CLI for Microsoft 365 script to find the internal name of SharePoint online list column using CLI for Microsoft 365:
# SharePoint online site URL
$siteUrl = "https://contoso.sharepoint.com/sites/wlive"

# Display name of SharePoint list
$listName = "InternalNames"

# Display name of SharePoint list column
$columnName = "Multiline Text Column"

# Get Credentials to connect
$m365Status = m365 status
if ($m365Status -match "Logged Out") {
	m365 login
}

# Get internal name of SharePoint list column
m365 spo field get --webUrl $siteUrl --listTitle $listName --title $columnName --output textBest practices for naming SharePoint columns
When creating columns in SharePoint, it’s important to follow best practices for column naming to avoid using special characters or Unicode characters in internal names. Here are some recommended best practices:
- Use only alphanumeric characters: Stick to using letters (A-Z, a-z) and numbers (0-9) in column names. Avoid using special characters such as @, #, $, %, _, etc. Avoid column names beginning with numbers.
- Avoid spaces: Use PascalCase to separate words in column names instead of spaces. For example, use
ColumnNameinstead ofColumn Name. This can help prevent issues with URLs, Unicode encoding, and referencing column names in scripts or code. - Avoid reserved words: SharePoint has reserved words that are used for system functionality, and using them in column names may cause conflicts. Examples of reserved words include “ID”, “Modified”, “Created”, “Title”, etc. Avoid using these reserved words as column names.
- Keep it concise and meaningful: Use descriptive and meaningful names for columns that clearly indicate their purpose. Avoid using vague or generic names that may be confusing or ambiguous to users. Use column description to provide more information about the columns.
- Be consistent: Establish a consistent naming convention for columns across your SharePoint site or site collection to ensure uniformity and ease of management. This can also help with documentation, training, and maintenance of your SharePoint environment.
I hope you liked this article. Give your valuable feedback & suggestions in the comments section below and share this article with others.