Dans ce tutoriel, nous allons découvrir l'un des scripts disponible sur le GitHub officiel de Microsoft : Health Checker. Health Checker est un script PowerShell simple d’utilisation qui permet de réaliser un audit de conformité des serveurs Exchange.
Grâce à au script healthchecker.ps1, il est possible en moins d’une heure de vérifier certains points cruciaux relatifs au bon fonctionnement et à la sécurité de vos serveurs de messagerie Exchange. Un rapport sera généré suite à l'exécution du script.
Par exemple, êtes-vous protégés contre les dernières CVE ? Avez-vous installé les dernières mises à jour Exchange ?
Les dernières actualités nous montrent l’importance de maintenir à jour son infrastructure serveurs et applicatives.
Vous constatez des lenteurs sur votre infrastructure malgré les ressources à votre disposition ? Avez-vous bien appliqué les recommandations de bases de Microsoft pour une infrastructure Exchange ?
Mais aussi d’autres points sur les composants, le système, les mises à jour et la configuration. Voici une liste non exhaustive des points vérifiés :
Si vos serveurs sont en mode maintenance ou en attente d’un redémarrage
Des clés de registre mal configurées comme le TCPKeepAlive ou des clés non configurées qui peuvent être exploitées
L’état de votre configuration
Si le SMB1 est installé et/ou bloqué
Si l’Extended Protection est activée
Si vous avez des doutes sur l'état de votre Exchange suite à la lecture de cette présentation, alors suivez le tutoriel ! Et si vous n’avez pas de doutes, une vérification vous prendra moins d’une heure...
II. Prérequis
Le script est compatible avec les versions suivantes : Exchange 2013, 2016 et 2019. Il est fonctionnel sur Exchange 2007 et Exchange 2010 mais n’est pas pris en charge.
Un compte administrateur local sur les serveurs Exchange et également membre du groupe Organization Management.
III. Utilisation du script
Les commandes utilisées dans la suite de cet article sont à lancer dans une console PowerShell en administrateur.
A. Télécharger le script
Le mieux est d’aller chercher le script directement à la source, sur le GitHub, pour s’assurer d’avoir la dernière version fournie par l’équipe Microsoft.
Une fois téléchargé, vous n’avez plus qu’à le mettre sur un serveur Exchange dans un dossier, par exemple "C:\script" ou "C:\Temp".
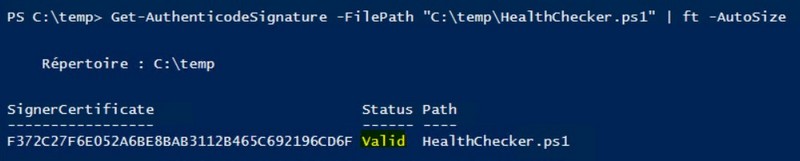
B. Vérifier la signature
On vérifie la signature du script à l’aide de la commande suivante :
Get-AuthenticodeSignature -FilePath "C:\temp\HealthChecker.ps1" | ft -AutoSize
Si le résultat vous indique que la signature est valide, vous pouvez passer à la suite.
C. Générer un rapport
En vous plaçant dans le dossier contenant le script HealthChecker.ps1, il vous faudra exécuter le script en ciblant le serveur souhaité. La commande ci-dessous cible le serveur "Win16-Exch-1".
.\HealthChecker.ps1 -Server "Win16-Exch-1"
On peut en générer un pour chacun de nos serveurs. Cette seconde commande cible "Win16-Exch-2".
.\HealthChecker.ps1 -Server "Win16-Exch-2"
Cela va produire un rapport format HTML et un XML par serveur.
D. Fusionner un rapport
Pour améliorer la lecture de nos rapports, il est possible de les fusionner. Voici la commande à utiliser :
.\HealthChecker.ps1 -BuildHtmlServersReport
Ainsi, dans un seul fichier HTML, on aura une synthèse globale de nos serveurs Exchange.
E. Auditer en une commande !
En vous plaçant dans le dossier contenant le script HealthChecker.ps1, il vous suffit d’utiliser la commande suivante qui va générer un rapport pour chaque serveur Exchange et fusionner le tout pour l’ouvrir dans un navigateur web.
Avec cet outil supplémentaire, il ne tient qu’à vous de réaliser l’audit de vos serveurs Exchange pour vous assurer de leur état de santé.
Maintenant que vous avez cette astuce en main, il ne reste plus qu’à réfléchir à comment vous allez pouvoir l’utiliser. Vous pouvez l’utiliser ponctuellement avant ou après l’installation de mises à jour, l’installation d’un nouveau DAG ou l’ajout d’un serveur supplémentaire. Mais vous pouvez aussi l’améliorer en le planifiant.
Un rapport hebdomadaire ? Une alerte en cas de ligne rouge dans le rapport ? On attend vos retours en commentaires
PowerShell provides multiple operators to manipulate binary numbers at the bit level. In addition to an AND and an OR operator, this includes those used for an exclusive OR and negation. There are also two shift operators, which shift the bits by a certain number of positions to the left or right.
All modern shells and command lines offer a prompt that provides the user with essential information about his context. By default, however, PowerShell displays only the current directory. Since its appearance is determined by a function, you can change the PowerShell prompt easily.
In your work in Microsoft Azure, should you focus your energies on Azure PowerShell, Azure CLI, or both? This lesson presents a comprehensive comparison of the two primary scripting languages in the Azure cloud.
Most programming languages provide string functions that can be used to selectively truncate leading or trailing characters. String objects in PowerShell have three such trim() methods that remove not only spaces but also any characters at the beginning and end.
We are thrilled to announce the 2nd edition of TechDay Pakistan, the highly anticipated online event that will take place on March 11th, 2023. Our goal is to bring together Microsoft 365, Azure, AI, D365, Power Platform specialists, developers, architects, end-users, and other professionals who work with Microsoft Cloud Technologies.
Our event aims to provide a platform for attendees to learn and share the latest information, best practices, and insights on various topics related to Microsoft Cloud Technologies. We will have expert speakers who will share their knowledge and experiences, along with interactive sessions, demos, and networking opportunities for all participants.
TechDay Pakistan 2023 is an opportunity for professionals to stay up-to-date with the latest trends, techniques, and tools in Microsoft Cloud Technologies. Whether you are a seasoned expert or a newcomer, our event promises to offer something for everyone.
So, mark your calendars for March 11th, 2023, and join us for a day of insightful discussions, learning, and networking. We look forward to welcoming you to TechDay Pakistan 2023.
We are excited to invite you to register for TechDay Pakistan 2023, the premier online event for Microsoft Cloud Technology professionals in Pakistan. Don’t miss the chance to connect with experts, learn about the latest tools and techniques, and expand your network.
Registration is now open and easy to access at our Eventbrite page. Follow the link provided below to secure your spot and join us on March 11th, 2023 for a day of knowledge sharing and networking.
The Microsoft 365 Discovery series is an exciting opportunity for individuals to expand their knowledge and skills in Microsoft 365. Starting on February 10th, 2023 and continuing until March 31st, 2023, the series will consist of eight weeks of informative sessions. Each Saturday, attendees will have the opportunity to attend two sessions – one featuring a community speaker discussing various aspects of Microsoft 365, and the second focused specifically on Microsoft SharePoint.
This series is completely free and open to those who have a basic understanding of Microsoft 365. Our goal is to provide individuals with the opportunity to enhance their skills and expertise in Microsoft 365 technology. Whether you are a seasoned professional or just starting out in the Microsoft technology landscape, this series offers an excellent chance for you to develop and strengthen your skills.
Migration is a process to migrate content from one location to another and similarly SharePoint online site collection migration is the process of moving a SharePoint site collection from one environment (such as an on-premises SharePoint server) to another environment (such as SharePoint Online in Office 365). This can involve copying all of the site collection’s content, data, and configurations to the new environment, and ensuring that the site collection functions as expected in the new environment. This process can help organizations take advantage of the benefits of SharePoint Online, such as increased scalability and improved security, while still retaining access to their existing SharePoint content and data. The migration process can be complex, so it’s often recommended to use a migration tool to help simplify the process.
Steps to Migrate a SharePoint Online Site Collection
Here are the steps to migrate SharePoint Online site collection content to another location:
Preparation:
Plan the migration process, including the scope and timeline.
Verify that the source and destination environments are compatible.
Create a backup of the source site collection.
Data Collection:
Use a migration tool or the SharePoint Online Management Shell to collect the data from the source site collection.
Store the collected data in a secure location.
Data Import:
Create a new site collection in the destination environment.
Use a migration tool or the SharePoint Online Management Shell to import the collected data into the new site collection.
Data Validation:
Verify that the data has been imported correctly and that the site collection is functioning as expected.
Test the site collection for any issues and resolve them.
Post-migration activities:
Update any URLs or links in the site collection.
Finalize the migration process and clean up any temporary files.
PowerShell script to migrate SharePoint online site collection
Here is an example of how to use PowerShell to migrate SharePoint Online site collection content to another site collection:
We shared a basic example and when you are trying to migrate using then you need to change the PowerShell commands and parameters depending on the specifics of your migration, such as the size of your site collection and the migration tool you’re using. It’s recommended to use a migration tool to simplify the migration process, as the process of migrating a SharePoint Online site collection can be complex and time-consuming.
SharePoint on-premise migration refers to the process of moving data, content, and settings from a SharePoint on-premise environment to a different environment, such as another on-premise environment, SharePoint Online, or a hybrid environment.
This migration process is necessary when organizations need to upgrade their existing SharePoint environment, move to a different hosting solution, or consolidate multiple on-premise SharePoint farms into a single environment.
Steps Involved in a SharePoint on-premise Migration
The steps involved in a SharePoint on-premise migration include:
Planning: Define the scope of the migration, determine the content to be migrated, and plan the migration timeline.
Preparation: Check the compatibility of the source and destination environments, set up the destination environment, and test the migration process.
Data Migration: Copy the content, data, and settings from the source environment to the destination environment.
Validation: Verify that the data has been successfully migrated and that the destination environment is functioning correctly.
Post-migration activities: Finalize the migration, update the URLs, and configure the environment as needed.
The process of SharePoint on-premise migration can be complex, especially when migrating a large amount of data, so it’s recommended to use a migration tool or engage a professional migration services provider to ensure a smooth migration process.
SharePoint Migration is the process of transferring content, data, and configurations from one SharePoint environment to another. The migration process can involve moving from one version of SharePoint to another, from an on-premises environment to the cloud, or from one SharePoint tenant to another. The main goal of SharePoint Migration is to ensure that the content and data remains accessible and usable after the migration.
I am going to write a series of blogs on SharePoint migrations and differences on SharePoint On-Premise and SharePoint online migrations.
Important Migration Factors
There are several factors to consider when planning a SharePoint Migration, including:
Source and destination environment compatibility: Ensure that the source and destination environments are compatible and can support the content, data, and configurations being migrated.
Content scope: Determine which content, data, and configurations will be migrated, and which will be excluded.
Timeline: Establish a timeline for the migration, including planning, preparation, data collection, data migration, testing, and go-live.
Tools and methods: Choose the right migration tool and method based on the size of the migration and the complexity of the content and data being migrated.
Security and compliance: Ensure that the migration process complies with security and data protection regulations, and that the migrated content and data remains secure in the destination environment.
User experience: Consider the impact of the migration on end-users, and plan for training, communication, and support to minimize disruption to the user experience.
The SharePoint Migration process can be complex, so it’s recommended to plan and test the migration thoroughly before executing it. The use of a migration tool can help simplify the process and minimize the risk of data loss or disruption to the user experience.
Different Ways of SharePoint Migrations
There are several different ways to perform SharePoint migrations, depending on the size, complexity, and specific requirements of your migration. Here are some common methods for SharePoint migrations:
Manual Migration:
Manually copying and pasting content and data from one SharePoint environment to another. This method is typically used for small migrations and requires manual configuration of the destination environment.
Third-party Migration Tools:
Using commercial or open-source tools to automate the migration process. These tools can handle complex migrations, manage large amounts of data, and provide detailed reporting and tracking.
SharePoint Migration API:
Using Microsoft’s SharePoint Migration API to automate the migration process. The API provides a set of APIs that can be used to migrate content, data, and configurations from one SharePoint environment to another.
SharePoint Content Deployment:
Using the content deployment feature in SharePoint to move content from one site collection to another. This method is typically used for moving content between site collections within the same SharePoint environment.
SharePoint Backup and Restore:
Using the backup and restore feature in SharePoint to move content, data, and configurations from one environment to another. This method is typically used for moving content, data, and configurations between SharePoint versions or between on-premises and cloud environments. It’s important to choose the right method for your migration based on the size and complexity of your content, data, and configurations, as well as your specific requirements and constraints. It’s also recommended to carefully plan and test your migration process before executing it, to minimize the risk of data loss or disruption to the user experience.
PowerShell has long been Microsoft’s preferred administrative tool for Windows and provides far more utility and flexibility than using its predecessor, the command prompt. For all PowerShell’s functionality and usefulness, it still has a reputation for being difficult to learn. For this reason, I want to present a few PowerShell tips you should know when you’re just getting started with the tool.
So I’ve compiled 5 PowerShell tips I wish someone had told me when I was learning PowerShell from the outset; may they serve you well!
5 PowerShell Tips
Let’s dive right into the 5 PowerShell tips that will make your life much easier.
1.PowerShell Mimics Natural Language
The first of the five PowerShell tips you need to know is that the command structure is designed to mimic natural language. That said, it reminds me more of the way that old video games used to work.
When I was a kid in the ’80s, command-line-driven adventure games were popular. The top half of the screen was a visual depiction of where you were in the game, while the bottom half consisted of a command line interface. You would enter really simple, two-word commands to control your character in the game. Some examples of these commands would be; open door, go left, climb stairs, or pay bartender.
PowerShell commands, or cmdlets, are made up of two words separated by a hyphen. Like the adventure games from halcyon days, the first of these two words is a verb, and the second is a noun.
Consider, for example, the open door command; “open” is a verb, and “door” is a noun. If this were a PowerShell cmdlet, it would be “Open-Door”.
It’s also worth noting that Microsoft tries to use cmdlet words consistently. For example, you’ll find quite a few PowerShell cmdlets that use the verb Get, including; Get-Service, Get-Process, and Get-PhysicalDisk. In each case, the word Get does the same thing; it retrieves information.
Microsoft tries to use nouns consistently as well. For example, the word Service always pertains to a system service regardless of the cmdlet like Get-Service, Start-Service, and Stop-Service.
Now that you know PowerShell’s core syntax, let’s look at the second pearl of wisdom!
2.Using Windows PowerShell Isn’t Your Only Option
Next, let’s cover number 2 of our PowerShell tips. Windows PowerShell usually refers to the version of PowerShell built into the Windows operating system. However, this is one of many available versions of PowerShell.
Two main differences exist between PowerShell 5 and PowerShell 7;
PowerShell 7 is cross-platform compatible; it works on Windows, macOS, and Linux, as well as on ARM and Docker. This gives you the power to unify your approach to administration across platforms. This will reduce errors associated with using different interfaces and code and save you time.
PowerShell 7 has several new features that don’t exist in PowerShell 5 — and these new features can help you. Notably, you can use new options for some cmdlets that contain logical operators, allowing you to run more intelligent code.
Remembering the differences above can help you when you’re working on cross-platform systems or can’t find the functionality needed to complete a task. Now, let’s move on to the third top tip!
3.Help Is Always Available
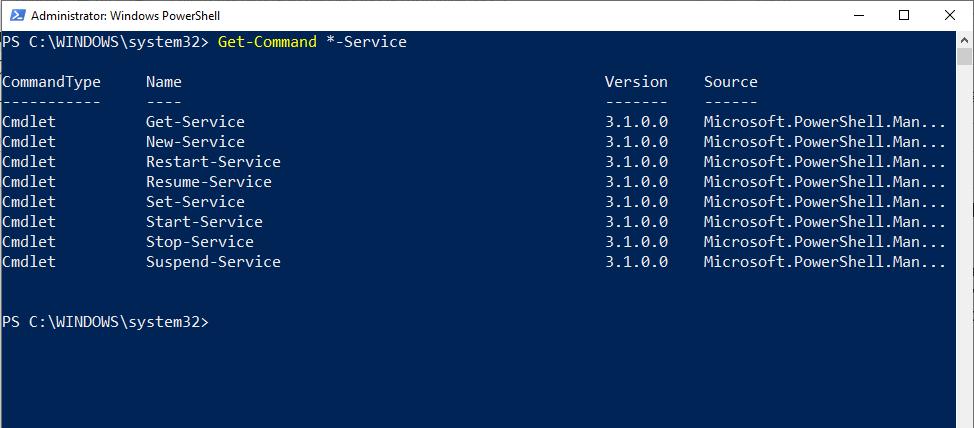
One of the most important PowerShell tips we cover here is that you can always ask for help! For example, if you need help figuring out what cmdlet to use for a particular task, you can use the Get-Command cmdlet. This cmdlet supports wildcards, so if you know what noun or verb you need to use, the Get-Command cmdlet can help you figure out the rest.
Suppose for a moment that you need to start a system service but don’t know the command to use. Let’s also pretend that you’re pretty sure the command will incorporate the word Service. In a situation like this, you might type;
Get-Command *-Service.
Typing in the above command causes PowerShell to show you every cmdlet that includes the word Service. You can see what this looks like below.
The Get-Command cmdlet can help you to figure out what command to use.
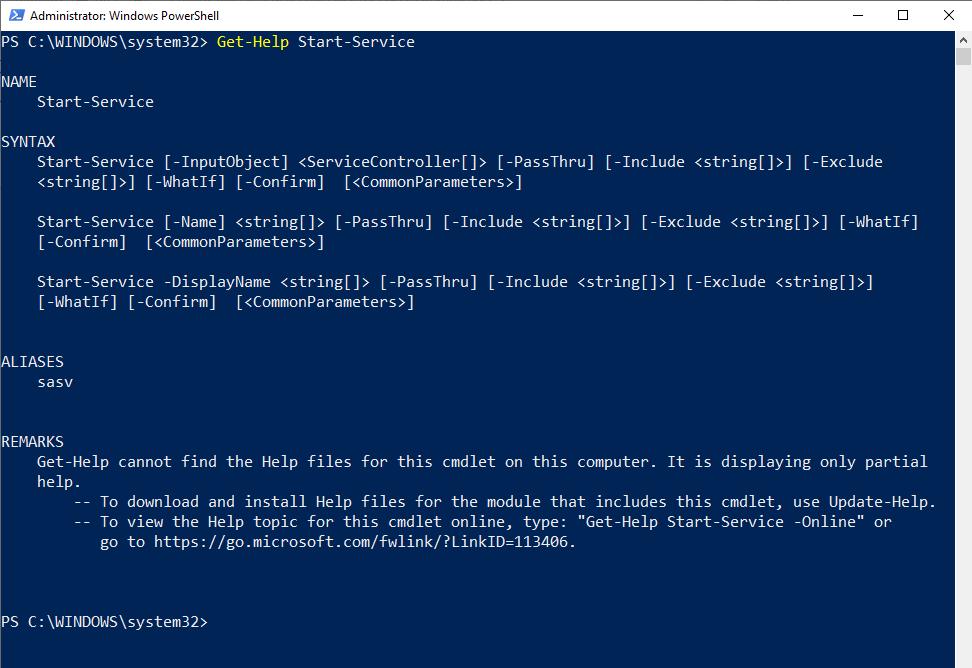
Conversely, typing the following shows you all the cmdlets that use the word “start”’;
Get-Command Start-*
Now, you’ve figured out that Start-Service is the cmdlet that will allow you to start a system service, but you don’t know how to use it. You can acquire the cmdlet’s syntax by using the Get-Help command. Sometimes, Get-Help will even provide you with usage examples using the Get-Help cmdlet. To use Get-Help, type Get-Help followed by the name of the cmdlet you need help with; look at the example below.
The Get-Help cmdlet provides assistance with using PowerShell cmdlets.
Remarkable how easy PowerShell is starting to look; now, onto number 4 in our PowerShell tips guide!
4.PowerShell Can Be a Scripting Language, a Management Tool, or Both
When PowerShell was first created, anyone at Microsoft would have described it as a command line-driven management tool for Windows. While that definition still holds today, it needs to be improved, and PowerShell is both a management tool and a scripting language.
PowerShell is an extremely capable scripting language that does almost anything that any other general-purpose programming language can do. Additionally, PowerShell can leverage WMI and the .NET Framework. If you need to do something not supported through native PowerShell, you can do it through WMI or .NET. For example, .NET allows you to build GUI-based applications even though PowerShell is a text-based environment.
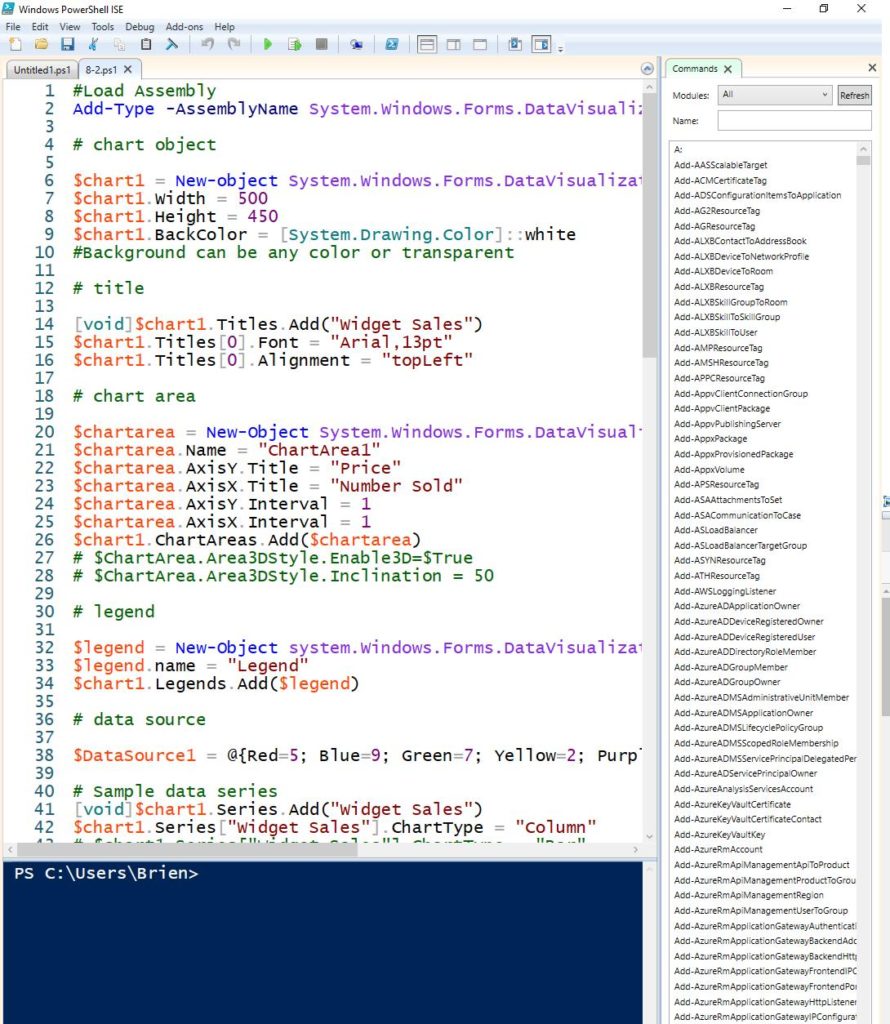
PowerShell scripts are nothing more than text files containing PowerShell commands. You can create or edit PowerShell scripts using any text editor, so long as it saves text files using ANSI encoding. However, most people new to PowerShell prefer to write scripts using PowerShell ISE. PowerShell ISE offers syntax highlighting, making it easier to locate syntax errors, and offers predictive suggestions, simplifying the coding process. The figure below shows an example of a PowerShell script within PowerShell ISE.
PowerShell ISE uses syntax highlighting as a way of making code easier to write and debug.
To run a PowerShell script, enter a dot and a slash (./) followed by the name of the script you want to run. Keep in mind that a script will only be able to run if PowerShell’s execution policies allow the use of scripts. You can check to see what execution policy is currently in use by entering the Get-ExecutionPolicy command.
Onwards and upwards to the last on our list of PowerShell tips you need to know!
5. PowerShell Can Be Used Remotely
In this last of our PowerShell tips, you should know that one of the advantages of PowerShell over GUI-based management tools is that it’s scalable. In other words, you can direct PowerShell commands, or even entire scripts, to run on as many systems as you need. As such, PowerShell can run commands locally, or it can direct those commands to a remote system.
Many PowerShell cmdlets support the use of the -ComputerName parameter. This parameter allows the cmdlet to be run against a remote machine, and you need only to enter the machine’s name or IP address after the word ComputerName.
Not all cmdlets allow the use of the Computer parameter, but you can use other methods of establishing remote connectivity. One popular method involves using the Invoke-Command cmdlet. The Invoke-Command cmdlet also requires the use of the ComputerName parameter. Still, it allows you to run an entire script block against one or more remote machines rather than being limited to a single command. It can also be directed at multiple remote machines. If, for example, you wanted to run the Get-Service cmdlet against a remote machine using the Invoke-Command cmdlet, you would use this command:
The third option is to establish a session with the remote machine. A session allows you to work as though you were accessing the remote machine locally. Once the session is established, you don’t have to worry about using ComputerName or Invoke-Command. The command you can use to launch a remote session is:
New-PSSession -ComputerName <remote machine name>
You may have to provide credentials when accessing remote machines, depending on your security configuration.
Let’s wrap up our PowerShell tips guide!
Final Thoughts
When getting started with PowerShell, you need to know a few crucial PowerShell tips to make the learning process easier.
Firstly, PowerShell is a natural language command line environment that you can use as both a scripting language and a management tool. Additionally, PowerShell cmdlets and scripts can be directed to run on a remote system just as easily as they can be used on a local system. PowerShell has been created to give you the power and flexibility you need to administer your system and surpass the shortcomings of the humble command prompt.
When using PowerShell, always remember that later versions of PowerShell can be used cross-platform and allows you to streamline your management tasks in cross-platform environments. In addition, later versions of PowerShell often provide new options, allowing you to manage your system more effectively. To this end, check new releases for features that can help you when a task appears impossible.
Always remember help is always available in PowerShell; simply add the service tag after the cmdlet you’re using to get a definition of all the options available. In addition, remember you can always use wildcards with the Get-cmdlet when you can’t remember the name of what you’re looking for.
Learn more about PowerShell tips and related topics in the FAQ and Resources sections below!
The basic PowerShell cmdlets tend not to change because if Microsoft were to change the command syntax suddenly, it would likely break any script that incorporates the changed cmdlet. But Microsoft does occasionally introduce new cmdlets and new functionality.
How can I change my PowerShell execution policy?
The easiest way to change a PowerShell execution policy is to use the Set-ExecutionPolicy cmdlet. If you want to disable the execution policy completely, you can type Set-ExecutionPolicy Unrestricted. Similarly, if you wanted to require scripts downloaded from the Internet to be signed, you could type Set-ExecutionPolicy RemoteSigned.
Where is the best place to get help with a specific PowerShell cmdlet?
While you can use the Get-Help cmdlet to get assistance with any other PowerShell cmdlet, Microsoft also provides online help for every native PowerShell cmdlet.
Does PowerShell ISE have any benefit over other text editors aside from its syntax highlighting feature?
Every text editor is designed to cater to different needs; you can’t make an effective comparison between PowerShell ISE and all other text editors. Noteworthy features include a live PowerShell window that can be used to test a script without having to leave the editor. It also has a built-in debugger, a list of PowerShell cmdlets, and line numbers.
Resources
TechGenix: Article on Working With PowerShell Variables
Lancé en partenariat avec le magazine Programmez!, nous proposons pour 45 euros seulement (frais de port inclus) un kit “maker” contenant tout le nécessaire pour créer facilement des objets connectés en Wifi et compatible avec la plateforme Constellation. Le kit « Maker Pack ESP8266 » Dans le ce kit vous retrouverez: 1 carte ESP8266 D1 mini Pro […]
Microsoft a officialisé la sortie d’un nouveau module Powershell pour administrer Azure Information Protection : AIPService. Dans le même temps l’éditeur à annoncé la fin de la prise en charge du Module AADRM pour le 15 juillet 2020. AADRM est maintenant obsolète et remplacé par le module AIPService, qui fournit la même fonctionnalité avec les cmdlets […]
L’utilisation de l’aide de PowerShell peut s’avérer peu pratique si vous ne connaissez pas le paramètre ShowWindow de la commande Get-Help. Celui-ci permet d’afficher l’aide dans une fenêtre contextuelle contenant les informations d’aide complétes de la commande. Par exemple, la ligne PowerShell suivante récupère le contenu de l’aide pour la commande Set-executionpolicy et l’affiche dans une fenêtre […]
Welcome to our first Online event TechDay Pakistan. Our aim is to engage Microsoft 365, Azure, D365, PowerPlatform specialists, end users, architects, developers, and other professionals that work with Microsoft Cloud Technologies to share the latest information for working with anything and everything. We are organizing an online event “TechDay Pakistan” on 20th March 2022.
Welcome to Microsoft 365 Discovery series. We are going to organize series of sessions for Eight weeks starting from 26th Feb, 2022 till 16th of April, 2022. There would be two sessions each Saturday, one would be from the community speaker on any of the Microsoft 365 area and second one would be a continuous series of sessions on Microsoft SharePoint.
This would a free event series and we encourage you to attend if you have basic understand on Microsoft t365. Our goal is to develop skillset on Microsoft 365 Platform. If you are new to Microsoft technologies, then this would be an ideal opportunity for you to develop the right skill set.
Microsoft 365 Mobile Device Management (Intune) component
Managing mobile devices and computers is not easy. Especially because mobile users are nowadays, mostly everyone, and therefore the challenges are greater. Through MDM-Mobile Device Management and Azure Intune you can provide business and data by organizing security politics, dynamic groups and assigning rights to access documents and applications. Microsoft 365 makes it easy for you to manage your devices as well as protect your data, learn through a demo in class.
An overview on Microsoft 365 will be shared and the app details and creation of a new dev tenant. A detail walkthrough on admin panel and creation of user accounts, configuring demo accounts and organization setting details for the created Tenant
Well-planned and executed information architecture is a prerequisite for an intelligent and high-performing intranet, hub, or site. The most important first step in planning an effective information architecture is understanding your users and helping them find what they need to complete tasks in a way that makes the most sense to them.
In this session I will share the details regarding the SharePoint Site templates and Hub Site. Will discuss about information architecture for the site and why its important including overview on content types, site columns and list templates.
If you haven’t worked on SharePoint before than session will be helpful for you to get understanding about the structure of SharePoint sites and how it works. And if you are working for a company, you will understand that what information you would need from business users.
How to configure Microsoft Teams to meet your needs
Microsoft Teams offers many options in its separate Admin Center to customize the feature to your needs. It distinguishes between global settings and settings that can be applied by policy to explicit users and groups. In addition, there are various options with the separate Microsoft Cloud features to customize the Teams environment to your needs. This session shows an overview focusing to: •Options with the Conditional Access feature •Microsoft Teams and Defender for Cloud Apps •Defender for Office 365 and scenarios in the context of Microsoft Teams •Microsoft Information Protection and Teams •App Policies with Endpoint Manger for Microsoft Teams Apps
In this session I will share details on SharePoint security and will show managing security at site at site level and also at document level. Will also different Tiers of Microsoft Teams security and also customization of security for SharePoint site and Microsoft Team to protect the secure content with ease of collaboration.
In this session, I will introduce what is Microsoft Graph & Connectors and how important they are for all our future search in our organization. Search is a key aspect on every product in the market for content management and how it solves the user experience is a topic to discuss. We will cover Microsoft & Custom Connectors on this topic and understand the architecture of building them with Microsoft Graph.
In this session I will be sharing an overview about SharePoint lists and Power Automate and will walkthrough the process for creating a flow associated with a SharePoint list. If you are new to Microsoft 365 platform and learning about SharePoint than this session would be very helpful for you and will give you understanding about SharePoint lists and how to integrate business processes.
This session tells you the different of “classic” sync and “Add to OneDrive”, the Pro’s and Contra’s, the Limits of sync and why Microsoft implement another way of sync. It includes a lot of demo’s to explain, that the new way of sync is much more better.
Microsoft Form, Power Automate and SharePoint list process Integration
In this session I will share the steps by step integration between Microsoft Form and SharePoint List using Power Automate flow and also will show the integration of different business activities.
Importing data from Excel sheets into an existing or new SharePoint list can be a great tool to have in your toolbox. Let’s take a look at the best approach to executing this from Power Apps using File Pickers and a Flow from Power Automate
In this session we will cover the different options available in Azure SQL in order to select the appropriate option for our next cloud project. We will see practical cases of how to migrate our on-premises databases to Azure SQL
SharePoint and Teams App Development using SPFx and PnP Modules
This session is about SharePoint app development using SPFx framework and how we can use PnP modules and other 3rd party components in SharePoint app development. This would be a walk through session where I will share the details on the project creation creation till deployment steps.
This is one of the most common requirement which you get from the site owners, they want to know who have access to the site. This is also one of the important report which one need at the time of site migration. You can generate this report with help of the migration tools. Or can go to the site permissions to verify who have access on the site by looking to site permissions.
For viewing site permissions, go to site settings and click on site permissions. Or use below URL to directly access the site permissions.


 Quelles sont les données de télémétrie sortant de vos ordinateurs ? Je ne pose plus de question : pour ma part, je les bloque.


