Mon avis personnel sur Triton. Avis objectif, sans partenariat, basé sur du matériel acheté et utilisé. Ce qu'il faut savoir sur Triton avant d'acheter.
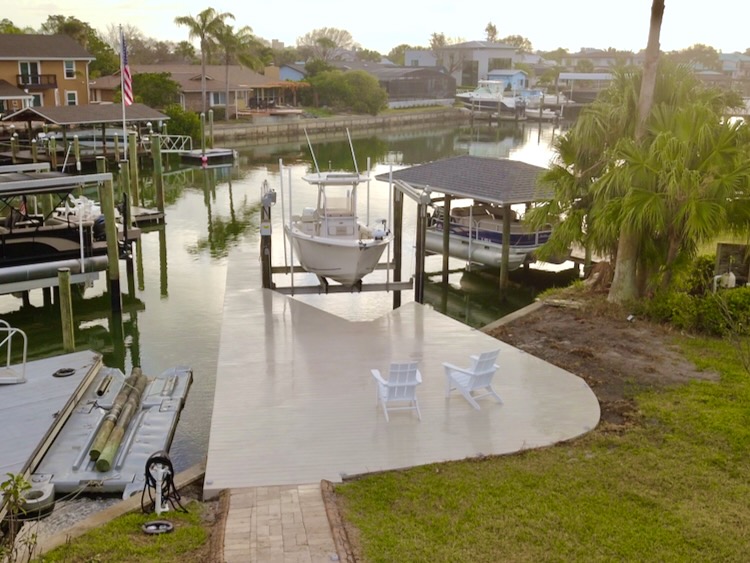
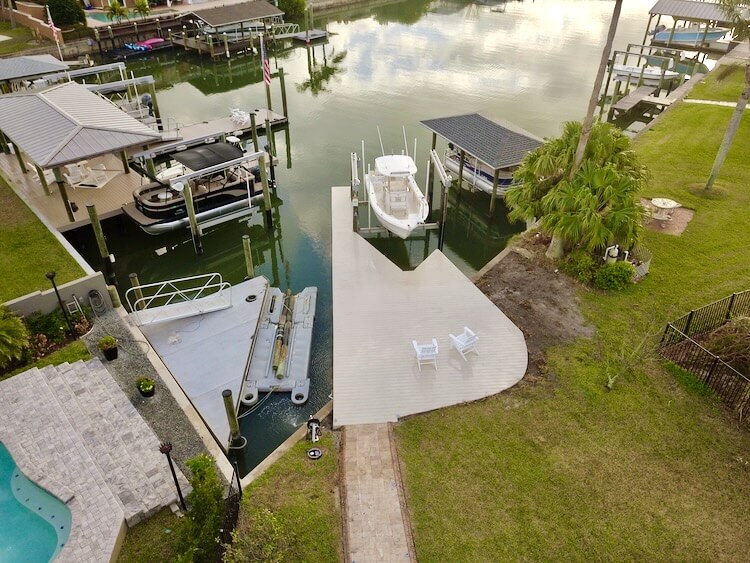
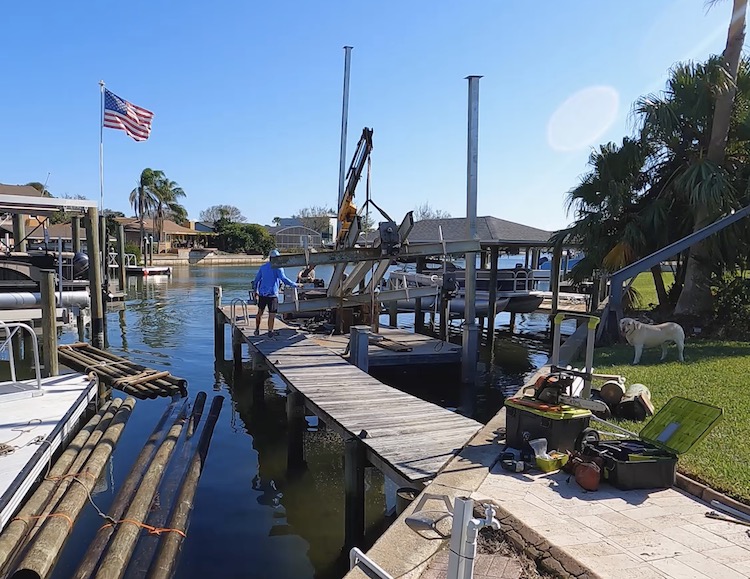
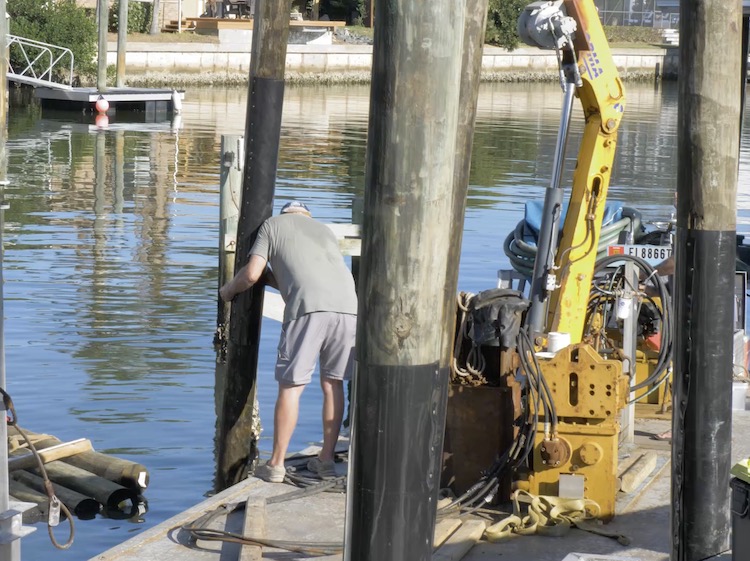
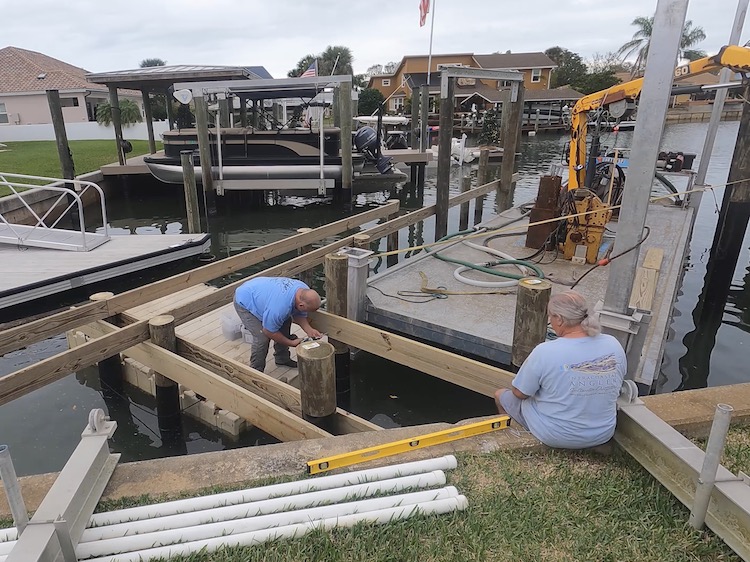
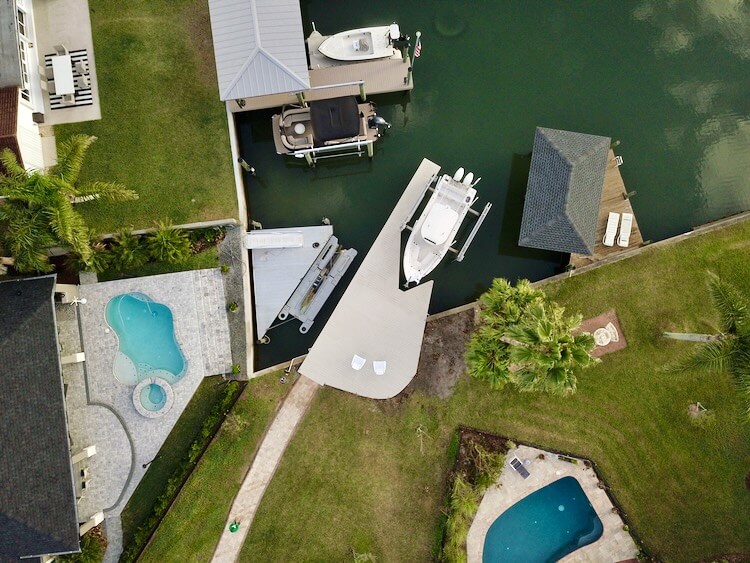
My parents recently bought a home on the water in Florida and having access to the water from their backyard has been huge! Unfortunately, the existing dock has been there since the 90’s and was in need of a makeover. The existing dock has pressure treated deck boards that are splintering and unsafe for bare feet. The layout is essentially a narrow pier positioned a few feet from the boat, making it difficult to fish from, with multiple people, as well as board the boat for less mobile people. Another thing I noticed is that the piles are covered in oysters and barnacles so the integrity was unknown.
In this article we go over how we were able to replace the existing structure and expand the decked area to allow for a much more enjoyable space to hangout, fish, and have my parents safely board the boat.
Full Project Video
Complete Coastal Dock Renovation
Design
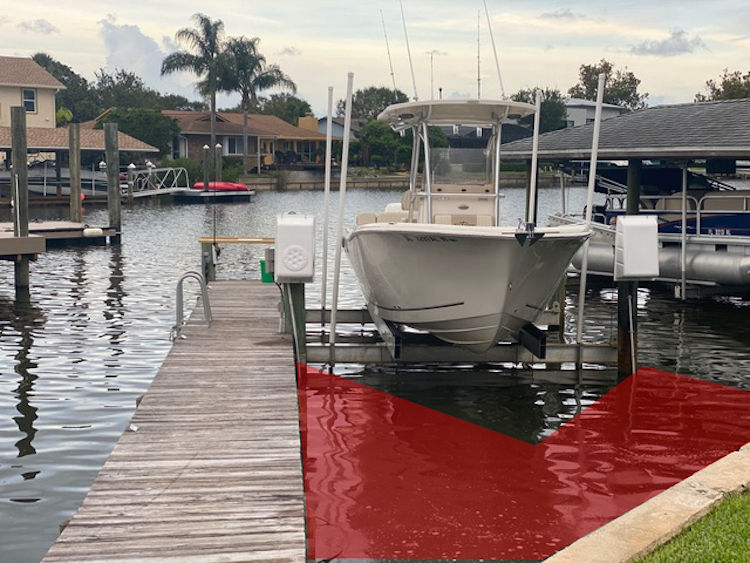
The goal with this dock renovation was to create a safe entry to the boat and expand the decked area for more usable space. My design was to add a few more piles that would create a V-shape around the front of the boat and put taller piles where the lift is currently so we can access the side of the boat. The constraints were that the are 10ft set backs from the extension of the property lines, into the canal. We did this by keeping the existing line on the left and expanding into the red shaded area on the right, up to the 10ft setback.
Permitting
This was the step that took the longest. For our location we needed to submit a checklist to the Environmental Management Department to ensure the manatees were not effected. Then, we had to submit a survey and plans to the Florida Department of Environmental Protection to assure the new dock met all the Florida statutes. Then, we submitted the survey and plans to the Army Corp of Engineers to get there approval. With all that in hand and the plans stamped by a licensed engineer, we could submit them to the city for review and issue of the permit.
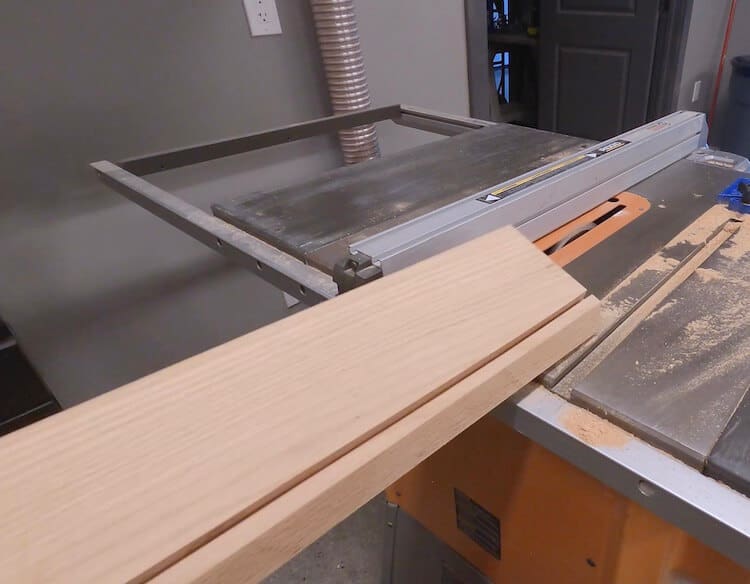
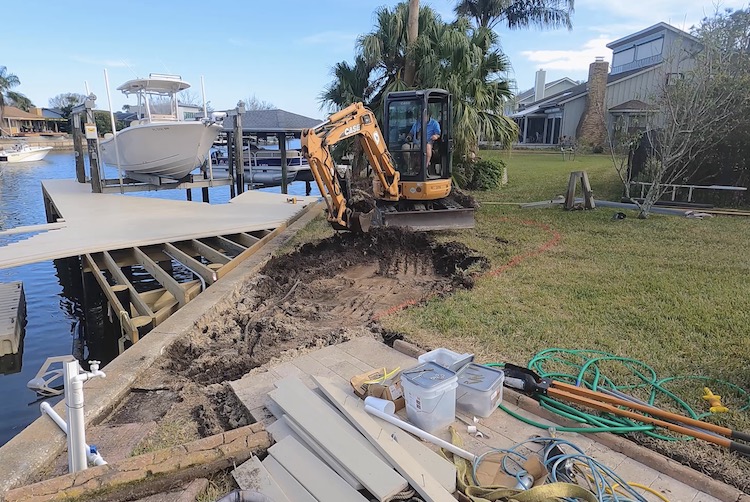
Demolition
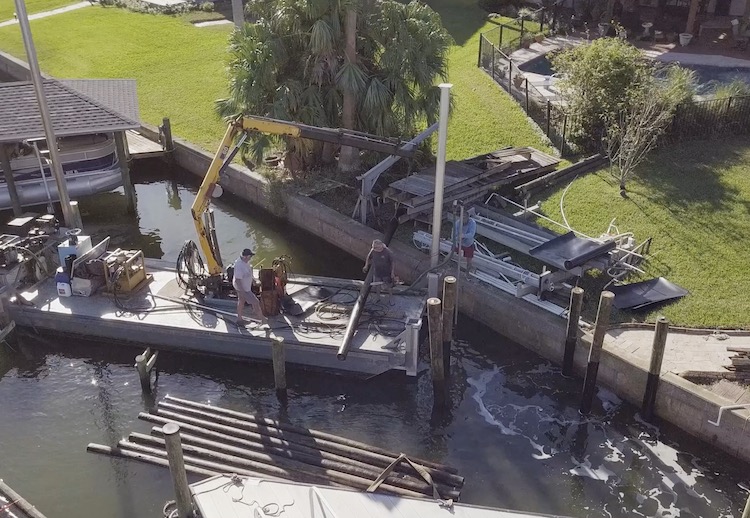
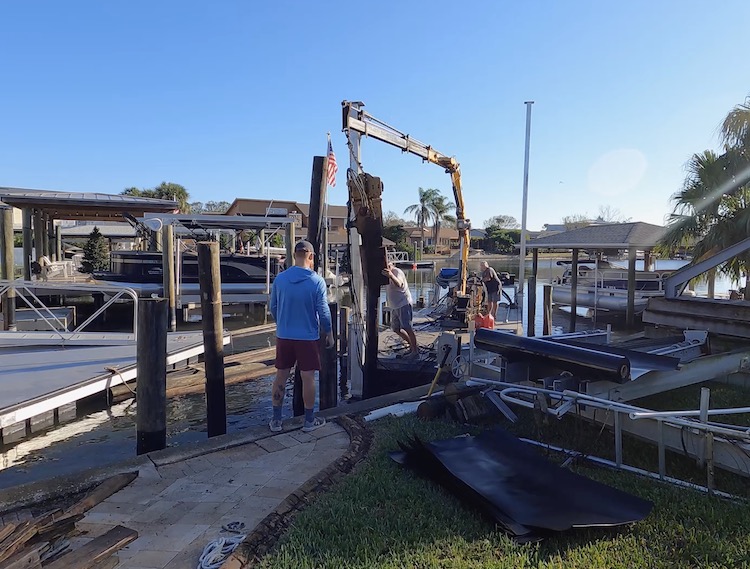
I was debating taking on this project myself, but without the right equipment it was going to take forever. So I ended up contacting a local dock builder, Titan Constructors, and they were able to fit me in.
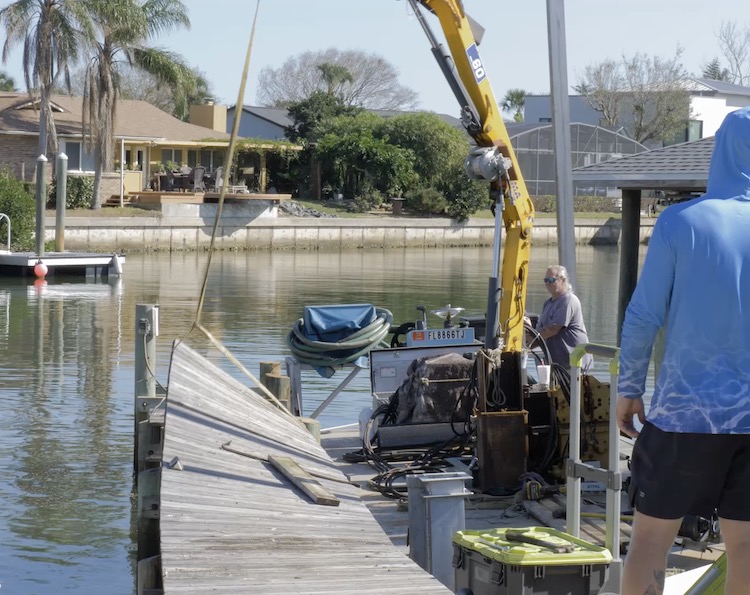
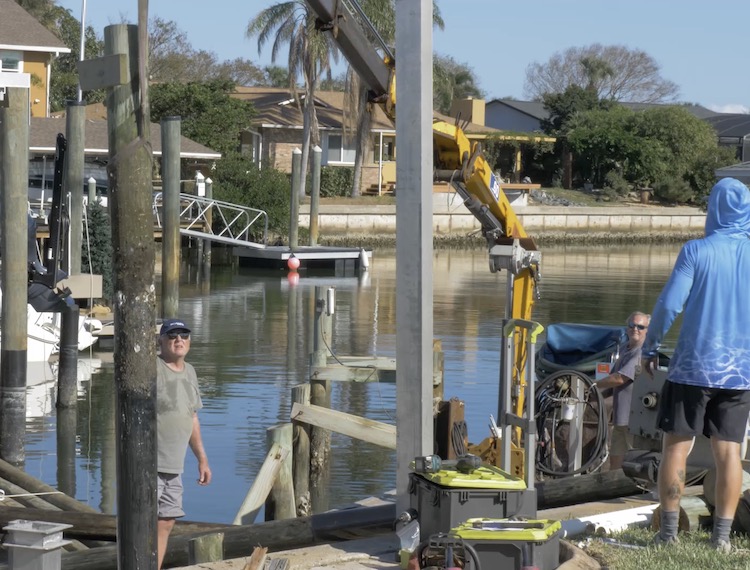
They rolled up with a barge and small crane and began by removing the old boat lift and setting it to the side.
Then they cut up and pulled off the old decking and joists with their crane.
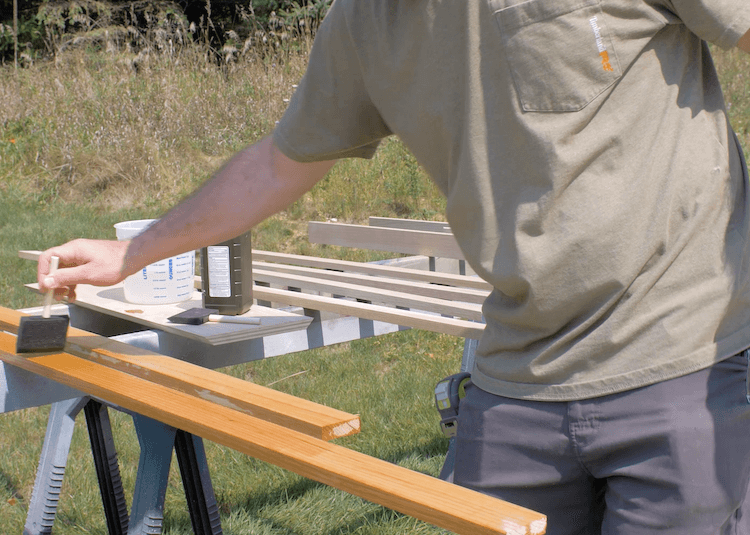
Finally, they started pulling the old piles, and while they were still in decent shape, I didn’t want to have to do this again anytime soon, so we just went ahead and replaced them all.
Setting New Piles
To set the piles they start by using a big water pump connected to a long pipe with a nozzle on the end. This is used to jet a shallow hole into the bottom of the canal right where they want the pile to go.
Then, they wrap the pile with a slick plastic material so the barnacles and oysters wont penetrate the wood below the water line. Using the crane and a strap they lower the pile into that shallow hole to start the driving process.
Using an APE Vibratory Hammer they then vibrate the pile a minimum of 10ft into the ground. Most piles were driven further than that, until the pile hits rejection and cannot be driven any further.
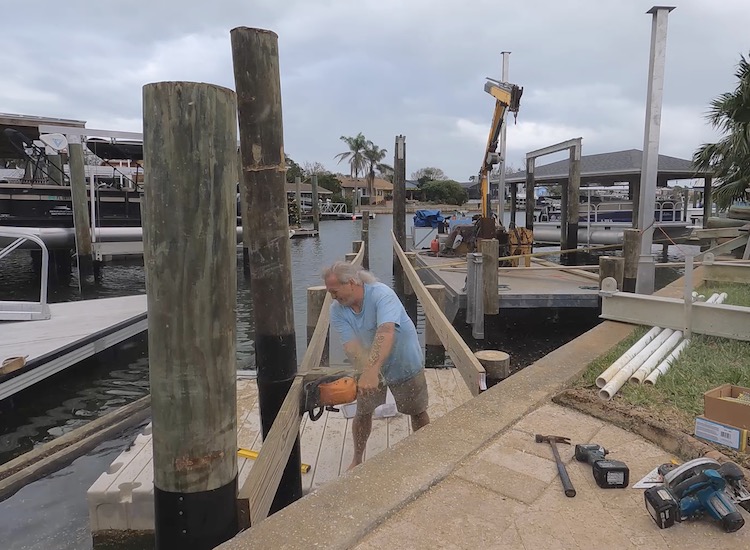
After driving the piles, a level line is marked for the top of the joists and the piles are cut flush to that point.
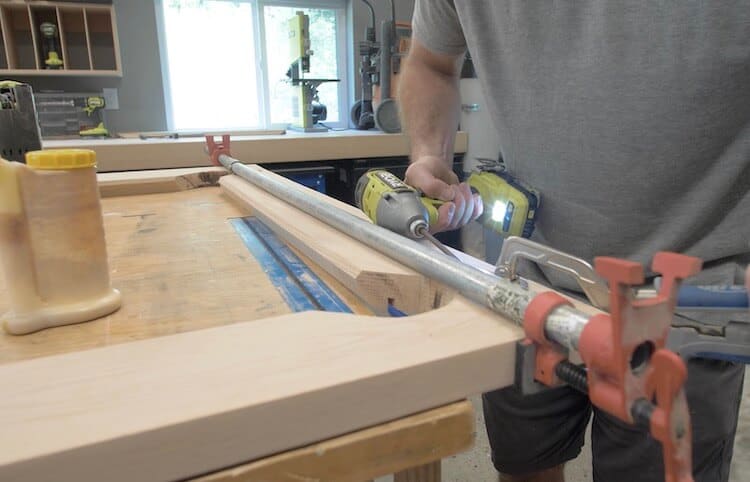
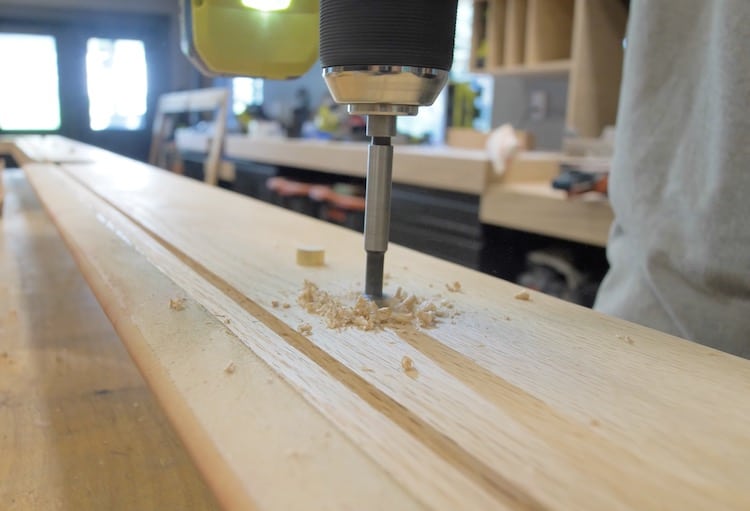
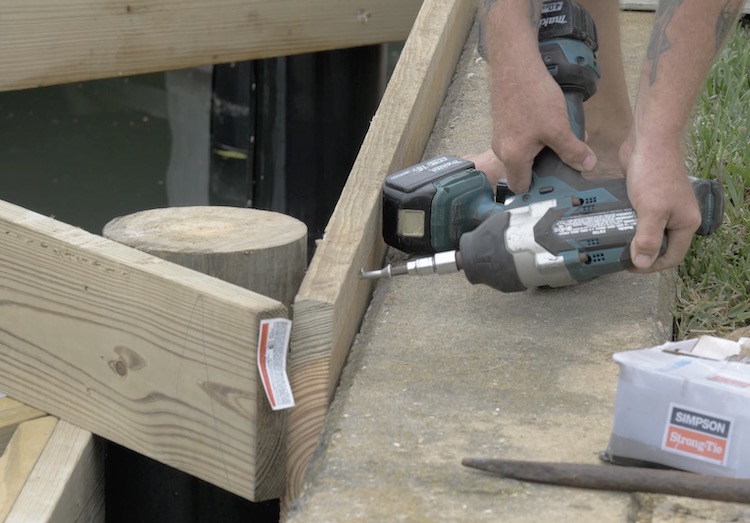
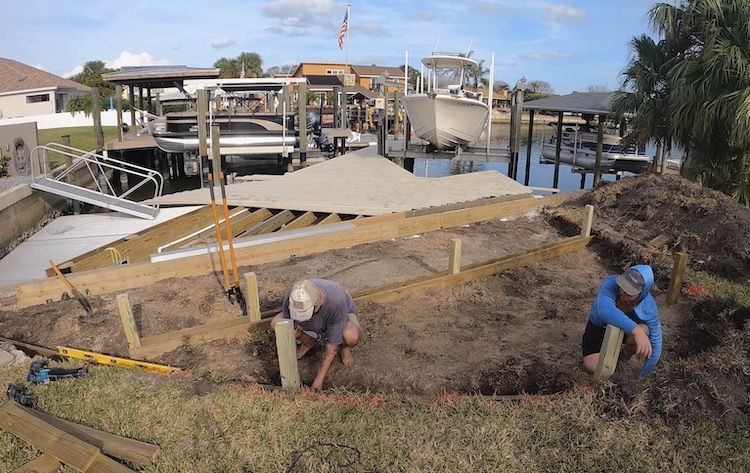
Installing the Beams
The 2×10 beams are then installed to the piles. Typically these are through bolted on both sides of the pile with 1/2″ all-thread. This process requires drilling multiple holes through the beams and each pile. The center of the pile is very hard and this can be difficult and time consuming.
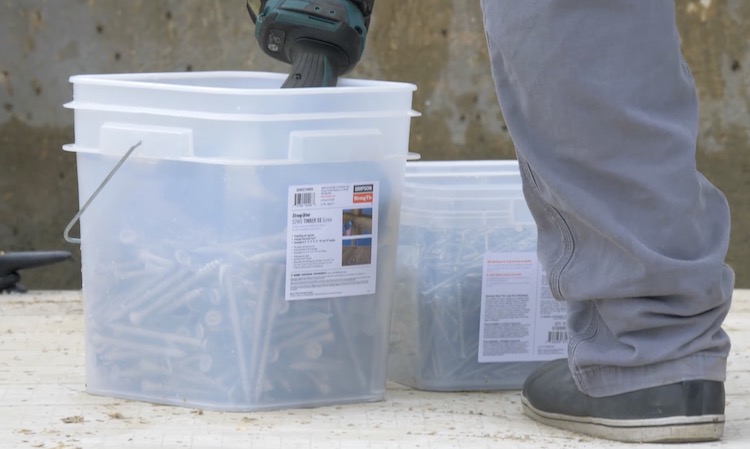
Luckily, Simpson StrongTie offers a stainless steel Timber Screw that is a 1:1 replacement for 1/2” diameter lag or 2:1 replacement for a 5/8” thru-bolt. These do not require pre-drilling which saves time and money and avoids the use costly auger bits.
Using these timber screws definitely sped up the process and are more than adequate.
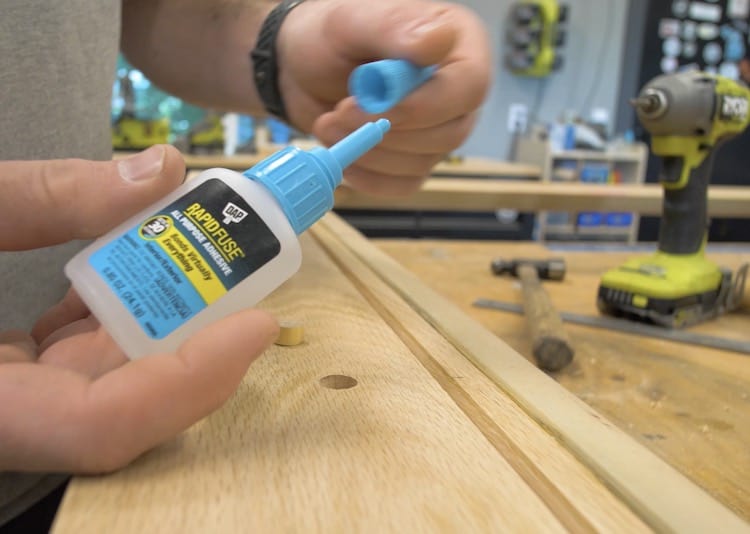
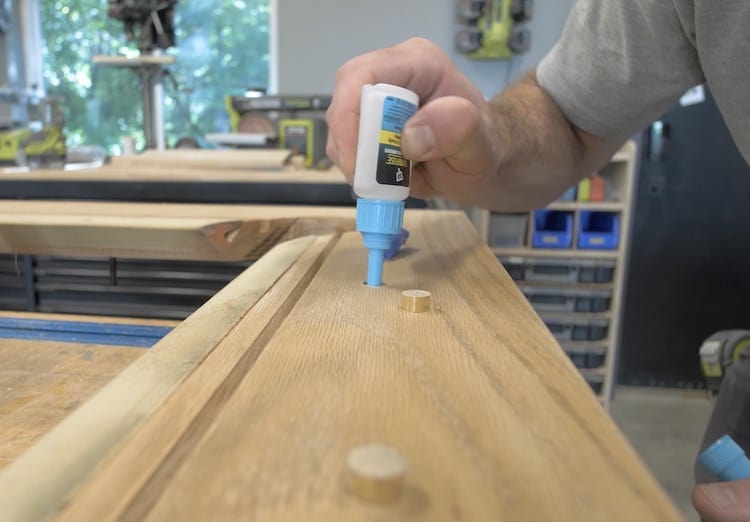
Installing the Ledger Board
Since the area that we are decking over has a lot of angles, we opted to install a ledger board to the concrete bulkhead. To do so we used the Simpson StrongTie Titan HD Heavy Duty Screw Anchors. These anchors are incredibly strong and perfect for corrosive environments like saltwater.
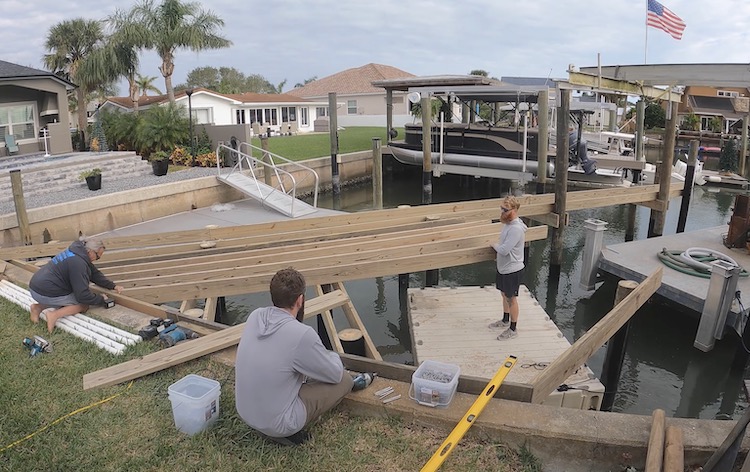
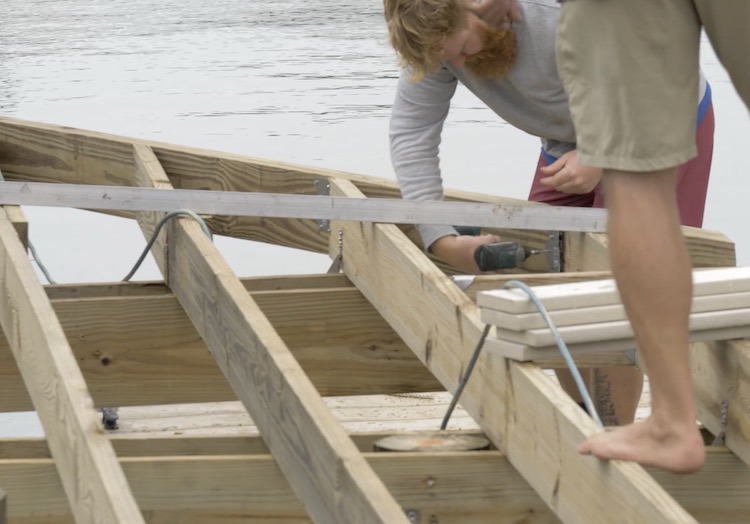
Installing the Joists
With all the beams and ledger installed, it was time to start laying out the joists. For this we went with 2×8 treated lumber, spaced 16 inches apart. For now these joists get temporarily installed and cut to length before capping them with a rim board.
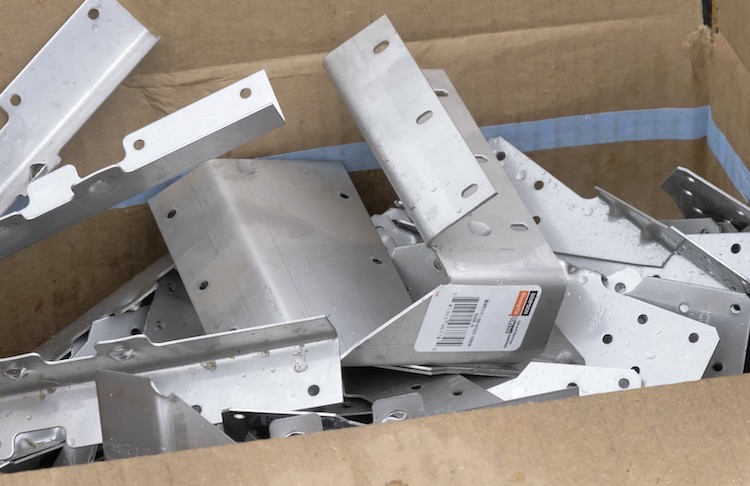
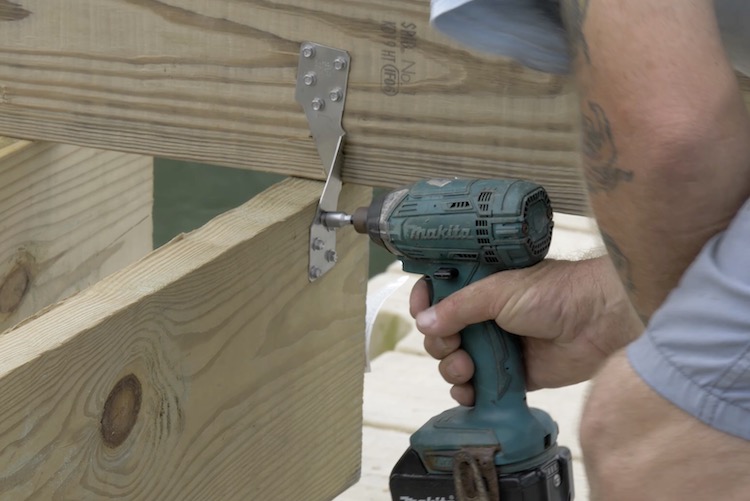
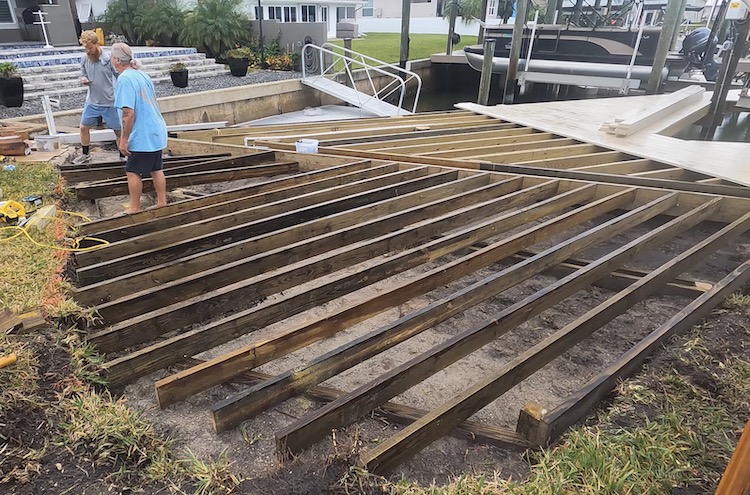
Installing the Hardware
With all the joists and the rim boards in place we could finish up by installing the hardware. This is where the real long-term strength comes into play. With all the angles we had to use some skewed brackets which, come to find out, even if they don’t stock them, Simpson StrongTie will custom make brackets for your application. In our case, we needed them in stainless steel so they were able to have those made for us.
We also needed to install hurricane ties to assure the dock stays together in high winds and storm surges.
Then we finished off the joists to rim board connections with stainless steel skewable angles.
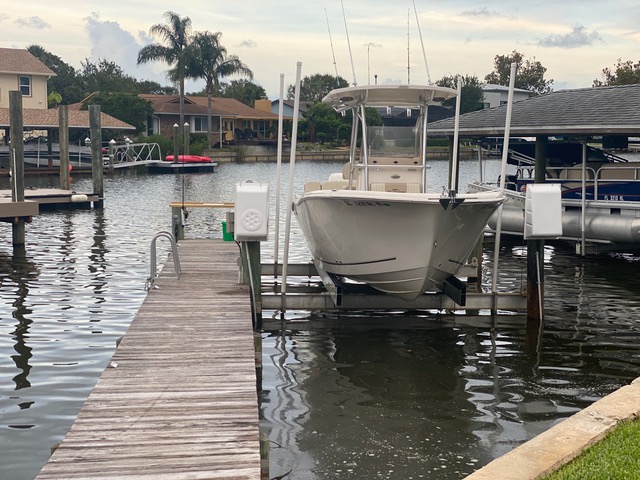
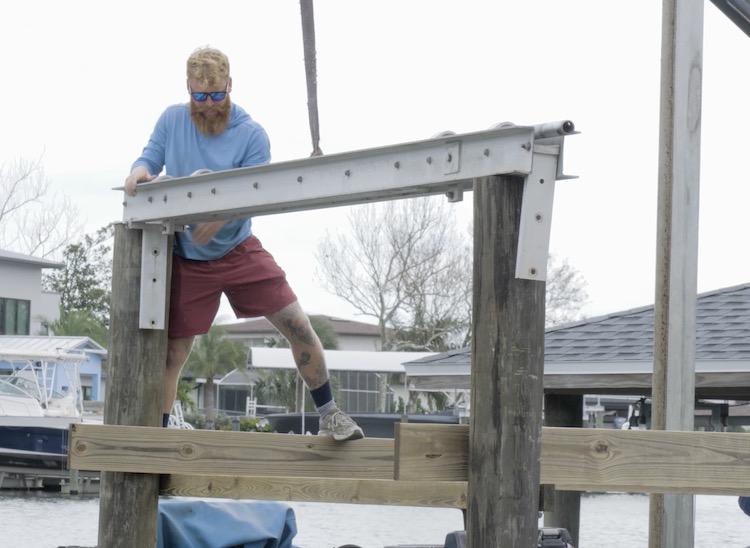
Installing the Boat Lift
With the new longer piles in place it was time to get the boat lift back up and running. The beams get mounted to the top of those and new direct drive motors were installed.
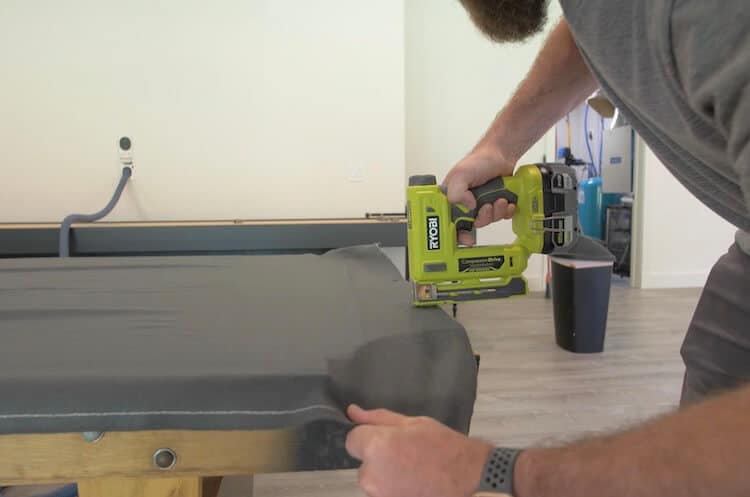
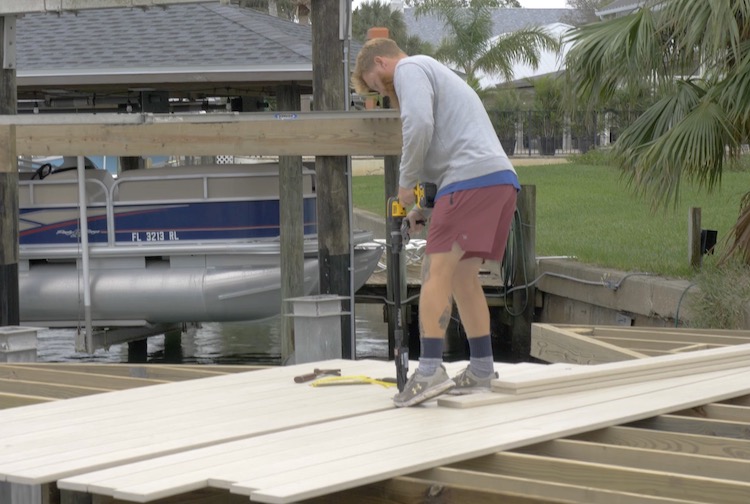
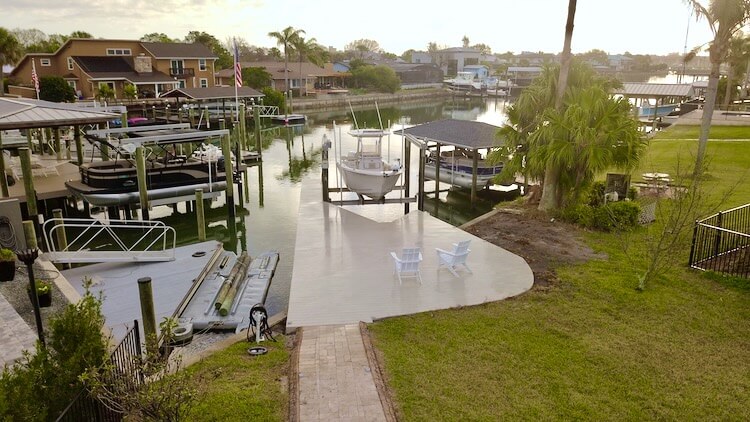
Decking
For the decking we went with WearDeck in the color Barefoot Sand which is perfect for harsh environments like saltwater docks. Not only does it retain less heat than typical composite decking but it also has a structural quality to it that will increase the strength and rigidity of the dock itself.
The deck boards get screwed down with stainless steel deck screws using the Simpson StrongTie Quik Drive Cordless Decking System. This system uses collated screws and gives you the ability to fasten the deck boards from a standing position which will not only save your back but it will save you a ton of time with the autofeed attachment.
Expanding the Deck
We did end up making a rather last minute change to extend the decked area into the yard. This gave us the opportunity to have more space to relax and entertain, as well as match up the height of the paver walkway with the deck to rid any tripping hazards.
They started by removing the top soil with a mini excavator and digging down enough to allow for the structure to be installed below the decking.
Posts were installed about 3 feet deep on a footing and beams were added to carry the joists.
The joists were then installed in the same manner as the dock.
Finally the decking and fascia boards were installed to complete the dock.
We couldn’t be happier with how it turned out. This renovation not only provides us with a safe dock to get on and off the boat, but it gives us so much more room to relax and enjoy the water.
With the addition of some dock lights and underwater fishing lights, this thing really looks great after sunset. And even better with a big ol’ fish on the line!
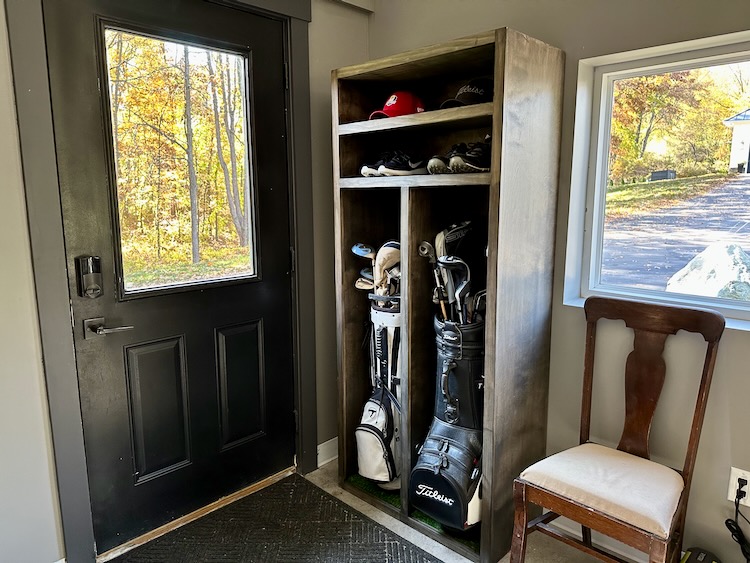
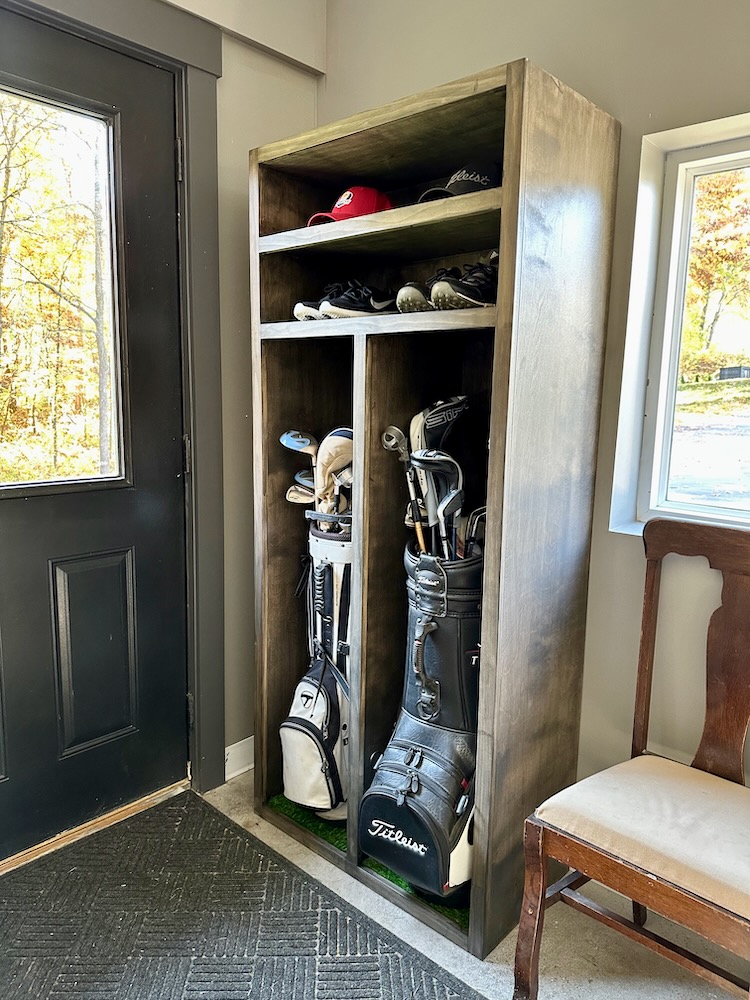
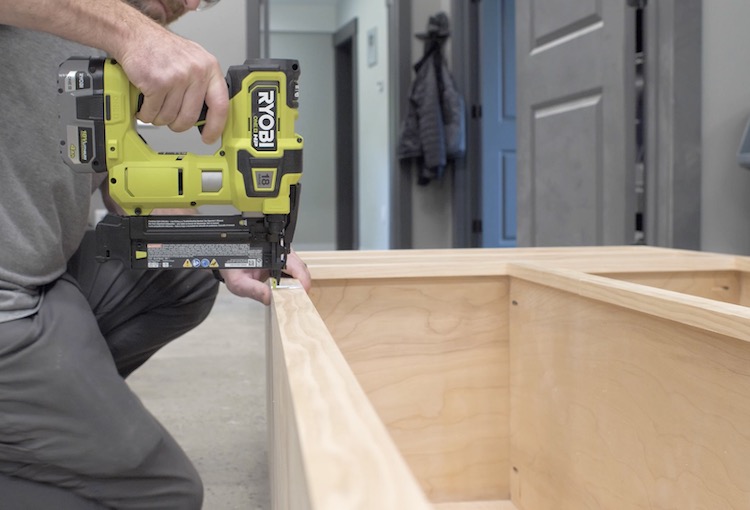
Many years back I built a simple single golf locker and it has been really nice to have, keeping all my golf gear together. Within the past couple years my wife has shown an interest in golf and now with the new golf simulator I knew I was going to need a double golf locker to hold all of our things. Not only is it a great place to store clubs out of the way, but with the shelves we can also house golf shoes, hats and extra gear in between rounds and in the off season. Read on to see how this quick and easy project came together.
Disclosure: The links provided in the “materials” and “required tools” sections are affiliate links. If you would like to support our site and help keep our content free come find out more about how we can make money with no extra cost to you.
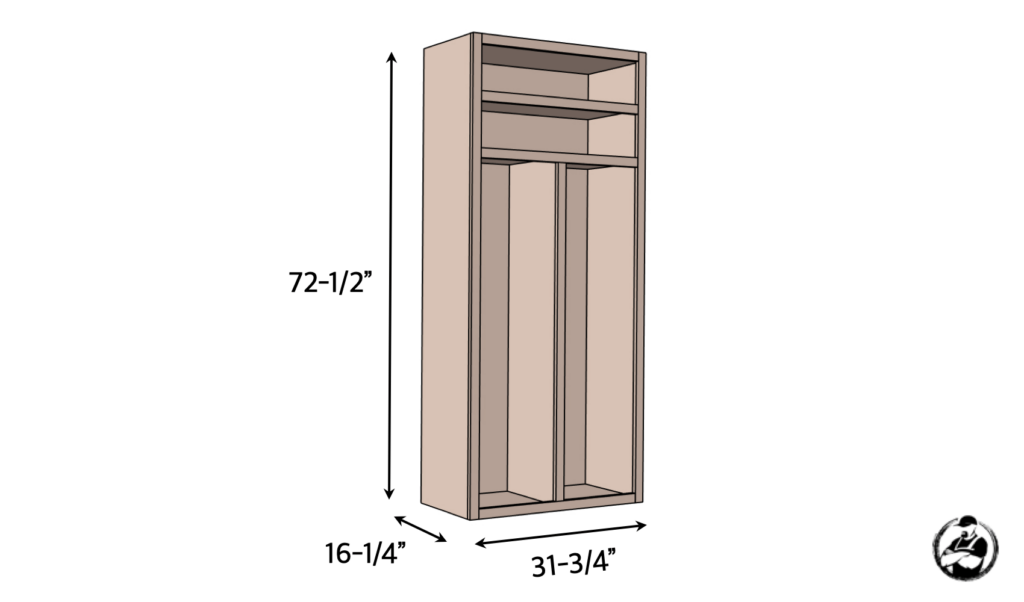
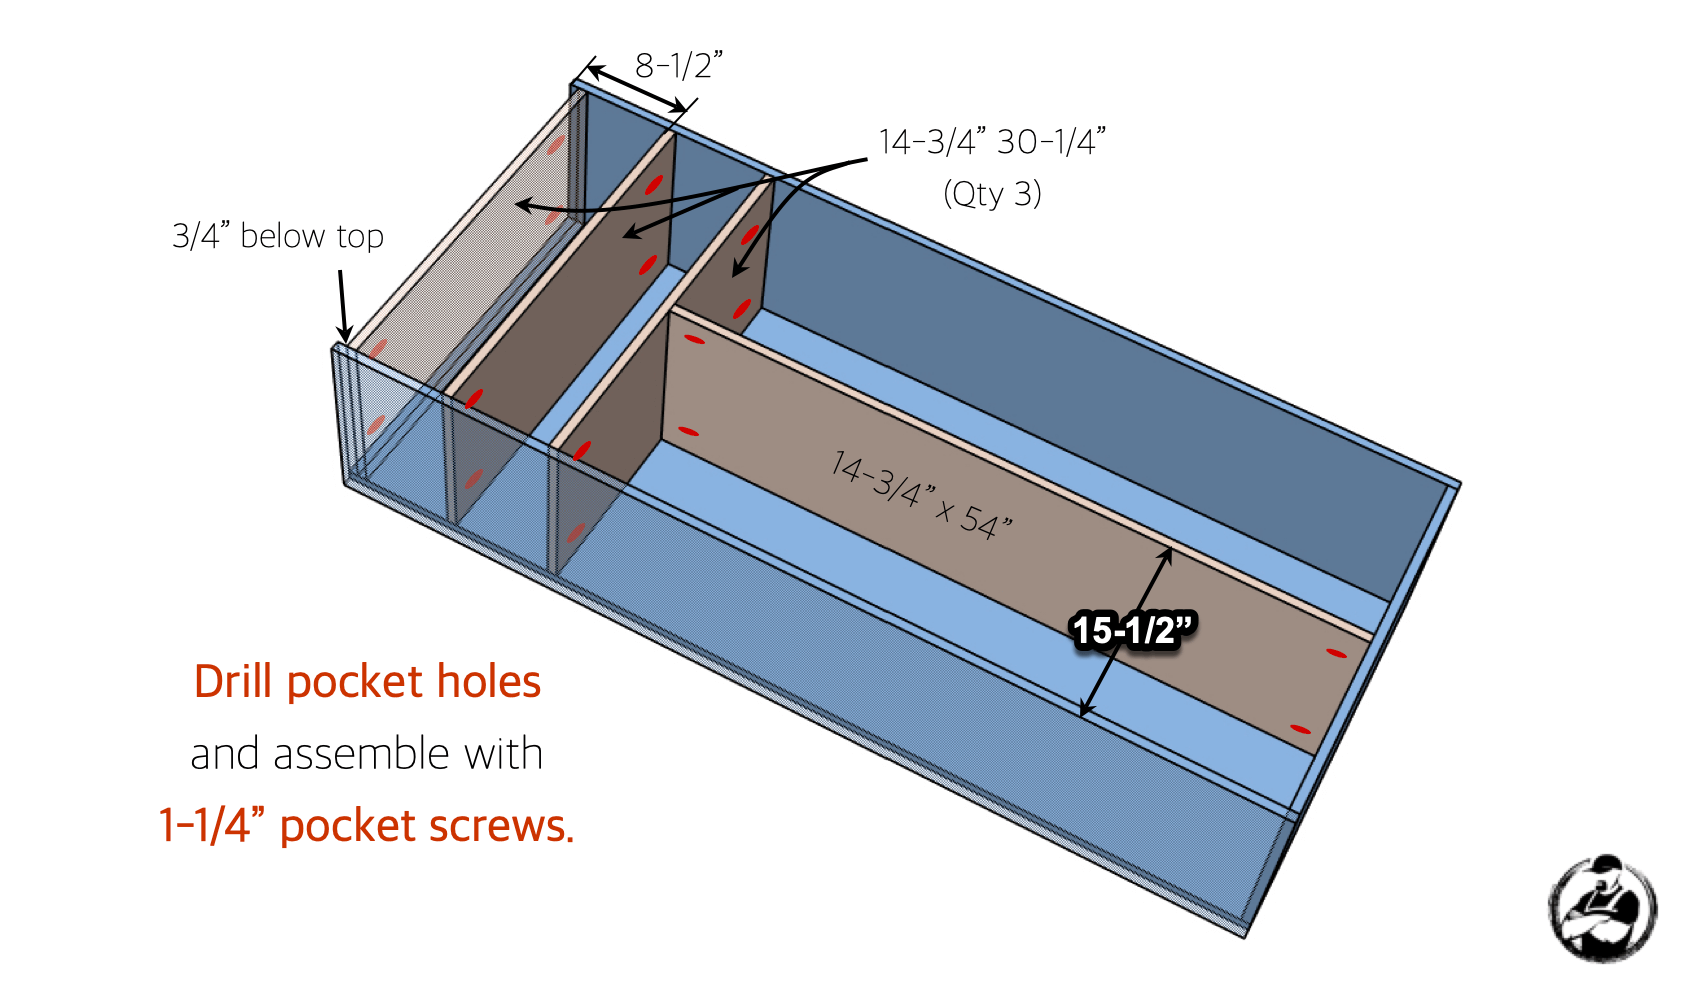
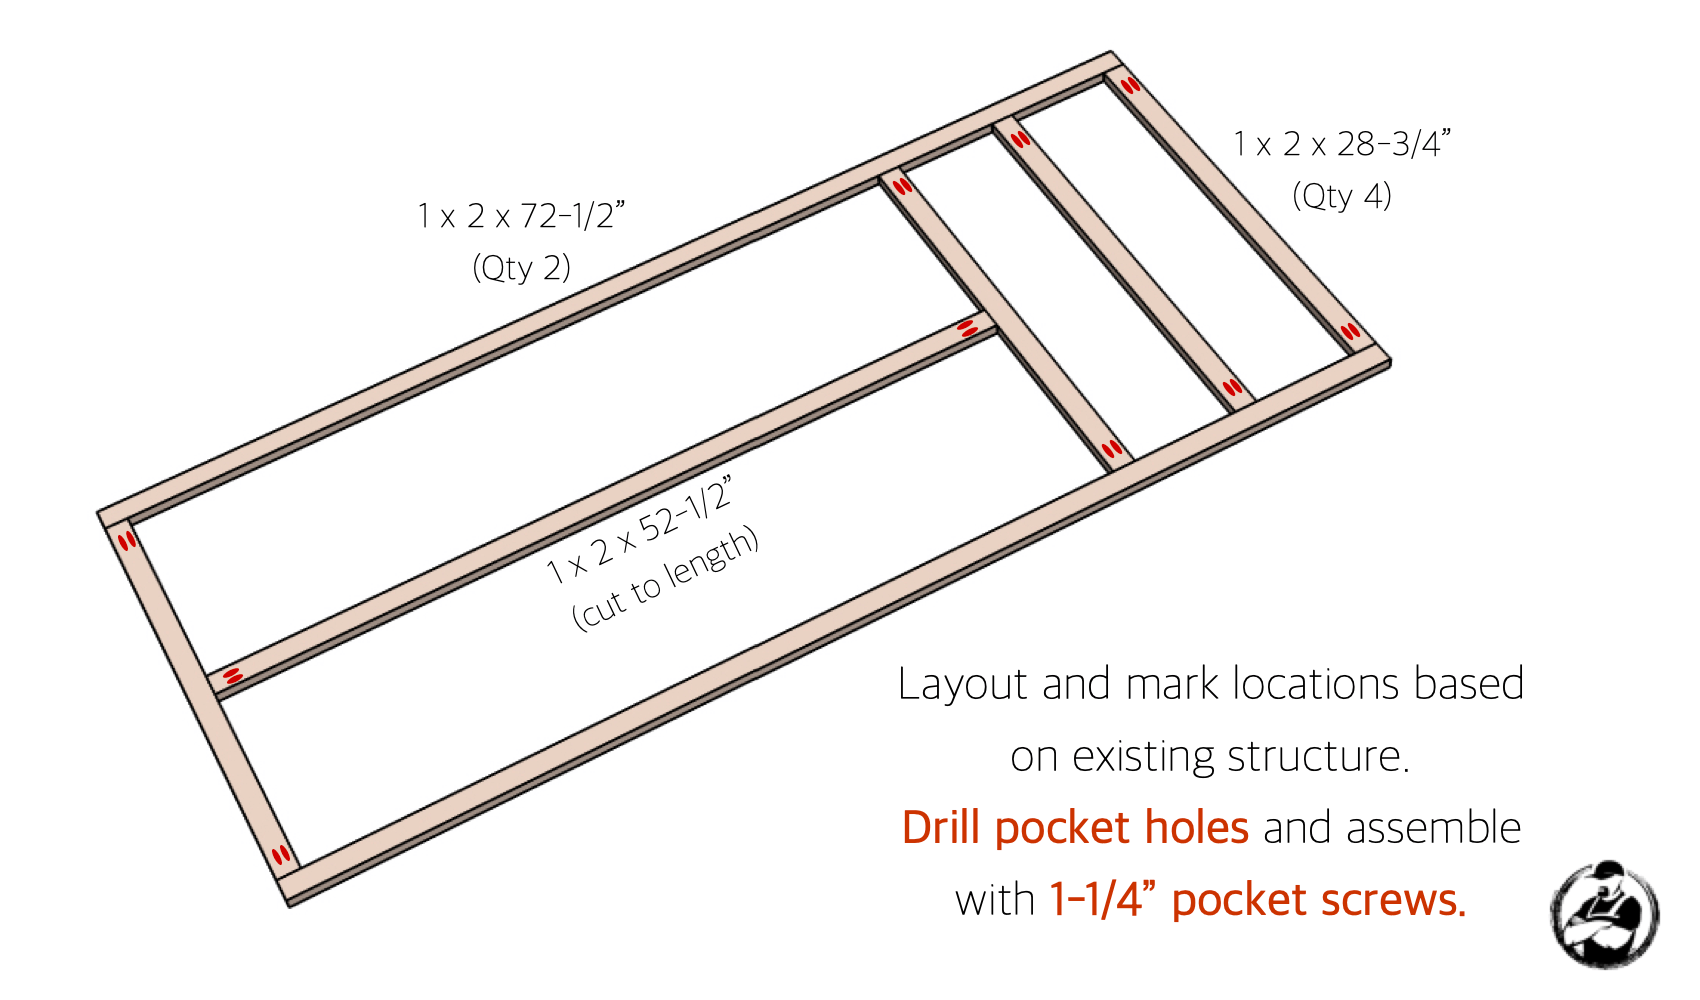
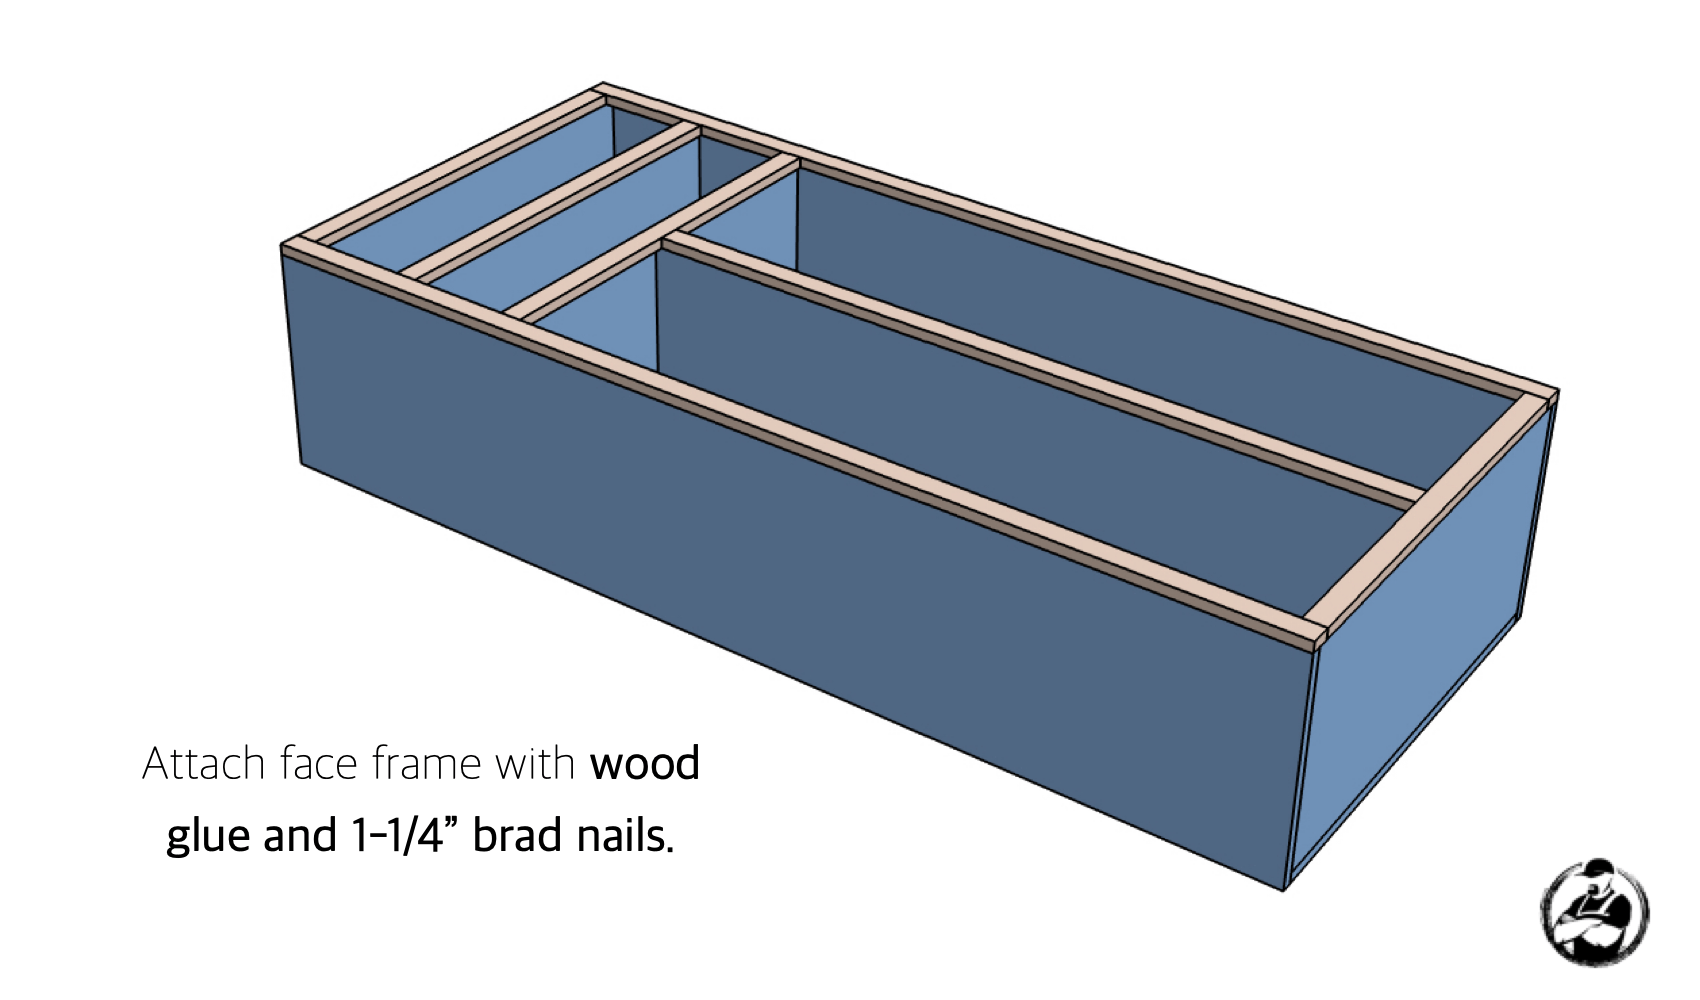
Dimensions
Cut List
How to Build a Poker Table
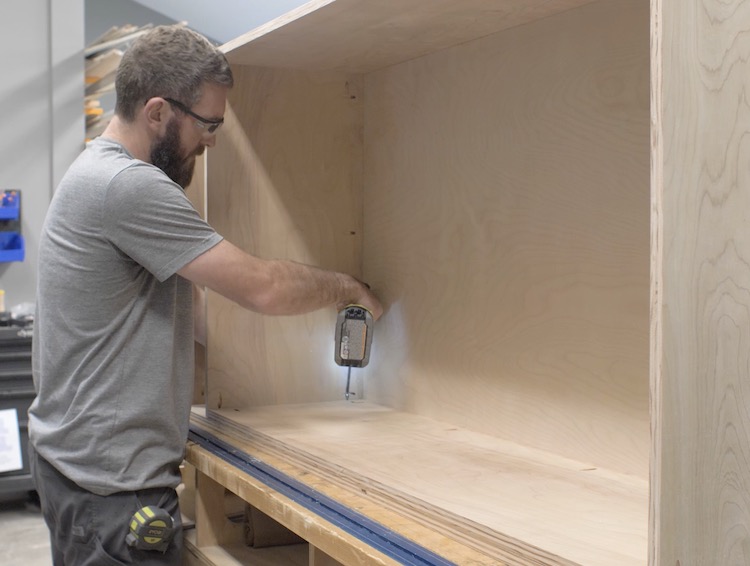
Assemble Unit
Install Shelves & Divider
Assemble Face Frame
Install Face Frame
Finishing
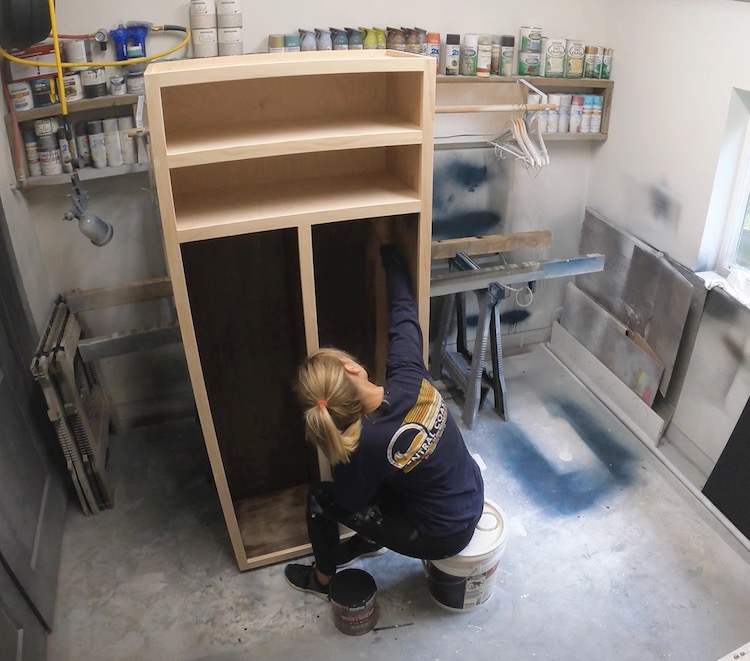
For this project we decided to go with Behr’s tintable semi-transparent deck stain in the color Wood Chip. I like using this because it hides a lot of the grain that can sometimes be not so attractive when staining plywood, and it waterproofs the locker all in one step.
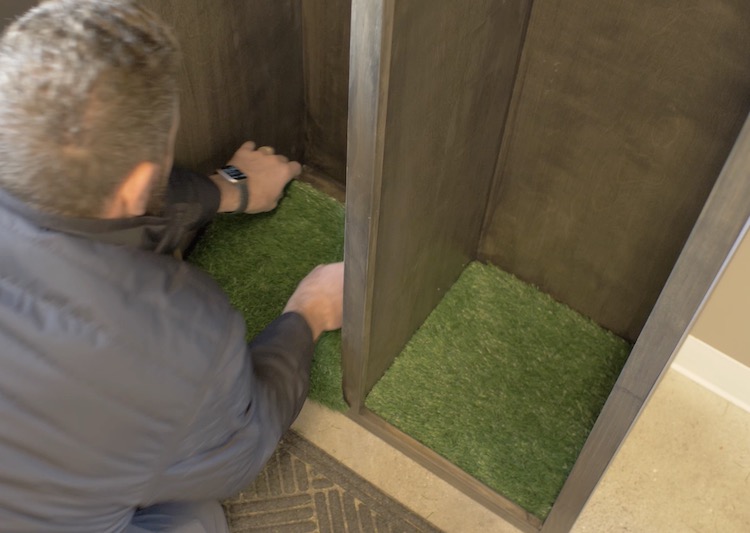
I also added some turf to the bottom. This was cut from a doormat I found on Amazon and looks great.
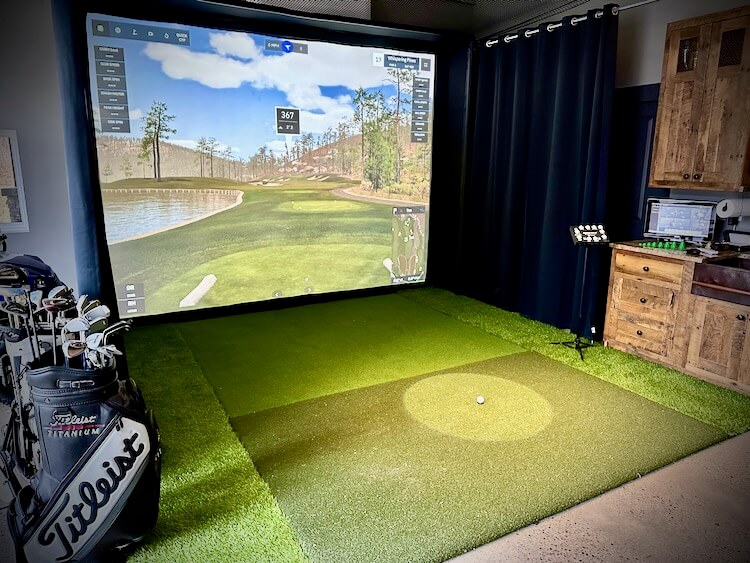
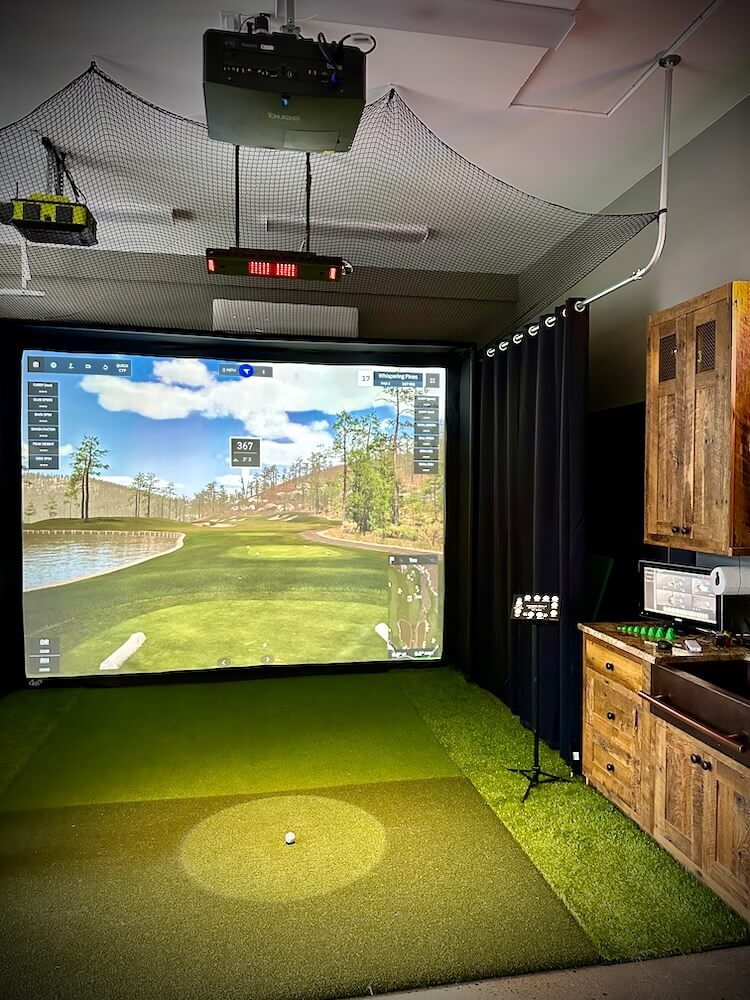
After seeing one for the first time many years ago, one of my dreams was to have a golf simulator in my home one day. That being said, a few years back I built a budget friendly golf simulator in my barn/workshop. While it was a lot of fun, the foam balls and cheap sensor limitations were quite unrealistic and ultimately fell short of what I had dreamed of. I finally decided to remove that simulator and give it a massive upgrade with the BenQ LK936ST 4K short throw projector, Custom Carl’s Place Enclosure, and Uneekor Eye XO Launch Monitor! This truly is a giant leap from what I had in past and the perfect place to enjoy winter nights with the guys, date nights with my wife, or improve my game in the off season. In this tutorial I’ll go over all the details of how it came together.
Full Project Video
How to Build a Home Golf Simulator
Research, Research, Research
Before I even started I did a ton of research. With an investment this big, I wanted to make sure I got it right. Luckily there are a ton of YouTube videos that go over the different components required for a golf simulator in depth as well as reviews and comparisons. One of my favorite channels was Golf Simulator Videos where Jay has a ton of golf sim content and is very helpful. There are so many options for each component required for your simulator and, based on your space and budget, deciding what and where to spend your money on can be a daunting task.
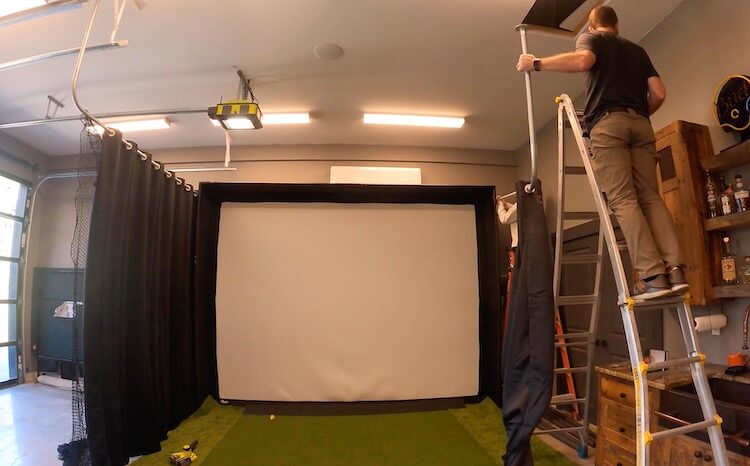
Enclosure
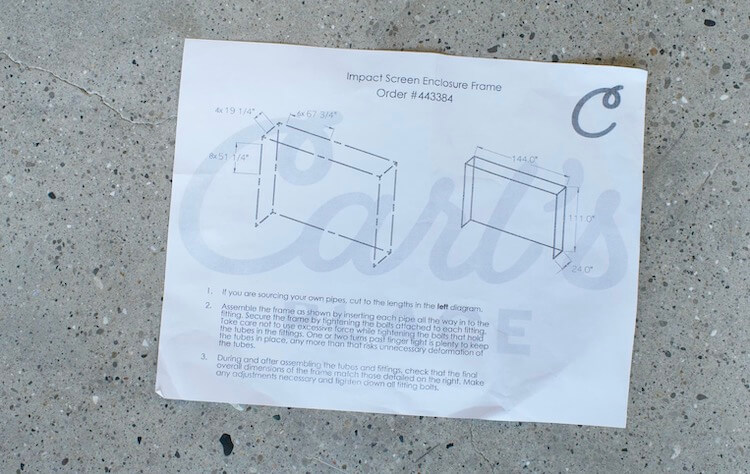
My space was a little unusual. It’s actually the side of a car bay in my barn/workshop. That being said, I didn’t want to permanently close that car bay off with a large enclosure. After looking into ways to build my own I ultimately landed at Carl’s Place where they sell everything required from a golf simulator. They even have a “Build Your Own Golf Simulator” design tool. I was able to customize the enclosure size and aspect ratio to fit my area perfectly (down to the inch!). Not only does it show you the viewable area but it also defines the total enclosure width, height and depth.
In an ideal world, 16:9 is the best aspect ratio to give you that immersive feeling. I have an area that is 12 feet wide which would leave me with a height of less than 7 feet and I didn’t like that. Another option is the 16:10 option, this is better but still didn’t give me the height I wanted. Which brings me to the option I went with, the 4:3 aspect ratio. With a 12 foot wide enclosure, the height is now 111″ (over 9ft) which felt like it would be great for those high loft shots.
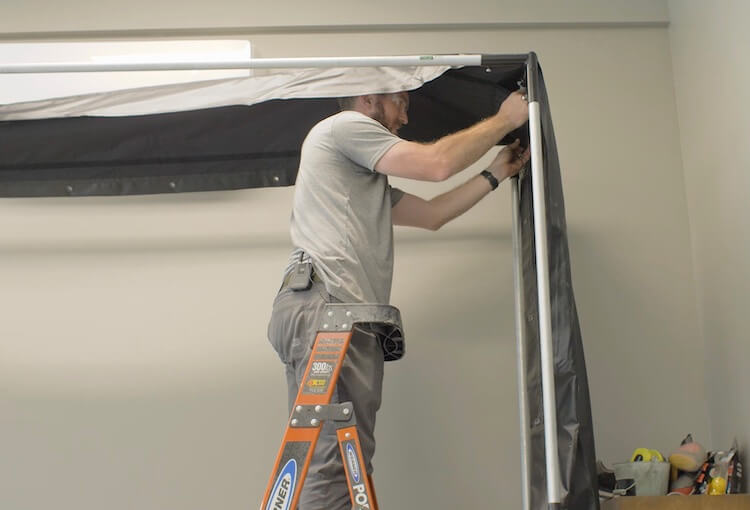
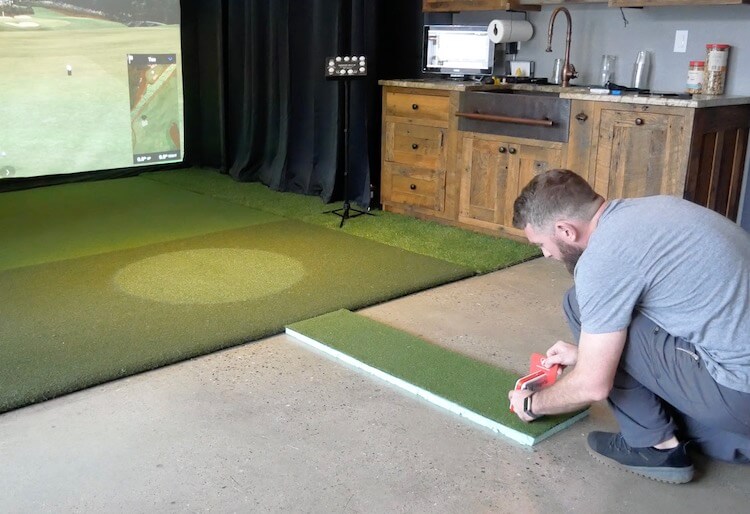
Now the depth of the enclosure was a concern to me, I really wanted to minimize the depth to allow use of that car bay if needed. Therefore, I went with a 24 inch deep enclosure, which meant I was going to need some curtains on the sides and netting above to catch any stray balls.
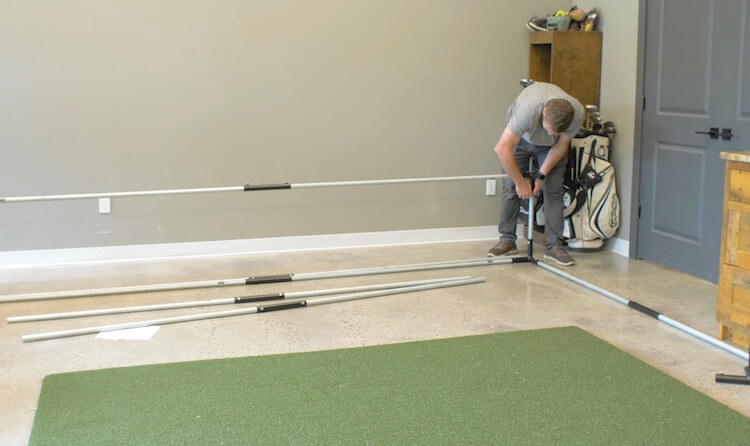
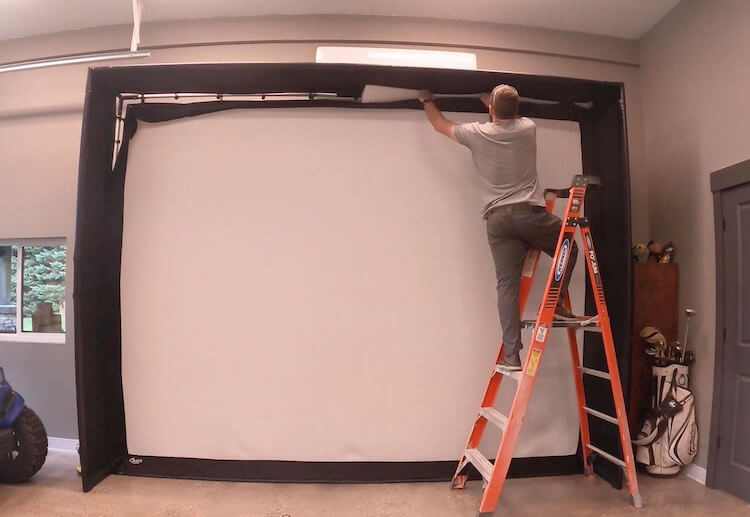
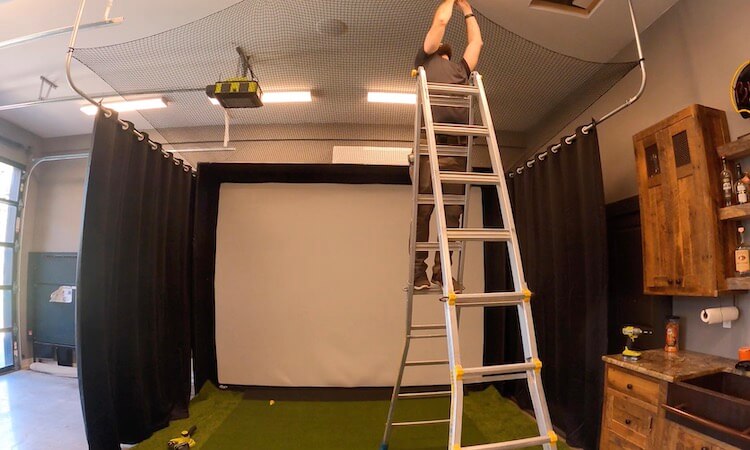
Assembly of the unit is very straightforward with a diagram noting pipe lengths and assembly instructions. The screen and enclosure fabric are installed with the included bungees and foam is installed with velcro. This process took an hour or so.
On my enclosure package, I opted to purchase and cut my own pipes which saved me some money but they do offer pre-cut pipes for a fee. I also added foam inserts to prevent ricochet off those pipes.
For the viewing area I went with the premium screen which is a 3 layer impact screen that has a smooth finish for a high quality image and reduces noise from the impact of the ball.
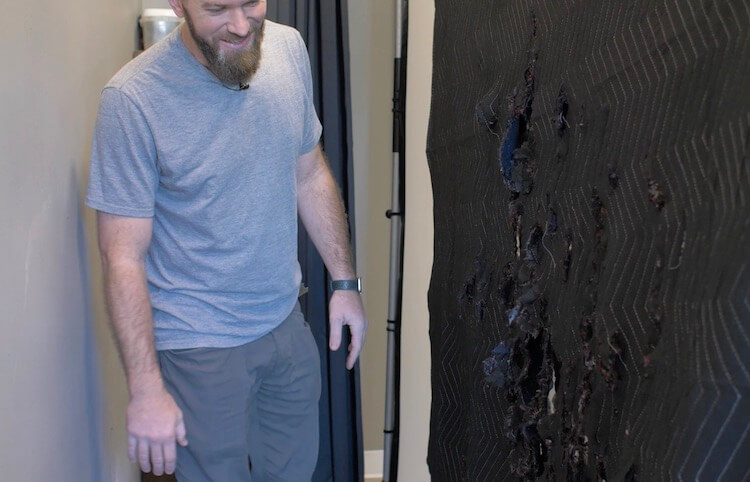
Another thing I did to decrease the bounce back of the golf ball was to mount a couple of heavy duty moving blankets. As it turns out, this was a bad idea and resulted in a lot of clean up.
After the clean up I tried again with a memory foam mattress topper. I found one that was more dense than most and it worked like a charm. I simply used the holes in the topper to zip tie it to a board and suspended it about 6 inches behind the screen.
Projector
When it comes to selecting a projector for your golf simulator there are a few key features that should be high on the list. A short throw projector will require a shorter distance to be mounted from the screen to get a large image. This will prevent shadows from the golfer when addressing the ball. Another feature that should be strongly taken into consideration is the brightness. This is measured in lumens and I think the ideal target should be 5000 lumens or above. Regardless of ambient daylight, you will require some light to hit the ball and a higher lumen count will make sure that doesn’t effect the image quality.
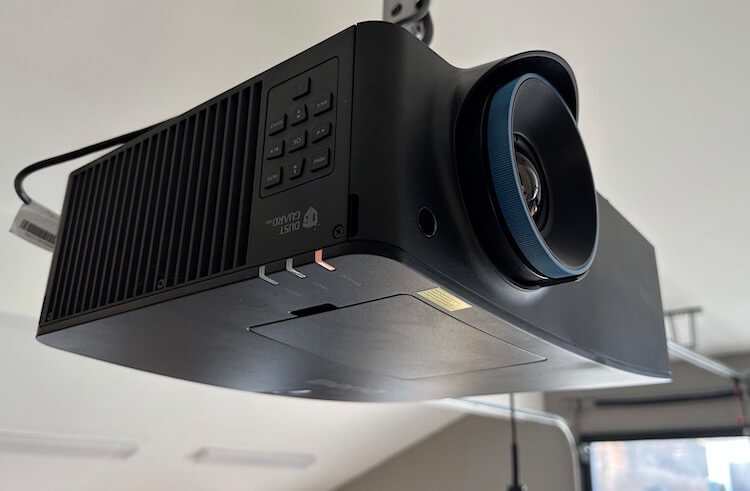
I happen to think I found the best projector for the job, the BenQ LK936ST 4K short throw laser projector, which is designed for this specific application with 5100 lumens and has a ton of other useful features.
The 4K resolution allows the software to perform at its peak giving you the most realistic image. But even more so when you enable “Golf Mode” which corrects purple fringing using the blue and green colors from popular golf software and allows golfers to view the game with more natural reproductions of blue skies and green grass.
Since this is a laser projector we will get about 20,000 hours of life whereas with a standard lamp projector, the lamps will need replacing about every 1500-2000hrs. Plus lamp projectors take time to warm up versus the instant on capability of a laser projector.
The installation of this projector is a breeze. After using BenQ’s calculator to determine a position for my projector, I was able to fine tune it with the lens shift and corner fit adjustments.
Curtains and Netting
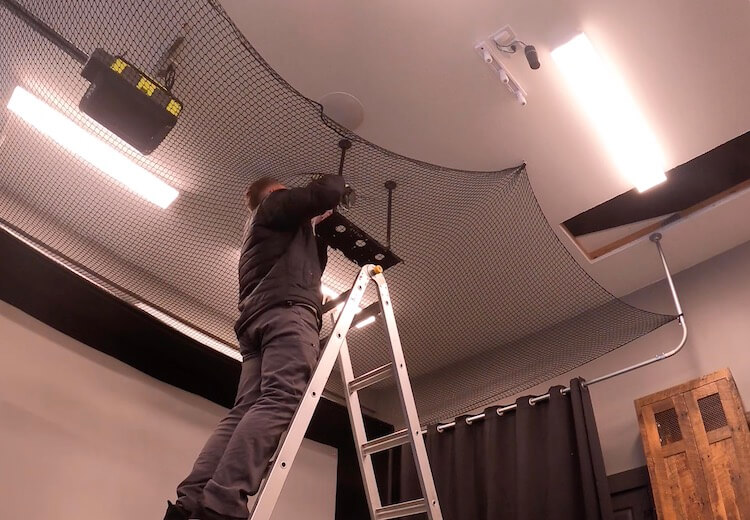
Since the enclosure was less than the ideal depth, I needed to extend the sides and top. I did so by installing 1 inch EMT pipes that extended from the back wall and tied into the ceiling. Those pipes carry the blackout room divider curtains that will not only collect any stray balls but act as a sunlight barrier when playing in the late afternoon.
To protect the ceiling I opted to install netting which gets connected to the enclosure, curtain rods and ceiling (using hooks).
Hitting Mat and Putting Surface
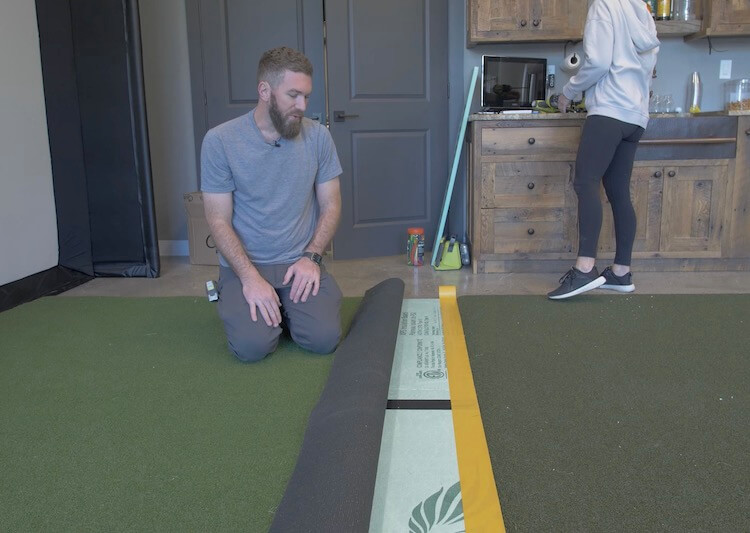
The surface in front of the hitting mat needed to be level to putt onto. For this I ordered some putting green turf and laid that over 1 inch thick rigid foam insulation with double faced tape. It feels great to walk and putt on but the lightweight foam makes it easy to move if I ever needed to.
The hitting mat I went with is the 5′ x 8′ Country Club Elite Mat. This is an amazingly realistic and durable hitting mat. If you wanted to save som cost here you could make a cutout for a small section to hit off however I liked the idea of feeling like I’m standing on the course.
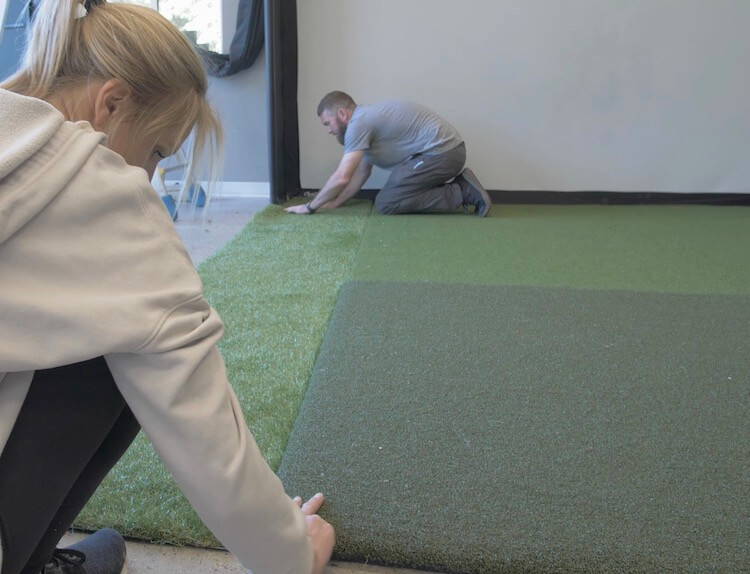
With the hitting mat and putting surface being only 8 feet wide and my screen being 12 feet, I needed to fill in the gaps on the sides. For this I though some thicker turf, to simulate the rough, would be a good accent and slow down any balls rolling
Launch Monitor
The launch monitor is the brains of the entire golf simulator. This is what tracks the ball trajectory and provides club data. This is where my budget golf simulator fell short.
For this simulator a lot of my research was pointing to the FlightScope Mevo+. It’s an accurate sensor for a decent price but after using it for a few weeks I decided it wasn’t for me. Here is why. The Mevo+ needs to sit on the ground 7-8ft behind the hitting area. This took up some valuable floor space and needed to be set up before every round as well as realigned when someone inevitably bumped it. It also runs on an internal battery which wont last a full round and had to be supplemented with an external battery pack or power cord. Another issue I had was that it connected to the computer via WiFi and that signal was pretty weak causing the unit to have to constantly be reconnected. Lastly, since this is a radar based system it tracks the ball flight but no club data. Furthermore, I was also getting radar interference from the mini split if that was on during putting causing the sensor to hit phantom long putts.
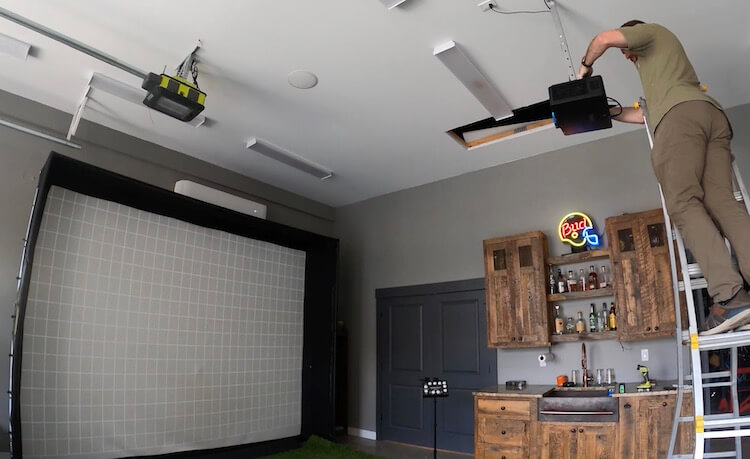
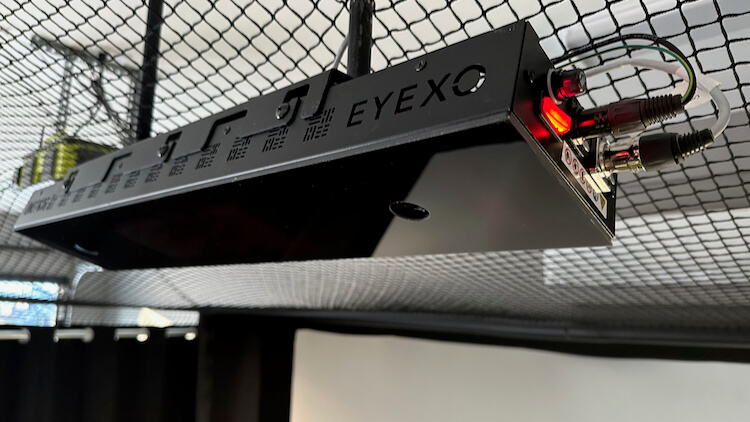
So, the launch monitor that I went with is the Uneekor Eye XO. This is a big investment for any simulator but the accuracy, reliability and club data that it provides is truly unmatched. The unit is mounted up and out of the way, 10 feet above and 3.5 feet in front of the tee. It also is hardwired to the computer so no connectivity issues. To drop it from the ceiling I used 1/2″ black steel pipe and flanges.
One of the biggest things to me though is the club data that I get from this sensor. It uses dual high speed infrared camera technology to capture a full range of precision data with the ball of your choice. With the included stickers added to the club face, it provides the swing speed, club path, face angle and impact location which has helped tremendously with analyzing my swing and what needs to be fixed. Plus the high speed camera provides a slo-mo replay of the impact. (So me and my hack buddies really have no excuses after a bad shot )
Gaming Computer and Software
The computer that you need will depend on the software that you are running. Some software such as E6 only requires a Nvidia 1070 Graphics Card or equivalent to run in 1080 which you may have a PC or laptop that already has this in it. Since we have a 4K projector I wanted to go with the highest resolution software out there to get the best performance. After doing a ton of research I ultimately I landed on GSPro. I loved the realistic 4K graphics and ball physics but what really sold me was the company. The fact that they are continually rolling out updates and improving the game was something I wanted to see.
For a great 4k experience they recommend the RTX 3080 GPU and 16GB memory. To meet and exceed those requirements I picked up this gaming computer from Newegg with a 3080ti GPU in it. Unfortunately it looks like they are sold out at the time I’m writing this so here are some other 3080ti options. I will say that this computer has worked flawlessly and my son is pumped because now he can use it for gaming (when I’m not playing golf )
Controls
You can definitely use the mouse and keyboard when making adjustments to the game. But after seeing this control box from Roxor Golf, I had to have one. This controller, once the game is launched, will make it easy for others to control the game with the intuitive buttons.
Other Uses
Golf simulators require a lot of space. The good thing is that they don’t have to be used for only golf. We are able to digitally shrink our projector area and cast a 16:9 viewing area for things like TV or movie viewing and even gaming! To make this happen we ran the HDMI from the computer to an AV receiver before the connection to the projector. Then, we connect speakers and through another HDMI input we connected an Apple TV.
Movies through Apple TV:
Live TV from Apple TV:
Gaming on the PC:
Driving simulator on the PC:
I could not be happier with how this turned out! It is extremely accurate and already gotten a ton of use. Our golf season up here in Michigan is pretty short so being able to have golf nights in the winter are a blast. And hopefully I can work on my swing as well.
One thing I wanted to mention is that this setup in a huge investment. If you want a home golf simulator but don’t have the budget for it all at once, you can easily pick one component at a time to upgrade the course of many years.
If you do choose to build your own golf simulator, I’d love to see how it turned out so be sure to post a picture in the comments!
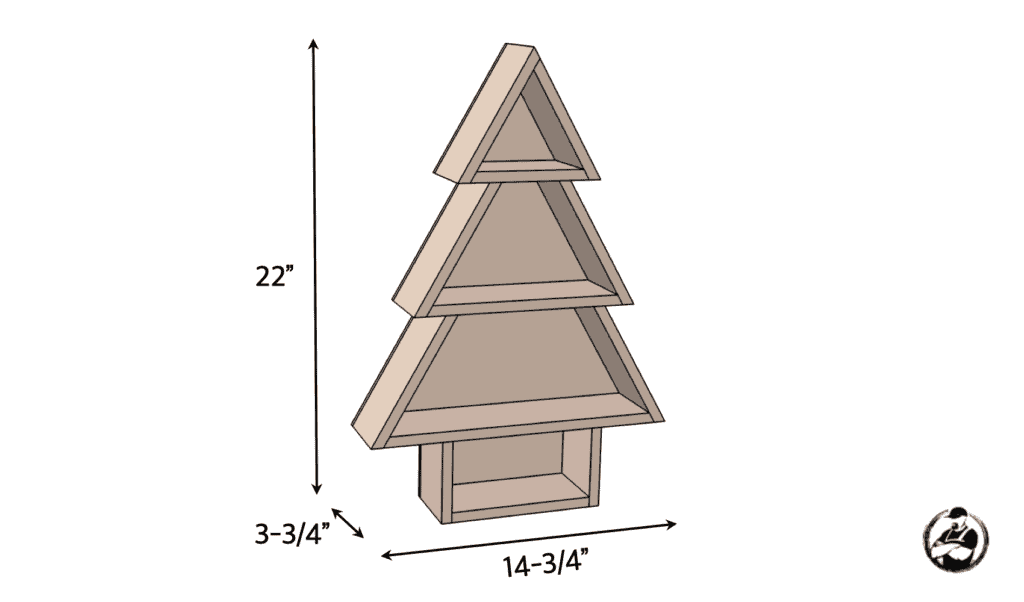
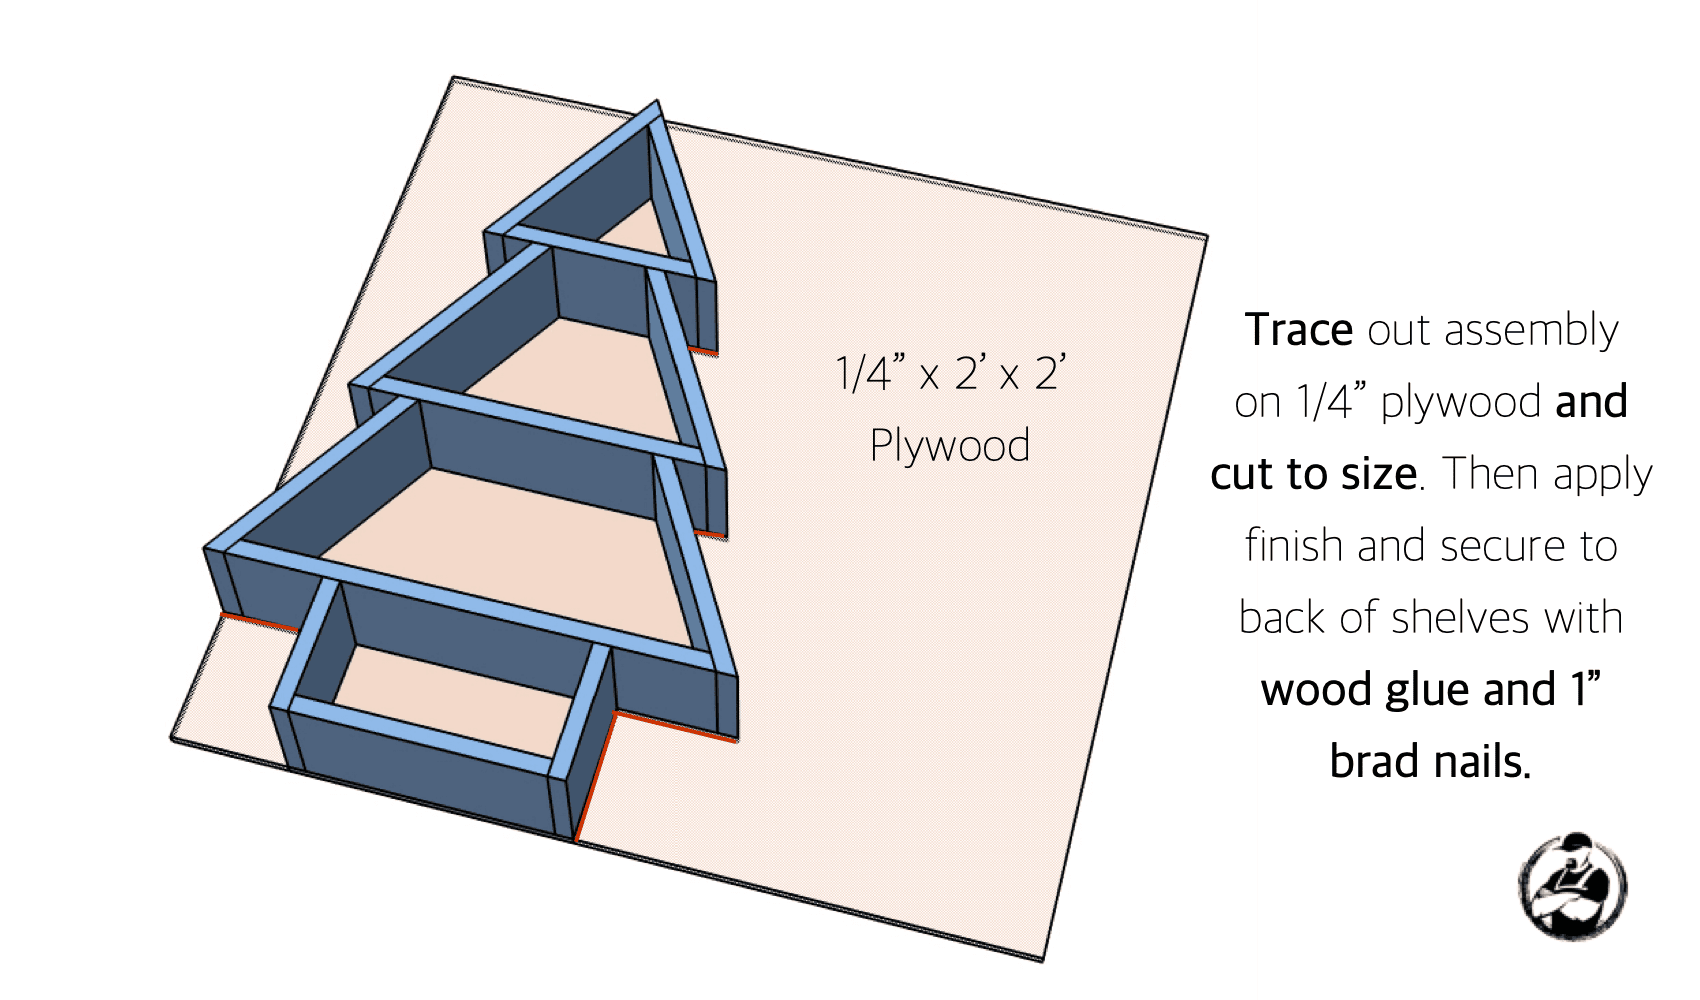
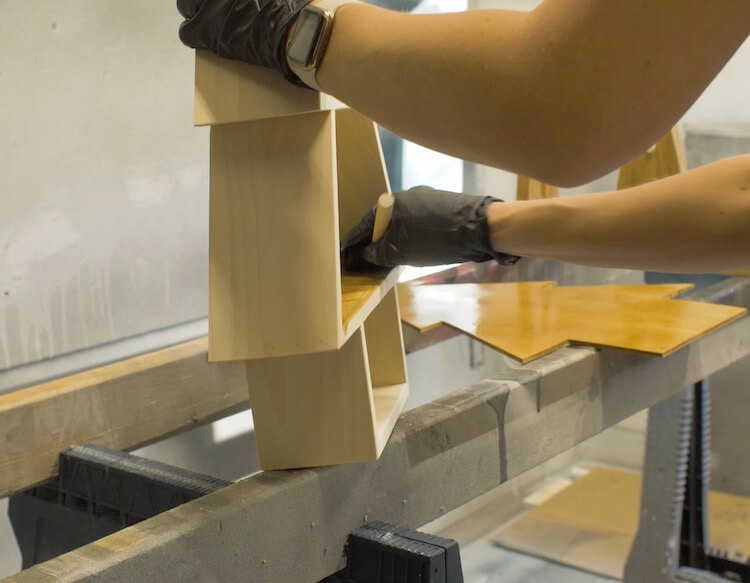
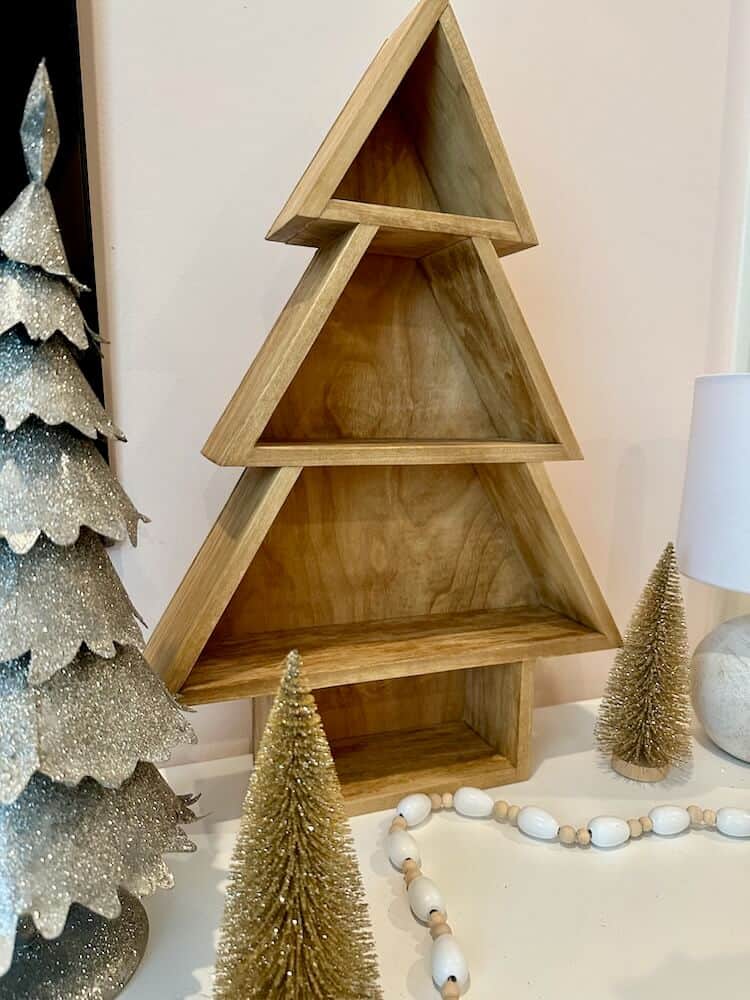
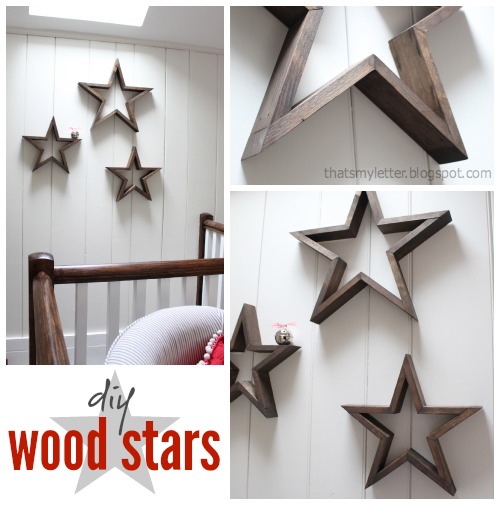
It’s time to make some quick and easy Christmas decor! In this post we are going to focus on making a small shelving unit that is in the shape of a Christmas tree. All you need is a couple of 1/2″ x 3-1/2″ boards and a small sheet of 1/4″ plywood. Not only does this decor look great but is great for showcasing ornaments and other small holiday items! If you like the of Christmas decor shown in the photo below, be sure to check out our Star Tutorial or the Christmas Tree Decor tutorial.
If you love this stuff as much as we do, you might want to consider following us on Instagram where we post sneak peeks and behind the scenes stuff in our stories. Also, did you know you can get tons of projects plans from all around the web when you follow us on Facebook and Pinterest!
Full Project Video
Wanna see how these all came together? Check out the full project video below and don’t forget to subscribe on YouTube so you won’t miss future videos!
Disclosure: The links provided in the “materials” and “required tools” sections are affiliate links. If you would like to support our site and help keep our content free come find out more about how we can make money with no extra cost to you.
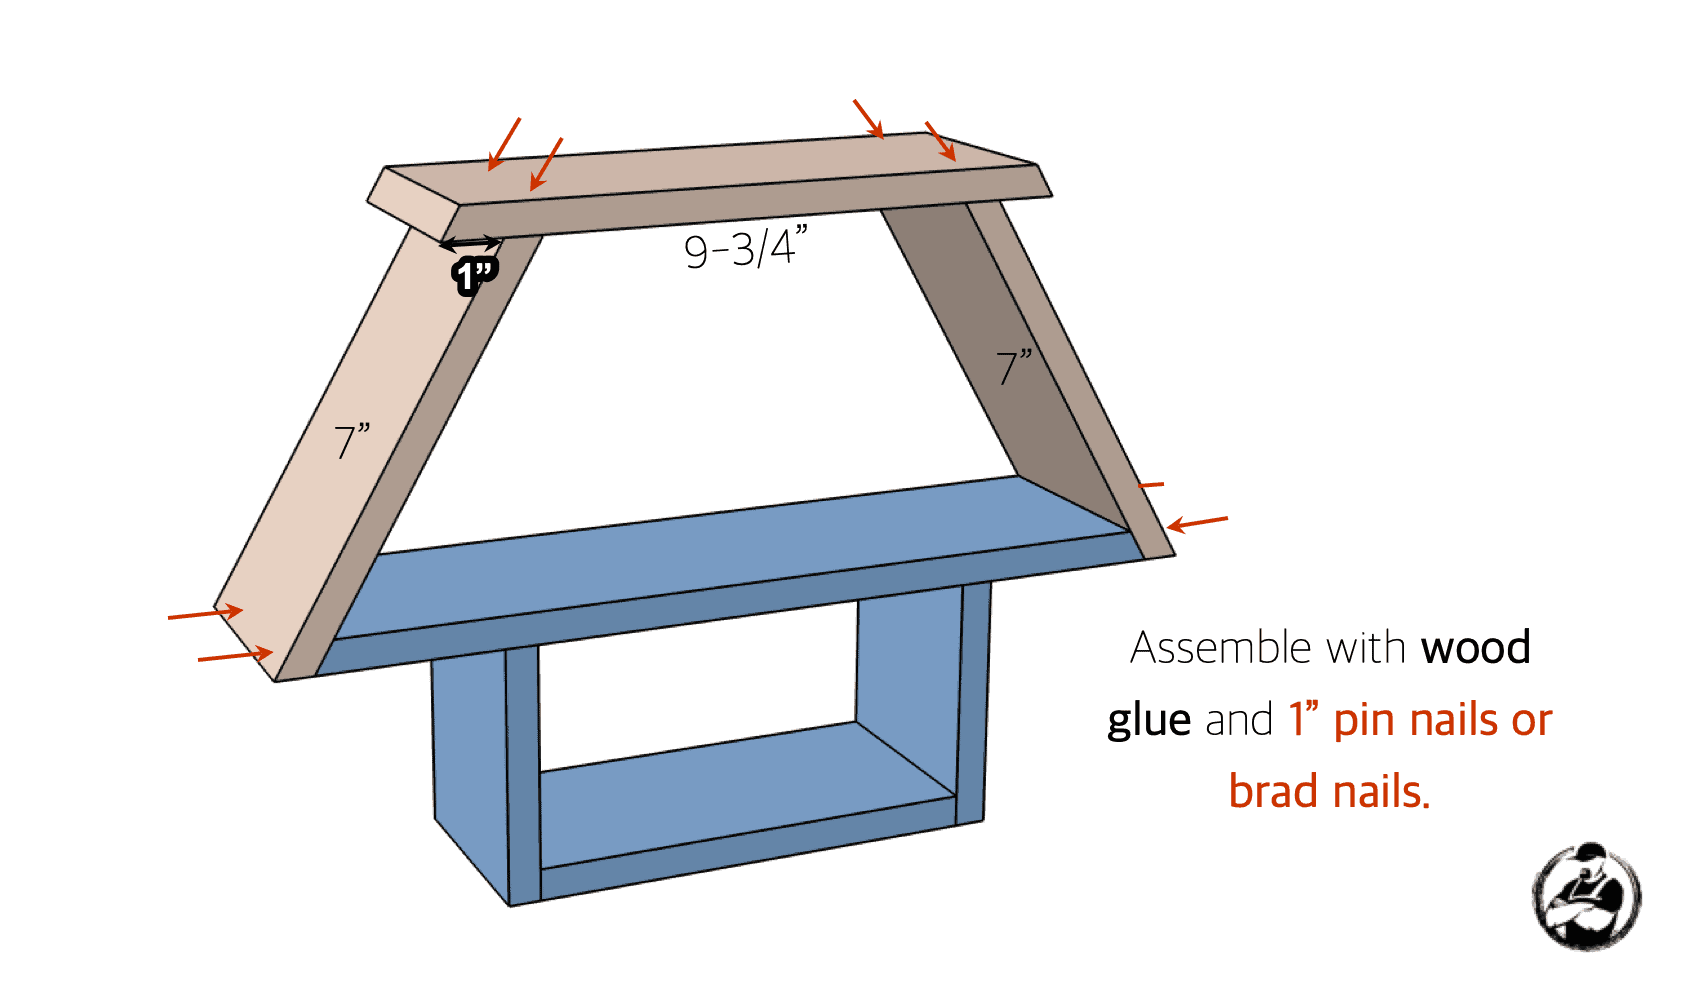
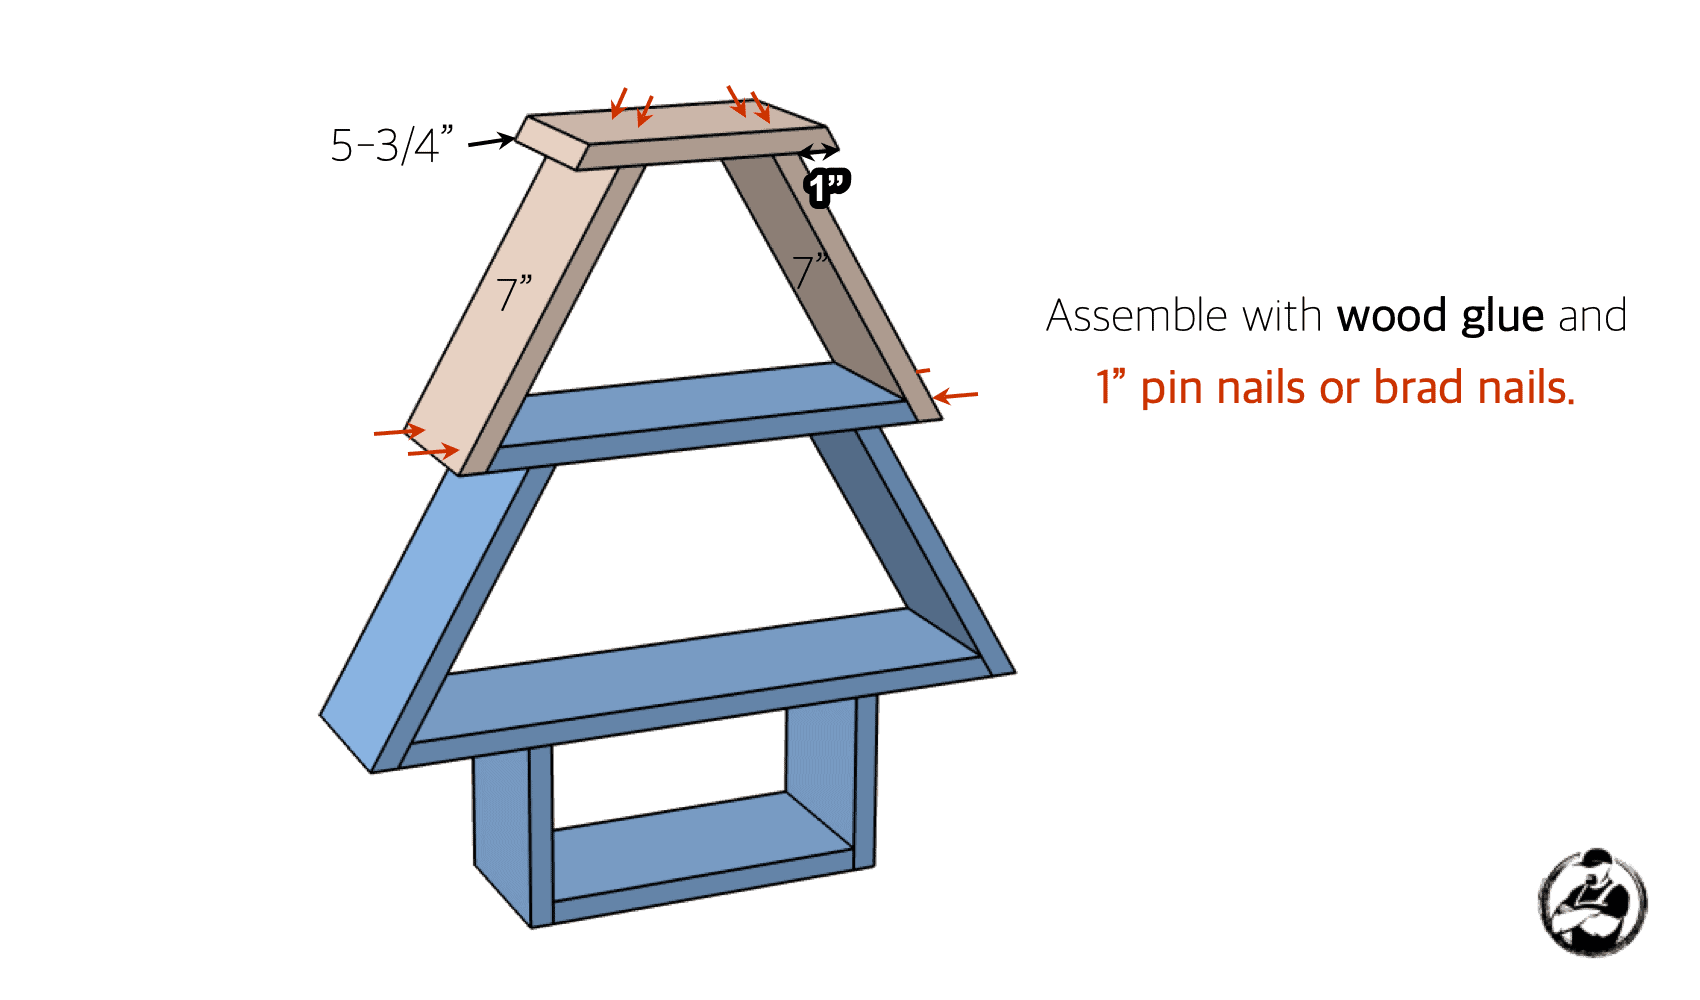
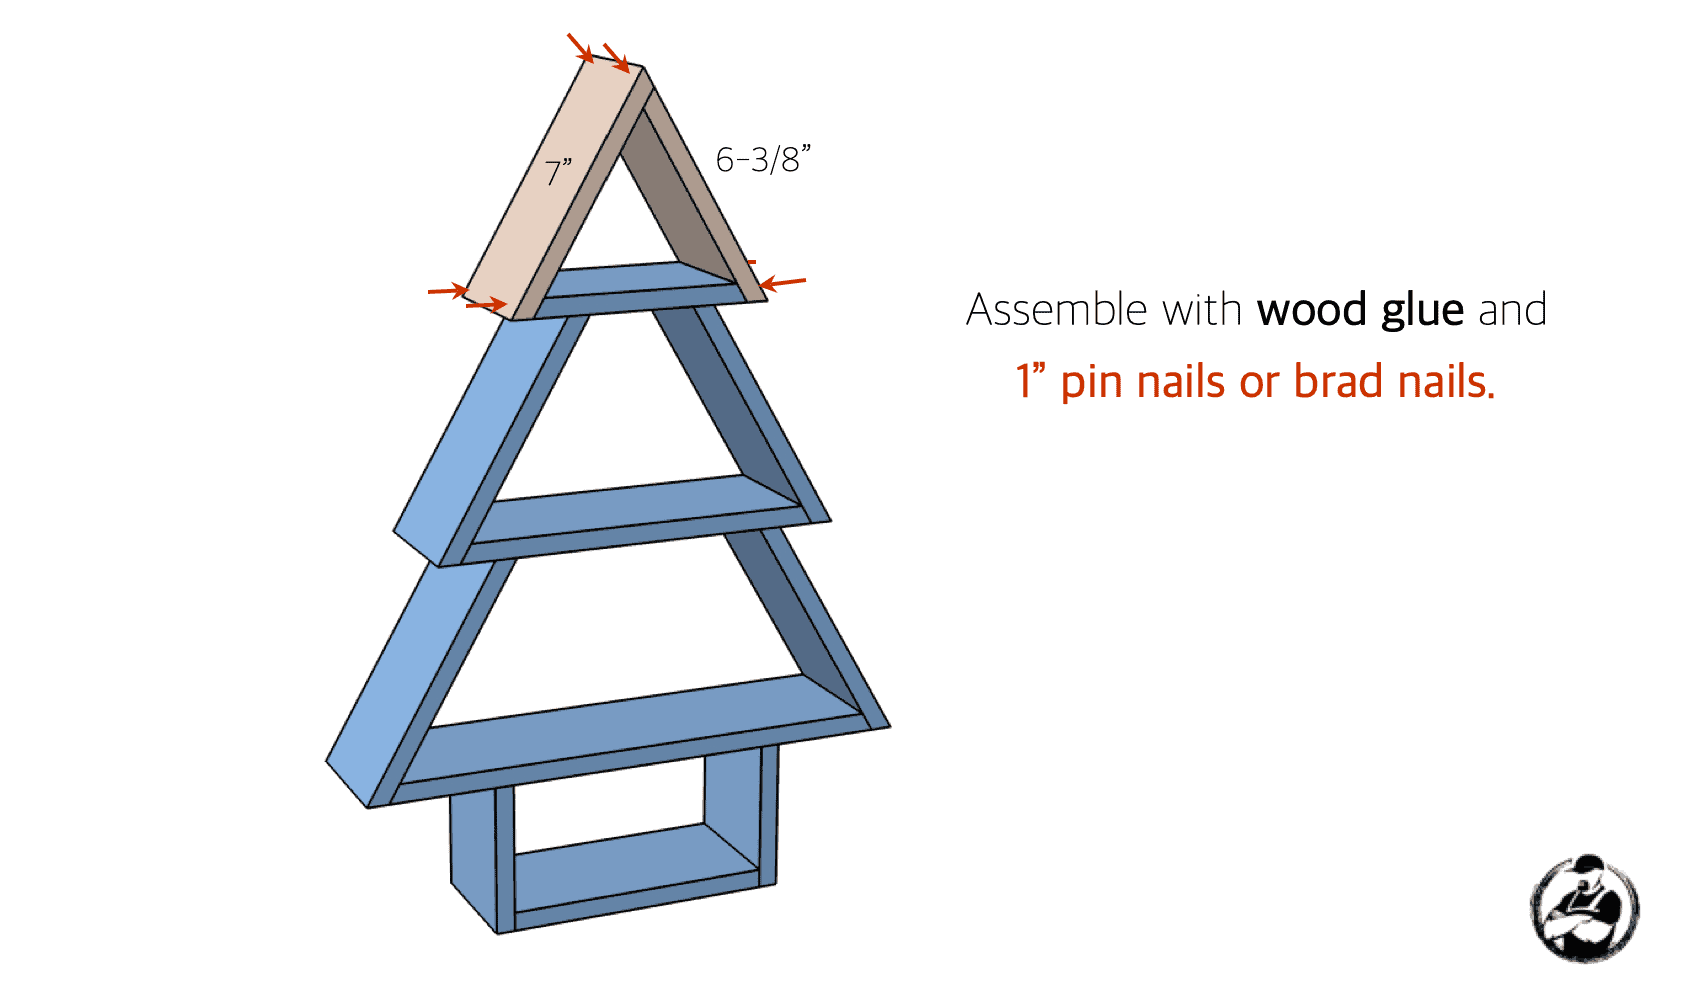
Dimensions
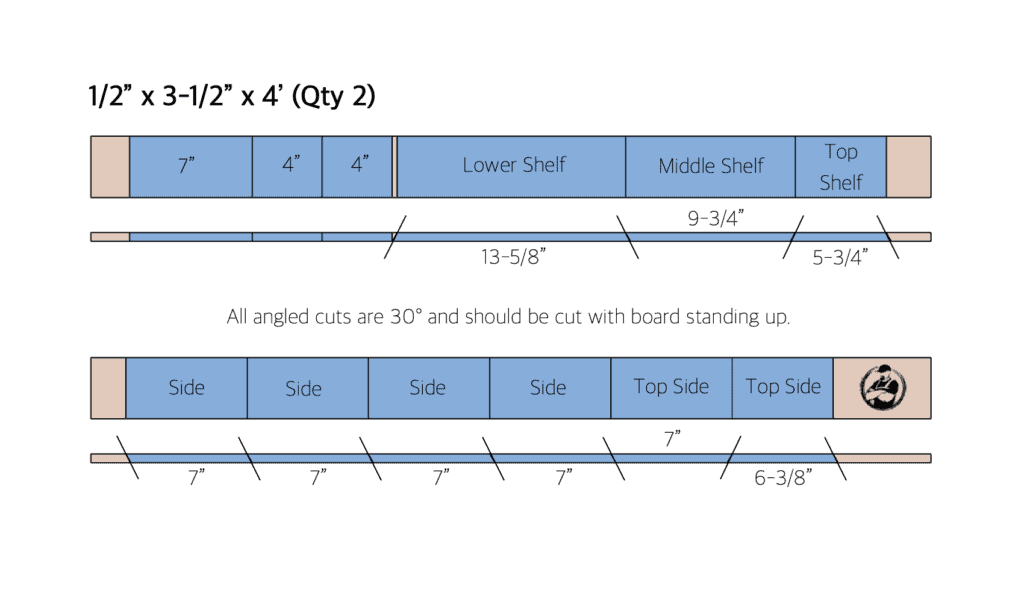
Cut List
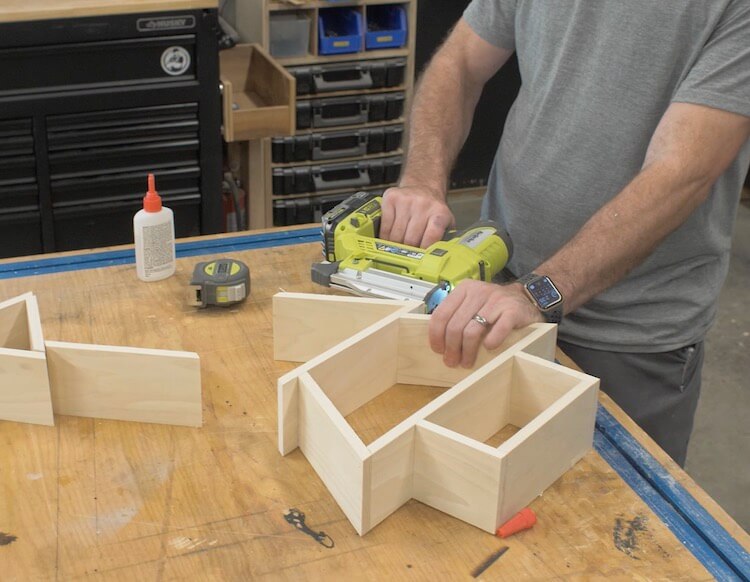
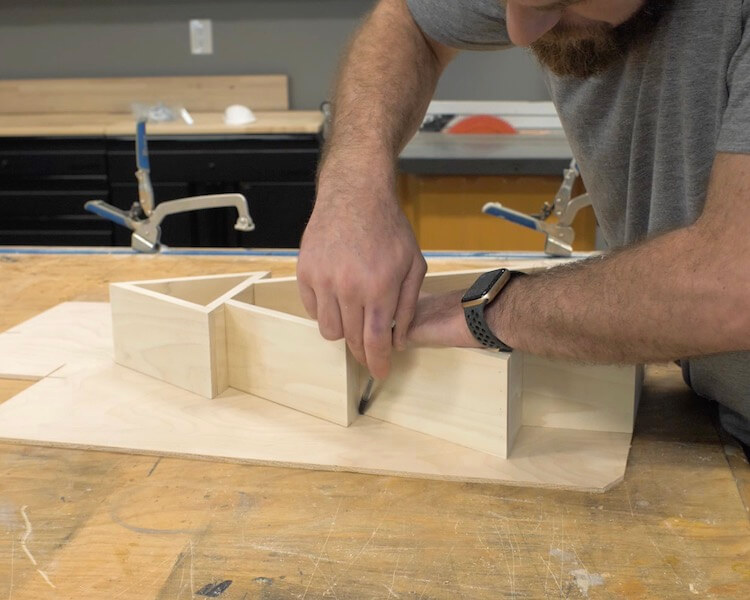
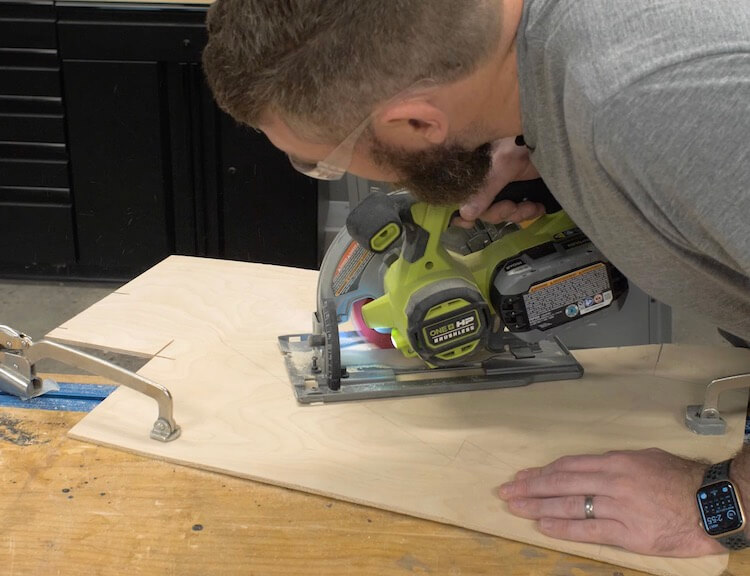
How to Build Christmas Tree Shelves!
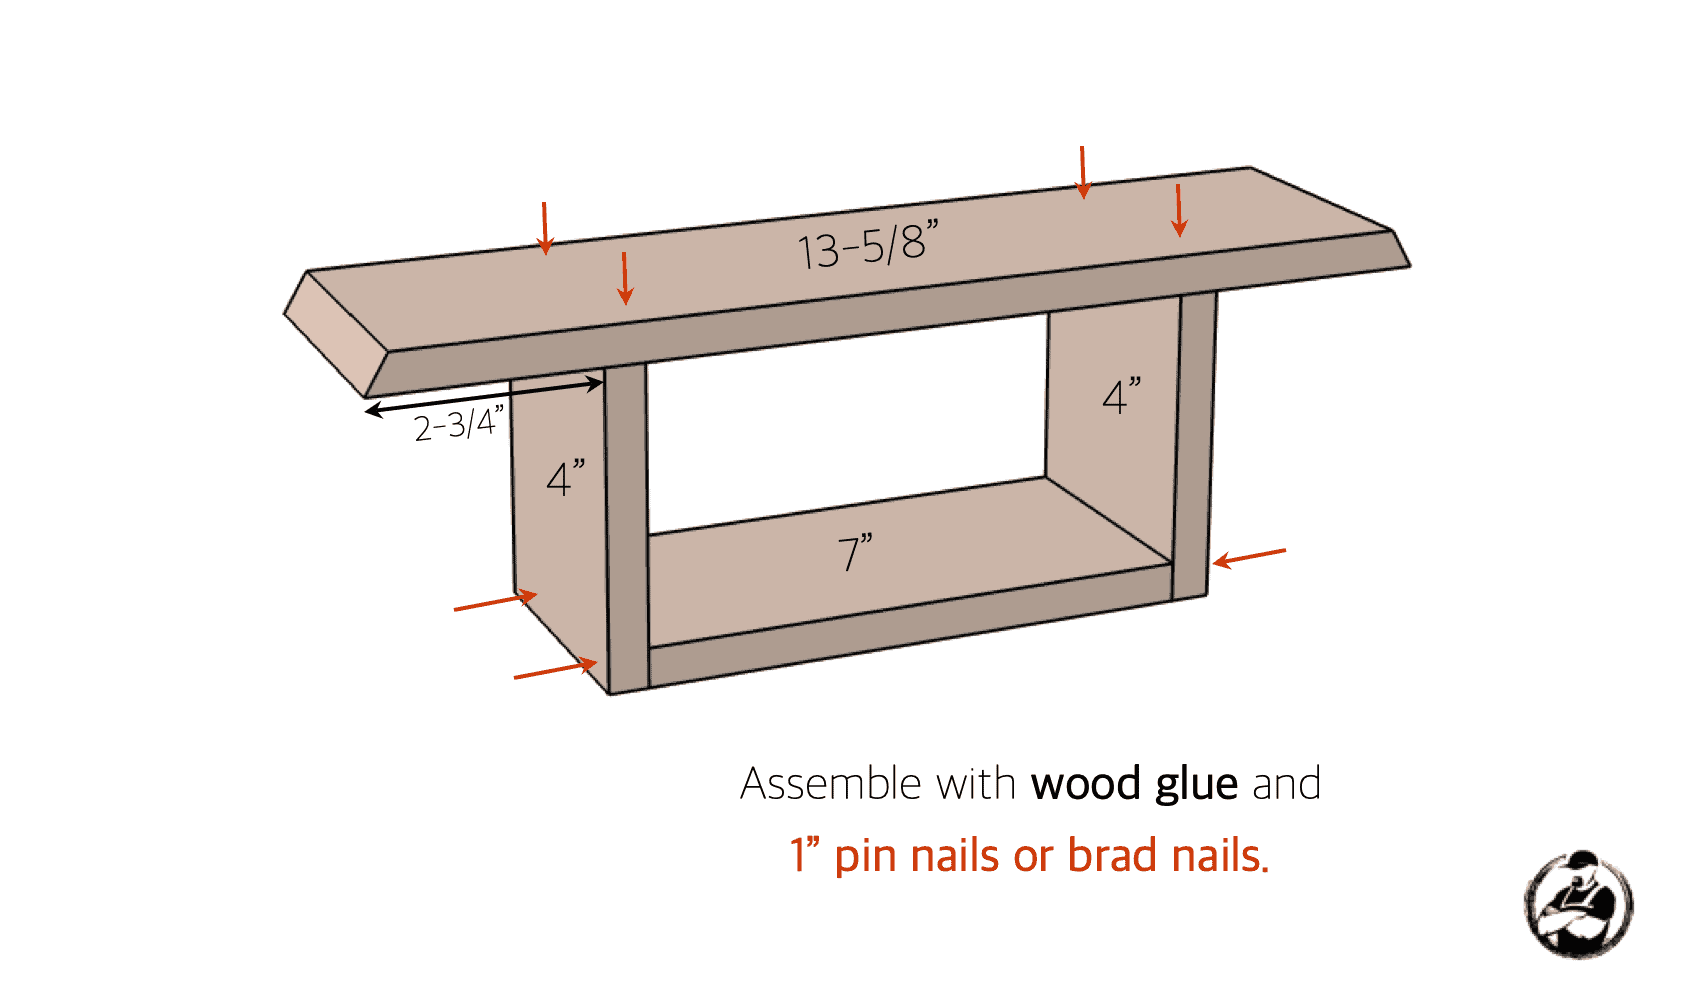
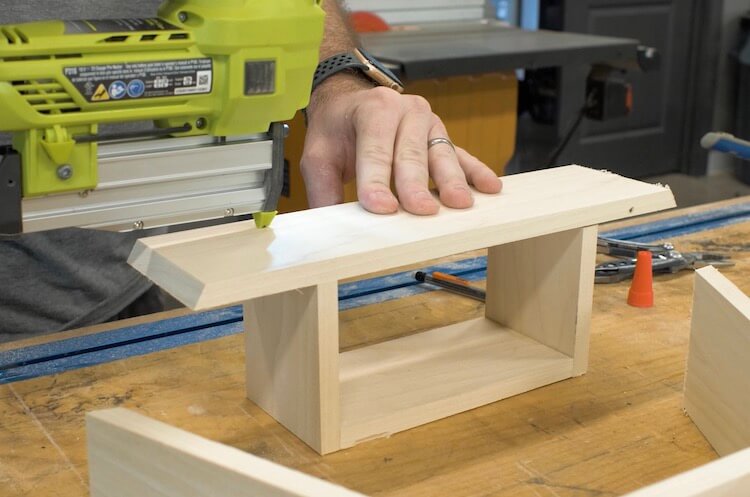
Assemble Base
Assemble Middle Shelf
Assemble Top Shelf
Install Top
Cut and Install Backing
Questions? Comments?
As always, if you have any questions don’t hesitate to comment below and especially don’t forget to post pictures of your finished products in the comments!
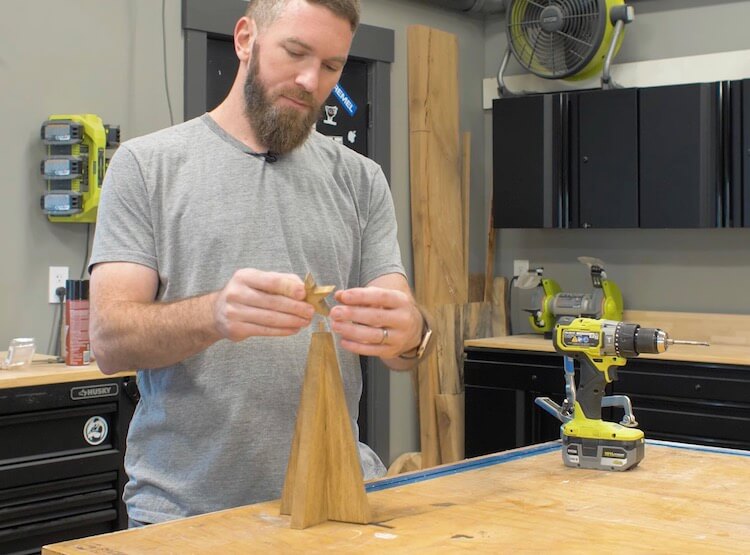
It’s time to make some quick and easy Christmas decor! In this post we are going to focus on making a small tabletop wooden Christmas tree. All you need is a couple of 1×6 and a 1/4″ wood dowel pin. If you like the of Christmas decor shown in the photo below, be sure to check out our Star Tutorial or the Christmas Tree Shelves tutorial.
If you love this stuff as much as we do, you might want to consider following us on Instagram where we post sneak peeks and behind the scenes stuff in our stories. Also, did you know you can get tons of projects plans from all around the web when you follow us on Facebook and Pinterest!
Full Project Video
Wanna see how these all came together? Check out the full project video below and don’t forget to subscribe on YouTube so you won’t miss future videos!
Disclosure: The links provided in the “materials” and “required tools” sections are affiliate links. If you would like to support our site and help keep our content free come find out more about how we can make money with no extra cost to you.
How to Build Wooden Christmas Tree!
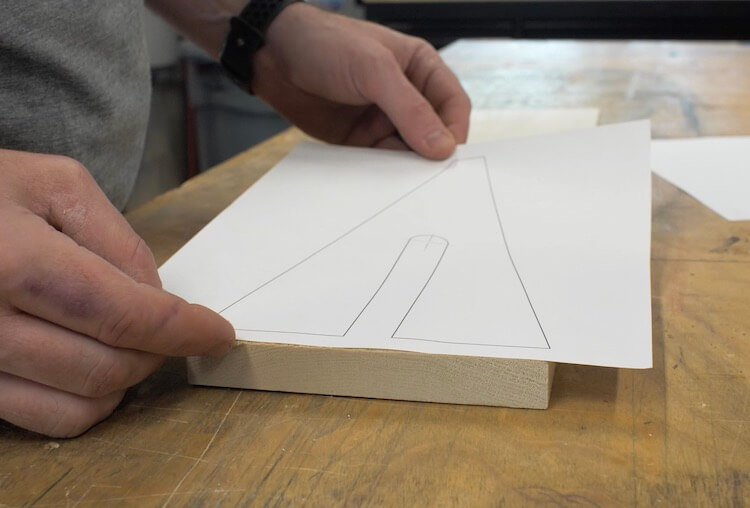
Apply the Templates
Download Templates and print out at 100% scale. You may need to uncheck any “scale to fit” or similar option. Cut the star off the one template and place to fit between the two tree parts. Then, adhere those templates to your 1×6 with spray adhesive.
Cut Out the Parts
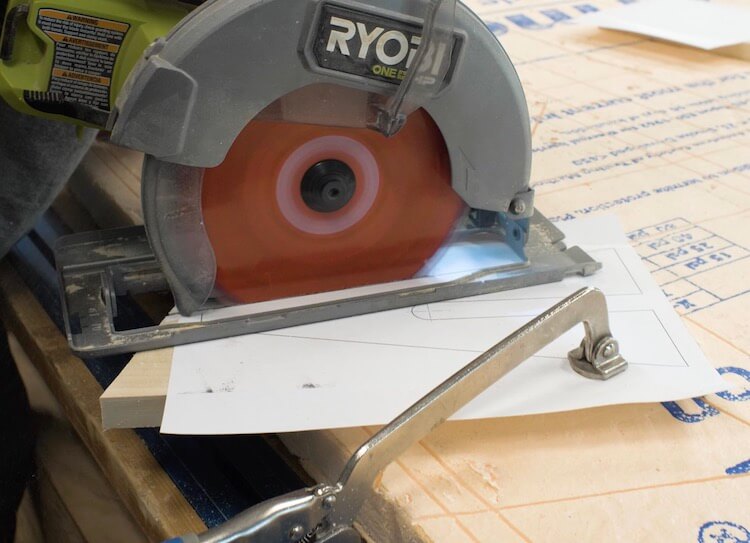
To cut the parts out you could do it all with a jig saw, scroll saw or band saw but I used a circular saw for the straight cuts to get a straight, clean cut.
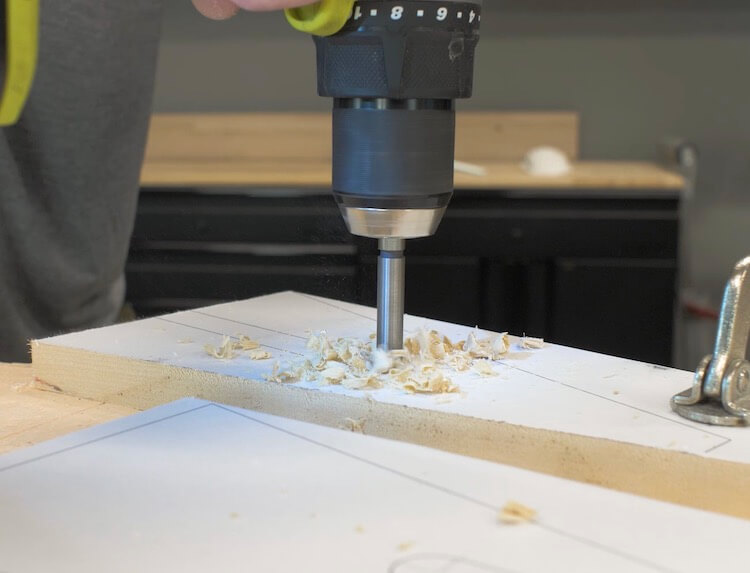
On the templates you will find some crosshairs where you can use a 3/4″ drill bit. I used a forstner bit to get a clean hole.
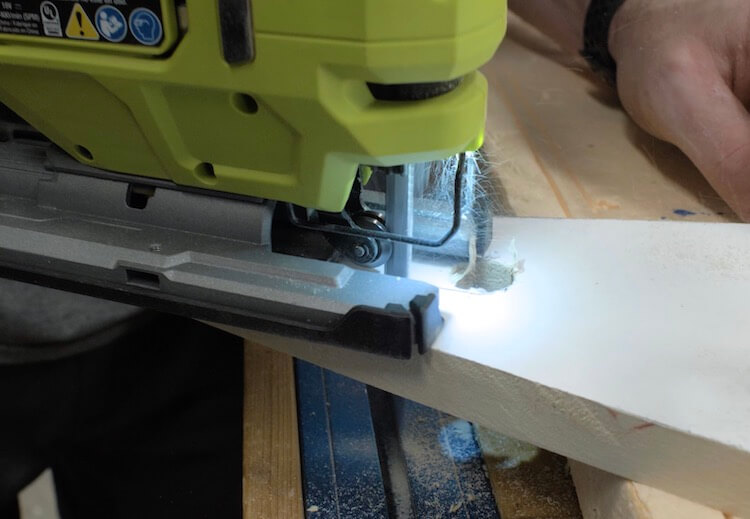
To finish off the half lap joint on the two tree parts I used a jig saw.
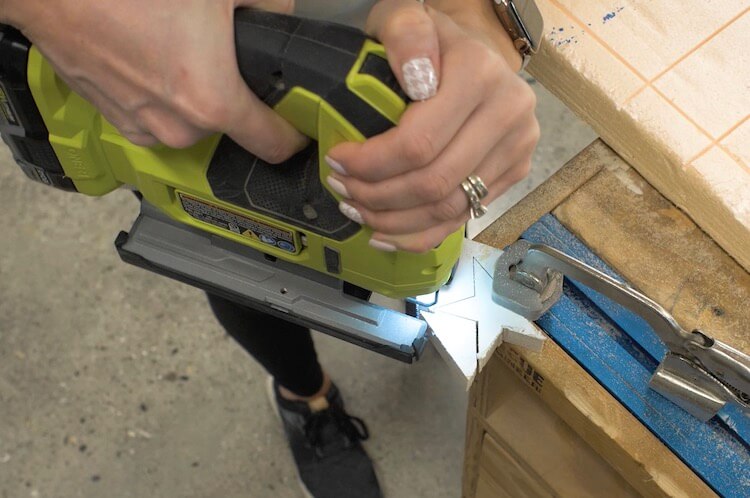
The star can get cut out with jig saw, scroll saw or band saw.
Drill Dowel Holes
After applying finish to each piece, I then used a 1/4″ forstner bit to drill a hole in the bottom of the star.
I also did the same for the top of the tree.
Assemble
After that, the assembly is pretty straightforward. The two tree parts slide together and the 1/4″ dowel is used to attach the star on the top. Wood glue is not required since everthing fits together pretty snug but can be used for a permanent assembly if desired.
Thats’s it, this is a super simple project that will add to your Christmas decor!
Questions? Comments?
As always, if you have any questions don’t hesitate to comment below and especially don’t forget to post pictures of your finished products in the comments!
If you love this stuff as much as we do, you might want to consider following us on Instagram where we post sneak peeks and behind the scenes stuff in our stories. Also, did you know you can get tons of projects plans from all around the web when you follow us on Facebook and Pinterest!
Full Project Video
Wanna see how these all came together? Check out the full project video below and don’t forget to subscribe on YouTube so you won’t miss future videos!
Disclosure: The links provided in the “materials” and “required tools” sections are affiliate links. If you would like to support our site and help keep our content free come find out more about how we can make money with no extra cost to you.
Dimensions
Cut List
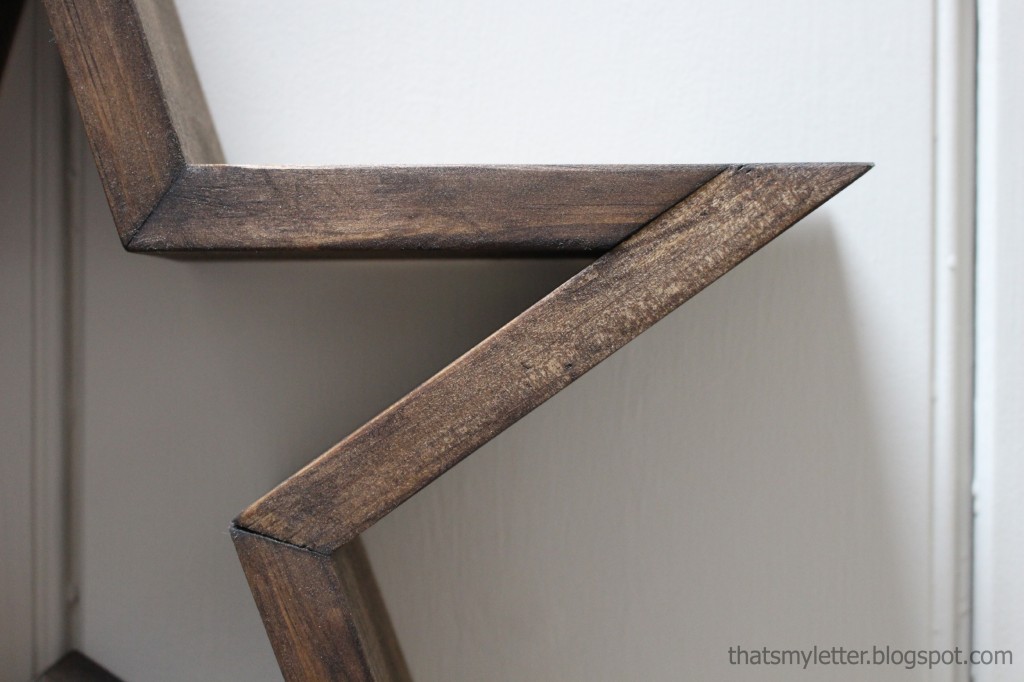
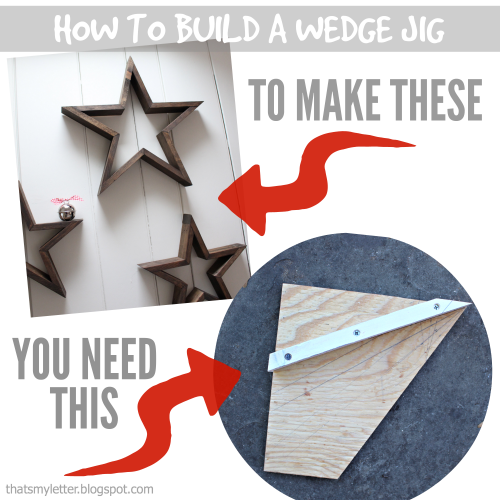
Luckily my miter saw goes to 60 degrees but you’re probably wondering how you’re going to make a 54 degree cut if your miter saw only goes to 45 or 50 degrees. Well lucky for you, Jaime shows us how to make a wedge jig here.
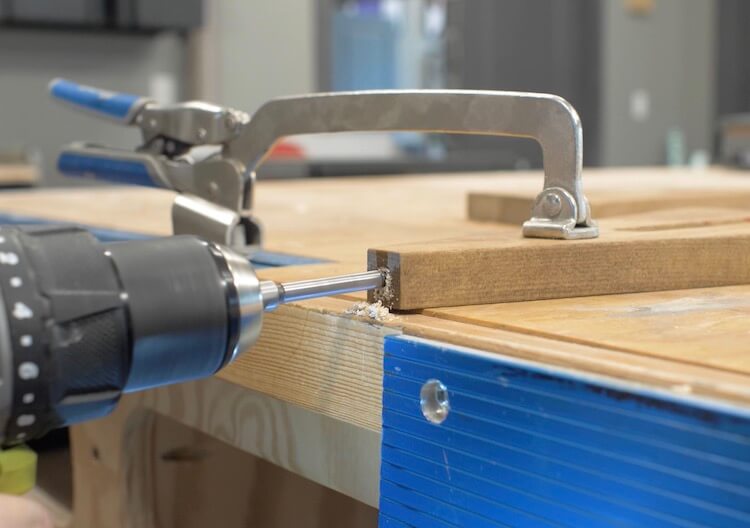
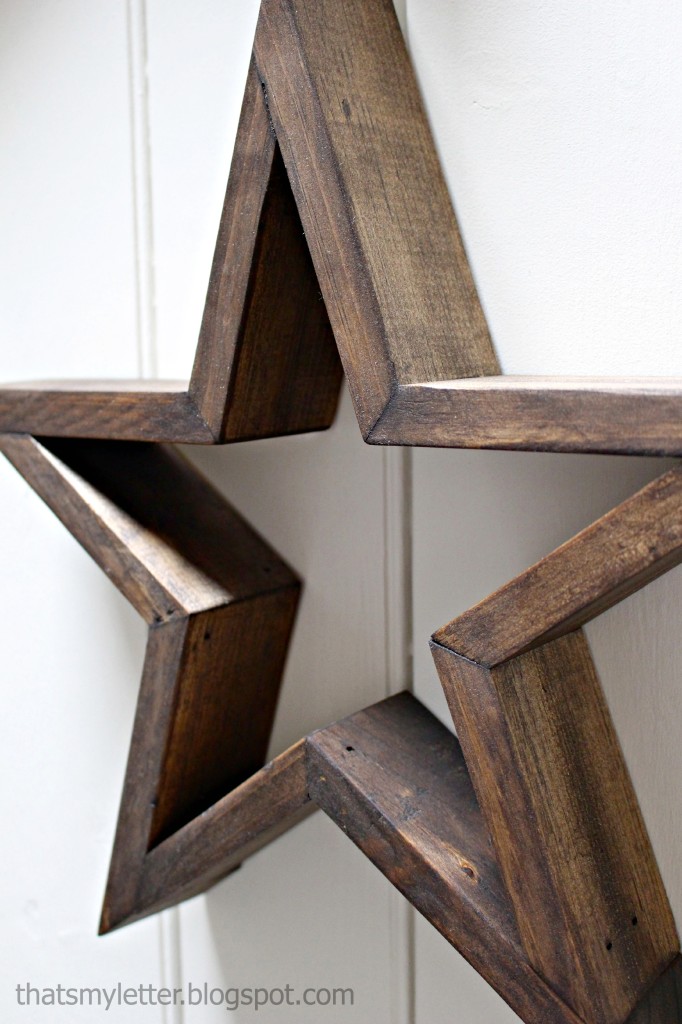
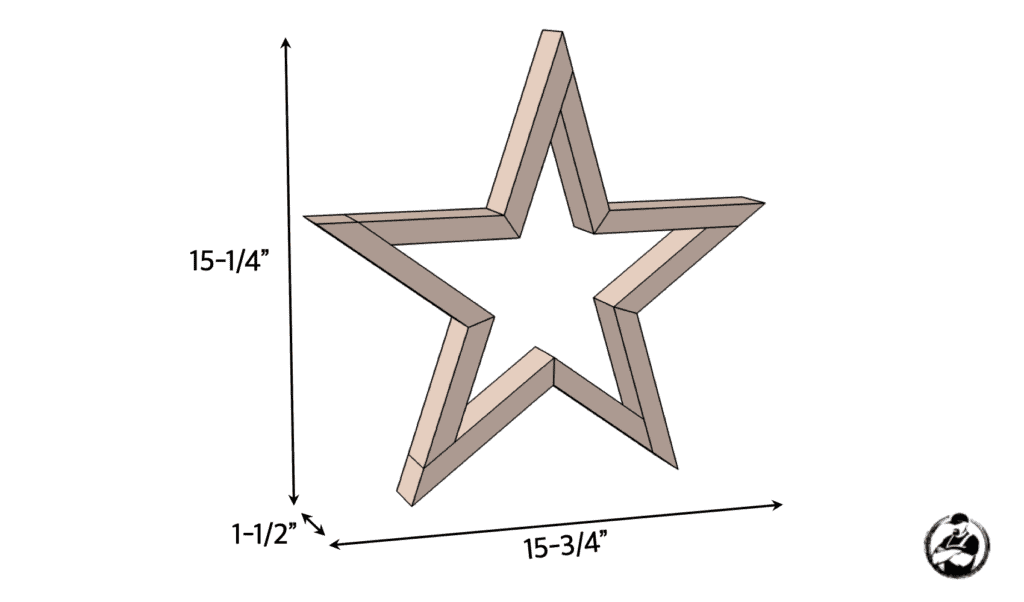
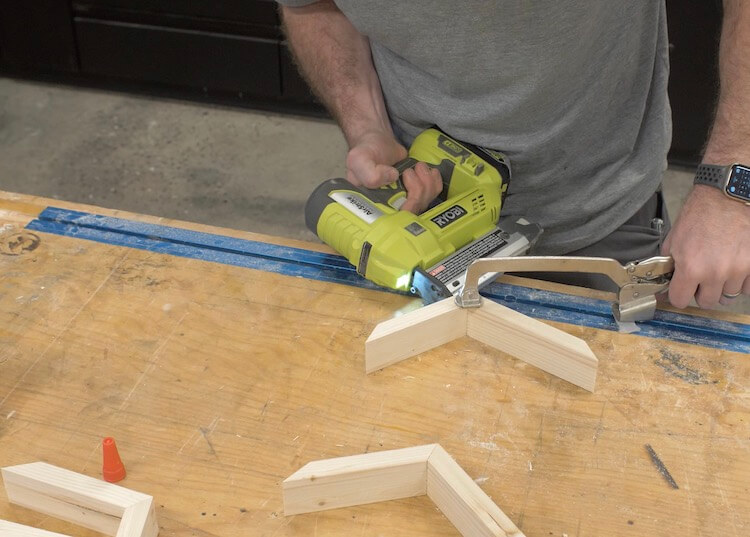
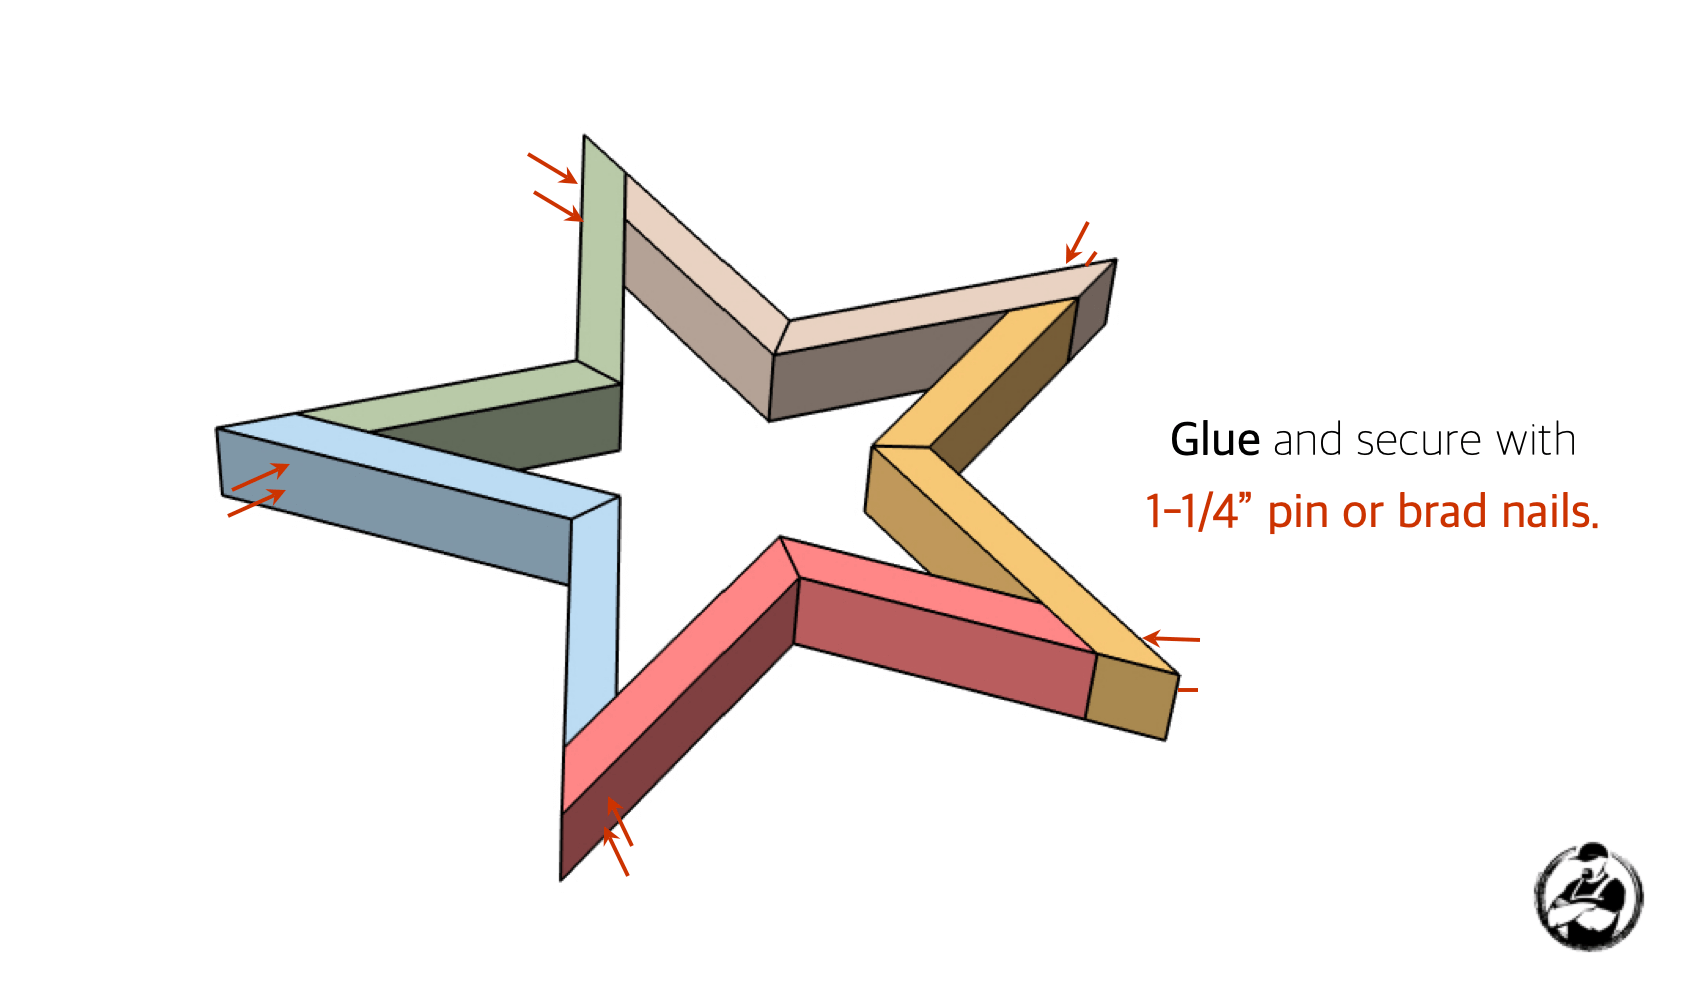
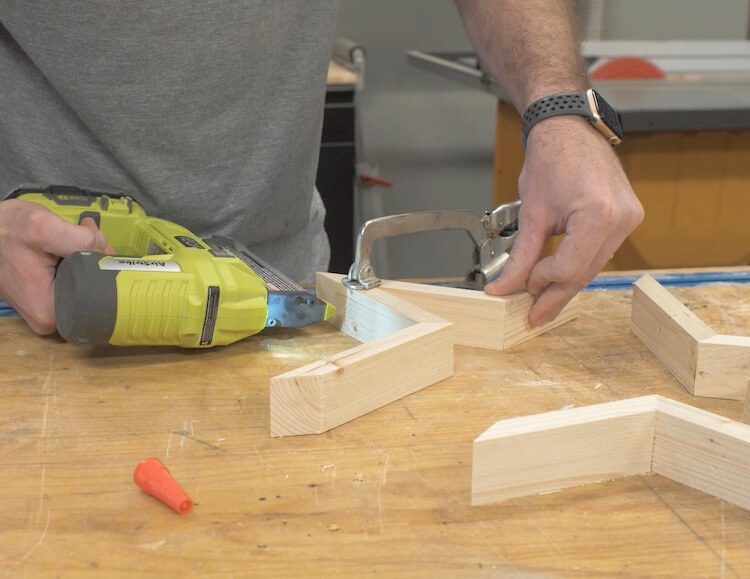
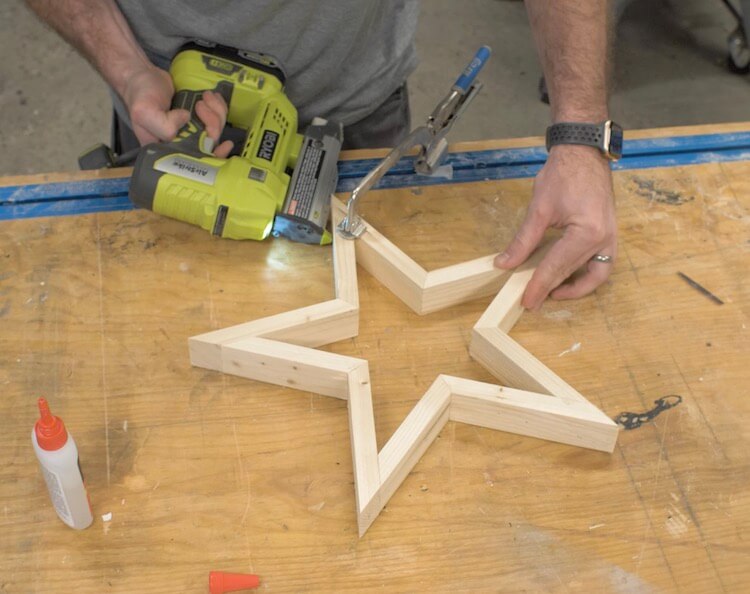
Free DIY Wooden Star Plans
Time needed: 30 minutes.
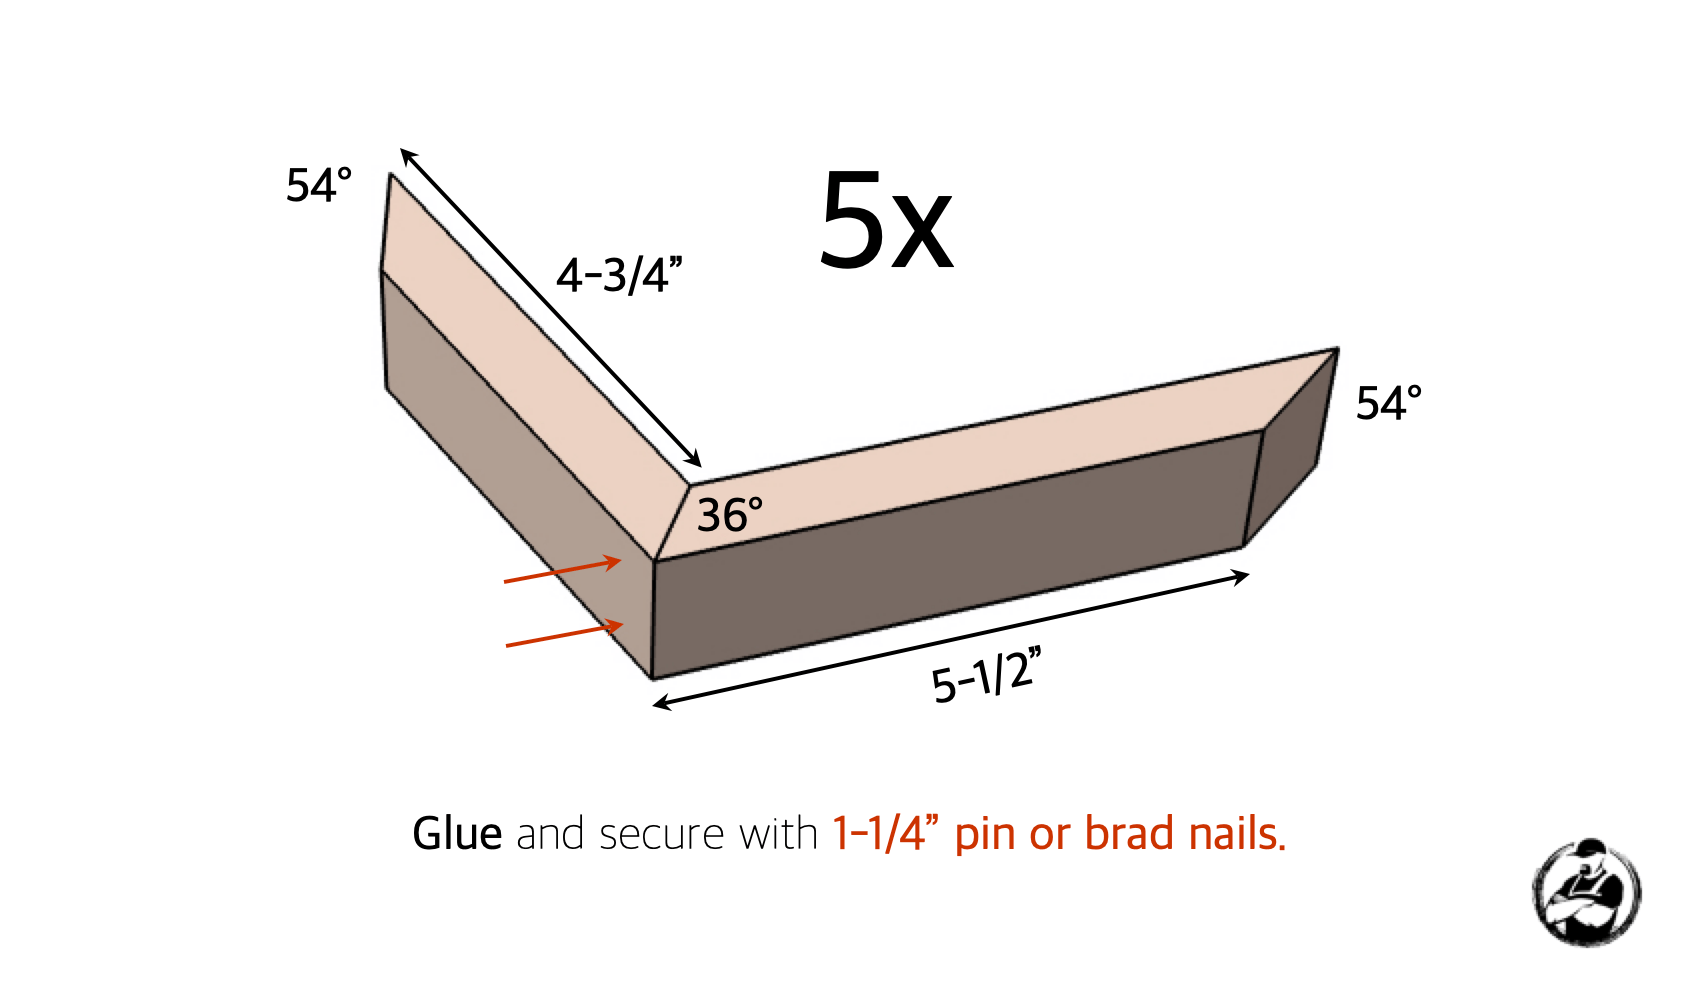
Assemble Inside Corners
Assemble Outside Corners
Questions? Comments?
As always, if you have any questions don’t hesitate to comment below and especially don’t forget to post pictures of your finished products in the comments! ENJOY!
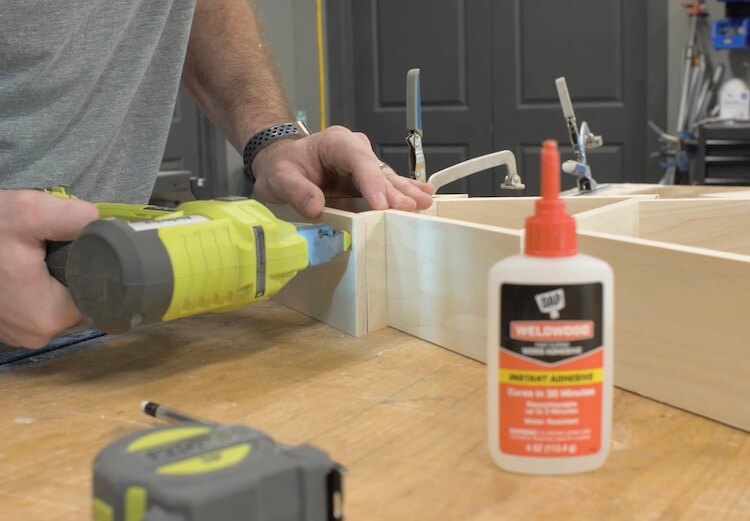
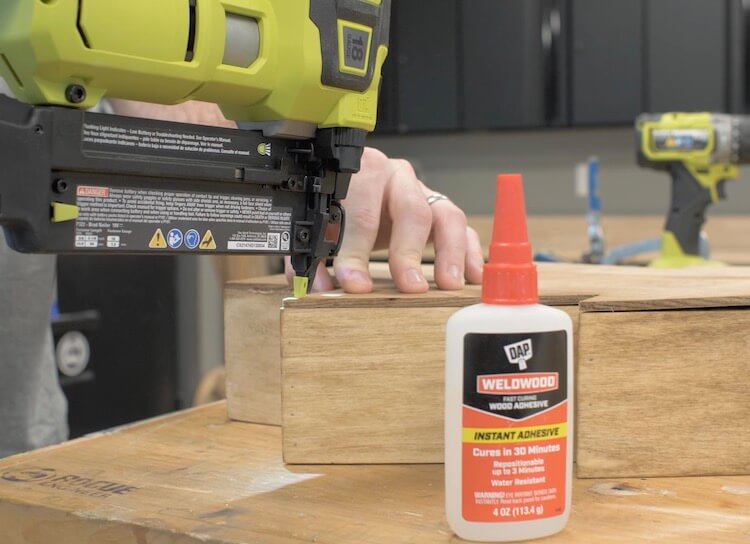
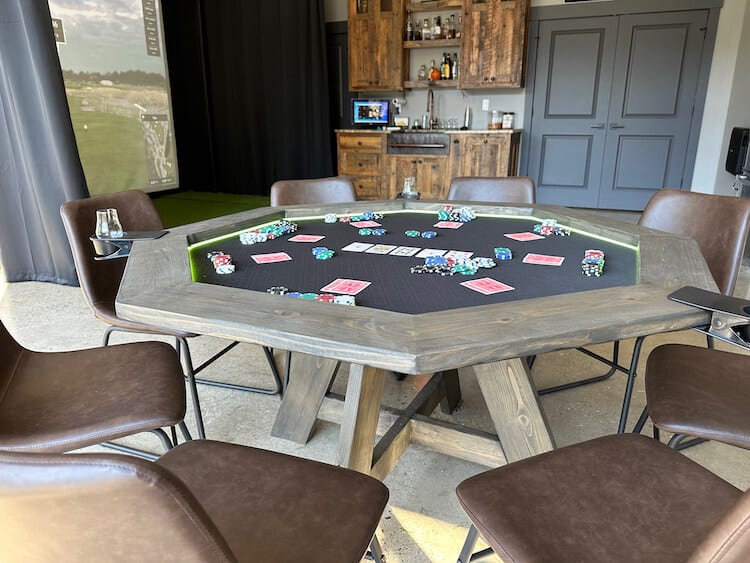
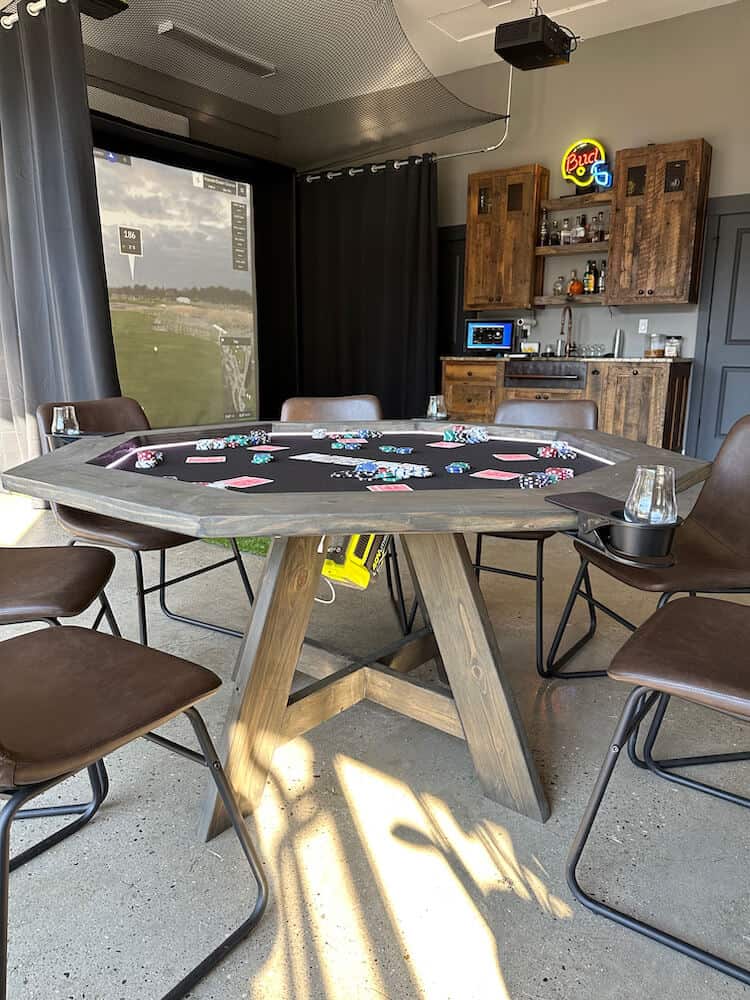
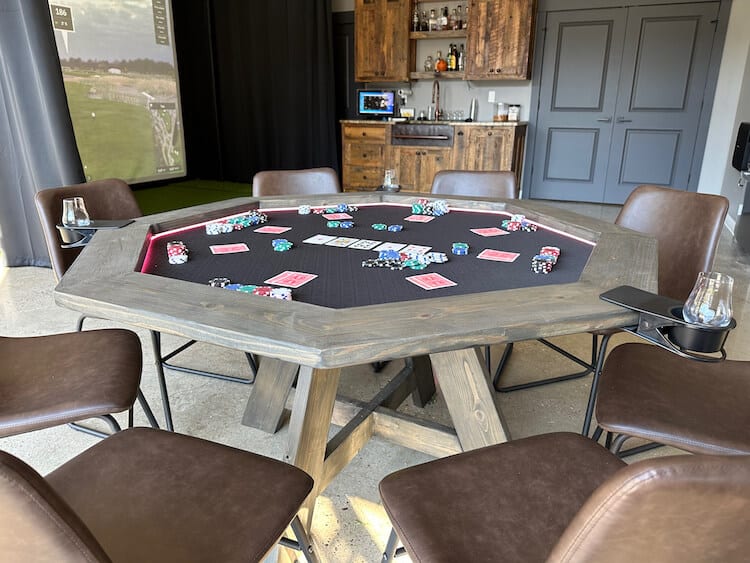
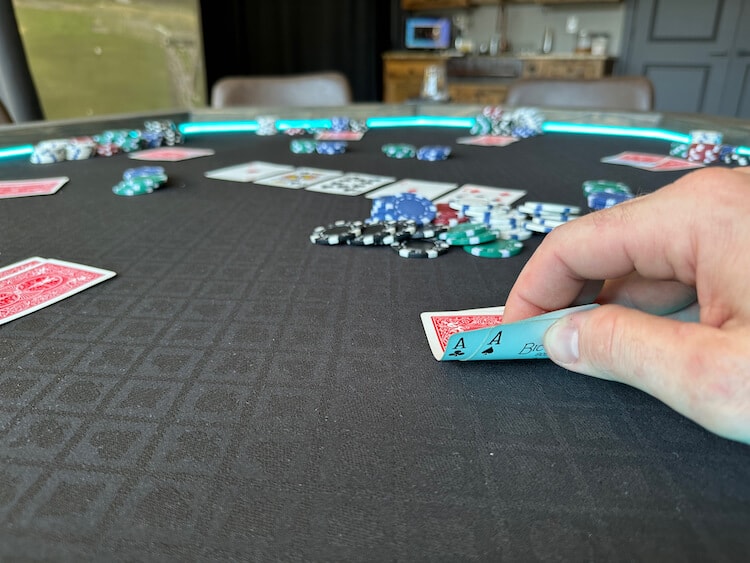
With winter around the corner the golf outings turn into poker nights. My makeshift poker table from last year worked great but it was simple and too big. This year was the perfect time to invest in a new poker table but they are SO expensive so I decided to build my own. I wanted it to be small enough to reach comfortably across the table but also be able to seat 8 people. Since I was taking the time to build a poker table I wanted to include LED lights and actual poker table speed cloth. Read on to see exactly how it all came together.
Disclosure: This post is sponsored by DAP Products. As well, the links provided in the “materials” and “required tools” sections are affiliate links. If you would like to support our site and help keep our content free come find out more about how we can make money with no extra cost to you.
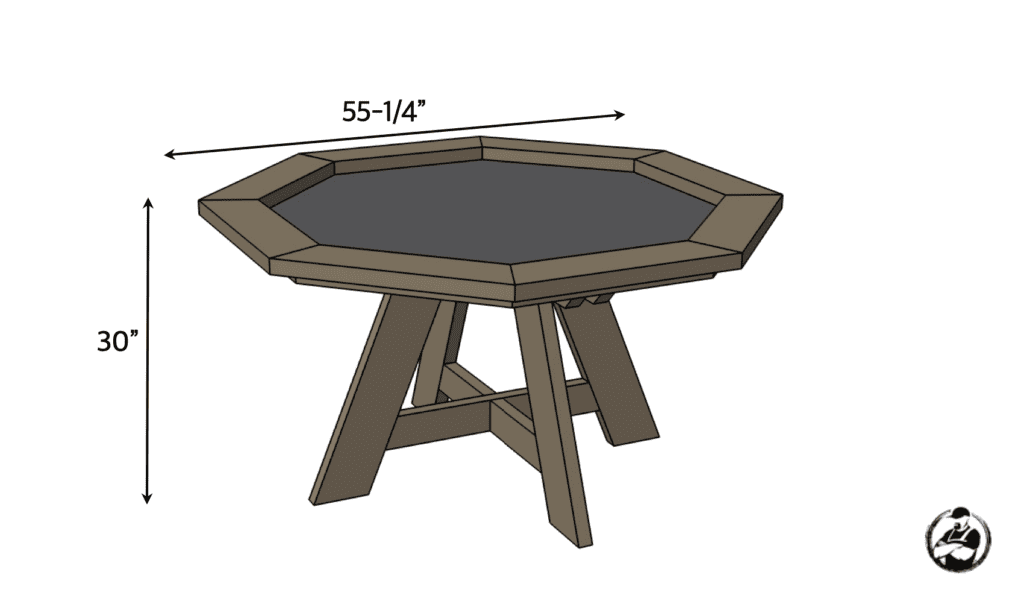
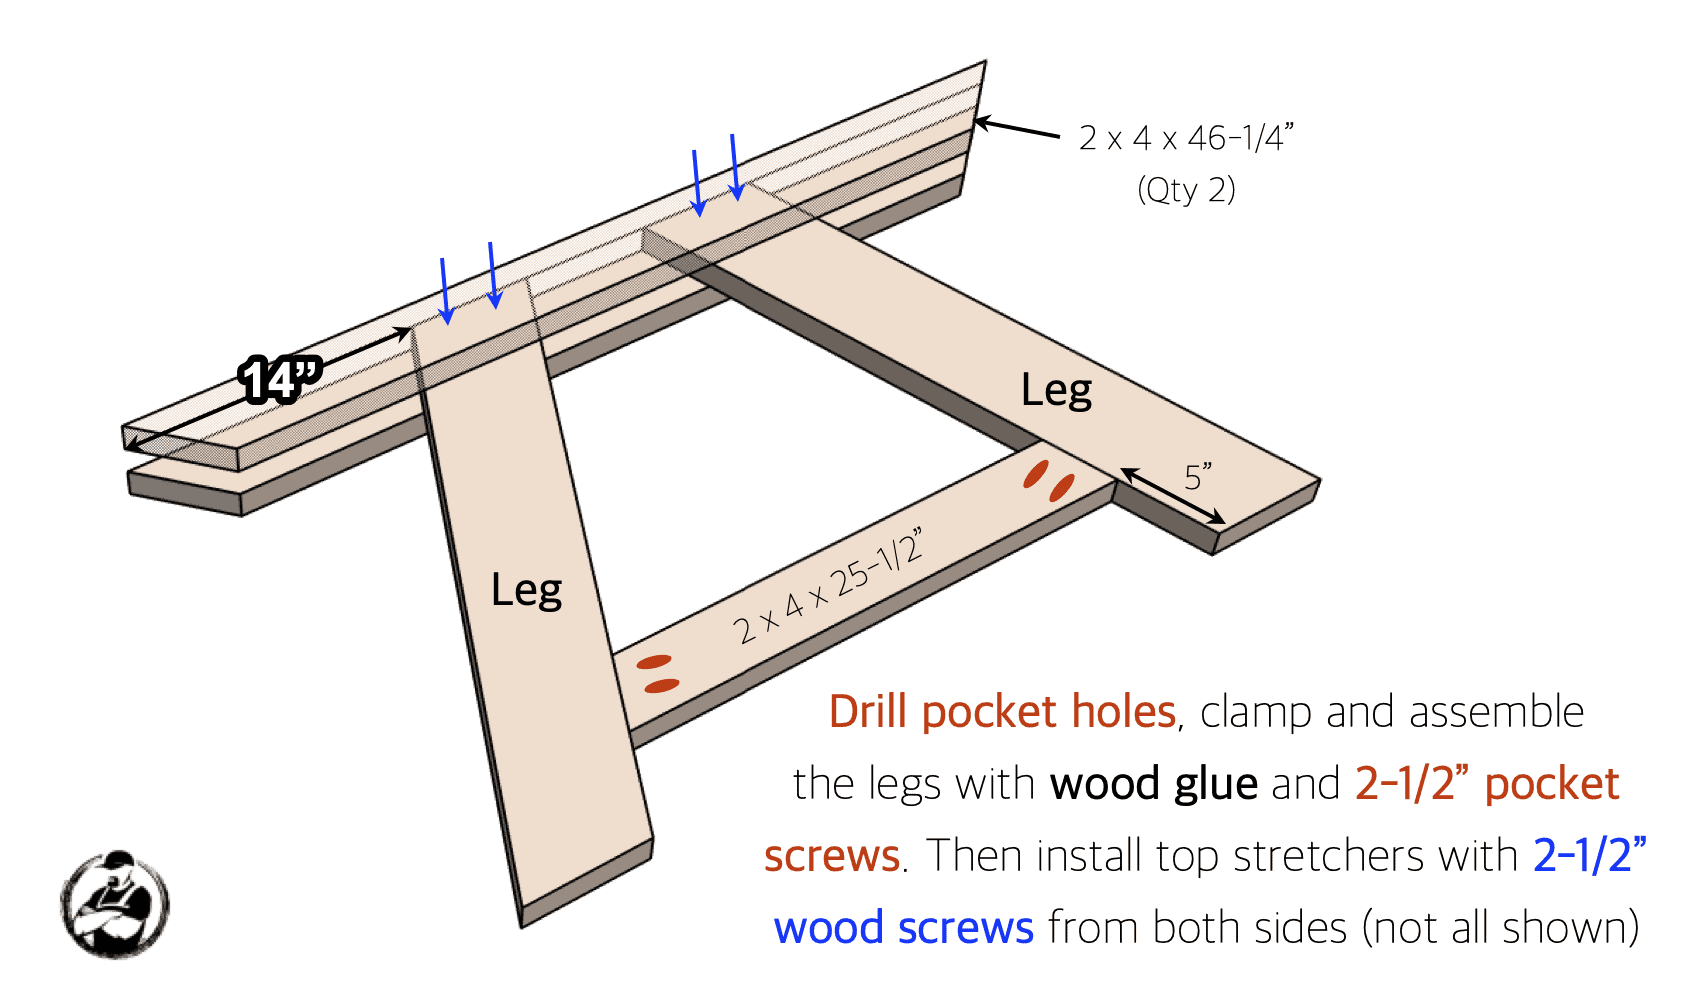
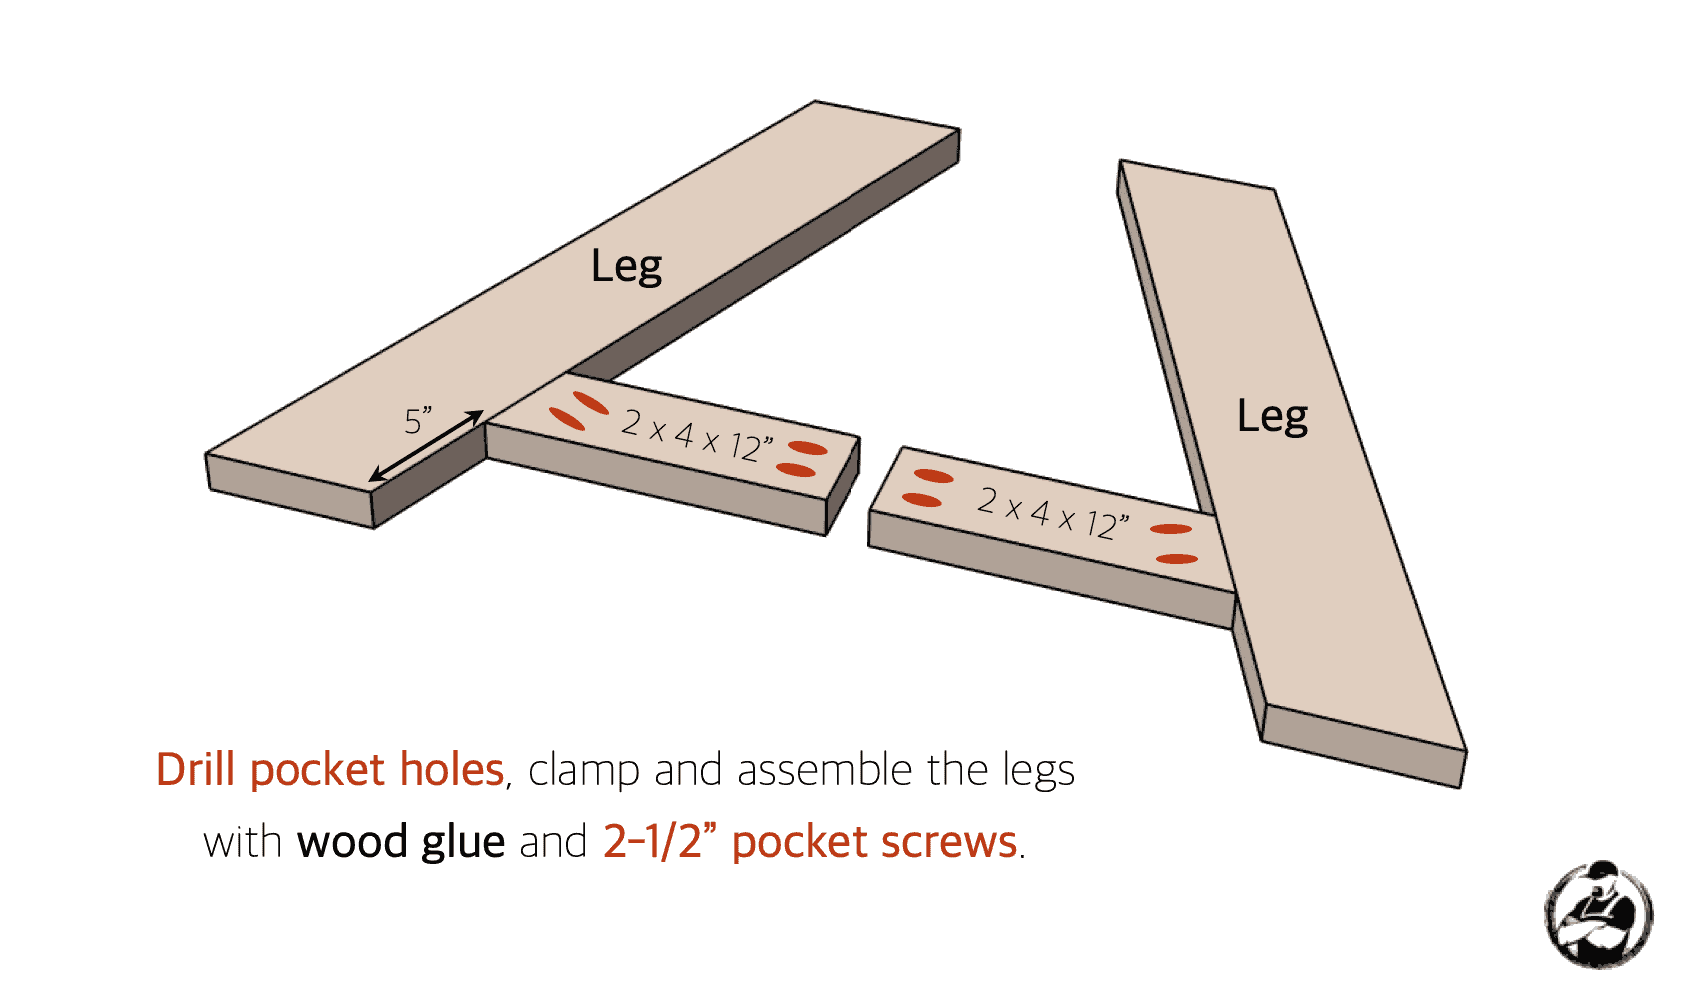
Dimensions
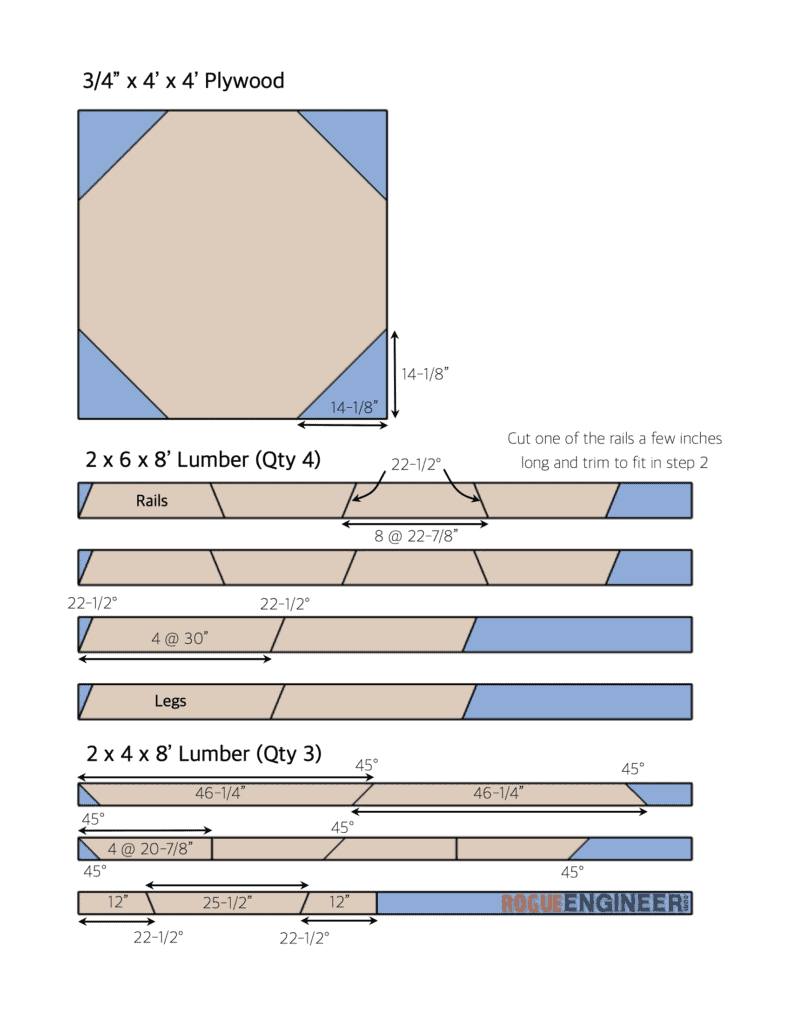
Cut List
How to Build a Poker Table
Time needed: 2 days.
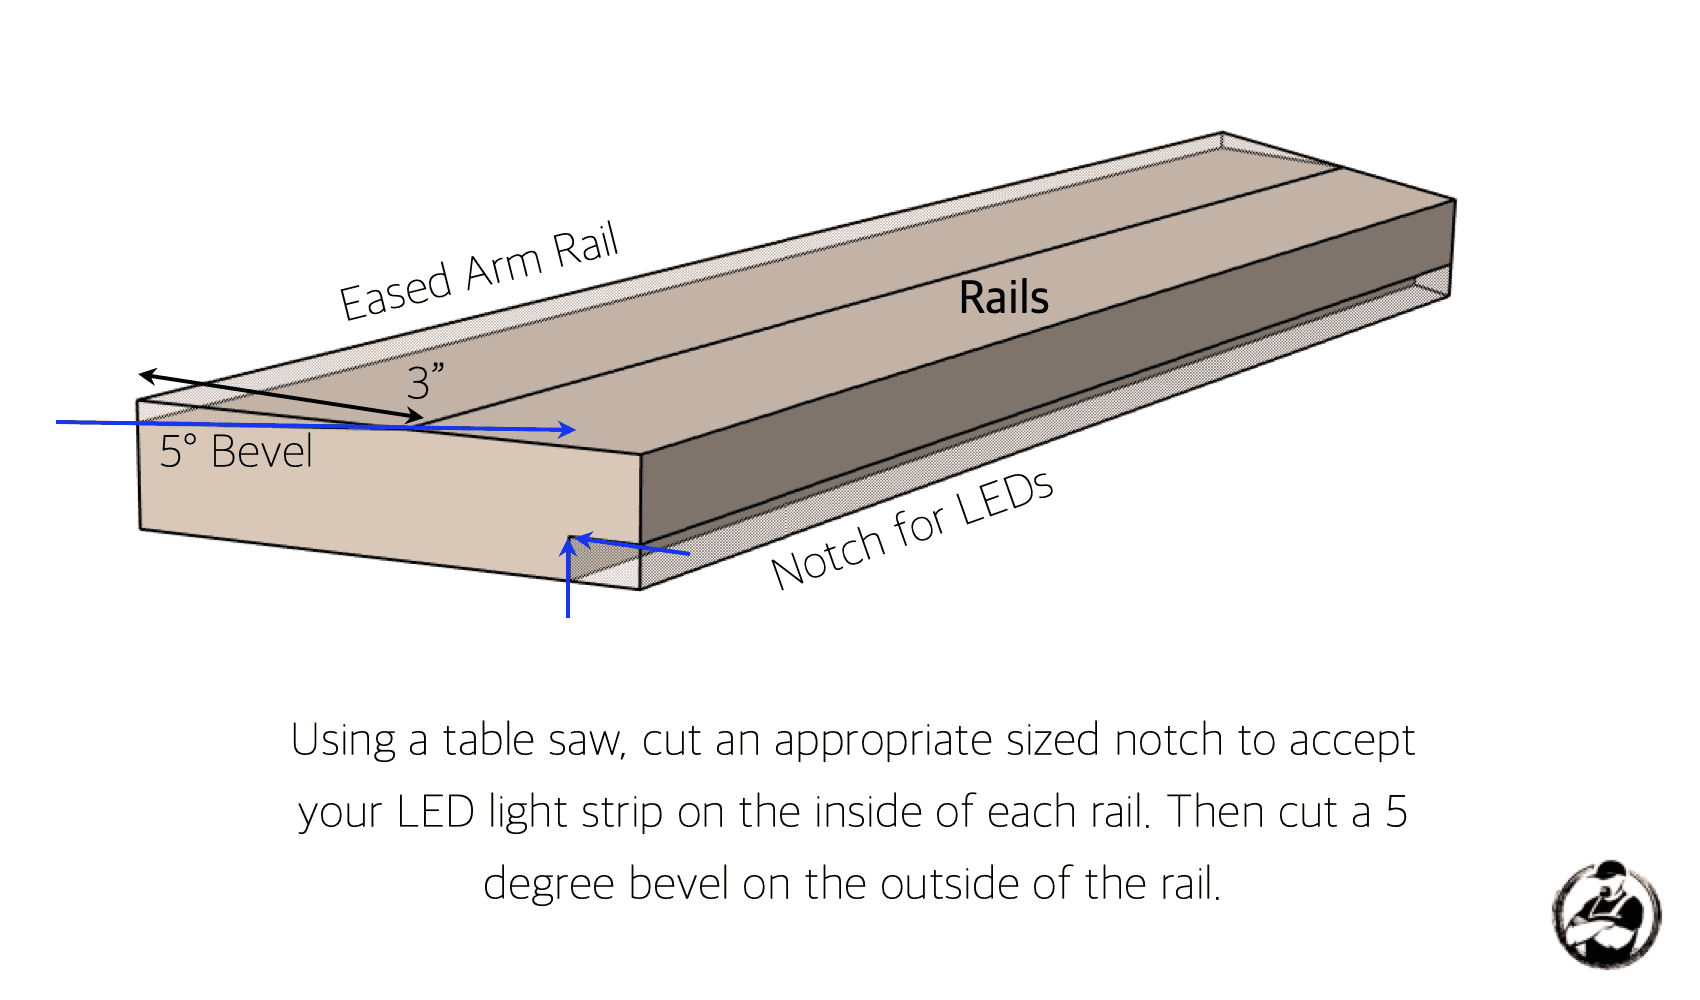
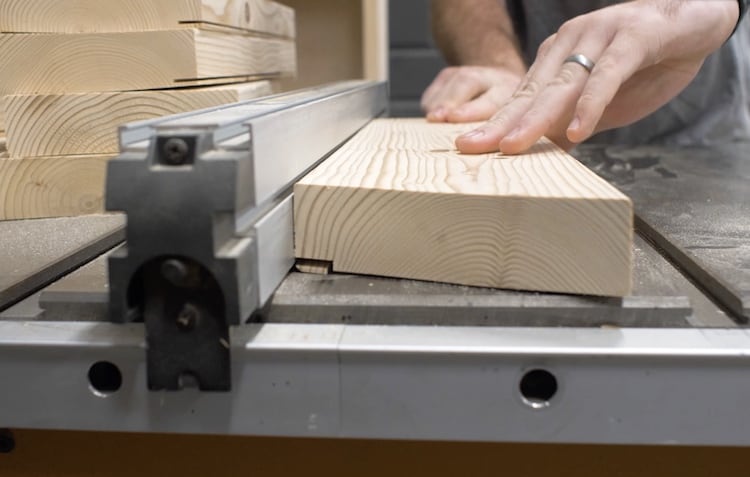
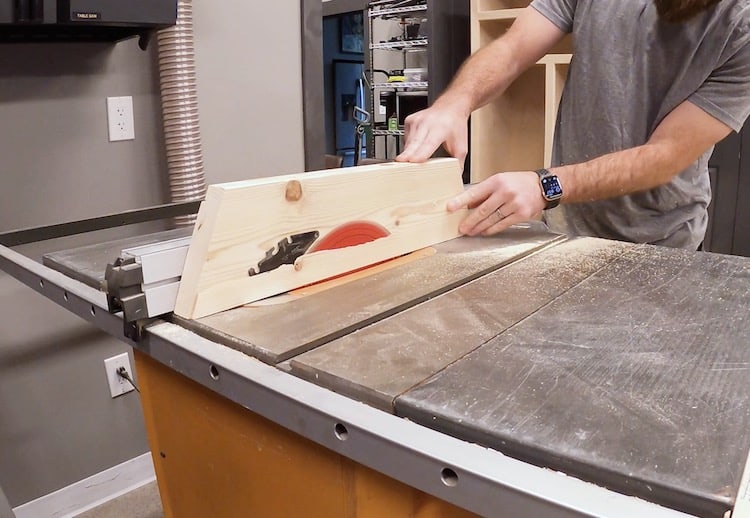
Cutting the Rails
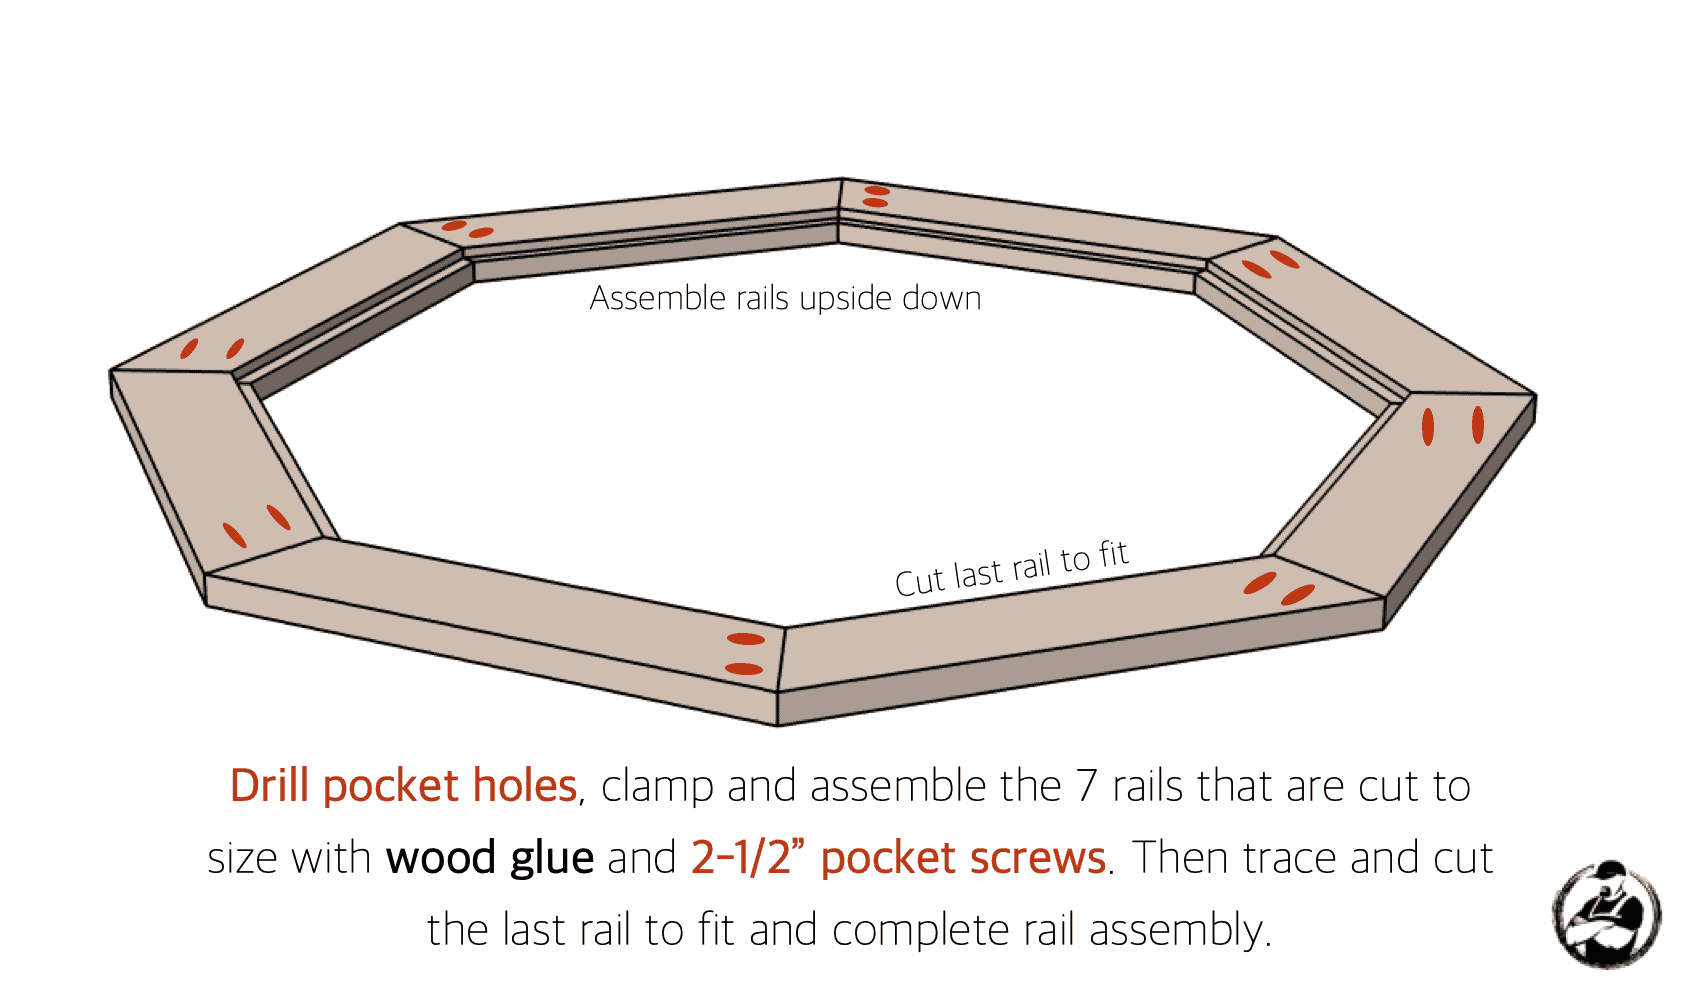
Assembling the Rails
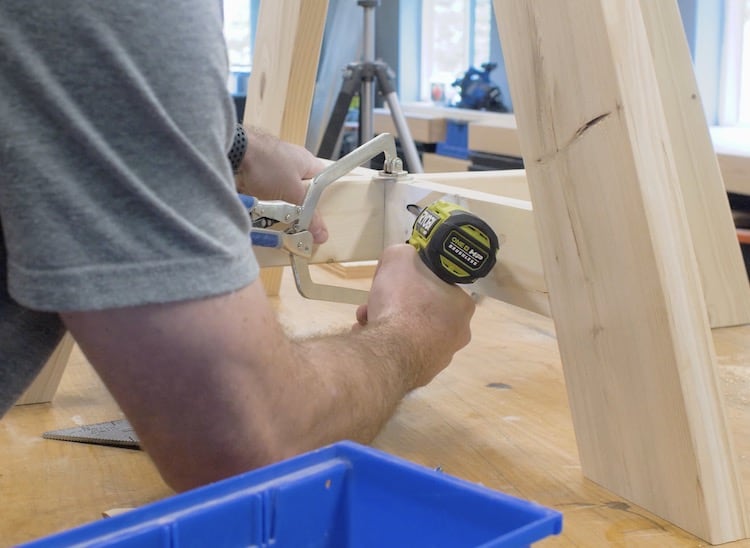
Assembling the Legs
Note: When I built my table, rather than using the 2×4 supports at the top I went with a piece of plywood which ended up a little wobbly. Below, the plans have been modified for more rigidity.
Assembling the Legs
Assembling the Base
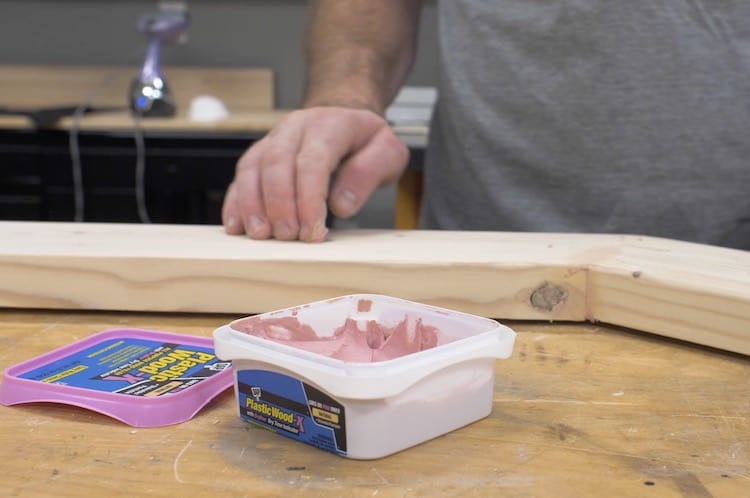
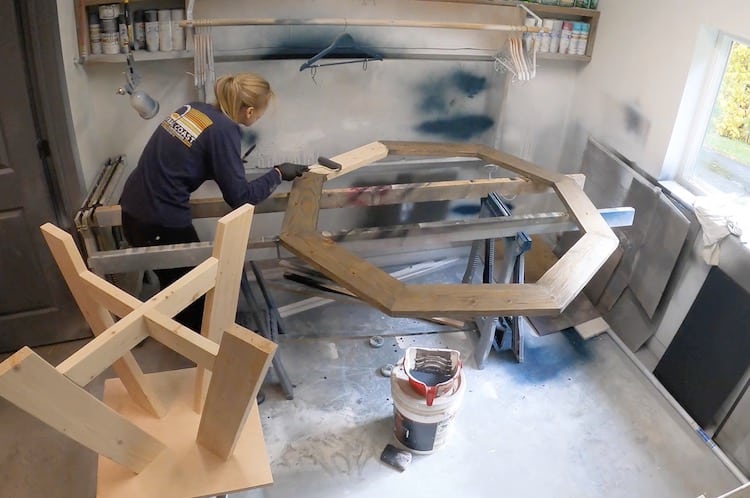
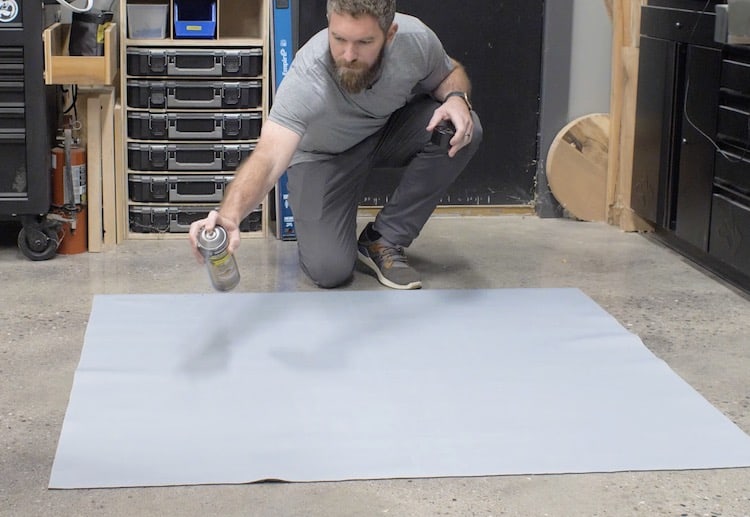
Finishing Top and Base
To make sure you end up with the best results make sure to prep the surface before staining. For this, I used DAP Plastic Wood-X to fill any joints, knots and imperfections before sanding smooth.
We then applied a semi-tranparent tintable deck stain (in the color slate) which I like working with because it help tone down the variations in color that you would normally see when staining pine, and it has the water proofing built in, making it an easy one step process.
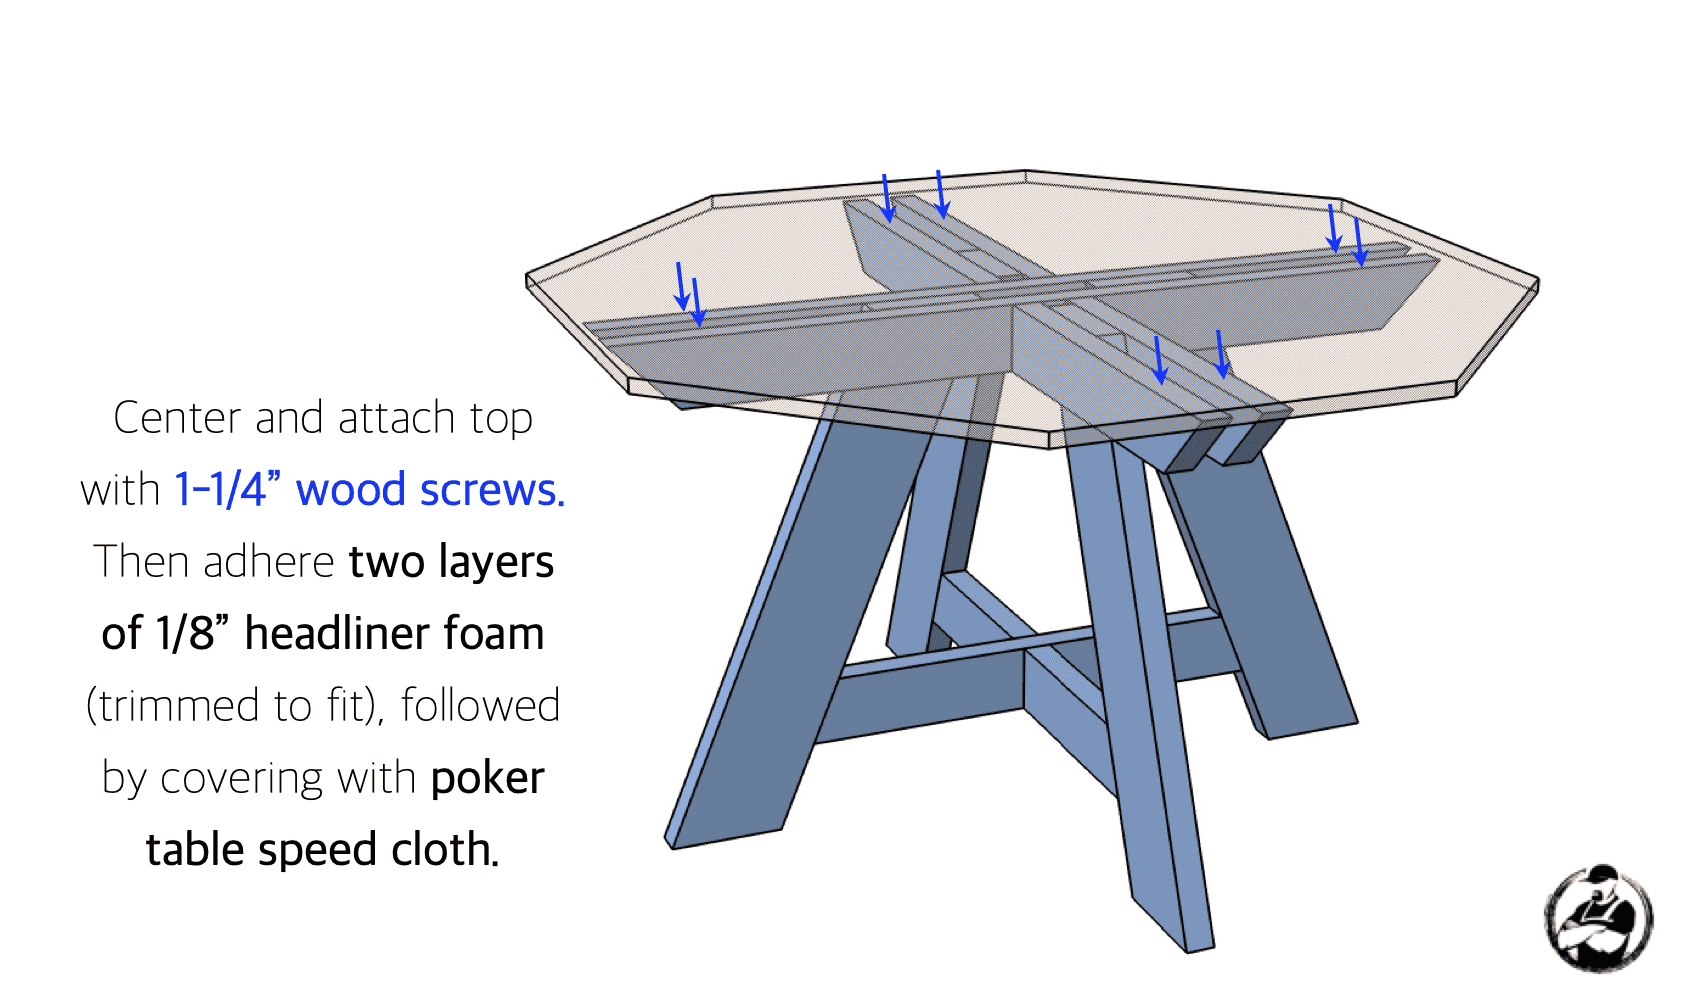
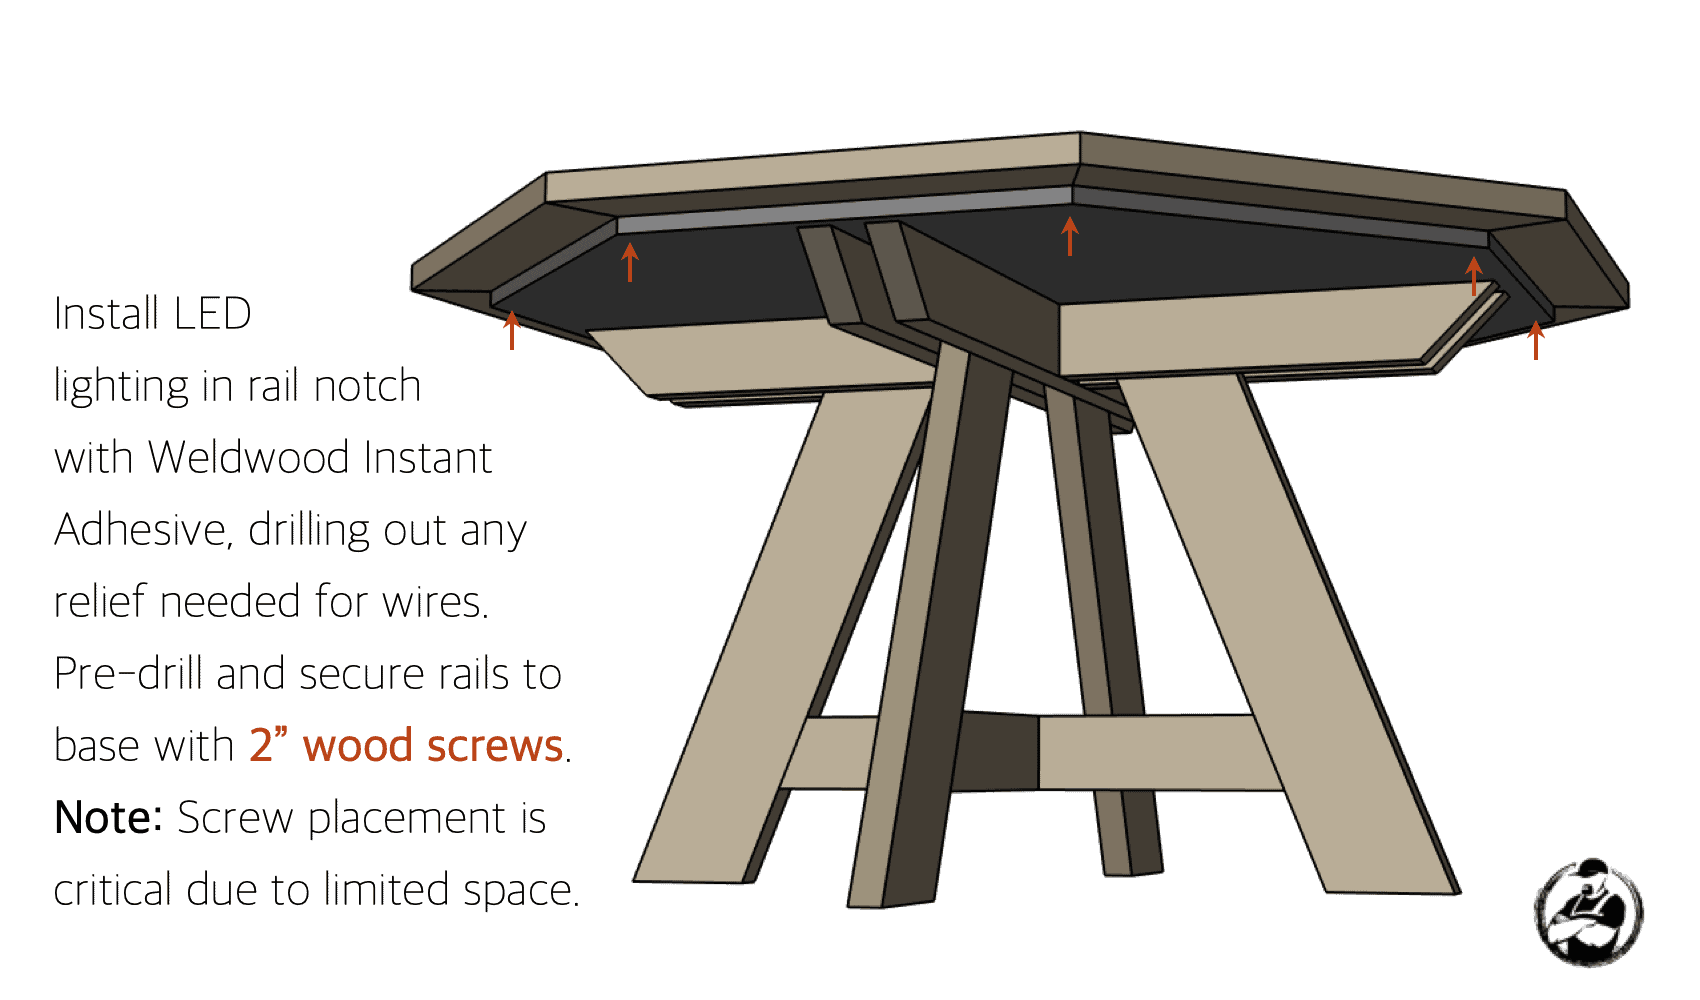
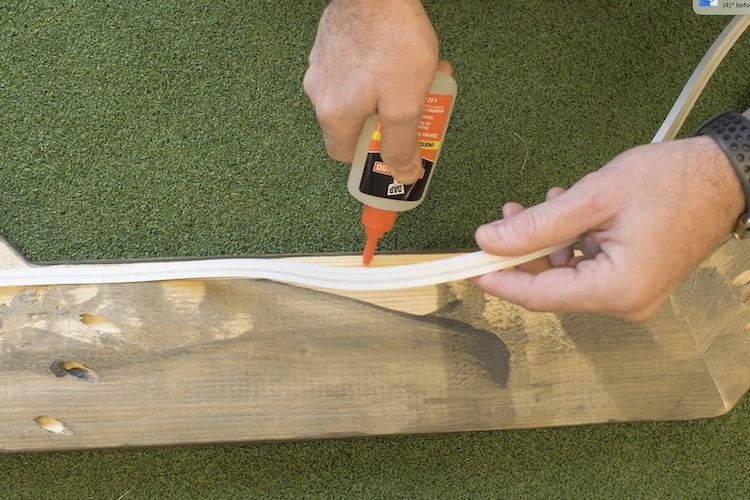
Installing the Top
Attaching the Rails
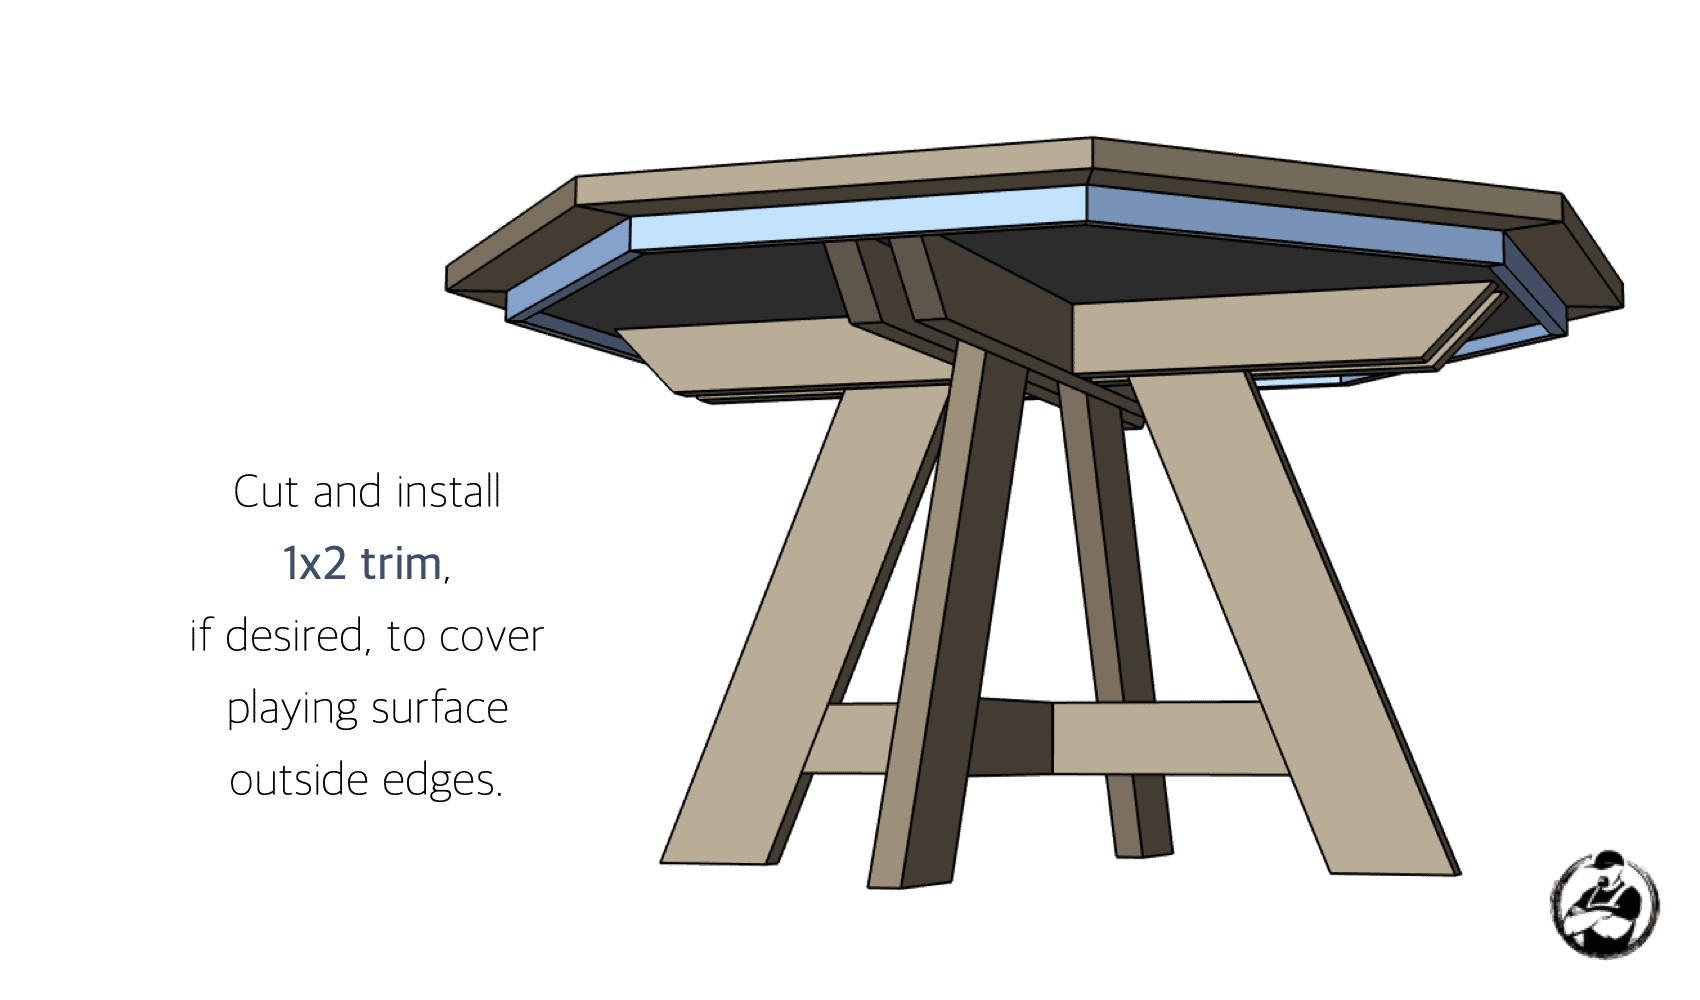
Adding Trim (Optional)
A couple things to note…
First, while they do look good, I did not add a racetrack (hard surface ring just inside the rail for stacking chips) because the consensus amongst most poker players is that they didn’t like it. If the cards are on there they are hard to pick up and most people just don’t like the noise when people are stacking/shuffling chips.
Second, I did not add cup holders. I wanted a smaller table and felt like sinking cupholders in would reduce the playing surface. I opted instead for clip on cup holders instead, this way they are out of the way and you can situate them however you like depending on how many drinks are at the table.
Overall, I couldn’t be happier with how it turned out. The poker table is perfect for guys nights and I know it will get a ton of use for years to come. If you end up building a poker table like this I would love to see your builds in the comments below so be sure to post a picture.
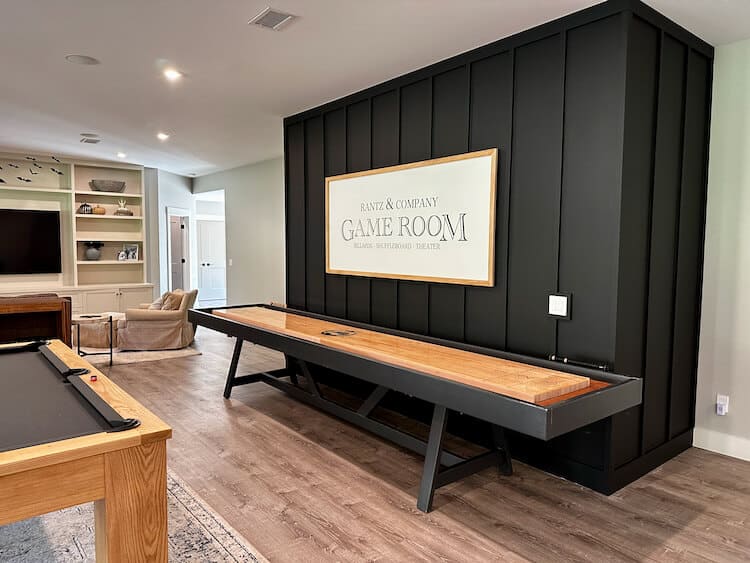
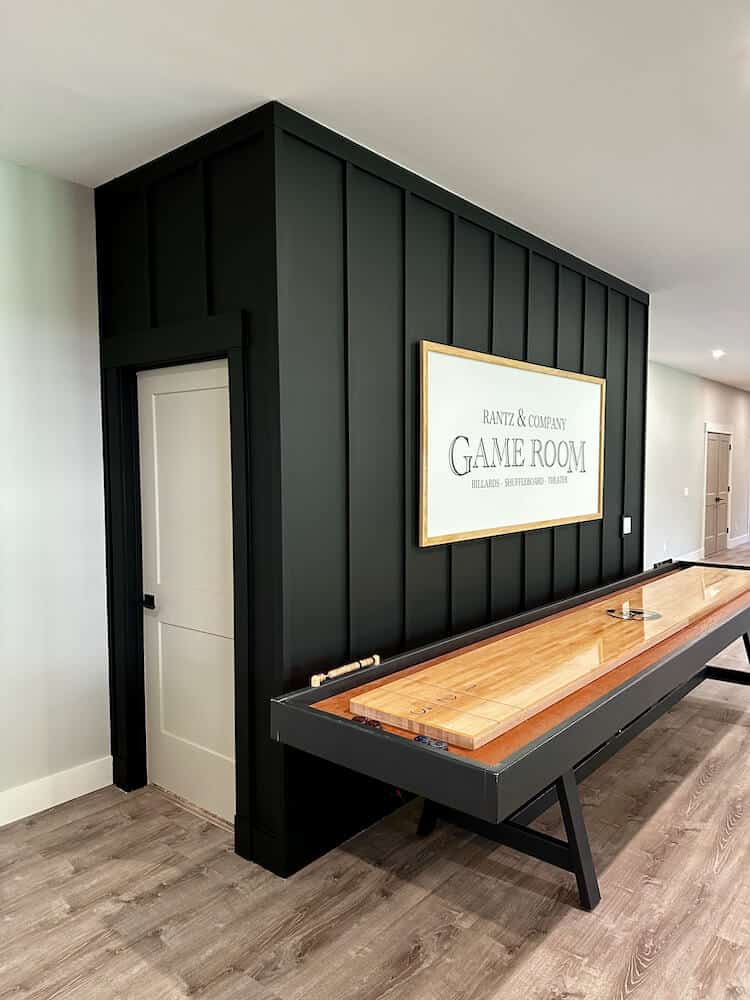
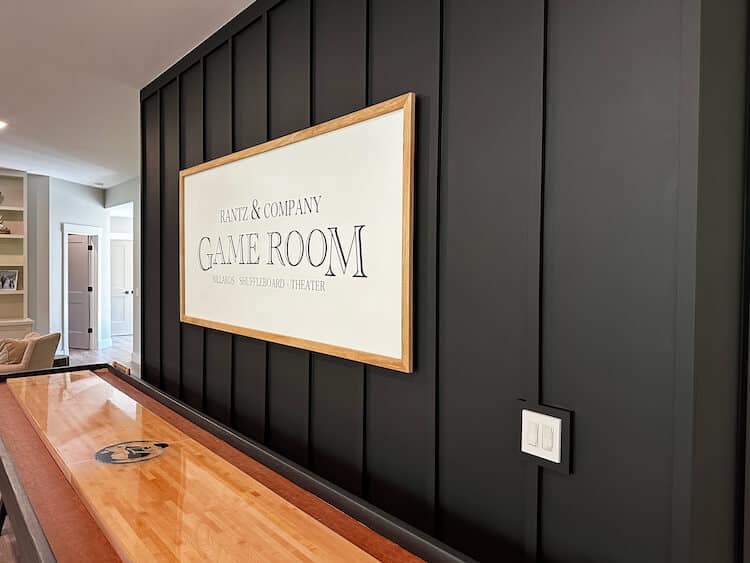
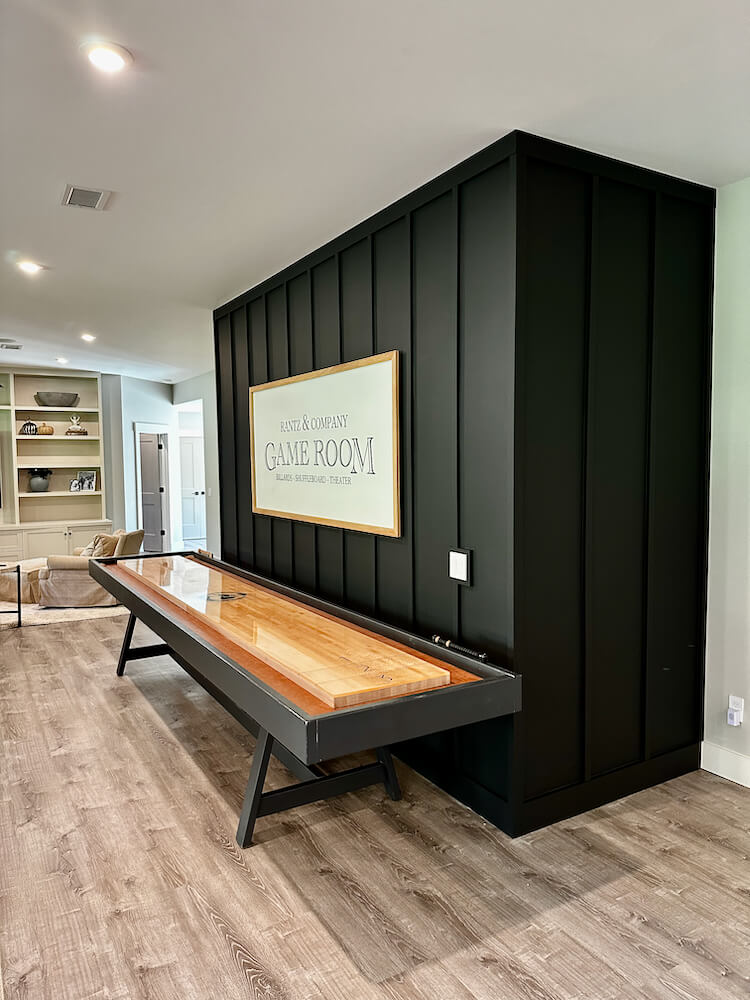
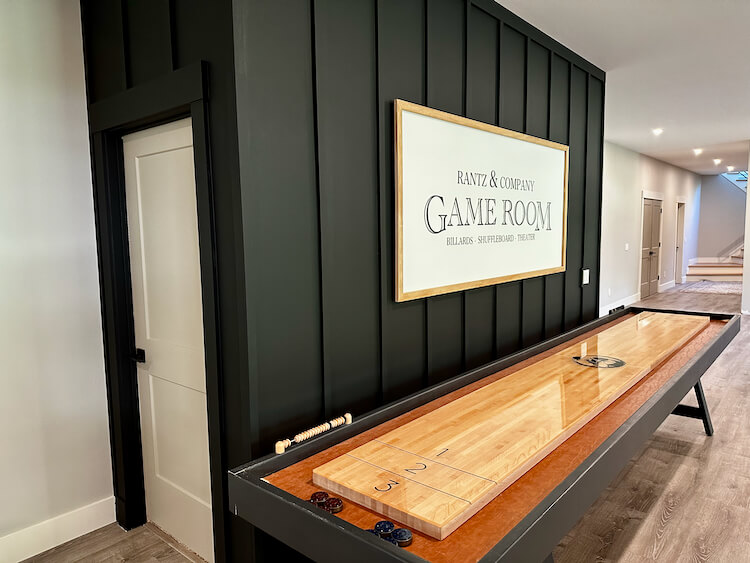
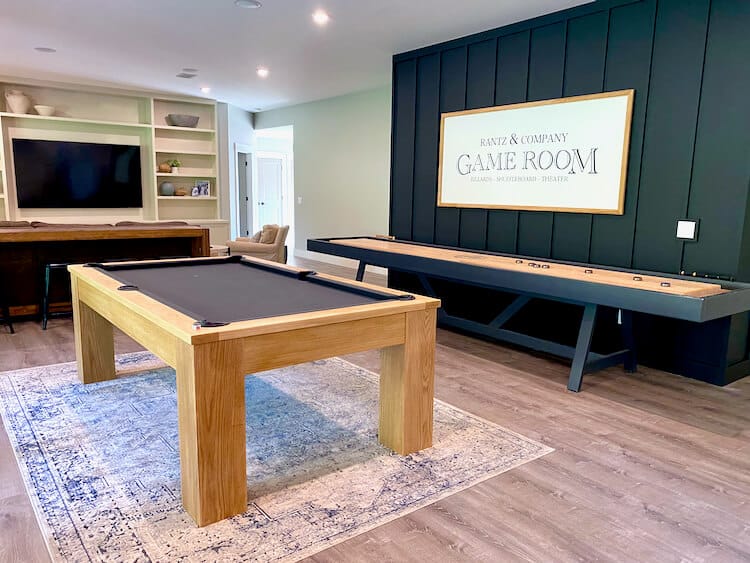
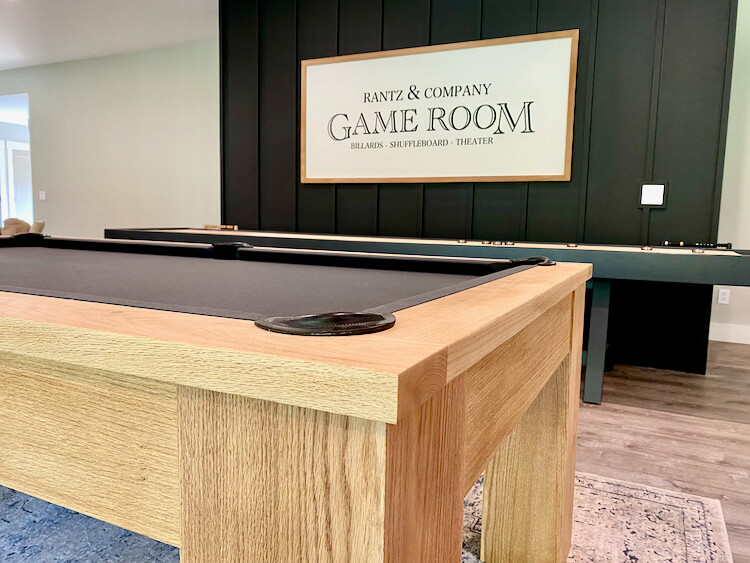
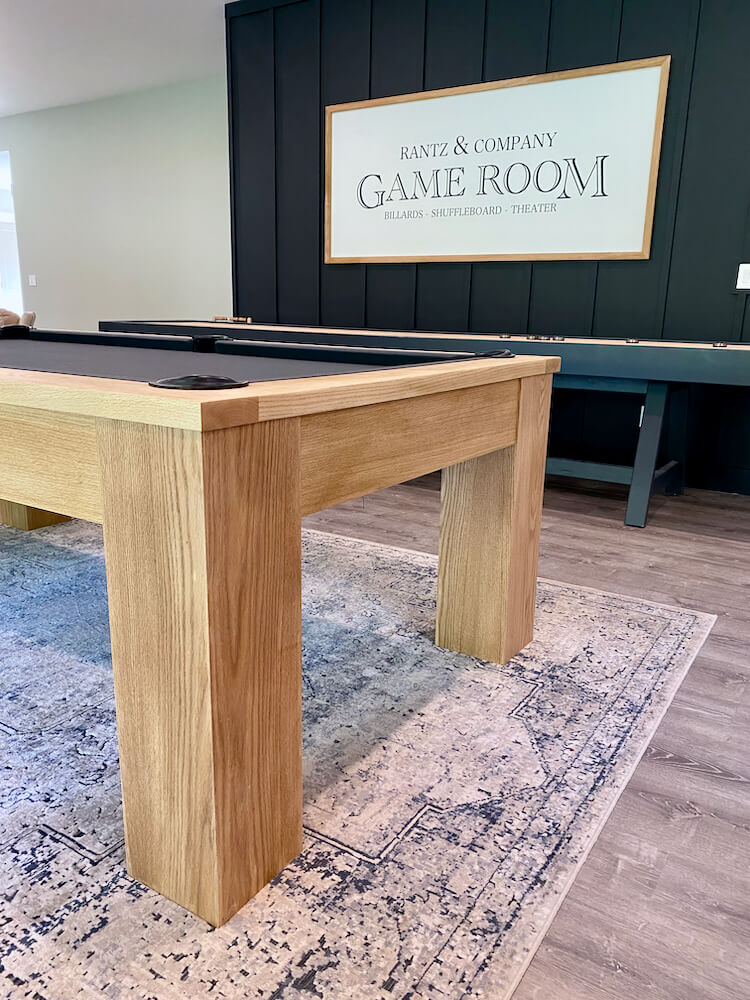
Our basement is definitely coming along. Little by little we have been turning it into the space we’ve always wanted. However the center wall in our basement is a long wall with a bump out which was all the same color. To differentiate the space and add a little pizzazz we decided on a board and batten feature wall. This is an inexpensive and easy way to spruce up a bare wall. Oh and we made a personalized game room sign that really sets it off. Read on for all the details on exactly how it came together.
Project Video
How to Make a Board and Batten Feature Wall
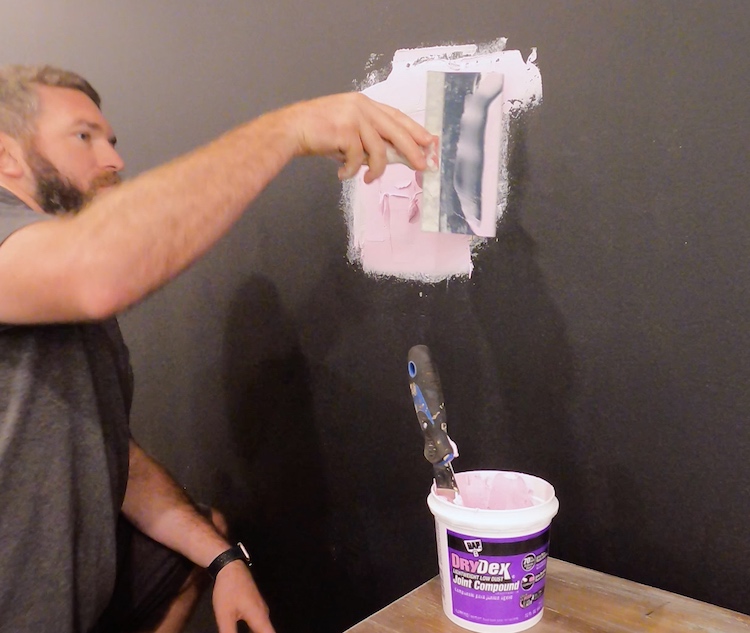
Patching Any Holes
We had a central vacuum port in the middle of our wall that we wanted to move. I was able to remove the port and, with a small piece of drywall, I patched the hole (leaving a 2″ paper boarder on the drywall to act as the tape) and coated it with DAP DryDex Joint Compound. I then sanded it smooth and it was ready for paint.
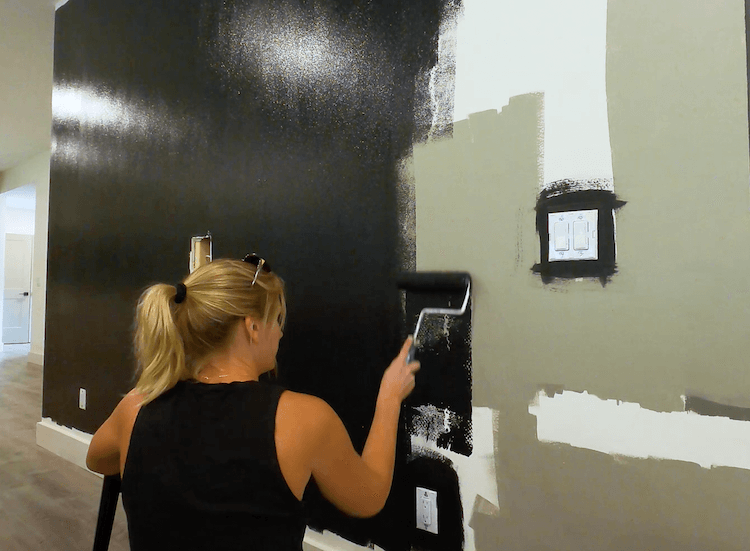
First Coat of Paint
Before installing the battens, we opted to apply the first coat of paint which was a lot quicker with the batten not in the way.
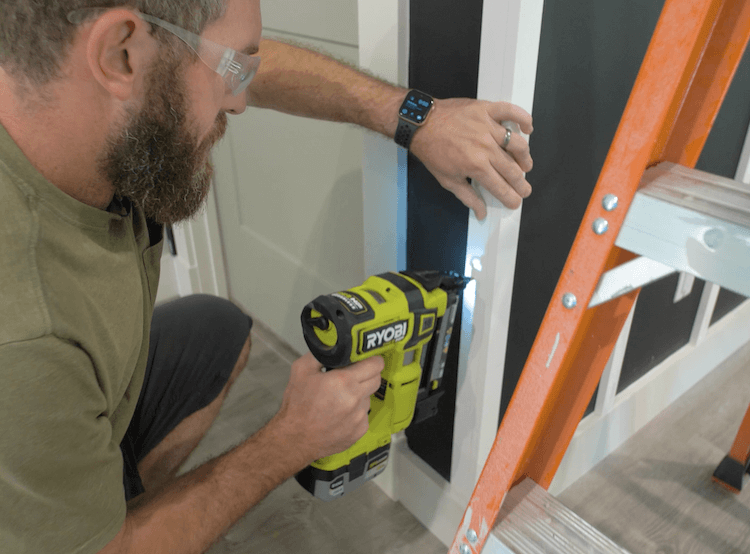
Install Top Batten
For the top batten, I went with a 1×4. I pre-painted this board and mitered the corners before installing it with 2in brad nails into the studs.
Laying Out the Batten Spacing
Board and batten walls, traditionally have the battens spaced 12″-16″ apart. I like the wider spacing so we went with a spacing as close to 16″ as possible, while still making sure they were equally space. Below is a formula that should help you figure this out.
Feature Wall Length = Wall Length + (Thickness of board(s) used on outside corners)
Number of Battens = (Feature Wall Length / 16″) + 1 (Rounded to nearest whole number) Note: Round down for larger spacings and up for smaller spacing.
Spacing = (Feature Wall Length – Width of 1 Batten) / (Number of Battens – 1)
Mark the inside edge of the first batten, then measure over (using spacing calculated) and mark the far edge of the next batten. Continue to do so over the entire wall.
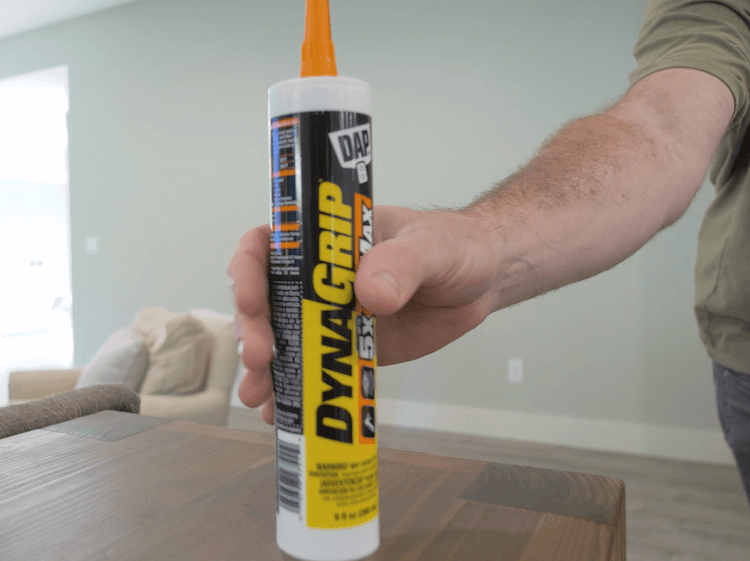
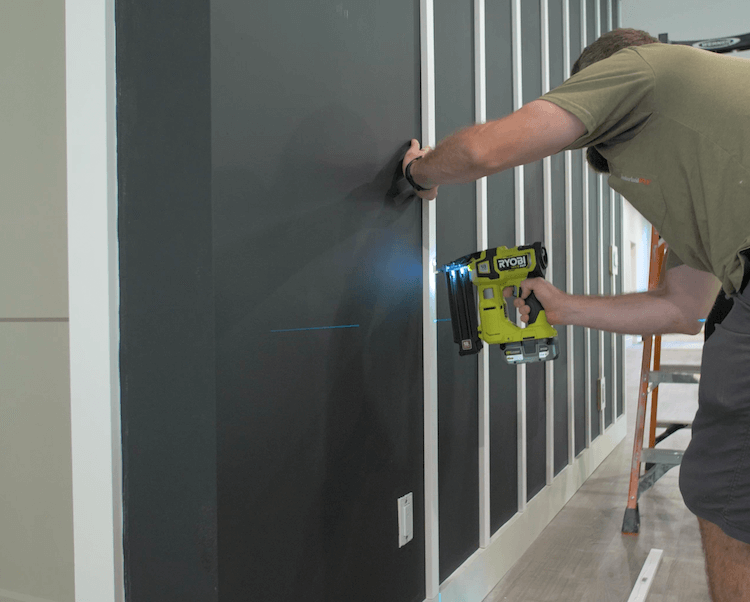
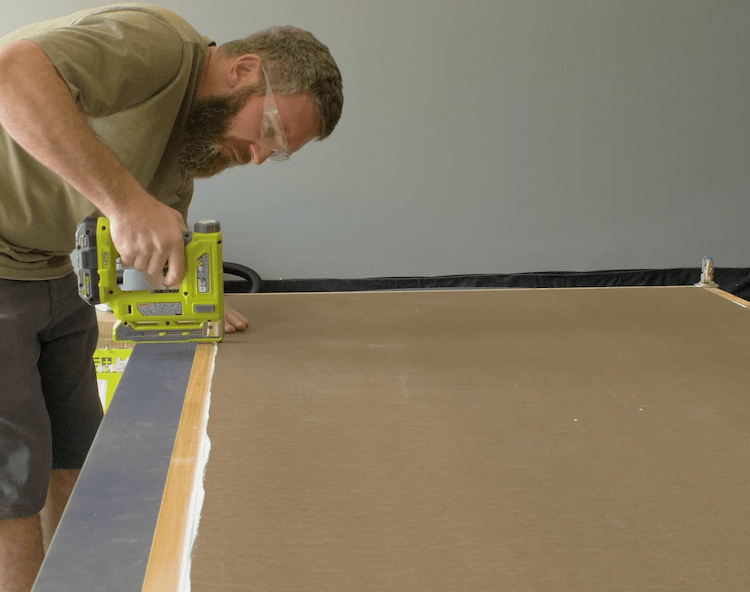
Installing the Battens
Since these battens are vertical, there will most likely be no stud behind them to nail into. To make sure they stay attached to the wall you will want to glue them with DAP DynaGrip HD Max which will ensure a fast and strong bond between the batten and drywall.
Simply apply a bead of DAP DynaGrip HD Max to the back of the 1×2 batten strip after cutting to length.
Then use a laser level to ensure plumb and tack to the drywall with 1-1/4″ 18g brad nails.
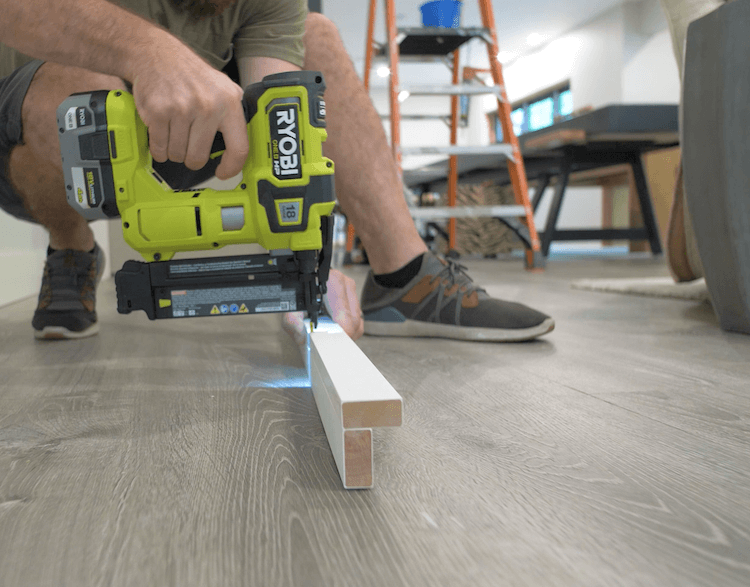
Installing the Corners
I started by assembling the corners on the ground with 1-1/4″ brad nails to ensure they were nicely aligned.
I then installed the corner assembly with 2″ brad nails into the studs.
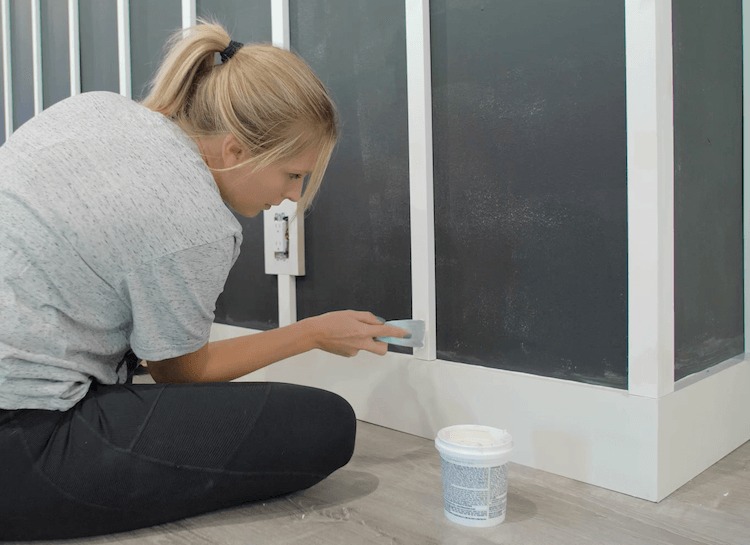
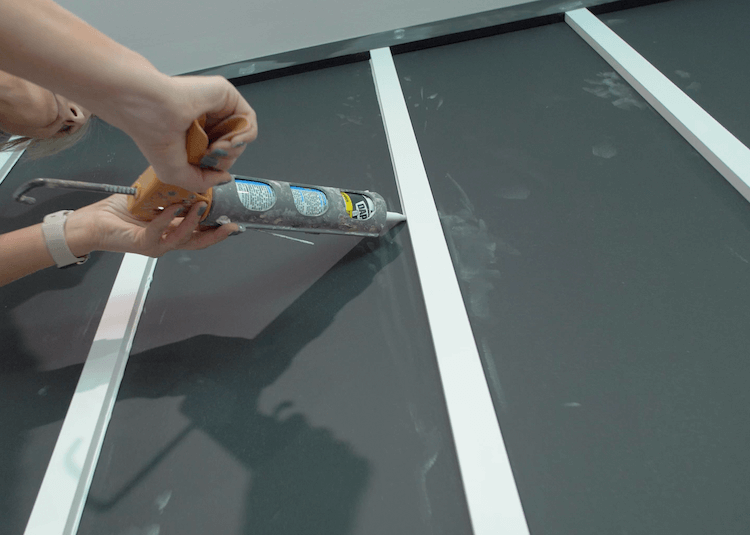
Caulk and Fill
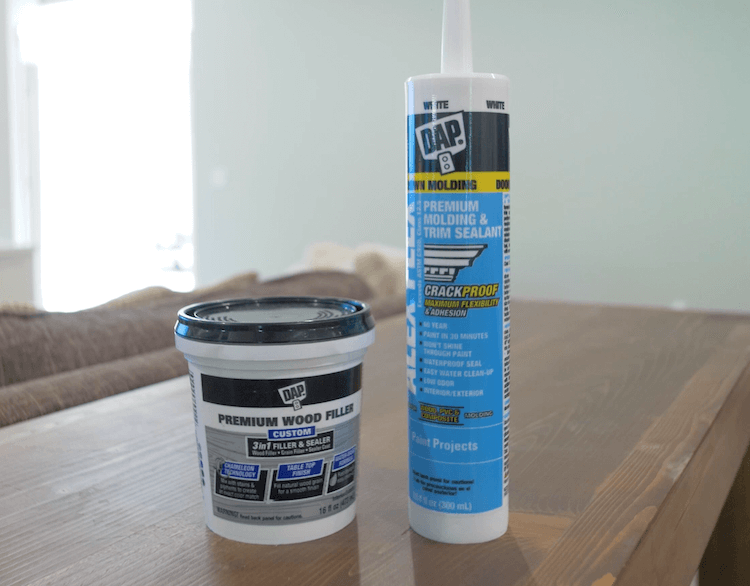
To make sure the feature wall looks as good as it can you will want to fill any nail holes with DAP Premium Wood Filler and caulk in the battens and other joints with DAP Alex Flex which is guaranteed to not crack and is paint ready in 30 mins.
Using a putty knife you can apply the wood filler to any nail holes. Then come back and sand smooth when dry.
Apply the caulk to any joints you want to hide and then wet you finger and run it over the joint to give it a nice round over.
Final Coats of Paint
Now apply the final coat of paint (which may actually require 2 coats) by cutting in the battens and rolling in between. We started by not painting the baseboards and door trim but ultimately opted to paint those black as well and were incredibly happy with how it turned out.
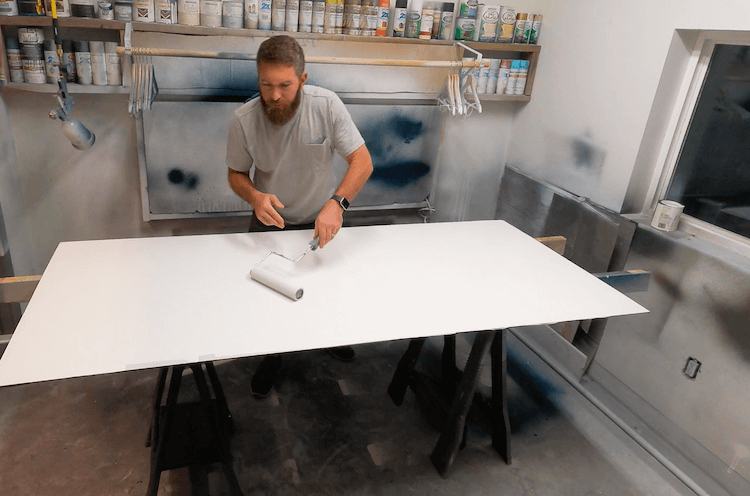
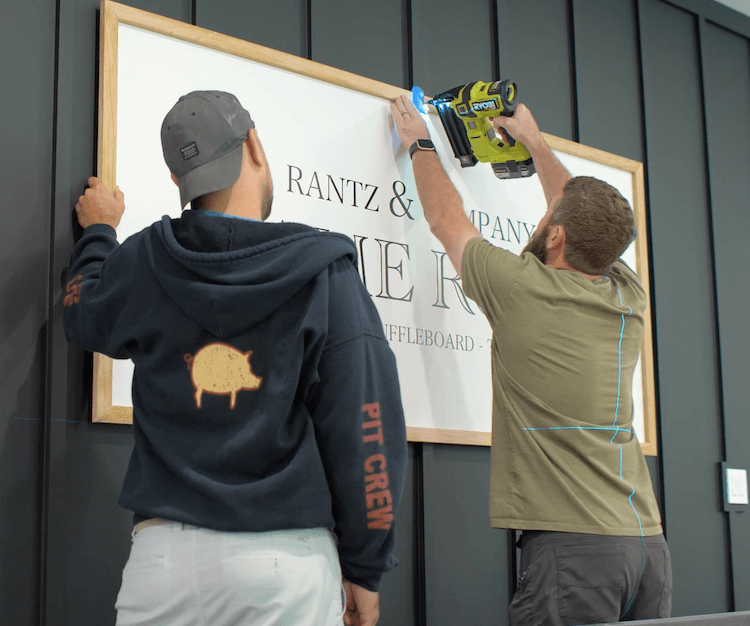
Sign Backing
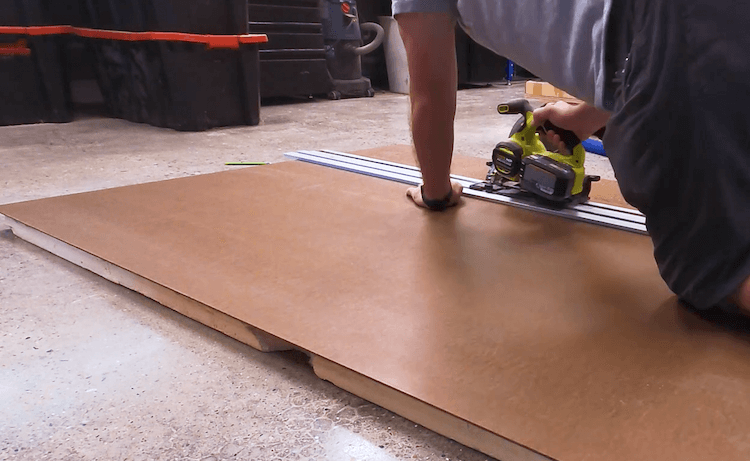
To add a personalized touch to this wall we wanted to make a sign. For this I cut down a 1/4″ MDF sheet to the dimensions I wanted.
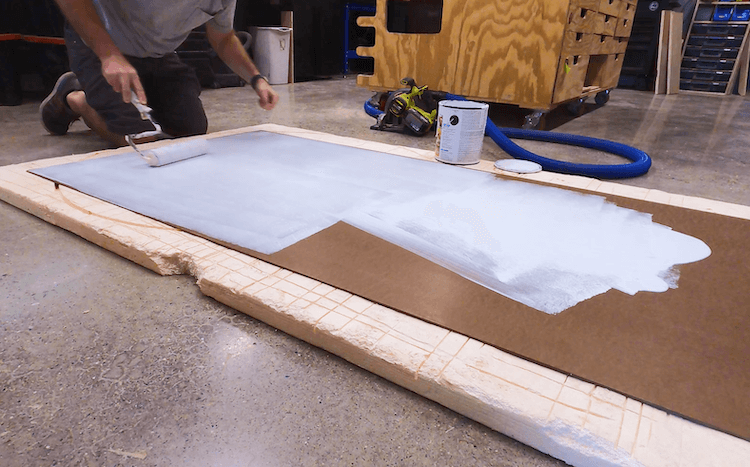
Knowing how MDF sucks up paint, I sealed the surface first with a coat of primer.
And then finished up with a few coats of flat white paint.
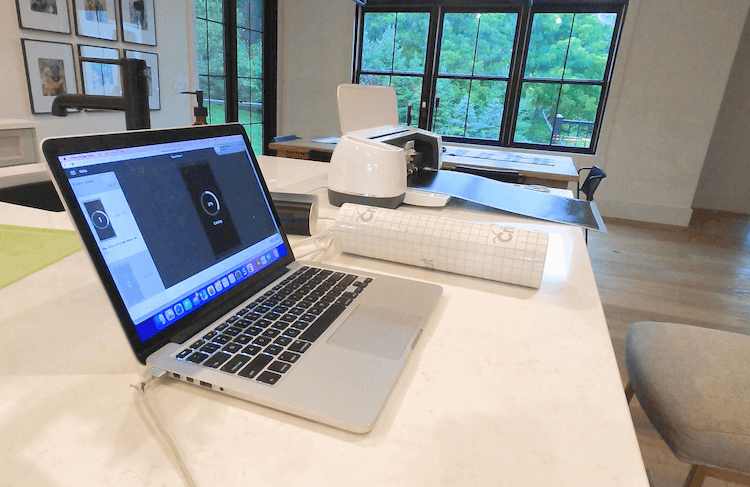
Vinyl Cut Signage
Using our Cricut vinyl cutter I was able to design the sign and cut it out of black vinyl.
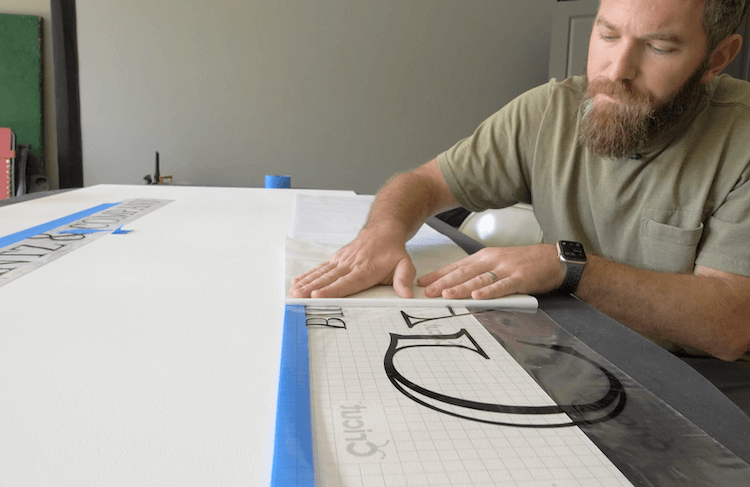
After weeding the excess vinyl and applying the transfer tape, I aligned it on the sign to get it centered and spaced properly. I then taped it in place on the bottom edge before flipping it over and removing the paper backing.
After flipping it back over and pressing the vinyl in place, I then removed the transfer tape to reveal the vinyl signage!
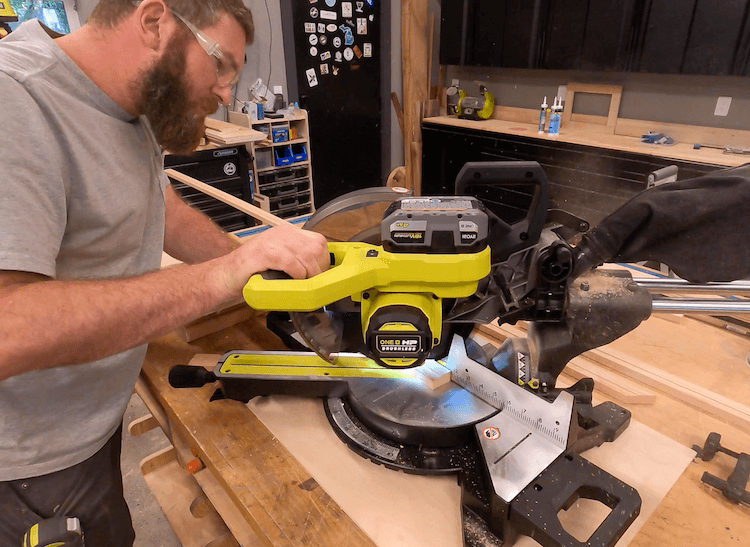
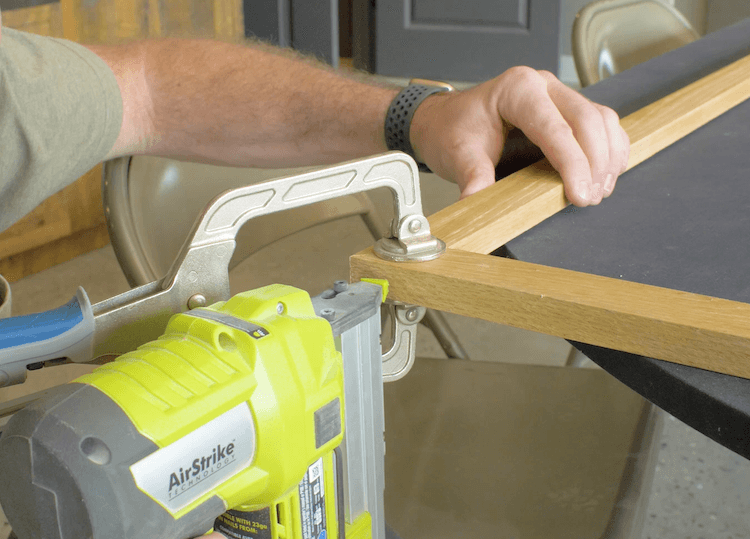
Assembling the Frame
I then moved on to the frame. For this I used red oak 1x2s. I cut a 45 degree miter on each end such that the frame would overlap the sign by about 3/4″.
To take out some of the red in the oak I applied peroxide then a lye mixture before applying a wipe on polyurethane.
I then attached the backing to the frame with staples every 6″ or so.
Installing the Sign
Using a laser level I made sure the sign was centered and level before attaching it to the battens with 2″ brad nails.
We love how this wall turned out. It definitely changes the entire space and really is the perfect game room accent wall. Let me know what you think in the comments and if you try this project, post a picture in the comments to show it off!
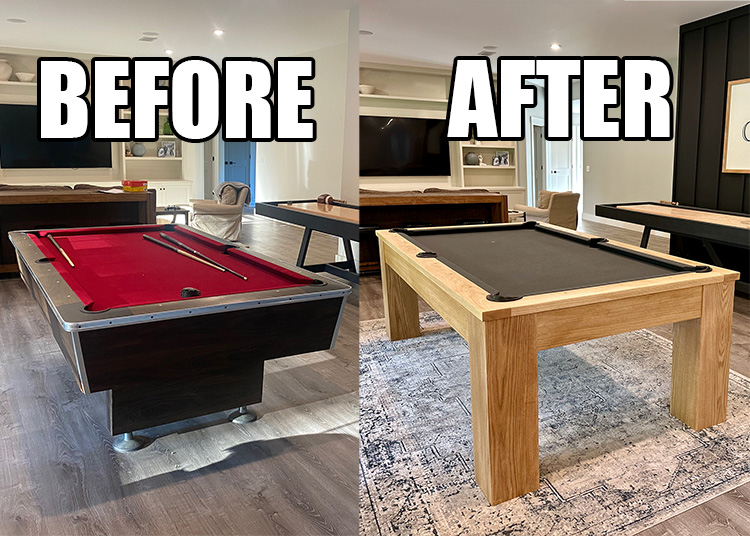
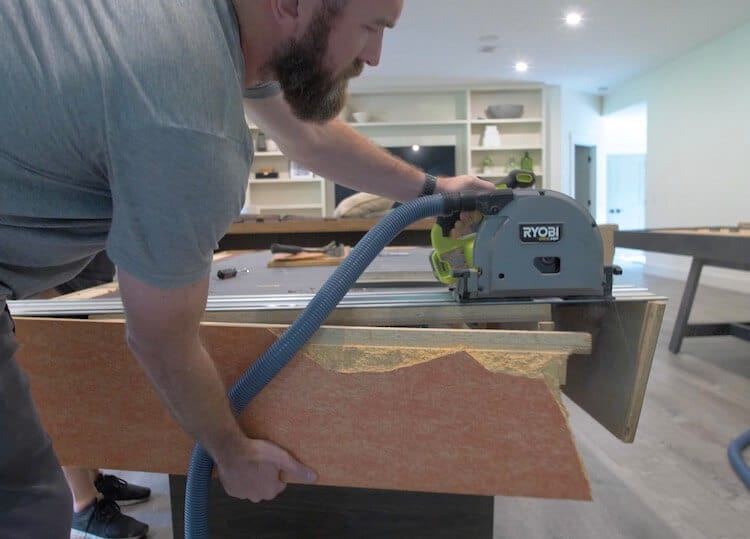
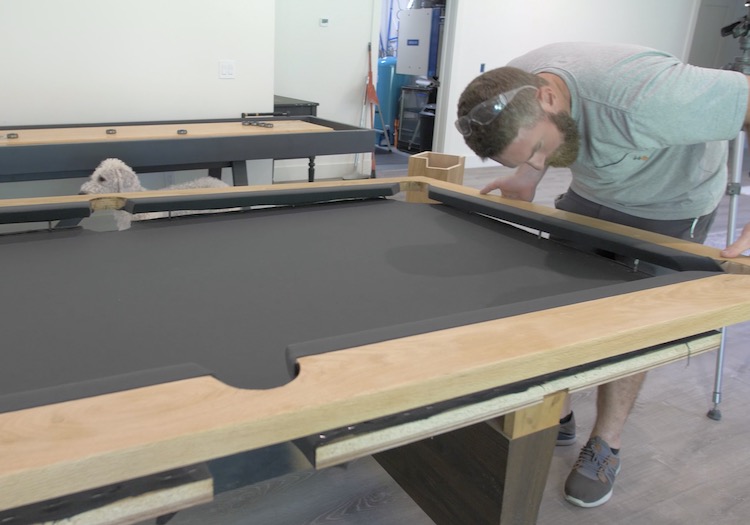
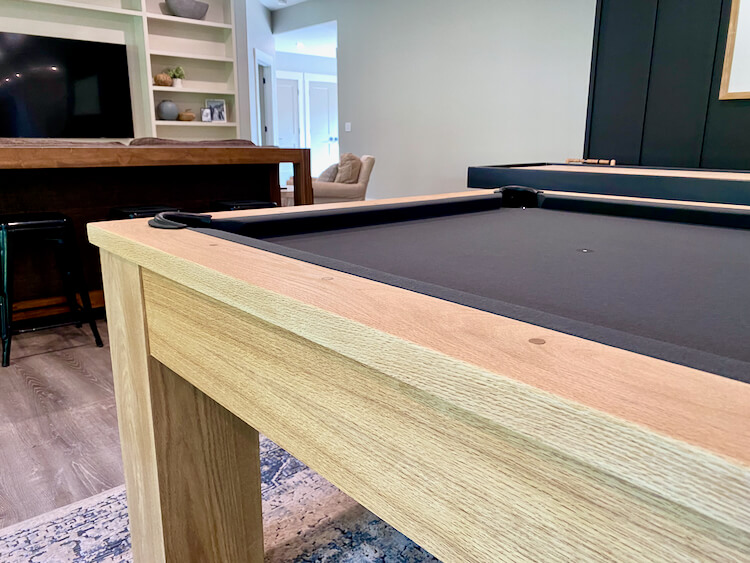
We’ve had an old hand-me-down pool table in our basement for some time now. The slate is in great shape and the size was perfect for our space but it was in need of a serious overhaul. So we decided to give it a face lift and it turned out even better than we both could have imagined.
Project Video
How to Makeover an Old Pool Table
In this tutorial I will detail how we took an old 7ft pool table and gave it a new modern look. From building new rails, to recovering and installing new legs and aprons. This table is exactly what we wanted and saved us thousands compared to buying a new one.
Time needed: 3 days.
Remove the Rails
Depending on your pool table the rails may come off in pieces or all as one like ours. Just remove the bolts from below to free the rails.
Remove the felt by cutting with a utility knife and prying out the feather boards. Remove all staples and hanger bolts as well.
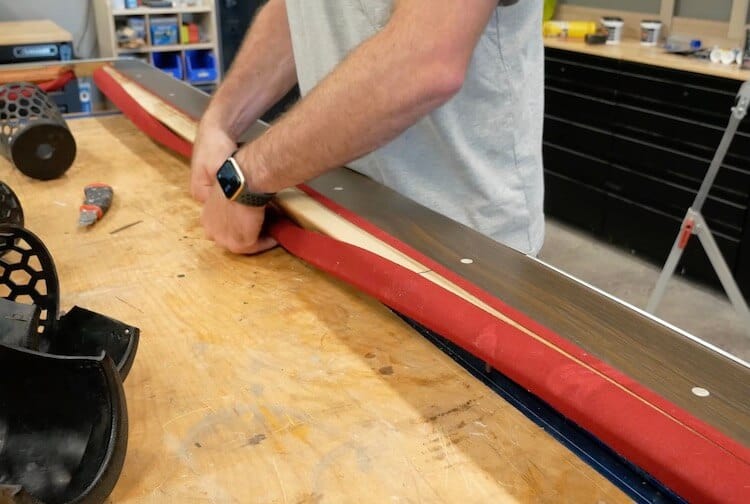
Cutting New Rails
I used my old rails as a template by first measuring the angles and matching them to the cuts made on the new, red oak, 2×6 rails. The angles you should be matching are the top angle, keeping in mind the length of cut on the rails (cushion mounts to this), and the bottom angle (matches cushion) which returns to the table.
I also cut a dado to match the old one which will be used to install the fabric to cover the bumpers.
I then traced the pockets and rough cut them with a jigsaw. The pocket holes are cut on a slight angle to help accept the pockets.
I finished the pocket holes by matching the compound angled cuts of the old rails on the miter saw. This is an important angle to try to match up.
Joining the Rails
I cut the rails down to their final length based on the old rails as a template and joined them together by gluing and clamping the rails and securing with 1-1/4″ hardwood pocket screws.
I then filled in any imperfections with DAP Plastic Wood-X which dries to a nice natural color.
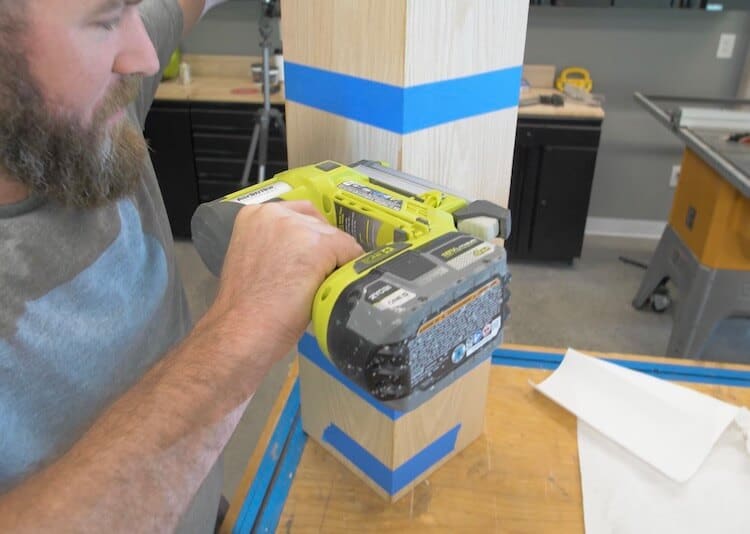
Installing the Hanger Bolts
I first removed the existing skirting to make things a little easier.
I then located the rails on the table and marked the hanger bolt locations.
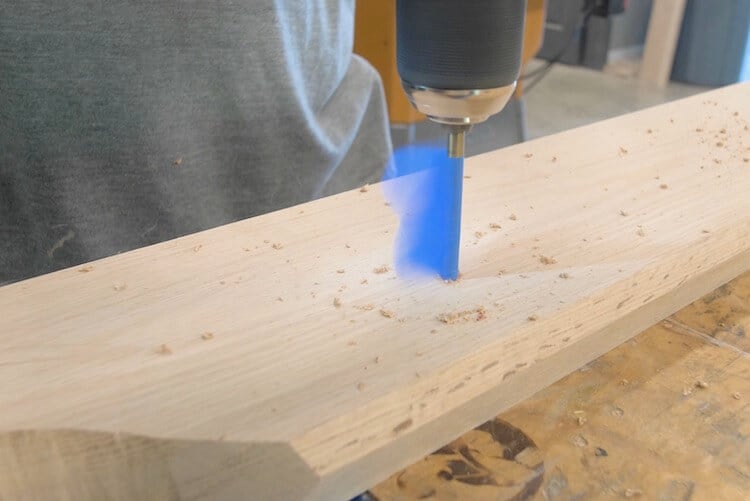
Using an appropriate sized drill bit, I predrilled the hanger bolt locations.
And installed the hanger bolts by cinching two nuts together and screwing the course threaded end into the rails with a socket.
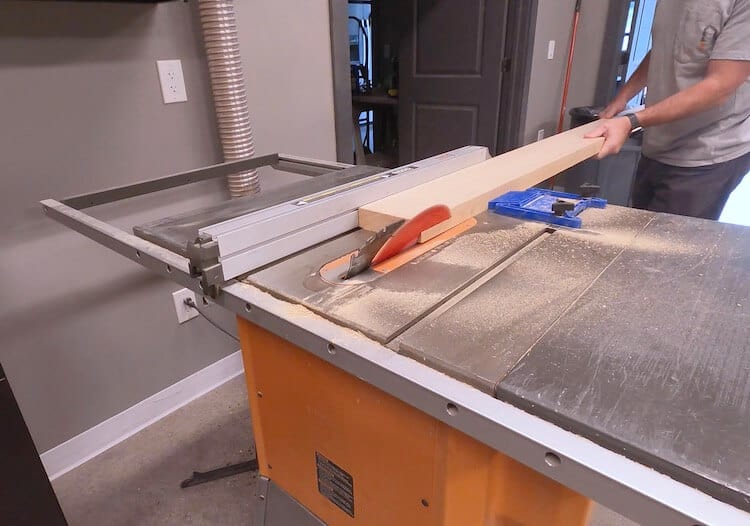
Building the Legs
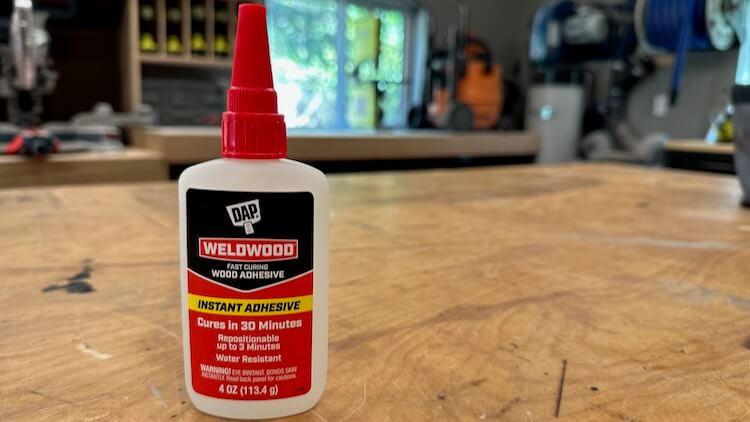
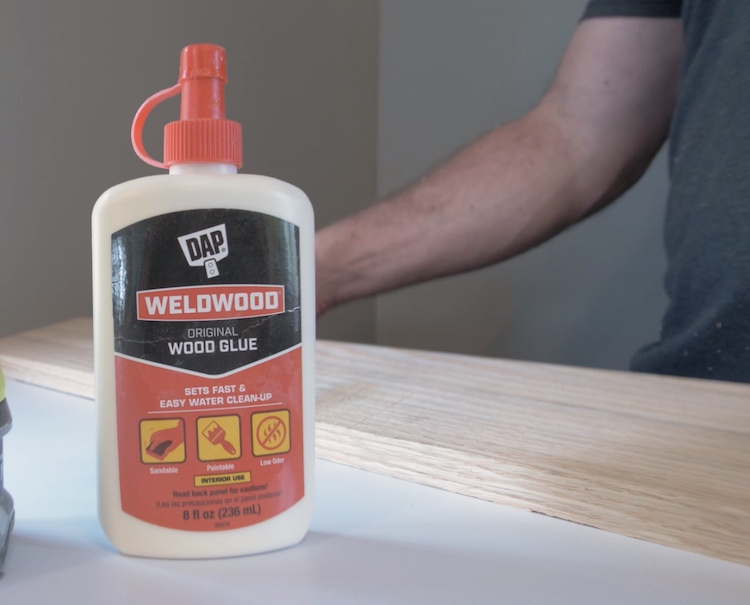
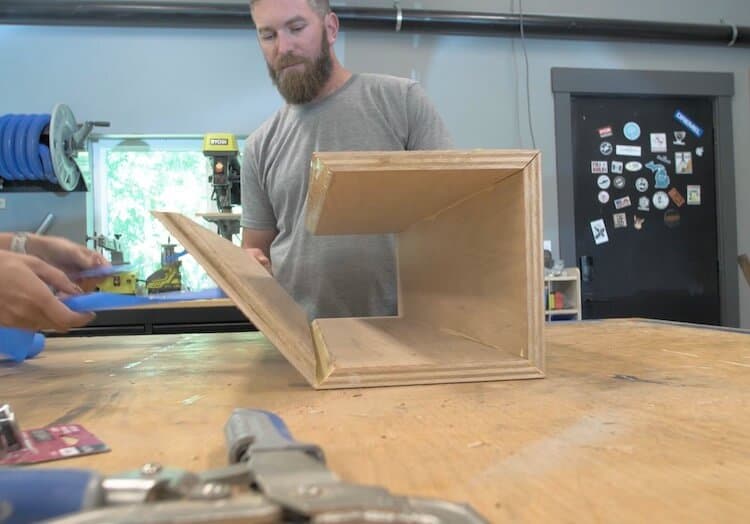
For the legs we wanted to bring them out to the corners. The problem was that this is where the pockets are. So I decided to build 8 inch boxes out of plywood. The boards were all mitered on a 45 and glued together with DAP Weldwood Wood Glue for a strong hold.
I laid down two strips of painters tape and placed the boards on that to help hold the miters. Then finished off the joints with a pin nailer.
Finishing
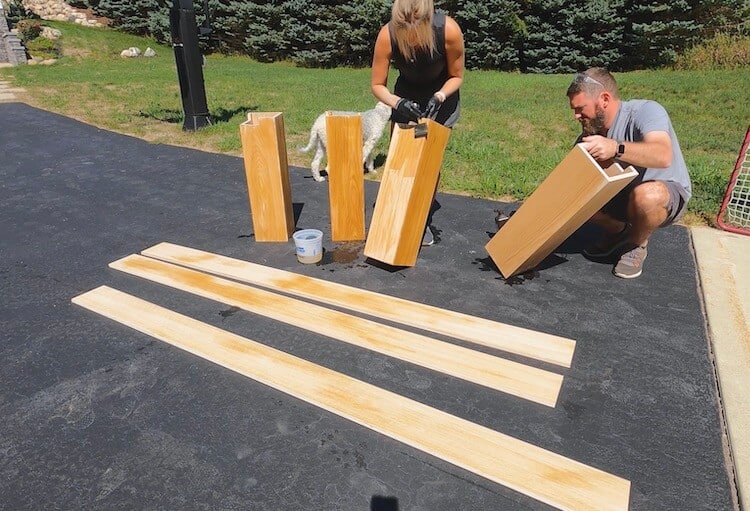
The red in the red oak really stands out when you apply a finish to it. So we opted to bleach all the wood. This process consists of wiping the wood with peroxide and then applying a lye mixture and allowing to bleach in the sun. The mixture is 3 teaspoons of lye in 1 quart of water. After it drys, you wipe it with clean water to remove any residue and apply a wipe on polyurethane for protection.
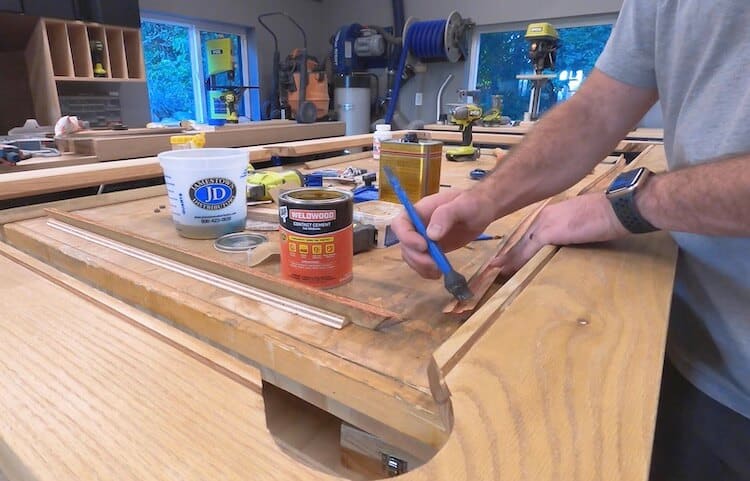
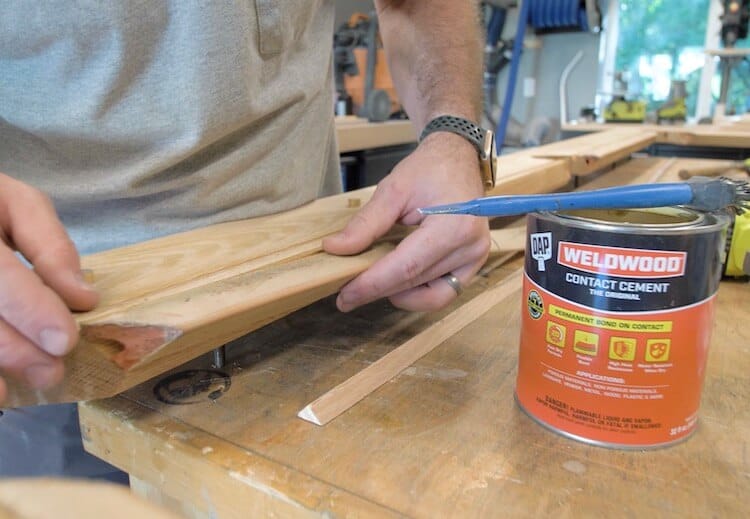
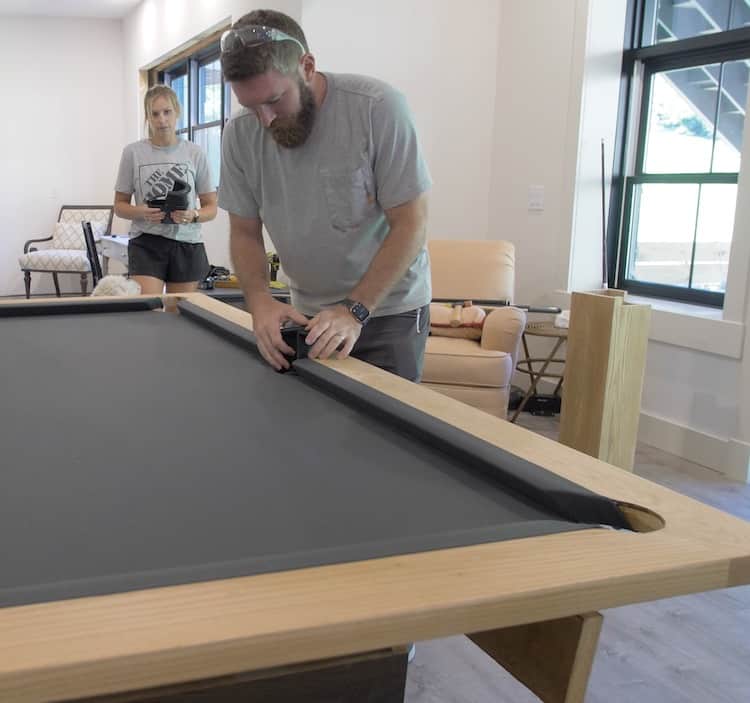
Installing Cushions
For a permanent bond I installed the cushions with DAP Weldwood Contact Cement. This is applied to both the cushion, and the rail where it mounts, and allowed to cure until both pieces were tacky. I was able to salvage the old cushions which were still in good condition.
Then it can be pressed into place for an instant bond on contact.
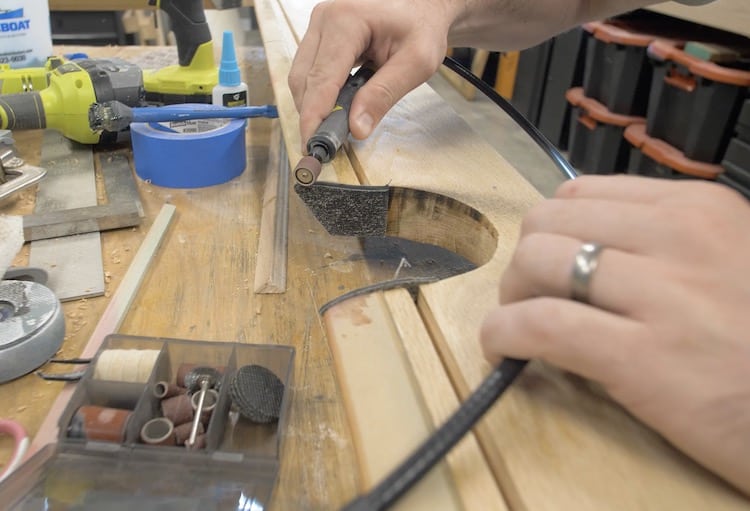
The bumpers I purchased on Amazon were also installed with contact cement. They are kind of like rubber end caps for the cushions and recess into the pocket. Once bonded we trimmed with a utility knife and eased the edges with a rotary tool.
Installing Sights
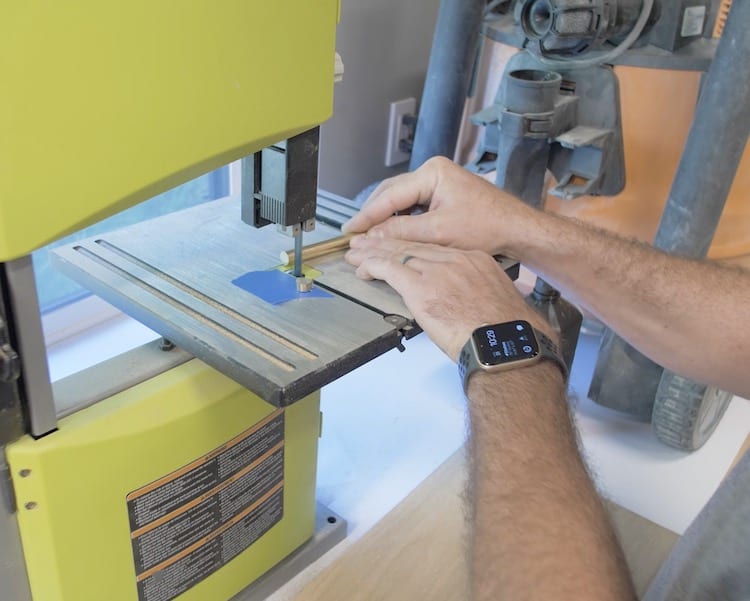
Sights are the dots on the side of the pool table that help you line up your shot. The old sights were a pearl inlay that I didn’t think would go well with the new style of the table so I opted to cut discs out of 1/2″ brass rod.
I then sanded them down, marked the locations based on the old rails and used a 1/2″ forstner bit to drill a hole the same depth as the discs. I checked the depth by placing the discs and removing with a piece of tape before adhering.
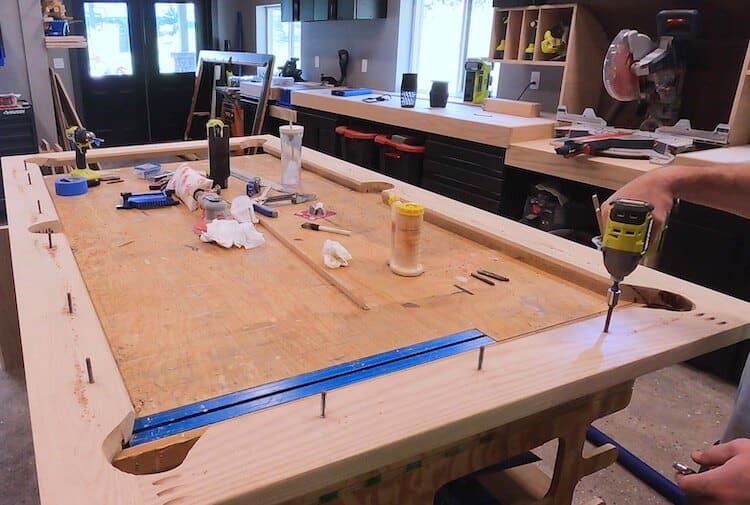
In the beginning I thought “I going to have to get a professional to recover this table” but after rebuilding the entire table and watching enough YouTube videos my confidence was pretty high, so I ordered some charcoal pool felt on Amazon and went for it.
I started by installing the felt on the table. Stapling the middle of one end and stretching both sides toward the pockets. I then did the same at the other end getting the felt nice in tight, lengthwise. After that I moved on to the sides, making sure to staple every 3/4″ or so and pull evenly.
After trimming the felt I cut 3 slits in each pocket and pulled tight, stapling below. This part of the recovering process wasn’t hard.
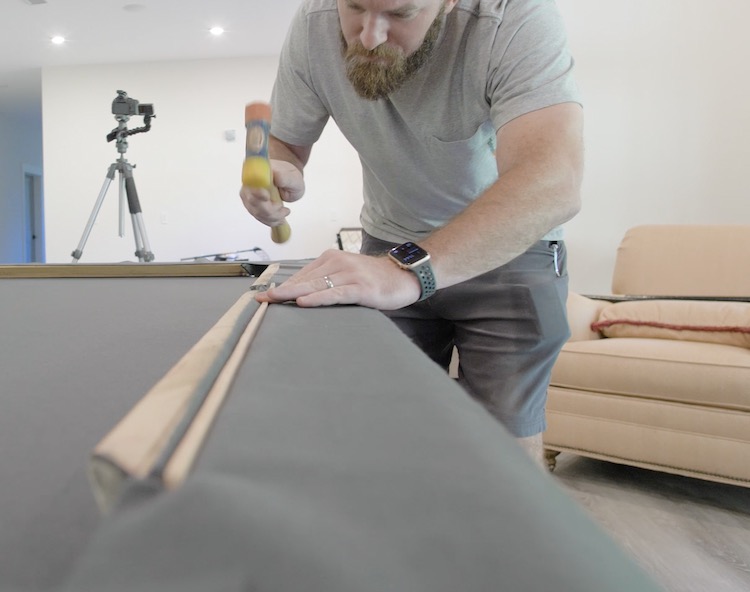
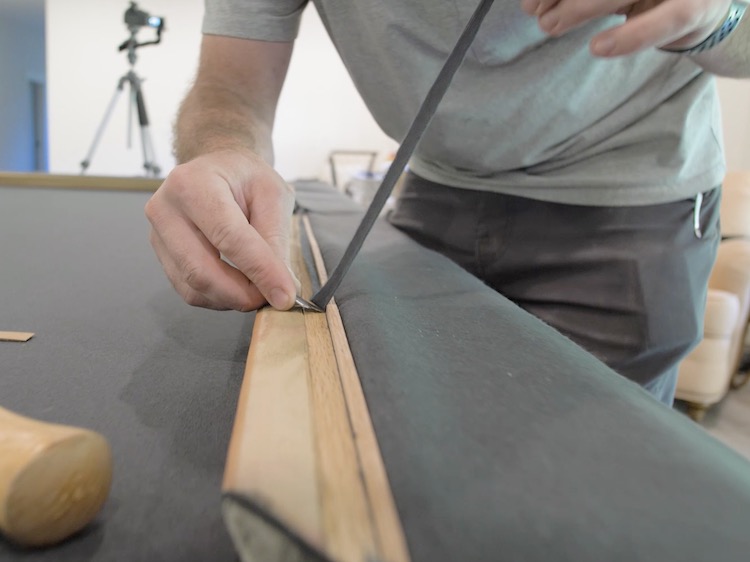
Then it was on to the rails. The part I was most nervous about. I highly recommend watching as much content on this process before beginning. I started by laying the fabric upside down and hammering the featherboard into the dado to secure the felt to the top of the rail.
Before completely seating the featherboard I trimmed the excess felt off.
I completed hammering the featherboard in with a scrap piece of wood.
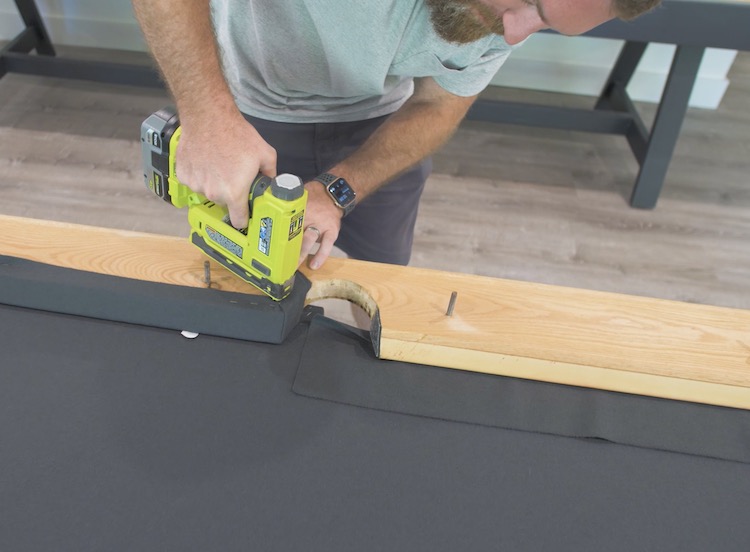
I then flipped the rails over, wrapped the cushions, pulled the felt tight in the middle and placed one staple there. I then stapled the corners of the side pockets getting the fold and tension just right.
After pulling the felt tight and stapling back to the middle, I moved on to the corner pockets which just get stretched around the corner and stapled tight. Then finish out the rail back to the middle, stapling about 3/4″ apart and trimming the excess. Sounds easier than it is to get it right, but this isn’t a recovering tutorial.
Flip the rails back over and insert the hanger bolts into the holes on the table.
Secure the rails from below with washers, nuts and socket wrench.
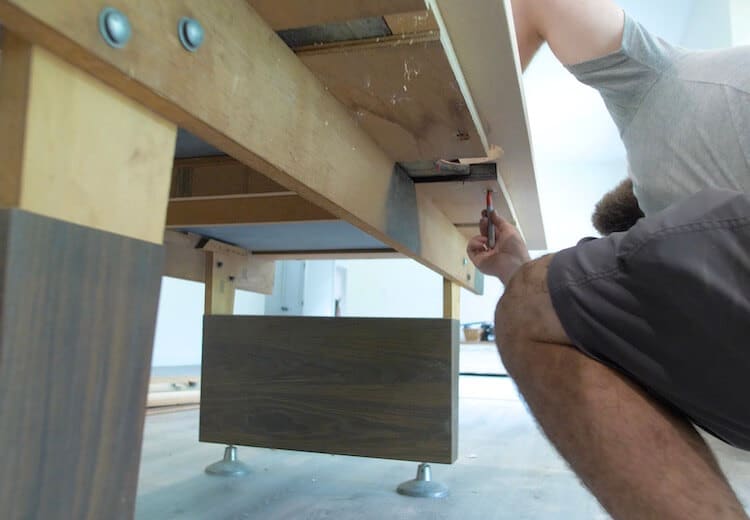
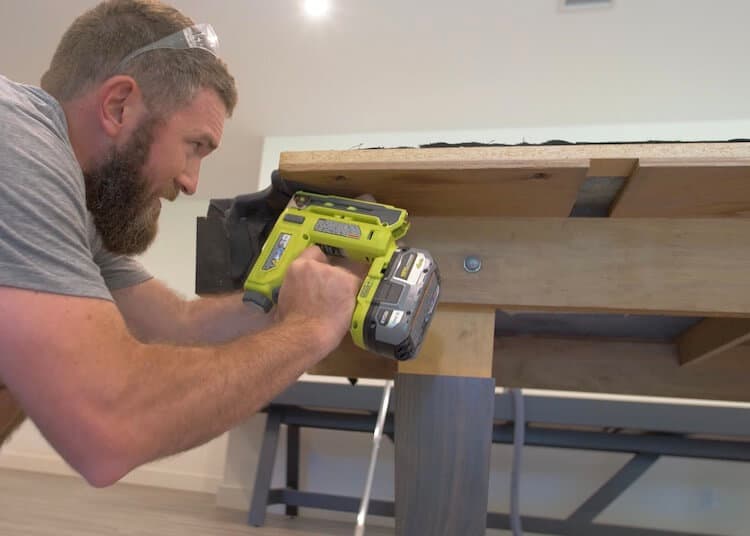
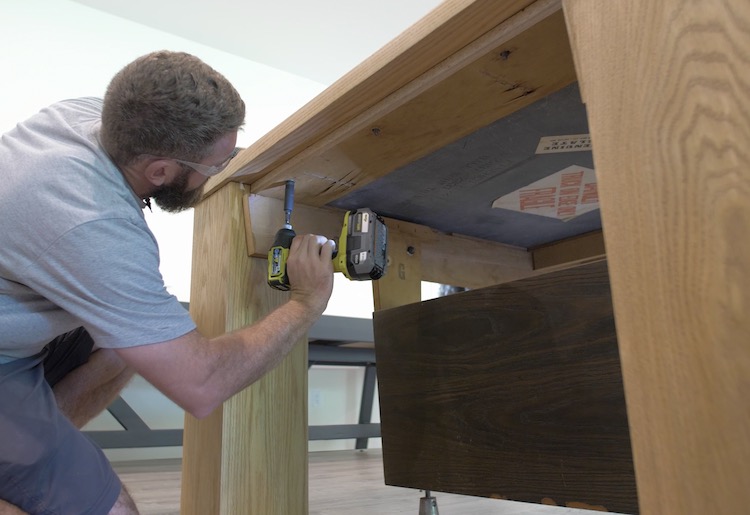
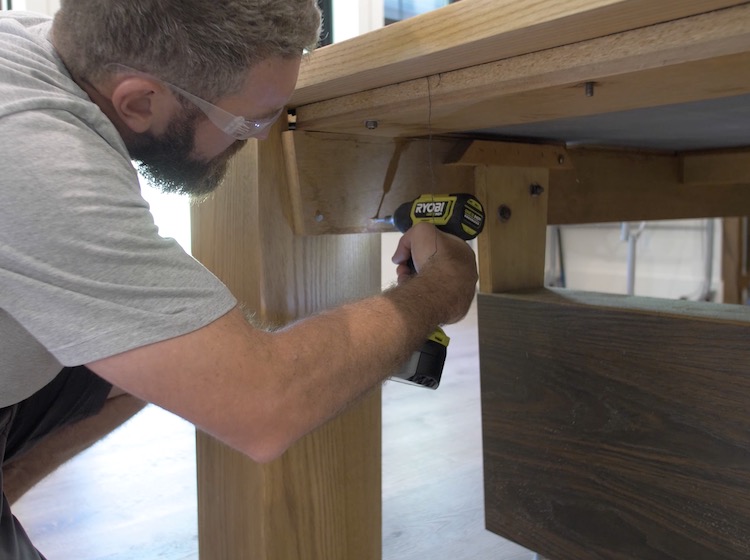
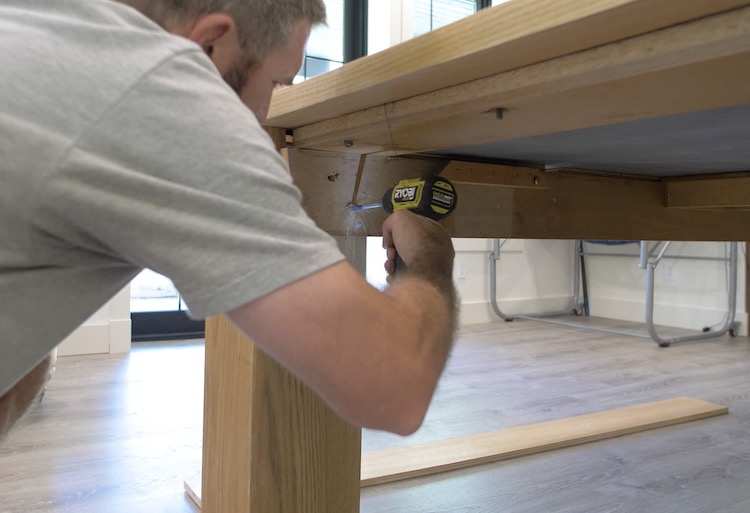
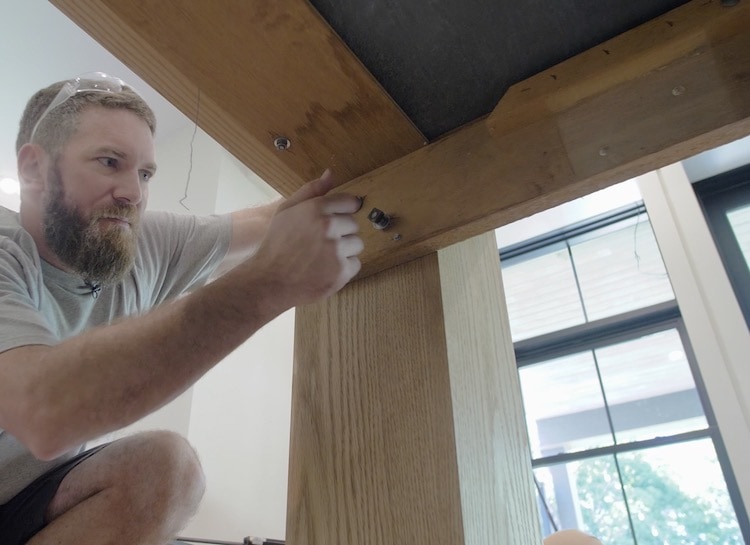
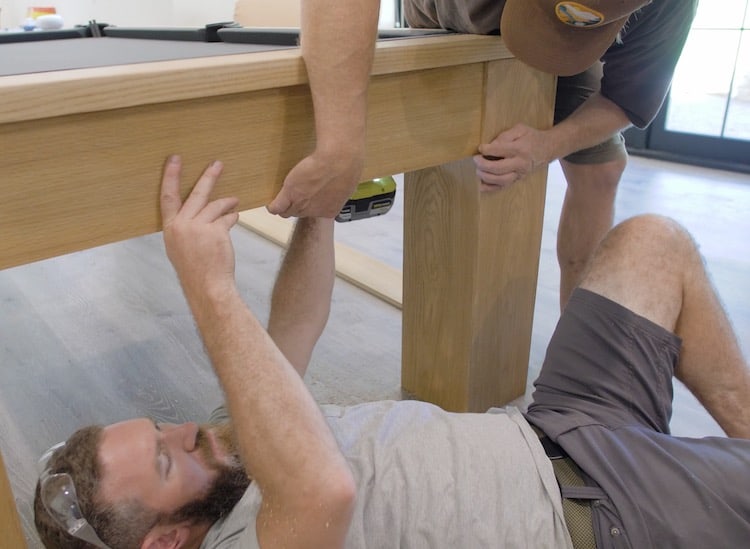
Installing the Legs
I first placed the legs at the outside corners of the table such that the pockets would recess into them. Then I secured the beams to the legs with wood screws temporarily.
We then unbolted and removed the old legs from the table.
Using a drill I drilled holes for through the beam and into the new legs.
Then, using the old bolts I secured the beams to the new legs.
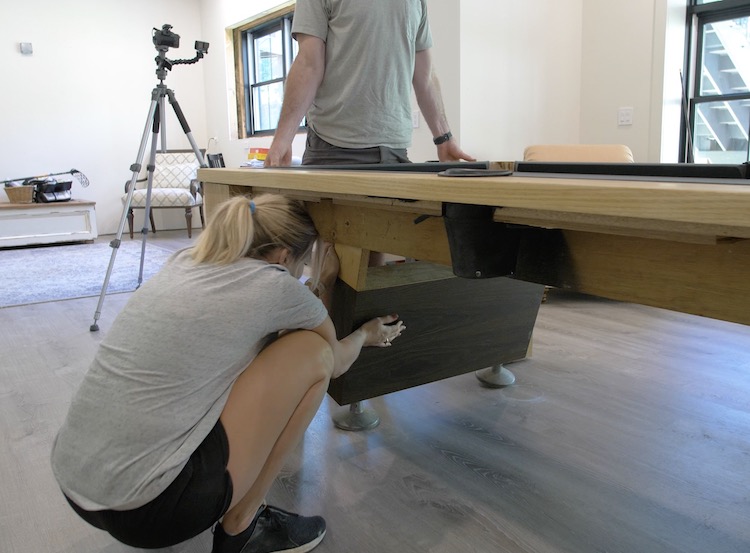
Aprons & Pockets
The final pieces of the table were the aprons. These were ripped to 6-1/2″ which is enough to cover the side pockets and secured with four 1-1/4″ pocket screws at each end and 90 degree clips in the middle.
And there you have it! A new modern pool table. Not only did we save the old pool table but we got a great new look for under $1000. Not bad if I don’t say so myself.


 )
) 

 )
)