Vue lecture

Il y a de nouveaux articles disponibles, cliquez pour rafraîchir la page.
✇ITProMentor

Reviewing the GDAP Wizard in Lighthouse

Hey folks! In today’s article, we will be taking a closer look at Granular Delegated Admin Permissions or GDAP.  You can think of this feature as providing similar functionality to Privileged Identity Management (PIM), including “Just-in-Time” (JIT) access, but specifically with regard to your partner tenant as you “reach across” into customer tenants in order to manage their subscriptions and services. If you are a Managed Services Provider, and you are constantly switching between customer tenants throughout the day, then this article is for you!

In The Days of Old

In the past, Partner Center would have been your “gateway” to managing customer tenants. We had the ability to establish relationships with our customers via Delegated Admin Permissions (DAP). To say the least, this was a rather clunky experience that left a lot to be desired. For example, accessing customer tenants from your own partner tenant was fraught with known issues and limitations that were not well documented anywhere (therefore most of us still just signed into the customer tenant directly using different browser profiles or “private windows”). Plus, with the DAP relationship in place your native partner account would effectively have global administrator privileges to all tenants all the time.

The situation was less than ideal. Eventually we had Granular Delegated Admin Permissions or GDAP, which goes a long way toward fixing some of these problems. For example, GDAP can be leveraged to provide Just-In-Time (JIT) access to customer tenants, so that you can elevate permissions only when you need to go execute changes, and that access is automatically time-bound (for example you can set it up to expire after 2 hours).

In order to take advantage of the JIT access capabilities, the partner tenant will need to have Azure AD Premium P2 licensing. In case you weren’t aware, Microsoft announced back in October 2021 that they would be giving away two years’ worth of AAD P2 subscriptions for Partners (and no, I am not sure if there are plans to extend this or not).

GDAP Wizard in Lighthouse

GDAP used to be pretty difficult to set up, but in recent months Microsoft 365 Lighthouse has made it much easier to establish GDAP relationships, or to convert existing DAP relationships.  It is also worth mentioning that Microsoft 365 Lighthouse recently celebrated a birthday. If you haven’t looked at this free multi-tenant management tool yet, or if it has been a while since you’ve poked around in there, I would encourage you to check it out for the first time, or to revisit it again. It has come a long way recently, and it is certainly the best place to set up your GDAP relationships.

Note: In the official documentation it is (incorrectly) stated that you need to be a Cloud Solutions Provider (or CSP) to use Lighthouse. This is not 100% accurate; many MSPs are not technically CSPs but they likely have access to Partner Center. Some of them sell licenses through a distributor such as Ingram Micro or Pax 8, others just serve customers who buy direct from Microsoft. No matter how you are set up in your own practice, you can get into Lighthouse with nothing but Partner Center access and your existing DAP customer relationships which exist therein.

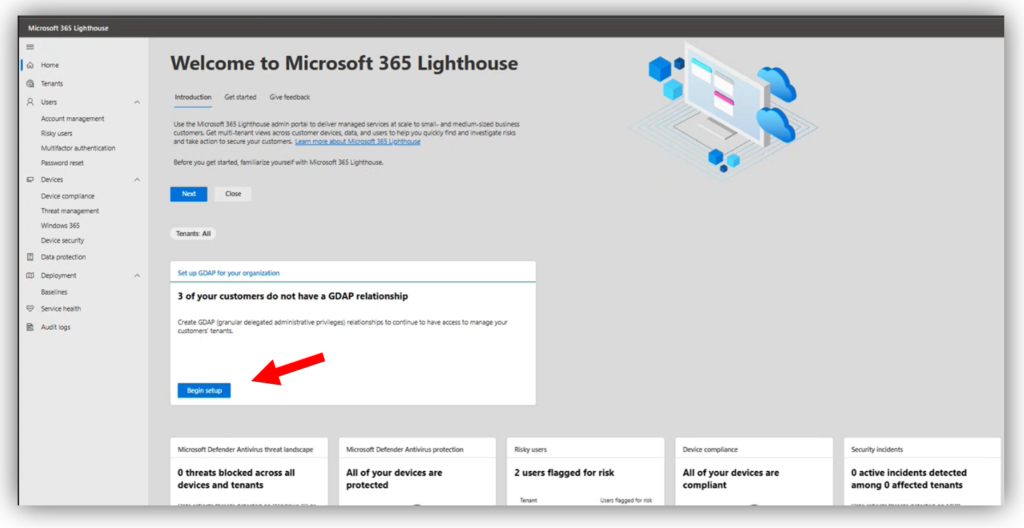
Before you start, make sure you have a Global administrator account in your partner tenant that is also assigned to the Admin agent role in Partner center, as these permissions are pre-requisites to being able to configure GDAP via Lighthouse. Using this account, navigate to https://lighthouse.microsoft.com and find the GDAP wizard right on the home page.

Begin GDAP wizardOne of the great things about this tool is that it comes with pre-defined “tiers” that you can use straight out of the box, or you can customize them to your liking.

Customize GDAP tiers

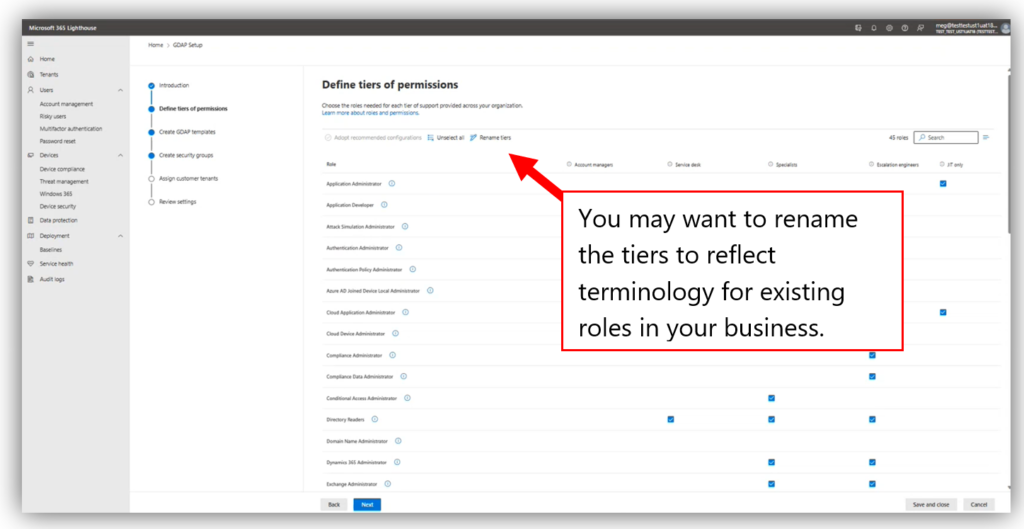
Tiers are collections of Azure AD roles that are selected for specific job functions like Account manager, Service desk, or Escalation engineer. There is also a “JIT-only” tier which would include your high impact roles such as Global administrator. More on the JIT role later. Note that you can also rename the tiers if you want to use different terminology in your own practice, such as Level 1 tech, Level 2 tech, etc.GDAP templates

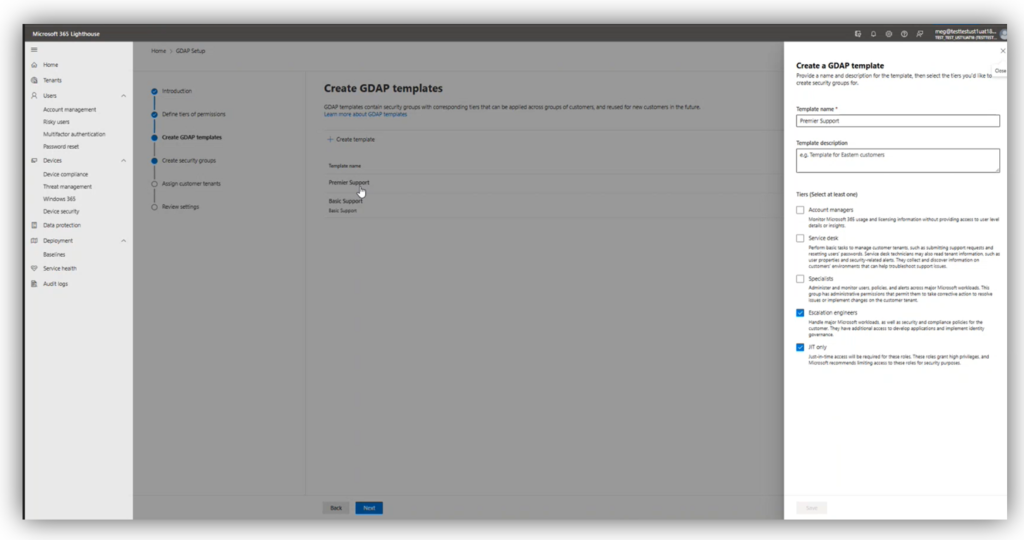
The wizard will help you build “templates” that you can then assign to one or more customers. Each template can contain one or several of the tiers. For example, you may have “fully managed” customers who require, at different times, a variety of these tiers all the way up to Escalation engineers and the JIT-only role. But you might also have customers who are not fully managed, or only require Account management, or Service desk roles. In this case you could have two templates and apply only the roles you need to each respective group of customers.

GDAP security groups

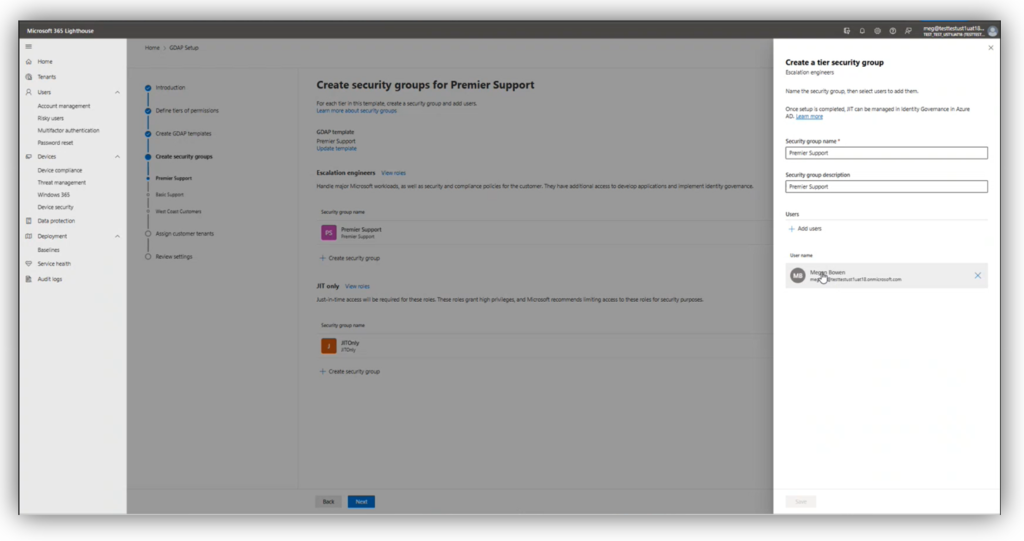
For each role, you need to create a security group in your partner tenant. Note: I have experienced at times that adding users is difficult from Lighthouse; for example, sometimes it cannot see all of my users, so I will need to go edit these groups later in my Azure AD or Microsoft 365 admin centers. I am guessing there are still some bugs being worked out here.

JIT Approver security group
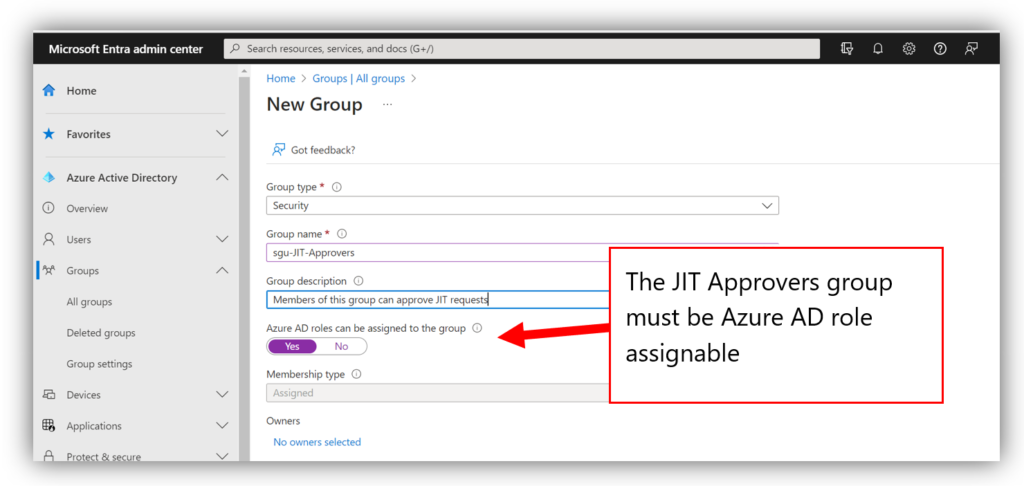
For the JIT-only role you actually need to specify two security groups: the “JIT Eligible” group itself (i.e., those users who can be elevated to global admin in your customers’ tenants) and the “JIT Approver” group (those responsible for approving any requests to elevate permissions). Be sure to create your JIT Approver group in advance, before you run the wizard (the other groups can be created within the wizard). Also, make sure that this group is configured to be Azure AD role assignable.

Role assignable security group
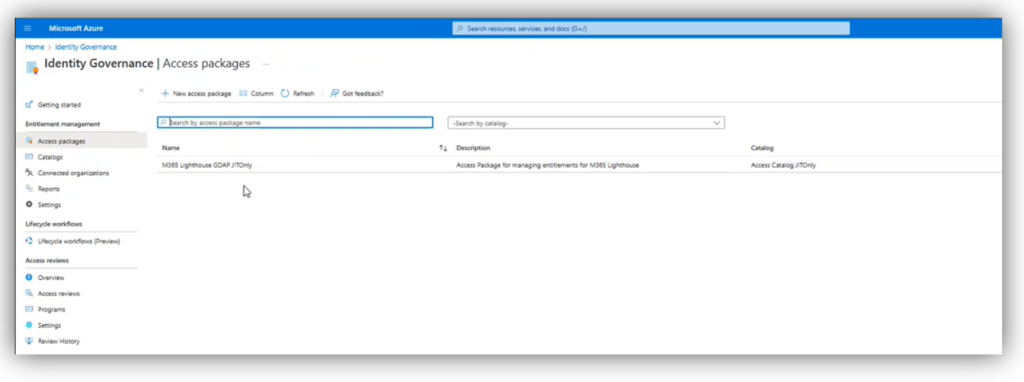
Once you assign customers to a template, they are converted from DAP to GDAP. To elevate into the JIT-only role, eligible users must navigate to https://myaccess.microsoft.com and request role elevation for the desired access package.

Request JIT access package
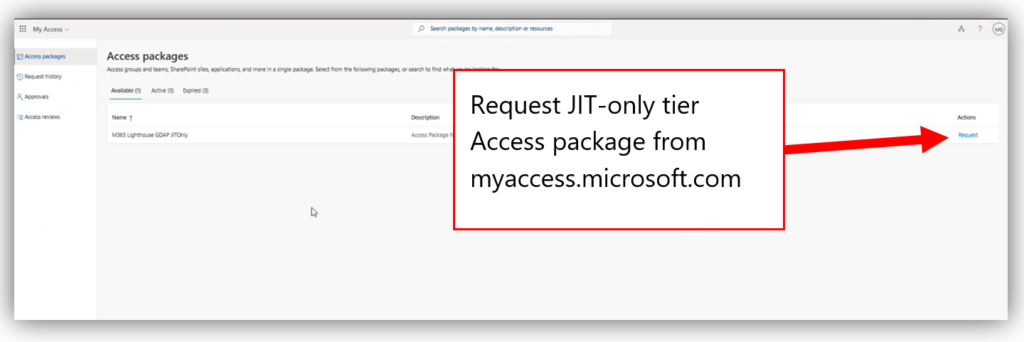
The approvers will then be able to answer these requests from the same “myaccess” portal under Approvals. Once approved, the privileged roles will be activated for the duration specified in the wizard. This process is not using PIM but rather it is leveraging Access packages from Azure AD Identity Governance (see Entitlement Management).

Azure AD Identity Governance

Potential downsides

Now one of the criticisms I have of this tool is that every customer who is attached to a template is equally impacted by the JIT escalation requests. There is only one access package created, so when you elevate an account to the JIT-only role, that account will gain superuser privileges in every tenant attached to the template for the time period specified. This implies that if you wanted to isolate your JIT access requests (which I think would be the most ideal scenario), you would need to create a unique JIT-only template for each customer.

That might be okay if you are only managing a handful of customers, but it makes this wizard a heck of a lot harder to use if you manage dozens or hundreds of customers. I would really like to see this improved in a future update, but for now I just want you to understand what the limitation is. Most of us will probably not want to run this wizard 100+ times and step through every customer every single time; it ends up (at least partially) defeating the purpose of the simplified wizard to begin with.

The other criticism I have is that we don’t (yet) have a great way to delete these relationships from Microsoft 365 Lighthouse. You can delete the templates, but this just removes the template object from Lighthouse itself, leaving all of the associated security groups, access packages, etc. in place. Therefore, to accomplish a “real” deletion, you would need to:

  • Delete the template in Lighthouse
  • Delete the corresponding access packages in Azure AD Identity Governance
  • Delete the security groups in Azure AD
  • Delete the GDAP relationship from Partner Center

But so far, these do seem to be the only real downsides to the solution Microsoft has come up with. At least we can say it is a good improvement on the previous architecture, where we only had global admin all the time. The questions that remain in my mind are:

  • Will we be able to keep our Azure AD P2 licenses at no cost to the partner after the initial two years?
  • Will we ever get the ability to request JIT elevation only for specific customers, or will it always remain “per template” (and if so, can we at least make it easier to clone templates or something, for applying per-customer JIT requests?)
  • Let’s say we have to remove customers or even entire templates, which could mean we also want the corresponding access packages (and in some cases even the relationships) terminated as well; shouldn’t this “offboarding” process be a bit easier?

Time will tell! But otherwise, I am pleased with the progress that has been made to date. Good job, Lighthouse team!

This article was written by the new Bing chatbot.*

*…April Fools! This article, like all content on ITProMentor.com, was written by a Real Human™

The post Reviewing the GDAP Wizard in Lighthouse appeared first on ITProMentor.

✇ITProMentor

A friendly reminder about least privilege access and other simple stuff

I just spent an exhausting 36 or so hours helping a customer out of a really bad situation. Well, technically they aren’t out of the woods yet, but things are clearing up anyway. And I am at the point now where I exit, handing off the bulk of remaining tasks to their internal team. I won’t go into the gory details (the customer did give me permission to share VERY limited information, but I am going to keep it even more generic here). What I will tell you is that it all came down, once again, to negligence of cyber essentials. Specifically, I want to take this opportunity to remind my readers about the importance of least privilege access and basic hygiene especially for admin accounts. I believe this is probably one of the most often overlooked items in terms of basic principles of cybersecurity. And I still don’t know why.

On the one hand, I get it: we do not always have time to dot every “i” or cross every “t”: how many of us can truly say with a straight face that we are 100% certain every single user and service account under our care has only the access required for its specific function, and no more? I think the number is very small.

But you know what? I am not going to ask you to wipe out your calendar in order to tackle a full audit and access review of all the accounts and permissions in your environment. Nope, not today. All I want you to do is mind some of the most basic rules of least privilege access, paying special attention to your “superuser” or “global admin” accounts.

Many organizations take a laissez-faire attitude when it comes to admin or “super-user” privileges in their environment. Especially as regards third-party apps. For example, it is not uncommon for employees to randomly adopt software packages or subscriptions and manage them independently of IT. Oftentimes, this is happening without any knowledge or consent from business owners, IT stakeholders, or other management (this is so-called “Shadow IT”). Worse yet, whenever I audit Microsoft 365 tenants, I regularly find that too many people have full global administrator privileges here as well, and those permissions often exist on “everyday” accounts which are also used for email and file sharing.

So here are the (bare minimum) five rules I wish everyone would follow with respect to their admin accounts, and yes, you have time to do this list:

  1. Minimize the number of accounts with Global administrator privilege: Microsoft recommends a maximum of 5 global admin accounts. This should be achievable in an SMB environment. Use built-in RBAC roles to limit privileges as needed (e.g., delegate Billing administrator, Helpdesk administrator, etc.). Find a list of Azure AD roles and permissions here.
  2. Make sure privileged accounts are separate from normal user accounts: Primary user accounts with access to apps and email should not be used for administrative purposes; for example, if Mary Contrary is an employee with an email address and UPN of Mary.Contrary@contoso.com, she should use a completely separate account for performing administrative tasks such as Mary.Admin@contoso.onmicrosoft.com.
  3. Do not reuse admin credentials across domains or services: This is a big one. I know, I know: it is so much easier to rely on muscle memory everywhere you work, but seriously, you have to stop this egregious practice. We have password managers for a reason. This rule applies to using the same credentials in multiple cloud apps, in different on-premises domains, and/or in Microsoft 365 tenants, as well as the all-too-common scenario where the same identity is used as an admin account on-prem and in the cloud through Directory Synchronization (Azure AD Connect / Cloud sync). Just do not do this. Do not do any of this.
  4. Require strong authentications for ALL your admin accounts: Yes, this includes emergency access accounts. Even if you are excluding admin accounts from every Conditional Access policy in Azure AD, you should still plan on using something to protect that account (per-user MFA with an alternate sign-in method, anything). Read more about emergency access accounts here: Manage emergency access admin accounts.
  5. If you are a Microsoft partner managing lots of tenants, implement GDAP: Granular Delegated Admin Privileges (or GDAP) replaces legacy DAP, and allows partners to manage least privilege access, so that their employees no longer have to use only the Global admin role to help customers with everyday tasks and subscription-related requests. Learn more about GDAP here. Consider using Lighthouse to make this process easier across multiple tenants.

Is there more you can do? Absolutely. For example, if you buy an Azure AD P2 subscription for just your administrative accounts, you could implement Privileged Identity Management to enable “Just-in-time” access when making administrative changes to a tenant. You could also (and probably should) remove admin privileges on desktop computers. You can also review my last post to be sure your strong authentication policies are all up-to-date.

So yes, there is always more you can do, more money you can spend, etc. But guess what? The story I referenced at the beginning of this article could have been avoided easily by minding certain items (more than one) in the above list. So always, always start with the basics, and then go forward from there. I often find that the essentials do not get implemented because there is a larger “to-do” list that includes items which, even if they are very good ideas, are just “biting off too much,” and this prevents the low-hanging fruit from becoming properly prioritized. Or maybe it is because these things are perceived as so “easy” or “obvious” that they never get double and triple checked. I dunno. But the same stuff seems to come up a lot.

Okay, end of rant.

I also just noticed that this is my first blog post in 2023, and it’s already the end of January. Wow. What a way to start the Year of Rabbit. Anyway, Happy New Year Everyone!

The post A friendly reminder about least privilege access and other simple stuff appeared first on ITProMentor.

✇ITProMentor

But have you turned multifactor authentication ALL the way on?

Do you remember just a short time ago, Microsoft would claim that switching on Multi-factor Authentication (MFA) prevents 99.9% of identity-based attacks? Well, the times they are a-changin. I do not know what they would report today for a percentage of attacks which are thwarted by MFA alone, but I can tell you it wouldn’t be 99.9%. I think most of you reading this blog have probably even experienced or heard by now of an attack where MFA was enabled, but the bad guy got in anyway.

The current state of affairs was inevitable of course: when we move our defenses up, the evildoers don’t just throw in the towel and go away, they simply adapt their methods. Thus, we have seen a steady rise during the pandemic years of more sophisticated phishing techniques, where users are tricked into giving up, approving, or passing time-bound access codes onto a third-party. We also see a rise of Man-in-the-Middle (MITM) attacks where a user interacts with fake (but very convincing) login pages that include MFA prompts and everything.

So what are we to do?

First, do not be discouraged: this process of “one-upmanship” is only natural. The good news is that having more than one proof of identity in place is still the foundation from which you must build. Moving away from passwords and towards MFA or even passwordless authentication is still the right path, but you have to be willing to stay nimble and introduce additional iterative changes as we move forward in time.

The tools to do the job are already available and waiting for you. In the world of Azure AD and Microsoft 365, this means revisiting our Conditional Access (CA) policies and reconsidering our authentication methods.

I assume most of my readers already know about the Security Defaults, or these four equivalent CA policies:

Once you have these basic scenarios covered, we have number of other holes to plug. In the following paragraphs, I will recommend some additional settings and policies to further cement your foundation and prevent some of the latest attack methods we have been seeing in the wild, with a bit of commentary explaining each.

1. Update your authentication methods (number matching, etc.)

Microsoft recommends updating your policies for the Microsoft Authenticator app so that users are required to do number matching when logging into cloud resources. In other words, instead of just tapping “Approve” when the app notification comes up (which many people will do quickly by automatic reflex, or eventually after a flood of continuous prompts), they will be forced to identify the correct number which is being displayed to them.

Number matching

This helps prevent what Microsoft calls “MFA fatigue,” or illegitimate authorizations due to automatic muscle memory.

This setting will become the default experience on February 27 of 2023, but you can turn it on sooner if you like from Protect & secure > Authentication methods > Microsoft Authenticator in the Entra portal. On the Configure tab, you can move from Microsoft managed to Enabled.

Enable number matching

You can also choose to turn on Show the application name…, as well as the option to Show geographic location… These toggles will give the user more context about the sign-in attempt whenever an authenticator prompt occurs. Be sure to save any changes you make on this screen.

Back on the Enable and Target tab, you can optionally move to passwordless Authentication mode, where the authenticator app is the primary authentication method instead of the password. This experience will use the number matching challenge by default, and it will also reduce password prompts in general.

Move to passwordless

2. Enable Temporary Access Pass

I also recommend turning on Temporary Access Pass, which is also found under your Authentication methods. This allows administrators to grant time-bound access codes for sign-in purposes, particularly when the end user is unable to use their multi-factor device, or if they need to update their authentication methods at https://aka.ms/mysecurityinfo.

Temporary Access Pass (TAP)

For example, imagine that one of your users had to get a new phone and they no longer have access to the authenticator app from their old phone anymore.

Once this policy is configured, administrators can go issue TAPs to any user right from the Azure AD or Microsoft Entra portal. The same process can also be used during the initial onboarding, when users go to set up their authentication methods for the first time.

Issuing a TAP

3. Protect registration of security information

If you enabled TAP as I suggested above, then you should also enable a Conditional Access policy called Securing security info registration, which means that in order to access the security info registration page, a user will need a valid TAP issued by their administrator. I suggest you also have a process in place for requesting and distributing these TAPs securely, in order to prevent illegitimate requests from going through; for example, confirmation of identity via a phone call or video chat with the helpdesk.

This policy is also available from the CA templates (under Identities):

Securing security info registration

Note that the templated policy also excludes any trusted locations that you specified (so that users could set up their authentication methods from the corporate offices, but not from home or some other public wi-fi, for example).

4. Require MFA to register or join devices

Certain scenarios are not covered by the CA policies outlined earlier. One such scenario is the registration or joining of devices to Azure AD. There is a special policy just for that purpose that you must deploy.

This can also be found as a setting under Devices > Device settings in the Azure AD admin center. But these days Microsoft recommends using the equivalent CA policy in its place (therefore the option on this page should be set to No rather than Yes).

Device setting to Require MFA (deprecated)

For some reason the required settings for this CA policy are not detailed on Microsoft Learn, even though Microsoft recommends moving to it, but here are the settings you will need:

  • Users: All users, exclude emergency access accounts
  • Cloud apps or actions: User action > Register or join devices
  • Conditions: None
  • Access Controls: Grant > Multi-factor authentication

5. Require MFA for Intune enrollment

MFA for Intune enrollment is a separate requirement and not something that is completely covered by any of the above policies. For example, a device which has already been authenticated for another application may be able to enroll without being prompted again unless this policy is in place.

I spoke with someone on Microsoft’s DART team recently, and he explained how this loophole had been used in the wild: in many organizations where CA has been previously implemented, a managed device tends to have greater access than unmanaged devices, with fewer prompts for MFA. But if an unmanaged device has even a little bit of access already, it is possible in some cases to elevate the device by enrolling it without encountering another MFA challenge. At this point the sphere of access has been expanded. Keeping this next policy in place will prevent this unauthorized ‘escalation’ scenario.

  • Users: All users, exclude emergency access accounts
  • Cloud apps or actions: Cloud apps > Microsoft Intune Enrollment
  • Conditions: None
  • Access Controls:
    • Grant > Multi-factor authentication
    • Session > Sign-in frequency set to Every time

6. Add device-based CA policies

This is something I have long advocated for. I recommend turning on a device-based access policy for at least Office 365. This way, access to corporate resources such as email can become contingent on registering devices with Azure AD or even enrolling your devices with Intune. The two primary benefits here are:

  1. You get pretty decent assurances that the inventory of devices you see in the portal is reflective of the actual physical devices out in the world (having an accurate and up-to-date inventory is necessary for good security), and,
  2. many of the current Man-in-the-Middle attacks are instantly thwarted, because the “middle” devices that are being used by attackers are not part of your inventory of pre-registered or enrolled devices.

Therefore, even if an attacker successfully phishes someone in your organization and tricks your end users into round-tripping an MFA code or approval notification, the unauthorized access request access would be denied by the device authentication requirement.

There are a couple of different approaches to accomplish a device-based authentication policy, but most organizations will aim for “Require compliant devices,” which looks like this:

  • Users:
    • All users (or a targeted group of your choice)
    • Exclude emergency access accounts
  • Cloud apps or actions:
    • Cloud apps > Office 365
  • Conditions:
    • Device platform: Select the platforms you intend to protect
  • Access controls:
    • Grant > Require device to be marked as compliant

With this policy in place, it is also necessary to prepare Compliance policies within Intune for each device platform you intend to support. End users must then download and sign-in to the Company portal app in order to complete device enrollment. The details around setting up Intune and enrolling devices is beyond the scope of this article, but I can recommend my courses or written guides on these topics for more information.

However, we must recognize that some organizations are not yet ready to implement Intune, or even if they are, they will not be ready to require device compliance across the board right away, and that is okay. In this case, I can recommend another policy which will prevent unauthorized device access based on device filters. We call this policy “Block unregistered devices.”

Block unregistered devices using filters

  • Users:
    • All users (or a targeted group of your choice)
    • Exclude Emergency access accounts and all Guest & External users
  • Cloud apps or actions:
    • Cloud apps > Office 365
  • Conditions:
    • Device filters:
      • Exclude devices where trustType Equals Azure AD Joined, Azure AD Registered, or Hybrid Azure AD Joined
    • Access controls:
      • Block access

In this case you do not need to have devices enrolled with Intune, however, the devices must be registered or joined to Azure AD before they can gain access to data in Microsoft 365 services such as Exchange or SharePoint Online.

I also recommend blocking device platforms that you do not intend to support, which I have outlined here (Microsoft has also since added this to their “common” CA policies on Learn); this policy does not require enrollment or compliance checks, either. These policies are sometimes an easier place to start out.

7. MFA for guests

Generally speaking, I like to keep my “guest-specific” policies separate from my internal user policies. Therefore, any policies targeting internal users will normally exclude guest & external users. If I want to deploy policies specifically against guests, those will be their own policies that I can turn on or off without impacting my “standard user” CA policies.

MFA for guests

You will notice that there is one such policy available via the templates provided by Microsoft: Require multifactor authentication for guest access.

However, before enabling this policy, I tell all my customers to enable the cross-tenant MFA settings. In case you didn’t know about these, navigate in the Microsoft Entra portal to External Identities > Cross-tenant access settings. Click Edit inbound defaults then go to the Trust settings tab.

Cross-tenant MFA settings

By checking these boxes, you are telling your tenant to respect MFA claims that have already been validated in other Azure AD tenants. In other words, if you deploy a Conditional Access policy in your own tenant that requires MFA for guests, those guests will not be double prompted if they have already satisfied MFA claims in their own (home) tenant. Completing this step also happens to be a pre-requisite for our last recommendation (though I have no idea why this is so).

8. Require stronger authentication

If your organization is ready to adopt passwordless methods of authentication using the Microsoft authenticator app, and/or FIDO2 keys such as Yubikey, then you have another option to consider. This past fall just prior to Ignite, we gained the ability to distinguish between authentication methods based on authentication strength.

Previously, any type of MFA was treated equally by Conditional Access requirements: so an SMS code was considered just as good as the authenticator app or even a FIDO2 key. But in reality, not all authentication methods are created equally. With a FIDO2 key for example, the key material is non-exportable. In other words, an attacker would have to physically steal your key in order to use it to gain access as you. It is therefore considered “phish resistant.”

I suggest taking a crawl-walk-run approach; if you are considering switching to stronger authentication you may want to identify specific use cases or groups to pilot the experience before pushing it out org-wide. For example, if you have to distribute physical keys, how does that process work? What happens if someone loses a key? Etc. These questions will be easier to sort out on a smaller scale, which will help you develop a system for more widespread adoption.

Here is an example of upgrading a policy where you require stronger authentication for specific admin roles:

  • Users: Select users and groups > Directory roles (select any groups or roles you require)
  • Cloud apps or actions: All cloud apps
  • Conditions: None
  • Access controls: Require authentication strength (select your desired strength)

Upgrade your authentication strength

Note that you may have additional steps to configure the passwordless or FIDO2 experiences before enabling these CA policies.

9. Fancier subscription, fancier options

If you are the lucky owner of the more expensive E5 subscription, then you also have access to “risk-based” Conditional Access policies, as well as a bunch of other upgrades that are well beyond the scope of this article. Once again, the Conditional Access templates are the easiest way to get moving on some of these features.

E5 risk-based policies

Note: If you buy licenses to support these features for just your administrator accounts (as some organizations do), just be sure that when you deploy the policies, they are scoped to only those users who are licensed for the features. This way, you stay in compliance with Microsoft’s licensing guidelines.

Conclusion

The principles of Zero Trust remain unchanged. In the past, we would have simply enabled MFA, or the equivalent of Security Defaults, and felt that we had fulfilled the spirit of the “Verify Explicitly” pillar, but as we have seen, that may not be enough anymore on its own.

Zero Trust Principles

As the game has changed, so have our tools. In order to have more confidence that our “Verify Explicitly” principle is being met, we just want to put in place a few additional measures, for example:

  • get users to slow down by adding a number-matching requirement on the Authenticator app
  • better protect the MFA registration process itself with Temporary Access Pass
  • require a strong authentication challenge anytime a device is registered, joined or enrolled for management
  • evaluate the device as part of your authentication challenge
  • even require a stronger level of authentication such as phish-resistant, hardware-based FIDO2 keys

And of course, do not forget to address the other two pillars of Zero Trust, either! I will soon release updates to my famous Best Practices Checklists and other written guides to reflect more of what we learned over the last year. If you already own a copy, then congrats! Your free updates will be arriving sometime in the next month or so. If you want to join thousands of other happy readers, I encourage you to subscribe, check out the store, or even consider joining our SquareOne community.

We are living in a different world now than the one we had 10 or even just 5 years ago. I wonder what it will look like 5 or 10 years from now? It’s part of what makes our jobs stay evergreen, I suppose. Staying up to date in the day-to-day and month-to-month, of course, is going to be the key challenge for most of us. I suppose this article, too, could go out of date pretty quickly after its printing. But do not be discouraged: it just means that we must always be aware, ready, and willing to make iterative changes over time.

If you see any omissions in the policies or settings I discussed in this article, be sure to comment below! We would love to learn from you out there in the audience, as well!

The post But have you turned multifactor authentication ALL the way on? appeared first on ITProMentor.

✇ITProMentor

What I am most excited for in 2023 after Ignite 2022

Earlier this month, Microsoft held their annual Ignite conference, and shared several big announcements. There are plenty of blogs and podcasts out there which have summarized some of the highlights, and of course we have Microsoft’s own Book of News, too. I won’t bore you with another re-hash like that.

Instead, I just want to talk about one announcement in particular that has piqued my interest, especially for the SMB space. The product? Microsoft Syntex. What, never heard of it? I don’t blame you. Or, if you have heard of it, did you assume this was just going to be one of those “Enterprise things?” That was my first reaction: “Content A.I.,” they called it. A fancy set of Machine Learning algorithms that will help you to better organize and categorize data, or at least that’s what I thought.

It turns out that Microsoft Syntex is going to be an umbrella that houses all kinds of interesting capabilities, some of which will be of particular interest to the SMB.

Syntex announcements

I encourage you to check out some of the content from Ignite: go see demos on some of these features for yourself. For example, content assembly, summarization of documents, translation of documents, etc. We also have native eSignature capabilities to look forward to! Yes, I know we have long had the ability to integrate with third-party clouds such as Adobe or Docusign to accomplish these tasks, but having the ability to natively collect signatures right in the Microsoft cloud (so that it never leaves your tenant) has certain benefits, too.

Next, I want to draw your attention to Backup and restore, as well as Archiving (coming 2023). Finally: we will have a native solution for handling backup and restore of data! I assume this will cover single item restores as well as an entire mailbox or document library. I am excited to see if this service can displace the third-party solutions that we service providers have been stapling on to date.

The Archiving piece is especially interesting to me, because this is going to involve a “cold storage” option that is (supposed to be) extremely cheap. This means old content can be preserved and kept available, but access times may be a bit slower (as content needs to “warm-up” or rehydrate before it is fully accessible again). This was sorely needed, as I have blogged before about the expensiveness of SharePoint storage, especially for the SMB, where we lack the volume in terms of seats to obtain decent capacity in the Microsoft cloud (1 TB per tenant plus 10 GB/user).

There are still some question marks around how much Syntex is going to cost, but I have reason to be optimistic: Microsoft announced that this service will be available on a “Pay-as-you-go” basis. In other words, you pay for the features/services you consume or use, but not the ones you don’t. Therefore, if you have no desire to use content assembly, but you still want to turn on the archive features, you could do so, and not worry about getting charged for the features you aren’t using.

As well, since it is a usage-based model, we expect SMBs to pay less in order to process less data. Whereas an Enterprise organization could have thousands of requests per day against Syntex capabilities, in the SMB we should see a fraction of that. So, we could be talking pennies or dollars, vs. hundreds or thousands of dollars.

If you like me, and are similarly interested in learning more about Microsoft Syntex, I encourage you to check out the following from Microsoft:

Cheers!

P.S. – You have probably noticed it has been quiet around this blog for a bit: yes, that is true. I am working on some big updates to my publications and will have more to share about that soon. Stay tuned!

The post What I am most excited for in 2023 after Ignite 2022 appeared first on ITProMentor.

✇ITProMentor

Alternatives to OneDrive and SharePoint (and when to consider them)

One of the things I often get asked about is how to deal with various limitations in OneDrive and SharePoint Online. For those who don’t know, SharePoint Online is the file storage & sharing solution underpinning the Microsoft 365 universe of applications, including the popular Teams application, while OneDrive for Business provides for personal file storage (i.e., modern replacement for “My Documents”) as well as a client application for keeping all your cloud-based documents synchronized to your local device.

Our SquareOne peer group recently had an informal, ad-hoc meeting about this problem: Where do you turn when OneDrive and SharePoint are (seemingly) unable to meet the needs of the business?

This can happen for a few different reasons. So, before we talk about solutions, let’s examine the most common limitations that organizations can run into when using SharePoint and OneDrive.

Not enough (shared) file storage

Every single user in Microsoft 365 gets a minimum of 1 TB of personal data storage (OneDrive space). This is not usually a bottleneck for most organizations. However, SharePoint Online (where you would put any of your “shared” Company data), is limited to 1 TB + 10 GB per licensed user.

For an Enterprise organization with thousands of users, those seats add up quickly, and you will easily have several terabytes of storage available. For example, 10,000 employees x 10 GB each = ~100 TB. Small business subscriptions unfortunately share the same limitation as Enterprise, so that means a 30-person organization only gets a measly ~1.3 TB of storage total for all shared documents in SharePoint Online.

This is a problem. Particularly if there are very many files, or very large files such as architectural or engineering drawings, or high-density images, or anything like that. That meager storage will be consumed very quickly indeed. Yes, it is possible to buy additional SharePoint storage, but at USD $0.20/ GB/month, it is some of the most expensive storage space in the cloud.

My personal wish here is that Microsoft would just change the storage limitations for “Business” plans so that instead of 10 GB/user, we get something better like 100 GB/ user (at least). Or, better yet, just give us like a “Business Ultimate” plan that includes unlimited email and file storage and charge a premium price like USD $35 or $40/user/month.

Too many files to sync, or other limitations

OneDrive includes a client app that will automatically synchronize your personal files to the local desktop (we have a similar app to make them available on personal mobile devices, as well).  You can optionally choose to sync shared locations in SharePoint Online in addition to your OneDrive files. However, when you attempt to sync too many files, you can cause problems for the sync application, and then your employees fall into the Pit of End User Despair™.

How many files is too many? Well, that’s a complicated question. Microsoft recommends syncing no more than 300,000 files and folders total to your computer. But that is somewhat misleading, because I have seen the client sustain more files than that (especially since the release of the 64-bit client), but I have also seen the client bomb out under even less stress (more like 90-100K files). If memory serves right, this limitation actually comes from a .DAT file stored somewhere in your local app data folder.

As well, larger files such as architectural and engineering drawings will sync (and support for large files has improved in the last year since the release of the 64-bit client), but it still is not the same experience as working with general Office files. For example, co-authoring is not a thing here, and syncing large files is more demanding; upload times can be very slow, especially over budget links such as DSL.

Therefore, certain SMB organizations that regularly use larger file types (e.g., construction, engineering, architecture, attorneys who deal with patents which include engineering drawings, etc.) may still find the sync experience is less than ideal for their requirements, especially if they are used to having SMB shares available on their LAN.

There are a few other limitations on file structure (such as depth of folders/length of file path), and number of files per folder or view (5,000), but these are not run into quite as frequently as the other problems I just now touched on. Plus, they are generally more “correctable” than running up against storage quotas or sync issues, which are less in your power to control. Nevertheless, several other limitations do exist, and you should be aware of them.

What do we do about these limitations?

Historically the way we dealt with these problems was to tell the customer, “Well of course it isn’t working, because you aren’t doing it right!

We would scold them for needing access to so many objects on every client device, all the time. “Don’t you know that it is impossible to work with that many files in any reasonable timeframe? Imagine trying to contribute to more than 300K files in a month, or even in a year! Nobody actually does that, so why sync all the data to begin with?!

Or, “Look, you can’t expect every third-party file type to be supported equally: if you work with some larger file types, do not expect co-authoring on them, instead plan to download/upload your changes like you would have for all types of files 10 or 15 years ago.

While these statements may be true, and difficult to argue with, the simple fact is that back in the olden days when customers just had a primitive NTFS file server with SMB file shares, users could keep whatever they wanted, for however long they wanted, and have access to it any day of the week. They didn’t have to obey the seemingly arbitrary laws of the Microsoft Cloud.

In an ideal world, we could just easily migrate all files and folders, as they exist today, from point A (usually an on-premises file server) to point B (the cloud), and have the experience be pretty much the same for end users. The problem is that file servers and SharePoint sites are apples and oranges. So, it’s not realistic yet to put those expectations out there (those who have, have paid dearly for it).

Yes, it is true that SharePoint does a bunch of cool stuff that your local file server cannot (e.g., metadata, search and indexing, retention labels, sensitivity for sites, etc.), but the reverse is also true: your old file server did some pretty basic things really well, some of which are still impossible for SharePoint and OneDrive.

Alternative #1: Use another popular cloud storage provider

I can’t speak for the Enterprise, but at least in the SMB market, the most popular alternatives to Microsoft’s “built-in” ecosystem for file sharing remain Dropbox, Box, and Citrix Sharefile (roughly in that order). Maybe Google Drive ranks in there as well, however, I know a lot of folks on Google’s platform also supplement with one of these other providers for file sharing, too. My personal favorite of these options is Box, but that’s just based on my own familiarity with it (others may feel strongly about one of these others—and that’s fine).

If you are going to supplement your Microsoft 365 subscription with one of these other solutions, I would recommend ensuring you get a real business plan, not a personal or “basic” plan. Generally speaking, this means you will be spending something like $25/user/month or more for a complete feature set, usually including unlimited storage space and Enterprise-grade security options. At the time of this writing, in the Dropbox world, this means aiming for at least the “Advanced” offering (for Teams). If you choose a Box subscription, this could mean the Business Plus or even Enterprise tier, and for Sharefile, you should be evaluating their Advanced or Premium options.

Why we do not have an “unlimited storage” plan in the Microsoft cloud is beyond me. If it were up to yours truly, Microsoft would have an unlimited offering that can compete with these other big hitters. The option for limitless capacity is probably the number one driver that pushes people into a third-party cloud when it comes to file storage. Note: You should not expect a switch into one of these other ecosystems to be a panacea: to eliminate all downsides, fix or prevent all sync issues, etc. However, when it comes to overall storage capacity, every other provider out there has Microsoft beat.

Anyway, if you decide third-party is the way to go, always set up Single Sign-On with Azure AD so that you can apply the same identity-based protections, such as Conditional Access, that you already enjoy with Microsoft 365. Also you should know that Box and Dropbox have integrations available with Microsoft Defender for Cloud Apps, so that you can monitor activity and create alerts and rules around these applications, just as you do for Microsoft 365, using the Activity log.

Alternative #2: Check out Azure File Sync

If you would rather not leave the Microsoft cloud, and especially if you want to maintain an experience as close as possible to your current Windows-based file server, then Azure Files is another solution worth taking a closer look at. This is basically SMB file shares in the cloud. However, the best implementation of it to replace existing file servers, in my opinion, would be Azure File Sync. This premium solution allows you to seamlessly extend your existing on-premises file server into the cloud, and the users generally cannot even tell the difference.

Basically, your existing file server gets an agent installed on it, which then synchronizes your shares into Azure Files. Client computers continue to connect to the local file servers, but the data can be migrated on the back end into Azure. Eventually the server just serves up cached copies of the most frequently accessed datasets. Better yet, you can choose to take the most infrequently accessed data (think: archives, etc.) and move those to “cooler temperature” storage in the cloud. This is cheap storage, which is slower to access, but less expensive to maintain. Active files can remain on “hot” storage so that access stays quick and reliable. This feature is known as “cloud tiering” and it is one of those things that makes the solution extra attractive. For backup, you simply deploy Azure Backup and configure a backup of Azure file shares on a schedule that works for your organization.

Now, let’s say that you need to replace your existing physical server, either because it is just time for a refresh, or because you had a sudden crash or hardware failure in your datacenter. No problem. In the short term, your end users can connect to Azure via VPN and get access to the cloud-based shares quickly. In the long-term, you would replace your physical server with something cheap and affordable: just install the agent to present the shares locally out to the network, and away you go.

Thus, Azure File Sync turns your local server into something resembling “Branch Cache” (if you were familiar with that Windows Server feature, it’s a very similar idea). It is not unreasonable to assume your current server capacity could be scaled back to maybe 20% of the storage requirements (most data lives in the cloud, with only the most frequently accessed items available on the local disks).

The big benefits to this service are that legacy applications generally still work with it (since it is still just SMB shares), and it tends to be more affordable per-user or “per-gigabyte” especially with cloud tiering enabled. Note also that both domain and workgroup environments are supported with this solution.

Alternative #3: Split the difference

The last option is to forge ahead (mostly) with Microsoft solutions: usually in a “hybrid” configuration where the on-premises server is going to be around for at least one more refresh cycle while your organization figures out the rest of the puzzle on its own.  Note: you can still start to relocate certain Office documents into OneDrive, Teams, and SharePoint as well, but you don’t have to go “all in” either. Take the time to learn how your organization can work around the current limitations in various ways. This makes for an easier end-user transition while still taking advantage of the elasticity and flexibility of the cloud where it makes sense.

For example, we direct people to use the SharePoint web interface and/or the Teams client for most shared repositories, and only sync very few data locations that contain smaller numbers of files (like a specific project folder), or other areas where the users work daily. We generally also recommend enabling the groups expiration policy and retention policies to keep content fresh and current (removing old, dead data regularly).

In a big migration project, we may even recommend migrating only those datasets which are considered “active” working data, versus all the “archival” stuff which may not need to exist in the cloud, at all. This helps cut down on clutter and overall storage demand. Some of these legacy items might end up on a separate network segment somewhere, on a legacy file server, SAN, or NAS device (where they go to die a slow death). Or maybe this is where we find a separate cloud storage account and place it under the care of a specific individual or individuals with access to those particular locations.

I should perhaps mention, there is also an alternative OneDrive/SharePoint sync client out there called Zee Drive, which some people have reportedly found success with (I cannot say much about it other than what others have told me—in other words, this is not an endorsement by any means).

Conclusion

Keep in mind that many organizations fit nicely within the existing limitations and have no problem moving 100% into the Microsoft 365 cloud ecosystem. Especially “Microsoft Office-centric” professional services that work primarily in the Office apps, perhaps with a splash of Adobe on the side, etc.

At the same time, there are many, many companies who run into these barriers due to legacy apps, large file types, larger file sets, etc., and therefore, these folks often wander down a different path. Sometimes, this means going to a third-party cloud, or it means remaining in a hybrid situation, or patching together some other alternative. This is not a new problem, either. Honestly it is a bit surprising that even now, in the year 2022, we are still left wanting in certain areas, and there isn’t always just one satisfying “right” answer. But, that’s where your consulting comes in, isn’t it?

What else have you been deploying for your customers when Microsoft doesn’t quite fit the bill? Let us know in the comments, below!

The post Alternatives to OneDrive and SharePoint (and when to consider them) appeared first on ITProMentor.

✇ITProMentor

Reader Question: How can I set up a “Deny-by-Default” Conditional Access Policy?

It has been a while since I took a question from a reader and turned it into a blog post. It is one of my favorite things to do here on ITProMentor, but the “busy-ness” of life has taken me away from the keyboard a lot in recent months. Now that I am (mostly) settled in a new home, I plan to rekindle some of these old joys.

This one came from Devin, who lives in the U.K.:

Hi Alex, I hope this message finds you well. I watched a recorded presentation of yours where you compared Conditional Access to a “Firewall for the Cloud,” but you mentioned that there are important differences. Specifically, you made the point that most firewalls have a “deny-all” rule by default, and it is up to the administrator to open the inbound ports that are necessary. In Conditional Access, you said it is almost the exact opposite, where everything is open by default, and you have to tell the system what you want closed.

This got me thinking, wouldn’t it be possible to start by creating a “deny-all” rule and then add other rules in front of that, to open the specific applications and access scenarios that you wanted, and no more? Wouldn’t this be more in line with the whole ‘Zero Trust’ concept?

Thanks for your insights!

–Devin, U.K.

Great question Devin, and I am glad that you asked it. No analogy is perfect, and it is actually because of these imperfections that the “firewall” comparison can be so illuminating. This will give us the chance to clarify a few things about Azure AD Conditional Access in general, and as well, offer some potential solutions to certain problems.

The first thing to remember is that Conditional Access differs from firewalls in another important way: there is no “ordering” to the rules. I cannot place one rule “in front of” another. All rules are evaluated simultaneously in Conditional Access. So, if I create a rule that says, “Block X,” it does not matter if that rule is located further up or down in my list. It will always be evaluated the same way. “X” will always be blocked.

This also implies that any “block” control always will always win over any “grant” control. Therefore, if I created one rule that said, “Block access to Email” (scoped to All users) and another one that said, “Grant access to email but require MFA” (either scoped to All users, or enabled for a specific security group), then guess what happens? Access is still blocked. In order to get the desired effect with these two policies, you would need to create a security group called something like “Email allowed users” and add that security group to the “Exclude” tab on the Block access… policy.

So, the answer to your question is both yes and no: it is possible to create “Deny-by-default” rules, but not exactly in the way you suggested. But in fact, this type of design (writing explicit block rules for everything then making many exclusions) would be unnecessary for most organizations. I will explain why shortly.

First, just notice that writing your “default deny” rule or rules quickly increases the complexity of your implementation. For example, you would need to manage double the policies and several security groups and exclusions for every access scenario you wanted to open/allow.

  • Deny mobile access for all users / Allow mobile access for approved users
  • Deny browser access from the desktop / Allow browser access from the desktop
  • Deny client app access from the desktop / Allow client app access from the desktop
  • Deny access to administrative services / Allow admin access
  • Deny all guest access / Allow guest access to approved apps
  • Etc.

I think these designs tend to get messy very quickly. You might say, so what? Why not do it this way?

Before we answer that question, let’s take a closer look at one of the other concepts I normally address during my talks on Conditional Access: the two so-called “Architecture types.”

Open (or targeted) architecture: This means targeting your policies to address specific access scenarios.  For example: “Require MFA for access to Office 365,” or “Require managed devices for access to Email.” In this architecture, you are putting specific requirements around certain applications or access scenarios, while leaving others “open” or unguarded (i.e.. you do not have policies covering “All cloud apps”).

Closed (or universal) architecture: This means targeting your policies as broadly as possible, for example All users / All cloud apps, e.g.: “Block legacy authentication globally,” or “Require MFA for all users.”

Closed architecture is better aligned to the concepts of Zero Trust since you are not leaving any “holes” or scenarios free of the constraints imposed by the policy. Note that it is also possible to combine these architecture types into a single policy set. For example, you may have a universal requirement for MFA across all cloud apps, but you only require managed devices for access to email, or certain other applications. That is completely fine and up to each individual organization.

Why Closed Architecture is more like Deny-By-Default

Now, let’s assume your goal is ultimate Zero Trust protection across all cloud apps, and that you want to impose both a multi-factor as well as a managed device requirement everywhere. In this case we require multiple policies for various reasons (e.g., easier troubleshooting, better for making more granular exclusions, and covering various access scenarios).

To begin, we need several policies enforcing the MFA requirement:

  • Block all legacy authentication: legacy authentication is vulnerable to password spray and replay attacks, and it does not support MFA challenges, so we should eliminate it for all users and all cloud apps.
  • MFA required for all admins: it is a best practice to have a policy covering this scenario even if you plan to place the same requirement against all users; that way, if the policy for standard users changes or needs to be temporarily disabled, admins are still protected.
  • MFA required for all users: This is your universal MFA requirement for everyone
  • MFA to register/join devices: We have a separate “User action” to control this behavior, as it is not covered by the “All cloud apps” selection above.
  • Secure the security info registration page: We have a separate “User action” to control this behavior, as it is not covered by the “All cloud apps” selection above. Also, it is recommended to enable the Temporary Access Pass option so that users can still get in to edit authentication methods with help from an administrator, even in the absence of another factor such as a mobile app or hardware token.
  • MFA for guests: Note that we can also trust MFA claims from other tenants, so that users are not double-prompted. If you have a policy for the guest access scenario, be sure to modify your default trust settings from Azure AD > External identities > Cross-tenant access settings.

And we need another policy set enforcing device-based requirements, for example:

I suggest that this configuration achieves the “Deny-by-default” posture that we want, without needing to add another “Block” policy on top of it, with additional exceptions, etc. Let me explain why.

When you create a policy with access controls that say, “Grant access” and “Require X, Y or Z” then you could also read this policy as saying,  “Access is denied unless X, Y or Z can be met/satisfied.” Therefore, if you do not satisfy MFA, or do no have a managed device, and your policy explicitly says those things are required, then guess what? No access for you!* This is already “deny by default.”

(*By the way, if you target “All cloud apps” with a compliant device requirement, then you must also exclude the Intune enrollment app or else you will be unable to enroll new devices. It’s like a chicken-and-egg problem: you can’t get enrolled in the first place to become evaluated for compliance if there is a compliance requirement in order to get enrolled. Note there may be other impacts as well with other cloud apps when enabling closed policies.)

Additional Deny-by-default rules

Another popular policy set is to have broad “location-based” rules that “deny-by-default” except from approved countries or locations. Example:

  • Block access from non-domestic countries: this policy is usually scoped to All cloud apps (closed), with a Block access control placed against All locations, excluding a named location containing the domestic country (e.g. USA, or wherever you live). Optionally, you can also use filters for devices to exclude managed devices (that way you can travel with devices that are already enrolled/managed)

And you can apply this concept to device platforms as well:

Anecdotal story

Let me briefly relate another story that hopefully clarifies the point further. This one combines the concepts of Open architecture with a “Deny-by-Default” policy (for a specific application: email).

Recently a non-profit organization contacted me with a very particular request. They wanted to use Closed architecture for their core policies (i.e., block legacy auth & require MFA), and at the same time use Open architecture for their device-based policies, especially for personal (mobile) devices. The main concern was around corporate email on personal devices. Okay, that’s no problem, and in fact is very common. Here is the catch. They had a very specific on-boarding process whereby a user would not be allowed to gain access to their corporate email using a mobile app until they had completed an E-safety training module. HR would assign them to a security group shortly after passing the exam, and they would thereupon be granted access (but not before then). It was basically a carrot for completing the course material.

They did not want a closed architecture because the scope for this requirement was no wider than email (Exchange Online). However, they still needed a “fail closed” policy set for this application because they did not want a user to gain access on mobile devices before passing the exam. So here is what we did: We implemented the usual policy set for block legacy auth, MFA requirements, etc. Then for the device-based requirement, we only targeted Exchange Online, and used a security group called “Allowed to access email on mobile devices.” We then created two policies:

The first policy was called “Block access to email on mobile devices” and it was configured as follows:

  • Users and groups:
    Include: All users
    Exclude: Allowed to access email + Emergency access accounts
  • Cloud apps: Office 365 Exchange Online
  • Conditions: Device platform > iOS & Android
  • Access controls: Block access

Then the second policy was called “Allow access to email on mobile and desktop apps” and it was configured as follows:

  • Users and groups:
    Include: All users
  • Exclude: Emergency access accounts
  • Cloud apps: Office 365 Exchange Online
  • Conditions: Client apps > Mobile apps and desktop clients
  • Access controls: Grant access w/ Compliant device or Approved App or App protection policy

Remember that all other access scenarios around this application are already covered by our “closed architecture” design for the MFA requirement, etc. This is an additional requirement that says access is granted only when the device is managed (MDM), or the app is protected (MAM), and when the user belongs to the proper security group (indicating they passed the E-safety course).

Now, in my opinion this configuration is not any “safer” or “more secure” than simply deploying the second policy and forgoing the first policy altogether. The reason we deployed both policies wasn’t “because security” or “because deny-by-default,” rather, we did this specifically to enable the custom workflow that they wanted to have, with the training pre-requisite. That’s it.

Conclusion

If your goal is to align your Conditional Access strategy as closely as possible with a ‘Zero Trust’ model, then you should probably be aiming for Closed architecture. However, a closed architecture approach may not be right for every organization and every application/access scenario. Whenever I implement Conditional Access, I always push closed policies for the basics: blocking legacy auth and enforcing MFA. After that, I think it is a good idea to begin evaluating device-based policies with regard to corporate email access specifically, and go further where it makes sense, even all the way to a closed policy set, especially in high-sensitivity or high-security environments. Just be aware there may be other impacts to certain applications (e.g. Intune enrollment, etc.).

Hopefully this cleared up the confusion for you, Devin. Thanks for writing in.

The post Reader Question: How can I set up a “Deny-by-Default” Conditional Access Policy? appeared first on ITProMentor.

✇ITProMentor

Updated Migration Advice: Remove the last Exchange Server?

The last time I published articles on the topic of email migration was in the long, long ago: in the before time. Yes, before pandemics and novel coronaviruses, but also before we had the option to remove the last Exchange server. Some have asked me if I would change any of my instructions or advice for migrating from Exchange on-premises to Exchange Online in light of these recent developments.

My short answer is: it depends, and even then, only if you want to.

For the longer version, read on.

Do you really need hybrid?

The first thing to note is that the new process for removing the last Exchange server is only going to be applicable to a minority of SMB tenants who require long-term hybrid identities with directory synchronization. Why? Because the vast majority of SMB’s should be focused on removing traditional AD anyway, and migrating toward cloud-only identities in Azure AD (as many have already done).

When someone says they absolutely cannot get rid of the local AD, that usually means there is either some legacy thinking, or a legacy Line of Business application standing in your way. This blog has often dedicated articles to dismantling the barriers related to the former problem, but when it comes to the latter (LOB apps), how should we address them?*

First, determine if there are actually dependencies here or not. For example, there may be web-and-mobile friendly alternative apps of which the stakeholders are unaware. If not, and you have to stick with the existing app, next you must ask: Does the application rely on Active Directory or Exchange mail attributes in any way? If so, you may have a legitimate reason to keep these systems around, if not, then proceed accordingly. Most of the time, the perception is different than the reality: most apps do not actually have a hard requirement for AD.

In some circumstances (where supported), legacy apps can be hosted in a virtual desktop environment by a service provider, or in Azure, leveraging Azure AD DS or a standalone pair of small-sized VM’s promoted as DC’s, along with Azure Virtual Desktop or similar. And of course, there is always the old refresh your server on-premises if none of these other options appeal to you.

Assuming you have exhausted your other choices (e.g. drop-and-shop) and you’re still stuck with a legacy AD (either on-prem or in the cloud), then your next step is to decide how important it is for you to keep the same credentials for this legacy app as you have for say, your email and cloud-based applications. Very important? Then consider keeping a hybrid connection. Not so important? Perhaps it is time to isolate this app from the rest of your (more modern) environment.

And what about legacy file shares?

Another place people get stuck is on larger-sized file migrations, particularly where there are lots of really large files like CAD drawings, etc. In this case you have similar choices to make. Just think of this requirement no differently than other legacy LOB apps.

How much of this storage is “current” and how much is just archival and can be pushed to an alternative cloud platform such as Azure Files or even a third-party cloud storage solution? Or, if you are going to elect to keep a local file system, will it be Windows-based and connected to the same identity/credentials as your email and other cloud apps? Or should you isolate this on a separate, purpose-driven system or alternative solution?

These choices will be up to you. Again I want to point out that this a niche case, and that the demand for this kind of solution is going to be an exception, not the rule. Most SMB’s with typical information workers can simply move files to OneDrive/SPO/Teams, and/or Dropbox, Box, Citrix ShareFile, or similar. In other words, cloud-based apps that can be connected to Azure AD for SSO and better security.

The hybrid path (only if you need to or want to)

Most of the time, small organizations are coming from older systems, such as Windows Small Business Server 2011, or Windows Server Standard 2008R2, 2012, 2012R2, or 2016, with Exchange Server 2010, 2013 or 2016 installed on top of one of those systems. If you are coming from anything older than that, then I would recommend a third-party tool to assist in the migration process. Otherwise, hybrid or “remove move” migrations will be the best migration option for you (or you can still use third-party tools if you prefer).

Once you are done with the migration, then you can either keep an Exchange 2016 or 2019 server around for hybrid purposes (like we have always done), or, now, you can choose to get rid of it. But for this option you will need to have Exchange Server 2019: so if you came from say 2016, add a 2019 server and run the latest cumulative update before executing the process to remove the 2016 as well as the last 2019 server. Remember that even after you “remove” the last Exchange server (really you’re just shutting it off forever), you are still dependent on the local AD for your identities and specifically for all the mail related attributes: the source of authority is still on-premises, and the Azure AD Connect synchronization must still remain in place just as before (so not that much has changed, really).

Review this Microsoft docs article for more details on how this “Exchange Server Free” hybrid environment looks in practice. Two main differences:

  1. You will no longer have to maintain a server with Exchange installed on it for hybrid management purposes
  2. You will no longer have the Exchange management web UI, and instead you will only have some PowerShell cmdlets with which to manage the attributes

Actually, Steve Goodman over at Practical 365 has provided a graphical web-based tool for managing the Exchange attributes after removing the last 2019 server. See this article for more details.

Okay, so the proper migration steps would be:

  1. Make sure your source environment has latest available cumulative updates
  2. Add your domain name(s) to Microsoft 365, verify (add TXT) but do not cut over MX yet
  3. Configure Azure AD Connect to sync identities & on-premises passwords to the cloud
  4. Run the Hybrid Configuration Wizard (HCW) / alt: third-party tool setup
  5. Create your remote move migration batches / alt: third-party migration batch setup
  6. Migrate public folder data (if applicable, usually try to replace w/ Groups, Teams, etc. instead)
  7. Finalize your migration batches
  8. Cut over MX records, SMTP relays, etc.
  9. New post-migration and clean-up tasks:
    1. If needed, add or upgrade to Exchange server 2019 (latest CU)
      • Remove older Exchange servers as applicable
    2. Follow the process to shutdown the last Exchange 2019 server permanently (optional)
      • Moving forward, update processes to manipulate mail attributes using the new cmdlets
    3. Consider configuring Hybrid Azure AD Join for your PC’s and configure device-based Conditional Access to improve security

Similar to how we have always done things, with a few extra items tagged onto the end.

Cloud-only identity (the preferred path)

As always, I encourage you to strongly consider severing your ties to that old beast known as Active Directory. Most folks can get by just fine (better actually) without it. In this case your migration looks very similar to the above, except that your post-migration tasks will include a different subset of items:

  1. Remove Azure AD Connect + Exchange hybrid
  2. Move shared files & other apps to the cloud or cloud-based alternatives (and setup SSO to Azure AD wherever possible)
  3. Join PCs to Azure AD and configure device-based Conditional Access
  4. Move DHCP from AD to firewall or router
  5. Shut down the AD domain forever

In this configuration you are in the best possible position to implement additional security & compliance capabilities, and take full advantage of the other goodness the cloud has to offer, without carrying any of the baggage of days past.

I really do think that the hybrid path appeals to a dwindling subset of SMB organizations: the vast, vast majority of you should be looking to cut ties and go toward cloud-only identities, even if it means managing a separate credential set/security boundary for a legacy app in some cases (especially if it is going to be temporary). But, if you are one of those “special case” customers, we now have the option to maintain a hybrid environment, without necessarily keeping that old Exchange server around. Some may still prefer to keep the Exchange server, and that’s totally fine as well.

If I were forced to keep a legacy AD around, I personally would choose to kill the directory synchronization and just maintain a separate security boundary for that application specifically. But that is due to my own preferences and risk tolerances. You may come to a different conclusion. I won’t shame you for it, as everyone has a right to be wrong. At least now you know how to do the wrong thing the right way.

:)

The post Updated Migration Advice: Remove the last Exchange Server? appeared first on ITProMentor.

✇ITProMentor

Selling the Digital Transformation Journey: Security & Compliance

When I talk to customers about their Digital Transformation Journey, I always like to give them the “10,000 foot view” so to speak. I suggest that we explore two different angles or “big pictures”  in order to paint an image that customers can then imagine themselves into. The first picture is Security & Compliance, and the second is Productivity & The Modern Workplace. Let’s start by examining the first.

With regard to Security & Compliance, we have to set the stage a bit: why should customers care about this stuff? After all, cybersecurity initiatives typically struggle to get funding and other traction, especially in the small and mid-sized business where resources are more scarce to begin with.

The structure of your pitch

You will often see security vendors at conferences begin their presentations with scary statistics about how many breaches occur each year, and how the cost of an average breach has been steadily increasing year-over-year; I find this type of information to have a very limited effect on people. If something like that is going to be your angle, it is far more effective to relate real-life stories, and the “closer to home” each story hits, the better (yet some orgs will refuse to act until it is their own home which is hit, and they become one of those stories you end up telling to others).

But selling customers on the importance of security & compliance should not be based on scare tactics, anyway. You also have to paint a picture of value. Give them a preview of what it looks like to live in the new world you want to guide them into. Remember that all changes are going to be met with some resistance (this is only natural), yet these changes are ones that must take place sooner or later. Plus, you can highlight new features such as Sensitivity labels, which grant users new superpowers they’ve never had before. In general, it is much more difficult to prod people from behind into the darkness than it is to coax them into the light, leading from the front. In other words, carrots are better than sticks.

The corollary in this message which you must communicate explicitly is that you have already walked this path yourself, and you have no regrets about doing so. You will also take them down this path, and it will go just as smoothly, or even better, since you already know the pitfalls and dangers that lie along the way. As you paint this canvas, also be sure to highlight how the new tools or capabilities would have prevented or mitigated the problems you shared earlier in your anecdotal stories.

In addition to sharing relatable anecdotes and painting the preview or picture I want them to inhabit, I normally make it very clear that this past decade has seen such a radical shift in the cyber landscape, that I can no longer afford to waste my time with customers who will not take this journey seriously. If they cannot even be bothered to implement a basic level of cyber hygiene such as CIS Implementation Group 1, then they are essentially begging to be compromised, and simply I cannot give my precious attention to folks who will not even address the most essential of risks, and therefore any further engagement is off the table. This is also why I suggest beginning your new engagements from Security & Compliance rather than Productivity & The Modern Workplace.

Let me be clear: this might mean you have to fire some existing customers, even long-standing ones. But that’s okay: you are going to replace them with better ones (the ones who will actually listen to you and trust your recommendations). Notice this is different from either a stick or a carrot. It is more like a “filter” or disqualifier.  Holding up this barrier is only fair to them, and enormously helpful for you, plus it sends a very strong message (it projects confidence in your own practice).

So let’s review: you should plan your Security & Compliance pitch using these key components:

  1. Relatable anecdotes from the wild (and the closer to home the better)
  2. A preview or “picture” of where your customer is heading and the new capabilities you will bring to them
  3. An ultimatum / disqualifier

So what does good look like?

Once you have a prospect’s attention, you will need a simple and engaging way to explain your Security & Compliance offering to them. If you are primarily selling solutions built on top of Microsoft 365, as I am, then I suggest leveraging the concepts, marketing and language that Microsoft themselves have already produced. For example you will see them speak and write frequently about “Zero Trust,” and what that phrase means to them.

They have also published some detailed documentation such as the Zero Trust Deployment Plan, which is targeted for Enterprise (read: E5) customers. You can simplify this for SMB a bit further, as I have done here:

Follow our simple 3-tiered approach to Zero Trust

There is no need to reinvent the wheel (that’s what Microsoft’s materials are there for). Plus, if a customer decides to “spot check” your pitch, they would find solid validation with a quick Google search.

Aren’t Security and Compliance different things? Why not two offerings?

You can sell separate offerings if you want to, sure. Remember that a “compliant” environment is not necessarily a secure one. On the other hand, the items that are generally called for in a high-regulation, compliance-intensive scenario most often exist because of concerns around data security. For this reason, I always suggest that you approach your engagements from a “Security-First” mindset. When you build a good, secure foundation, you will very often find that compliance is a breeze thereafter, and this is because most compliance requirements will map back to common cybersecurity frameworks such as NIST anyway.

And yes, I am aware that in some cases “compliance requirements” actually contradict the latest cybersecurity guidance. The most common example I see thrown around is password complexity & rotation requirements, which are moot after the implementation of a good Zero Trust baseline including Multi-Factor Authentication and other identity protection systems. Look, I have gotten into with auditors before: I have found that the spirit behind the law is more important than meeting the letter of the law itself. So with regard to this particular example, the point is not to put people through the discomfort of changing passwords every 90 days, the point is to protect them from credential theft and identity compromise. We have better, more sophisticated ways of doing that now which are more comfortable, so why would we go backwards? I have fought this battle and won on more than one occasion (so that we could end password rotations), and I won because I supported my claims with reputable references.

Anyway, my original point is that you can splinter off a cybersecurity essentials baseline offering, and then have “compliance” add-ons for helping organizations meet more specific requirements such as PCI, HIPAA, GDPR, etc. as needed. Some service providers will specialize around a particular vertical, and get to know their requirements really well, and then just focus on those (then a single, flat-rate Security & Compliance offering makes a lot of sense). How you bundle this stuff and sell it to your customers is largely up to you. I would not say there is just one right answer here.

Conclusion

Once your customer has committed to the Security & Compliance journey, then you are off to a very good relationship indeed. From here, you can begin to explore the next big picture, which is improving productivity and modernizing outdated, tired business practices. This will require a new change of frame, so to speak, and another pitch. But this second journey is going to be taking place against a more secure background than what you had before (this actually makes life easier and less stressful for both you and your customer). Without the first journey, you could jeopardize all of your subsequent efforts in the second: the modern workplace transformation should be undergirded by that Security-first foundation.

If you enjoyed this blog post and would like to see more content like it, which goes into greater detail and gives you an opportunity to work with myself and other peers who are implementing these solutions for customers, I would suggest you check out our SquareOne Practice Development Group.

After you get your customers onboarded to your “Security-First” services, the next step is helping them to complete their digital transformation and maximize the value they invested into the modern workplace. But that is a topic for another day.

The post Selling the Digital Transformation Journey: Security & Compliance appeared first on ITProMentor.

✇ITProMentor

What are the limitations with Microsoft Defender for Business Standalone?

Most of my readers will already be familiar with Microsoft Defender for Business (MDB), which is included with Microsoft 365 Business Premium. And a majority of those will be deploying MDB as one part of a broader security solution which includes other services within the Business Premium bundle. But a subset of folks have asked about the “Standalone” version of Microsoft Defender for Business.

Yes, it is true, there is indeed a standalone version (USD $3/user/month), which was announced last month. The use case? Consider a scenario where the customer is using a different productivity platform such as Google Workspace, or they haven’t yet made the transition to other Microsoft 365 services. Using the standalone SKU, you could theoretically onboard devices and start providing protection, ahead of deploying other services, and with far less upfront licensing commitment.

Some of the MDB-related services will function much in the same way as you are used to with the full product, however, you should be aware that certain services would only be available with an Intune license (Microsoft Endpoint Manager). For example, the “Automatic onboarding” option during the first-run wizard experience requires devices to be enrolled with Endpoint Manager already. As well, certain functionality in the Microsoft 365 Lighthouse product may rely on the presence of the Intune licenses in order to work. At the same time, some functionality within Endpoint Manager will still be available, even without the “complete” license set. In fact, just enough of the MEM product is activated to make basic policy deployment possible for the “standalone” scenario. Clear as mud, right?

Show me

Let’s take a look at an example where I have onboarded a new “standalone” device into a tenant where I also happen to have some “fully licensed” Microsoft 365 Business Premium users.

In the first place, I need to actually purchase and assign the standalone license product to the correct users. For this purpose, I created a new user named “Mark Twain” in my tenant, and assigned the MDB standalone product.

Assign the MDB standalone license

Next, we want to check on a couple of settings related to this scenario. Begin by navigating to Settings > Endpoints from the Microsoft 365 Defender Security Center, and click on Enforcement scope.

Enable the features in Defender security center

You will want to turn On the setting called Use MDE to enforce security configuration settings from MEM and select the OS choices below (and yes: Windows Server support is coming soon to the Business product).

Then, check Microsoft Endpoint Manager by navigating to Endpoint Security > Microsoft Defender for Endpoint.

Enable the features in MEM

Be sure that the option Allow Microsoft Defender for Endpoint to enforce Endpoint Security Configurations is switched to On, and Save settings if necessary.

With those settings in place, let’s onboard a device named “Workstation10” using the local script method (you could also use GPO or other methods, but just note that you cannot use MEM to onboard the device in this scenario since the requisite license is not available and the device is not enrolled into the service).

Run the local onboarding script

Okay, now that the script has been run, we expect the device to show up in our inventory. Let’s take a look. We should be able to see it from the Defender Security Center:

See the device from the Defender Security Center

Yep. And as well, from Endpoint Manager:

See the device in MEM

You will notice in both cases that there is a column called Managed by which will indicate whether the device is being managed by Intune or MDE (which is the Enterprise term for MDB). Those devices which are managed by MDE are the so-called “standalone” devices. You will also notice that not all the data are available for standalone devices, because they are not enrolled with Intune (therefore things like Compliance cannot be evaluated).

Finally, you will notice that we can still take all the same actions against standalone devices, such as Isolate device, Restrict app execution, Run antivirus scan, Collect investigation package, Initiate Live Response Session, etc.

Same device actions are available for standalone devices

I will also add that in addition to the device inventory and device actions, the Vulnerability management functionality that we have via the Microsoft 365 Defender Security Center is still available and visible for standalone devices.

TVM data is available for standalone devices

Assigning policies

Let’s say you want to assign policies to your standalone devices. We can either use the Microsoft 365 Defender Security Center (you will find it under Configuration management > Device configuration), or we can use MEM. Since the purpose of this blog is to highlight the boundaries and limitations of MEM with regard to these standalone devices, let’s examine the option to assign policies from Endpoint Manager.

Start by creating a Dynamic device-based security group. Go to Groups, and create a new group. Name it something descriptive like “MDB Standalone Devices” or similar. Then, use the following expression to capture the devices managed by MDE:

  • (device.systemLabels -contains “MDEJoined”) or (device.systemLabels -contains “MDEManaged”)

Create a dynamic device group

(Note: I have also observed that using the “All devices” option works as well when making assignments, but it can be useful to have a group that can identify for you which devices are managed by MDE/MDB, and not yet onboarded to MEM.)

Next we can create a policy and assign it to our new security group. The following policy types are supported currently:

  • Antivirus
  • Firewall
  • Firewall rules
  • Endpoint Detection & Response

I suspect we will see additional policy types supported in the future (e.g., Attack Surface Reduction), but at the time of this writing, the above is all that is included.

I created a simple Antivirus policy. Again this could also be achieved from the Microsoft 365 Defender Security Center, but I have elected to manage my policies in MEM instead for the purposes of demonstration.

Antivirus policy is applied successfully

Now, if I try to create and assign a policy that isn’t yet supported, such as Attack Surface Reduction rules, what happens?

ASR policy stuck in pending state

As of now, we see that it just remains in a perpetual “Pending” state. I hope to see support for more policies soon, though. Fingers crossed.

Takeaways

So can the standalone product do everything that the MDB product can when bundled with a more complete subscription set such as Business Premium? No.

Certain policies and functionality would require the “full” license bundle including Azure AD Premium and Intune/MEM. For example, if you want to unlock features like the Conditional Access integration, and measure device Compliance, or if you want to view and managing additional device attributes. But it appears that Microsoft is attempting to open “just enough” functionality here to support a sort of “lite” management scenario of the MDE/MDB product via MEM, even if you don’t have an Intune license. (It is always best of course if you can move into the full experience with the complete license bundle).

In my opinion, we should at least get support for Attack Surface Reduction rules added both to the MEM for standalone scenario, as well as receive a new way to deploy these policies from the Defender portal (like we have with Antivirus and Firewall policies today). I do not know if/when this will happen, but my hope is that we will see it yet this year.

And that is basically the whole story in a nutshell, as of right now. Hopefully that cleared up some of the more confusing points. If we get additional functionality in the future, I will be sure to report back.

The post What are the limitations with Microsoft Defender for Business Standalone? appeared first on ITProMentor.

✇ITProMentor

Making sense of the many DLP options for Microsoft 365

One of my readers wrote to me recently about an article that I penned a couple of years ago, on the topic of Data Loss Prevention in Microsoft 365. They pointed out that my breakdown was a bit dated now, and that the Microsoft universe seems to have become more complicated since then.

I suppose that’s true in some ways. I think some of this confusion was multiplied by the fact that many (if not all) of these products have new names now, such as the recent rebranding of the “compliance-related” features to Microsoft Purview. The other confusion points tend to revolve around licensing: “What is included in my subscription, and what requires an upgrade?

I wonder if I can help those who are seeking clarity by taking another stab at this from a slightly different perspective.

There are many different risks associated with data leakage and/or loss of data. Each risk has a different set of possible mitigations, and most of the time we can find a solution within Microsoft 365. In fact, sometimes there is more than one technology solution in this suite of tools which could help us to address a particular area of concern. Let us examine a few common risk concerns that businesses may have, and apply the Microsoft 365 features that best help us to address these concerns. I will also highlight the features that require a full E5 subscription, versus the more common Business Premium or E3 that we tend to see in the SMB space.

Concern #1: Loss or theft of a device with access to corporate data

This is the first concern I normally ask small businesses to address. If a device were to fall into the wrong hands, wouldn’t you want to be able to wipe the corporate data from it? There are several solutions to this problem.

The first is App protection policies (a.k.a. MAM policies). This would be the minimum recommended mitigation for most small businesses, and more specifically with regard to personally owned iOS and Android devices. Although these policies are also available for Windows devices, it is more difficult for me to recommend this option (for Windows, this turns on a feature known as Windows Information Protection, which ends up being a difficult user experience for most people).

We will soon have a new App protection policy for the Edge browser on Windows; when combined with a Conditional Access policy, this would allow us to grant access on personal Windows devices via the Edge browser (using a corporate profile), while blocking access from client applications such as Outlook or the OneDrive sync client. Therefore, no company data would persist on the device itself. You can already accomplish a similar outcome using something called Conditional Access App Enforced Restrictions, which enforces ‘limited web access’ where downloads are prohibited on unmanaged devices, and this works on any device platform or browser.

Another option that I generally recommend is requiring devices to be enrolled and compliant with corporate policies in order to gain access to corporate data in the cloud. This is accomplished with a combination of Compliance policies, and Conditional Access policies. I always require this at least for Company-owned devices, but this can be made mandatory for personal devices as well if you prefer. This way, not only do you have remote wipe capability over the device, but you can enforce specific rules and settings as well, including  rules to reduce other risks such as malware, for example, by deploying Microsoft Defender policies like Antivirus, Attack Surface Reduction, and Endpoint Detection & Response (at which point you are addressing risks well beyond data loss).

Controlling access to corporate data on managed and unmanaged devices can be accomplished with Business Premium or E3 subscriptions, but if you happen to have E5, some additional scenarios open up. For example risk-based Conditional Access policies that apply certain restrictions only when risk is detected.

Concern #2: Oversharing of sensitive information stored in the Organization

Some types of information should not be shared externally, or at least not widely outside the walls of the Organization. For example Social Security Numbers, or other Personally Identifiable Information (PII) are often considered sensitive information which should be shared more carefully. The same can be said for financial information like credit cards, bank account numbers, and so on. Sometimes these information types are even regulated by certain laws whether local or state or federal/nation-wide.

To address concerns with handling sensitive information within the Microsoft 365 service, we can write rules using Microsoft Purview Data Loss Prevention that can help us monitor and govern how these data types are to be shared and sent outside the Organization. In most subscriptions (e.g. Business Premium, E3) this includes common services like email and file sharing, meaning we can have rules which are triggered when sending emails or links out of OneDrive or SharePoint. With an E5 subscription we gain rules for additional services such as Teams chat and channel messages, and even on-premises file severs.

Usually the rules we write include such common scenarios as notifying an administrator when something sensitive has been shared, or filing an incident report. As well, we can take actions to automatically encrypt emails containing sensitive info, or we can block certain types of data from being shared at all. Any of these rules can be accompanied by notifications or “policy tips” which display warnings to the end user when sensitive information is being shared in a way which triggers the rule.

Concern #3: Movement of sensitive data from a device to an unapproved app or location

This is sort of a sub-concern of #2 above. Sometimes organizations will want to prevent the movement of certain sensitive data types on an endpoint, for example, to prevent sensitive information from being copied off to a USB storage device, or printed to a network printer, or uploaded to an unapproved cloud service.

For these types of rules, App protection policies can once again come to the rescue. I normally turn these features on for iOS & Android devices, and, as I mentioned before, Windows Information Protection is available as an option too, but I generally shy away from implementation of WIP for various reasons. Within all of these policies, we have the ability to block copy/paste and save to unmanaged apps and storage locations. Sort of like an “Endpoint DLP Lite.”

And that brings us to the “Premium” E5 subscription: here Microsoft offers Endpoint DLP, which brings some more granular DLP controls down to Windows devices only, and these can even be extended to Google’s Chrome browser using the Microsoft Purview Extension (note: all of this is still included under the umbrella of Microsoft Purview DLP, but again you need an E5 subscription to unlock it).

Concern #4: Control of sensitive information once it leaves the Organization

There are cases when sensitive information needs to be sent or shared beyond the boundaries of the organization. And in these cases, we want to ensure the data can still enjoy some protection once it moves beyond our control, to an unmanaged device for example, or to an outside party.

The flagship solution in this space is Sensitivity Labels (part of Microsoft Purview Information Protection). Labels which define Sensitivity can have a lot of different powers attached to them. Sometimes they may do nothing more than mark a file visually with something like a header, footer, or watermark. In other cases, we may want to apply encryption, so that the recipient of the file or email message will need to sign-in before they can read or work with the information. Encryption can also be accompanied with permissions that restrict certain capabilities (for instance we can prevent exporting or printing the data).

Other powers include being able to restrict certain sites or groups (including Teams) with rules like, “Unmanaged devices cannot download, print or sync the contents of this site.” Further, Sensitivity labels can be used as a condition when writing our rules in Microsoft Purview DLP.

Finally, it is possible to automate the application of Sensitivity labels under various circumstances. For instance, we can scan for and label data at rest using auto-labeling policies. Otherwise, we may want to apply or even just “recommend” that a certain label be applied using the auto-labeling settings within the label itself. Or, only apply labels under specific conditions, such as when a file containing sensitive information is downloaded to an unmanaged device from a managed cloud application (including third-party apps like Box or Google); in this case we would need to layer on an additional solutions, for example Microsoft Defender for Cloud Apps.  Most of these auto-labeling capabilities will require the E5 subscription, of course, or another add-on which includes these features such as Microsoft 365 E5 Compliance.

Another “premium” auto-labeling feature (read: E5) includes the ability to use trainable classifiers to recognize information that you want labeled in a certain way. With this solution, you feed examples to Microsoft Purview so that it can “learn” what you consider sensitive data. This gives you some capability to move beyond the common preset information patterns like Passport Numbers, Social Security Numbers, Credit Card numbers, etc. that you get with the standard DLP features.

Concern #5: Insider Risks

Some businesses may have a higher level of concern around insider risks such as:

  • Data theft by departing users
  • Data leaks by disgruntled users
  • Insider trading
  • Intellectual property (IP) theft
  • And more

Microsoft 365 E5 includes a Microsoft Purview solution called Insider Risk Management with several policy templates that can help you detect and take action on these types of events. This is an example of a more “advanced DLP” solution that also relies on additional components of E5 such as Microsoft Purview eDiscovery (Premium).

Since these are all dependent on more expensive subscriptions, most small businesses will choose to handle these risks in an alternative way. For example: by having a strict written policy, and leveraging the standard Microsoft Purview DLP rules to monitor or alert on the movement of sensitive data.

Conclusion

Here we presented a few examples of common risk concerns around data loss or leakage, and how each of these concerns can be addressed or mitigated using one or more possible technology solutions available within Microsoft 365. When you get into more advanced DLP scenarios, especially involving more automation, or control over third-party cloud apps, or insider risk management scenarios, etc., then we are talking about the more expensive Enterprise E5 subscription. The below table is an updated breakdown of the landscape today:

Table of risk concerns and solutions

I think this is a simpler summary, which is perhaps even easier to understand than what I previously published. I can’t say it is completely exhaustive, but it’s a pretty good overview of the most common risk concerns and the associated solutions that we tend to  implement.

The post Making sense of the many DLP options for Microsoft 365 appeared first on ITProMentor.

✇ITProMentor

A Sneak Peek at Application Management for Edge

This blog has been active for at least six years. To this day, I probably receive more questions about BYOD and the various options we have for management with regard to personal devices, than any other topic that I have written about. I think this just goes to show the types of challenges and questions that consultants and service providers face in the wild. It is also telling because I would have expected by now to see these types of questions taper off as the market “figured it out,” so to speak.

But we haven’t quite figured it out yet. Especially for Windows devices (ironically). Part of the problem, I think, is that we can approach the BYOD concerns in several different ways, so folks need help navigating their choices. While we have many tools available which can help us to enable BYOD experiences, unfortunately, every solution has its trade-offs. Some good, some not so good.

For example, take Windows Information Protection (a.k.a. MAM for Windows). This solution can be difficult to configure, and has a fairly large impact on user experience. Certainly it is not something you would casually roll out without some pretty decent planning and testing in advance, not to mention communication and expectation-setting with your user base. Plus, you’ll often find yourself needing to do maintenancy-things like update your approved network locations and cloud resources list, so that certain websites can be considered “inside the corporate fence” and play well with all of your corporate-protected applications.

Adding new cloud apps to WIP

And even after all that effort, you’ll still notice some serious limitations and drawbacks to the solution. To make matters worse, it is my understanding that Microsoft is stepping away from further development on WIP; when I have asked them about possible improvements to the product, they have pointed me toward Endpoint DLP as an alternative (thanks but no thanks…it’s an E5 solution anyway).

Therefore, I generally recommend against WIP, and suggest that customers either block personal Windows device access outright, or use an alternative approach like requiring device enrollment and full management (which does open another can of worms) or settling for the “Limited web access” experience via Conditional Access / App enforced restrictions.

In short, no matter which path you walk down with regard to Windows devices, every option seems riddled with gotchas and caveats that put a sour taste in your mouth. (And may I just add that it is absolutely maddening that Windows–Microsoft’s own product–still has a less mature and less functional app management solution than iOS and Android? I mean MAM for mobile devices is awesome–so why does it still suck on Microsoft’s own OS?!)

Anyway, soon we will have another option, and this one looks more promising (fingers crossed). It’s called Application Management for Edge. I believe it was first announced publicly here. There was also a digital event where they teased a bit of this functionality in a short demo (see the 11:20 mark in the IT Management and Hybrid Work breakout). Some notes from my observations:

Notice the new policy type

First, we see in the demo that there will be a new App protection policy type in Endpoint Manager (Apps > App protection policies). It appears the current policy we have will be renamed to Windows Information Protection, and we will be given a new option called Windows.

You can only select Edge at first

Based on these screenshots from the demo, only the Edge app is going to be available at first, but I am hoping that in the future we will see other Microsoft 365 apps (for the desktop) added here as well, including Word, Excel, PowerPoint, Teams, etc. (I have no idea if this is true but it would be awesome if so).

In any event, being able to target the Edge browser has some important benefits. First, we can enable a better web access experience that is tied to a corporate Edge profile, rather than a pre-defined network boundary, where we have to add all of our “protected” websites and apps to a list in advance. Then, it appears we will have the ability to set Data protection boundaries between the corporate profile and personal profiles, just like we experience with App protection policies on mobile devices (and it is about time)!

Set boundaries on data flow

We even have Health checks, and I spy that Minimum OS version as well as Defender’s Max allowed device threat level integration will be included off the bat as well, where the threat level on the device can become a bar for access to corporate data.

Configure health checks

Once the policy is implemented, the end user experience looks pretty slick so far  (and it doesn’t say this anywhere but I wonder if there is a Conditional Access policy requirement at play here as well, take a look and let me know what you think):

Access blocked from personal profile

When a user attempts to access a corporate resource such as email from a personal profile in Edge, they are blocked, and given an option to Switch Microsoft Edge profiles.

Sign in with the corporate profile

They sort of gloss over this prompt in the demo video, but when you sign in with a corporate profile, there appears to be an option to enroll your device in order to “Stay signed in to all your apps.” There is a checkbox here, “Allow my organization to manage my device.” Then at the bottom is an option “No, sign into this app only.” If you click OK without checking the box, I assume that would have the same effect as clicking the No… option.

Hopefully we will get an opportunity to remove this prompt entirely, in cases where we do not want users enrolling personal devices (I would suggest that blocking personal enrollment via device restrictions should automatically remove this screen from the end user’s view, but I suspect that it would still remain, so the end user who is restricted from enrolling could get an error if they attempt to check the box–we’ll see if Microsoft is smart enough to improve this flow before it is released to Public preview).

Health checks complete

We can see that the health checks have passed, the policies have applied, and the profile is now available on the device.

Notice the corporate context
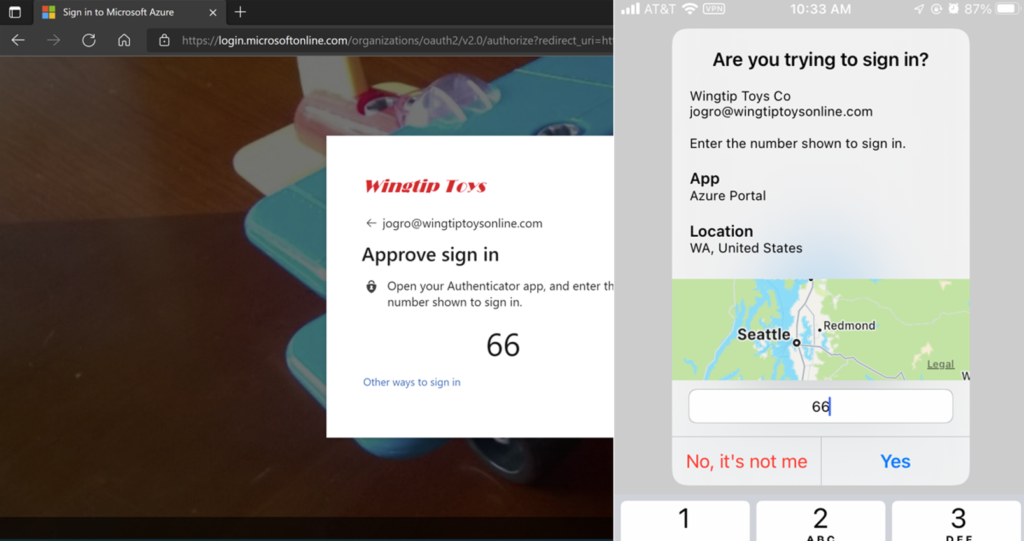
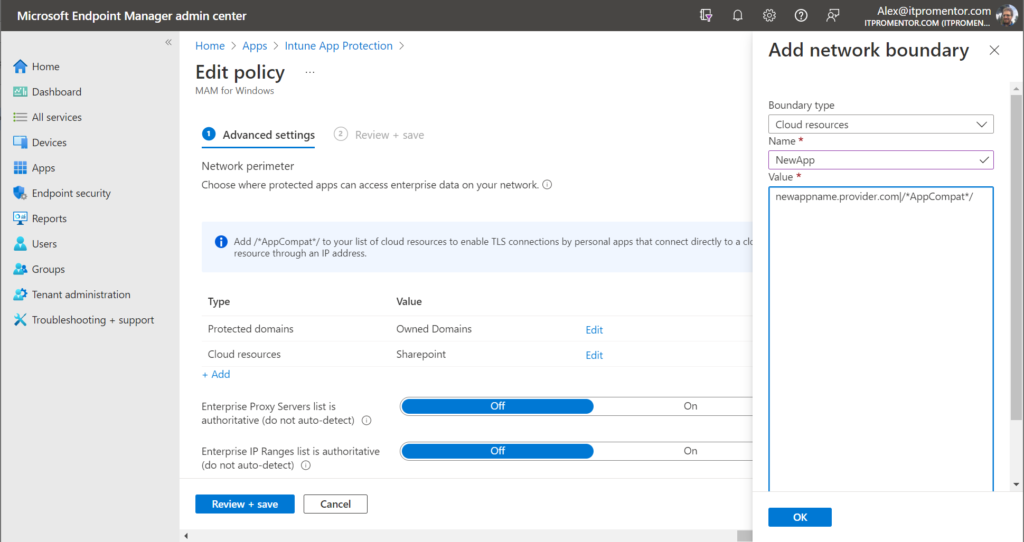
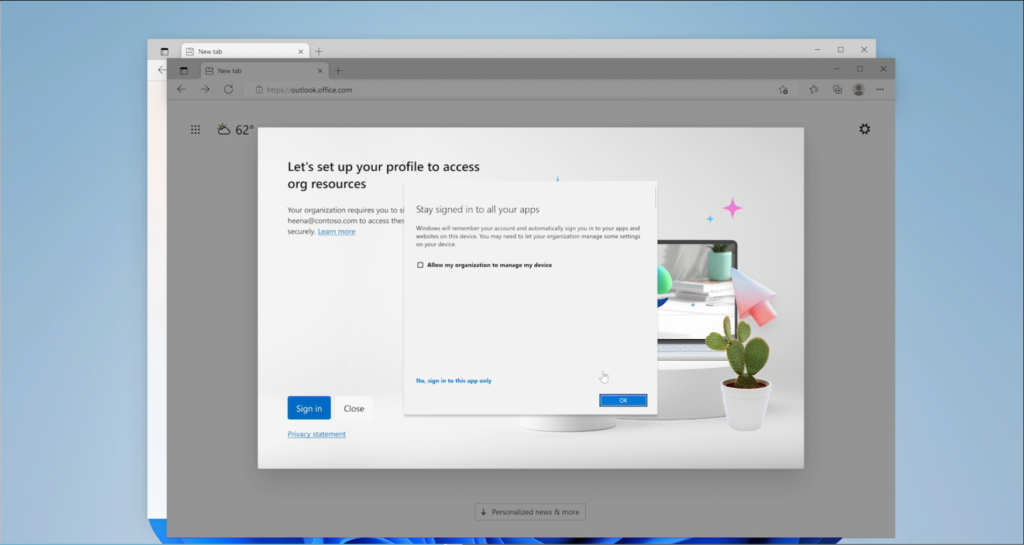
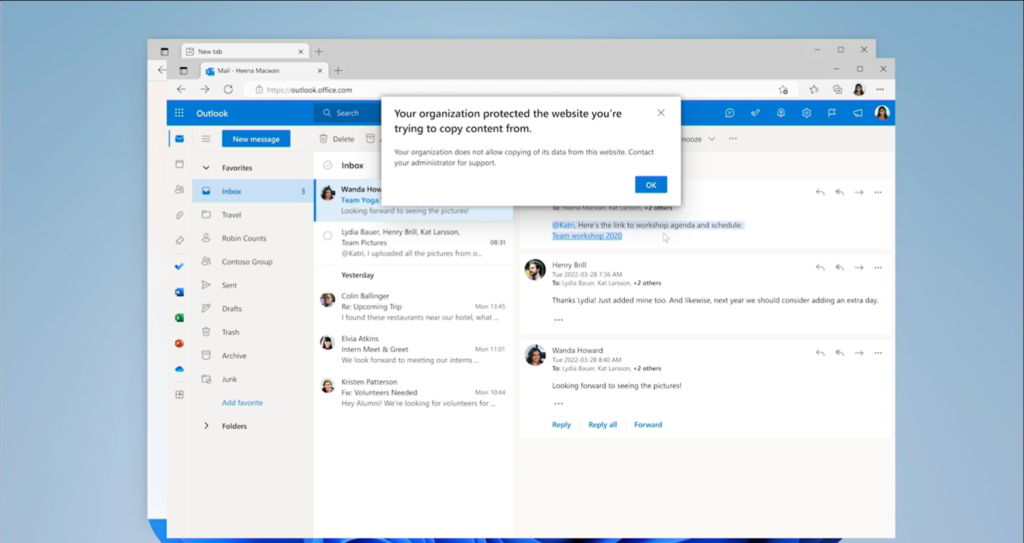
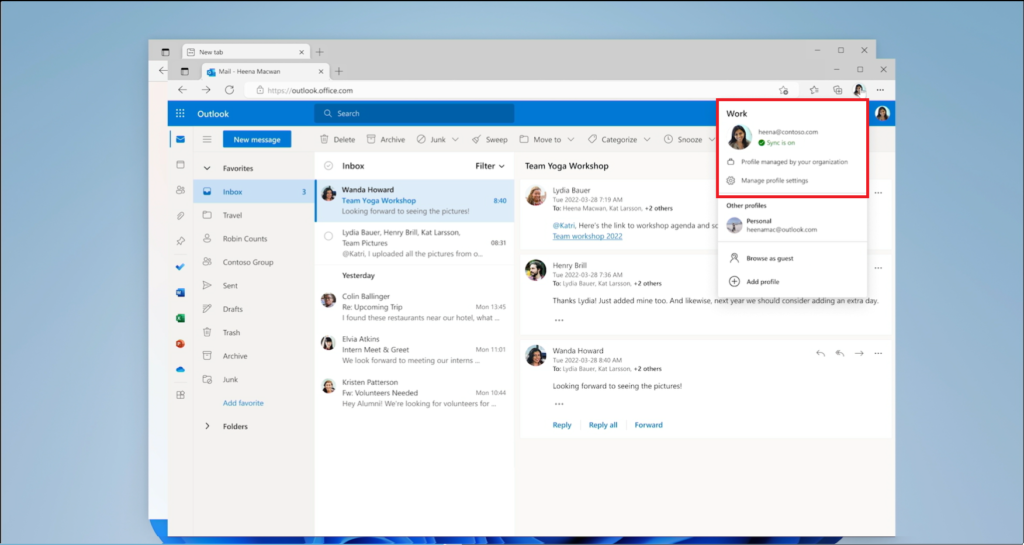
Clearly, we can see the user is now signed in with a corporate profile (and I suspect that this means any site the user visits under the corporate profile would be within the “corporate boundary,” without us having to manage a list of apps and websites in a “network boundary” within a policy somewhere).

Finally, we can see the policy in action, blocking a copy/paste action:

Block copy/paste policy in action

All in all, a massive, MASSIVE improvement over the legacy WIP experience: easier to set up for the administrator, and easier for the end user, as well. Although, until they add client app support for the desktop apps, this solution appears to be limited to web-only access at first, which is somewhat similar to the experience we have always had with Limited web access (using Conditional Access App-enforced restrictions). Still, I am optimistic that we will find this “profile-based” app management solution allows for more granularity and flexibility as development continues. I am excited to see this released to pubic preview (I haven’t seen a date on that yet), and of course, everything the future holds beyond it.

(I just hope this new policy will be included with Business Premium, and not held behind the E5 paywall!)


The post A Sneak Peek at Application Management for Edge appeared first on ITProMentor.

✇ITProMentor

The Importance of Clear Communication

I regularly advocate for aggressive change in small-sized organizations. In many ways, this is one place where smaller sized businesses have an advantage over mega-corporations. The larger the company, generally the longer it takes for them to adopt (and adapt to) new technology. There are exceptions to every rule of course, but if you ask me, as a small business owner I want to be as nimble as possible, and, due to my size, I can afford to be.

That having been said, the number one cause of friction and distress in our work lives tends to be… you guessed it: change. It causes discomfort when you move someone’s cheese, no doubt. We can all relate to that. So how do you make this uncomfortable experience as easy as possible?

The answer my friends is Clear Communication.

Setting expectations

Setting expectations is everything. The reason people get upset with change usually comes down to something so simple it’s almost absurd. We had one expectation, and then, suddenly, we were greeted with a different experience. To folks like us who work in IT and have grown accustomed to seeing a different set of screens every time we log into our admin centers, I think we can take our flexibility with new technology for granted. But I urge you to have some compassion with your users, because to them change can be a very frustrating experience.

Now some changes may happen outside of your control, so it is not always possible to manage expectations for every new bit or byte your employees are going to come across during their work day. However, one way you can avoid the Pit of End User Despair (TM) is to at least manage your communications in advance of any major change that you are aware of, especially the changes that you yourself are responsible for making.

For example, in Microsoft 365, managing devices or protecting applications makes your life as an IT admin much better, and improves your quality of nightly sleep, but it also comes with end-user impact. If you turn these things on without alerting people to the anticipated outcomes in advance, they are going to become very upset with you. And understandably so.

Therefore, it is imperative that you communicate your machinations in advance. This does a few things:

  • It sets the end user’s expectation. If they are “in on it” they are less likely to feel powerless: like these changes are just happening to them without any input or warning.
  • It dispels fear and empowers the users by giving them a “preview” of what is going to be expected of them moving forward.
  • It builds trust and rapport between you (or your department/company) and the end users.

You need this bank of trust, because when there are issues later down the road (inevitably technology breaks sooner or later), then they will be more likely to forgive and be patient with you if they are already “on your team” so to speak. It seems simple, but it is because of this simplicity that it is so important.

Generally speaking, I recommend making fewer changes at one time. So for example if you implement Multi-factor Authentication (or even passwordless authentication), do not also try to implement device or application management on the same day, or even the same week. Also, do not ask users to adopt an all-new application at the same time as other, security or management-related changes. Give folks some space between disruptions. As well, I suggest that you keep your communications short and to the point. The end user does not need to read a novel about why these changes are taking place. Just keep it straightforward:

  • We are making this change for your protection, and ours
  • We expect you to take such and such actions by this date
  • Moving forward, the new experience will be like this

Literally bullets, and maybe a 1-page branded PDF file with links to further documentation or video instruction.

Free resources

Check out my FREE Customer Communication templates for some more detailed examples that you can use and rebrand as your own. I also include a bit of additional instruction for the persons responsible for communicating the changes to staff.

Partial screenshot of one of the communication templates

Obviously the usual disclaimers apply: you will want to verify everything matches up with your experience because stuff in the cloud does not stay static, and of course you will want to apply your own colors and brand to the documents. Cheers!

The post The Importance of Clear Communication appeared first on ITProMentor.

❌