Vue lecture

Il y a de nouveaux articles disponibles, cliquez pour rafraîchir la page.
✇TFerdinand.net

Pourquoi vous utilisez mal l'IAM d'AWS

Pourquoi vous utilisez mal l'IAM d'AWS

Je travaille sur des environnements AWS depuis plus de 6 ans maintenant. Que ce soit en tant qu'Ops, architecte, ou architecte sécurité, il y toujours une constante que je constate autour de moi : l'IAM d'AWS est très souvent mal utilisé.

Dans ce billet, je vous propose de faire un petit tour d'horizon des raisons probables.

Parce que la doc vous indique de mettre du wildcard

La documentation est censée être le pilier sur lequel s'appuyer. Toutefois, force est d'admettre que la documentation d'AWS est loin d'être un exemple en ce qui concerne l'IAM.

Bien que la firme prône le least privilege, beaucoup de ses documentations en sont très loin.

Pourquoi vous utilisez mal l'IAM d'AWS
Petit exemple tiré de la documentation officielle

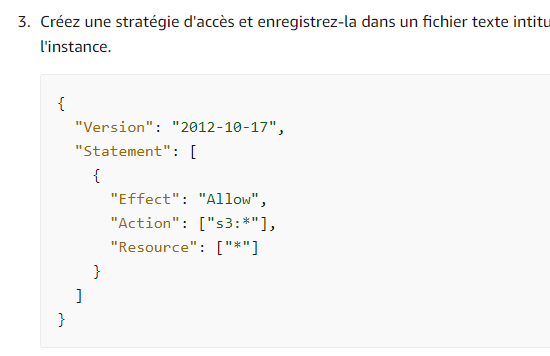
De mon point de vue, la documentation est censé montrer des exemples les plus sécurisés possible pour "pousser" les utilisateurs à adopter les bons réflexes. Force est d'admettre que ce n'est pas le cas.

Parce que les APIs sont inconsistantes

Principal souci du modèle d'AWS, qui fait que chaque équipe produit est autonome : L'inconsistance des API.

Les même actions ne correspondent pas forcément au même verbes API...

Ainsi la simple action de créer un tag peut avoir plusieurs nom différents en fonction des services, comme par exemple :

  • elasticloadbalancing:addTags
  • ec2:createTags
  • ecr:tagResource

Mais comme ce serait trop simple, toutes les API n'ont pas forcément les mêmes type de cible.

Ainsi si je veux cibler des ressources en fonction de leurs tags, j'ai encore une fois des filtres différents :

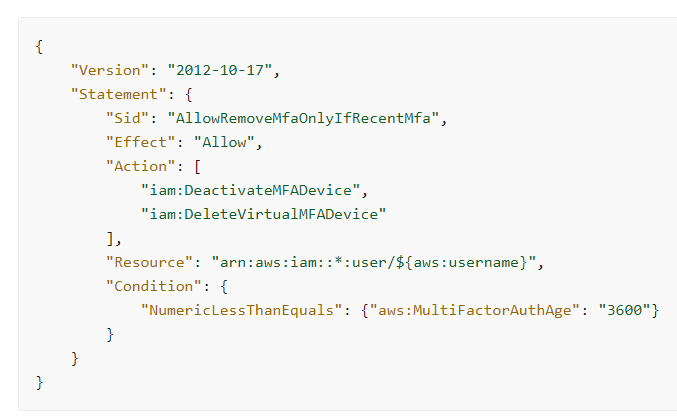
Parce que le filtrage est inégal

Lorsqu'on met en place un modèle zero trust basé sur le least privilege, on va vouloir cloisonner au mieux les droits que l'on donne pour éviter toute action non désirée.

Maintenant on arrive au vrai problème.

En fonction des ressources, on pourra (ou non) filtrer correctement, mais pas forcément au même niveau.

Certaines ressources ont des ARN prévisibles, dans ce cas il est simple filtrer en amont (avant même que la moindre ressource soit créé).

D'autres fonctionne sur des identifiants internes créés par AWS, comme les security group par exemple.

Dans ce cas, il est parfois possible de filtrer sur la présence de certains tags, mais une fois de plus, pas tout le temps!

En effet, tous les services n'appliquent pas les tags de la même manière. Certains vont l'appliquer dès la création, d'autres après. Parfois tout se fait en un seul appel API, parfois en plusieurs...

Parce qu'il y a de multiples type de policies

J'aime à dire que l'IAM d'AWS est sans doute l'un des plus complet à ce jour. Toutefois, sa complétude vient aussi avec une complexité certaine : Le nombre de policies et les différentes couches qui s'appliquent à chaque évaluation.

  • Commençons par le plus simple : les policy IAM "classiques", que l'on appelle aussi "Identity based policies", ce sont les politiques que tout le monde exploite directement lorsque vous vous connectez à AWS. Ce sont aussi ces dernières qui sont utilisées quand vous utilisez des roles AWS.
  • Ensuite, il y a les "resource based policies", qui au contraire des précédentes sont directement attachées à un service, comme S3, SQS ou IAM (pour les trusts)
  • Puis viennent les boundaries, ces policies sont attachées à des roles ou utilisateurs pour filtrer les droits, un peu comme un tamis.
  • On pourrait aussi parler des SCP, qui englobent tout un compte ou une OU du service AWS Organization, pour appliquer des boundaries globales.
  • il y a enfin des policies qui peuvent être crée à la connexion avec un utilisateur fédéré : les session policies

Cinq type des policies qui peuvent toutes être utlisées en même temps lorsque vous accédez à un service, cinq!

Je ne peux que comprendre ceux qui se perdent dans ces multiples niveaux d'abstraction.

Parce qu'il y a beaucoup de limitations

Comme tous les services d'AWS, l'IAM a ses propres limitations.

Par exemple, un role IAM ne peut pas avoir plus de 10 managed policies d'attachées, et chacune de ces policies ne peut pas dépasser 6144 bytes (sans les espaces/sauts de ligne).

Un role ou un utilisateur ne peut pas avoir plus d'une boundary attachées.

Ces limitations empêchent de pouvoir composer des roles ou utilisateurs de manière optimale car si l'on veut restreindre au maximum, on est obligé de recréer des policy pour chaque ressource!

De plus quand on veut pouvoir donner des accès console + CLI, on est parfois obligé de donner plus de droit que souhaité car sinon on empêche la console de fonctionner correctement.

Parce que même le support y perd son latin

Mon dernier point et non des moindre : le support lui même s'y perd!

j'ai déjà eu à contacter le support à de multiples reprises pour des soucis d'IAM, et force est d'admettre que très souvent le support tatône pour trouver une policy fonctionnelle ou comprendre d'où peuvent venir les blocages.

Entre l'inconsistance des API, des ressources, des filtres et la complexité de certaines policies lorsqu'on veut filtrer efficacement, c'est parfois compliqué de suivre le fil.

Pourquoi vous utilisez mal l'IAM d'AWS
Petit exemple de policy avec une condition (source : documentation officielle)

Comment améliorer les choses ?

Malgré tout les points que j'ai cité, il est toujours possible de faire "proprement" des policies (du moins du mieux possible), toutefois, ca demande du temps et de l'outillage.

Pour ma part, voici ce que j'utilise très (très) souvent :

  • La documentation officielle de toutes les API, avec leurs filtres : Cette documentation est relativement bien tenue à jour et vous permet d'avoir déjà une bonne vision d'ensemble
  • Le simulateur de policy d'AWS : qui vous permet de tester une policy sur une action particulière, très utile quand on veut filtrer sur des ARN ou tags par exemple.
  • Des linter de policy, que ce soit celui intégré dans AWS Access Analyzer ou des outils tiers comme Parliament par exemple

Il faut garder en tête que l'IAM d'AWS reste complexe de part sa puissance. Pour ma part, même après des années à en faire quotidiennement, je suis très loin d'en maîtriser 100% de ses aspects...

✇TFerdinand.net

Log4j depuis l'œil de la tempête

Log4j depuis l'œil de la tempête

À moins de vivre dans une grotte, vous n’avez pas pu passer ces derniers jours à côté des failles découvertes sur la librairie Java log4j.

Je ne vais pas vous faire un énième post pour parler de cette faille, mais plutôt parler de mon expérience sur le terrain sur l’impact de cette dernière au niveau opérationnel.

L’importance d’avoir un inventaire à jour

J’en ai parlé sur Twitter, mais pour moi, cette faille met en exergue le fait que beaucoup d’entreprises manquent d’un inventaire à jour de leurs ressources.

L'asset management est primordial si vous voulez faire de la sécurité!

La faille majeure #log4j le rappelle, il faut patcher vite, mais pour le faire il faut avoir un inventaire à jour!

Encore une fois, le plus important n'est pas forcément l'application ;)

— Teddy FERDINAND (@TeddyFERDINAND1) December 11, 2021

Lorsqu’une faille comme celle-ci se déclare, il est important d’être en mesure d’identifier rapidement quelles sont les ressources en risques. Mais avoir un inventaire à jour ne se limite pas aux machines, mais aussi à leur contenu.

C’est d’autant plus important lorsqu’on exploite la puissance du cloud, avoir des machines volatiles rend d’autant plus complexe leur gestion.

Pour ça il existe plusieurs solutions.

Faire uniquement de l’infra as code

Ce point va sembler trivial à beaucoup d’entre vous, mais faire uniquement de l’infra as code simplifie énormément les choses pour visualiser rapidement ce qu’on déploie, sur quel projet, quelle machine, quel compte, etc.

Dans un pipeline CI/CD c’est le rôle d’un SAST (Static application security testing) de repérer les failles courantes au moment de la compilation des nouveaux projets, toutefois, il faut de l’outillage pour les projets déjà compilés, par exemple, sur GitHub, Dependabot m’a indiqué assez rapidement les projets dans lesquels il avait identifié l’utilisation de la librairie.

Toutefois, ce point n’est clairement pas suffisant. Ce n’est pas parce que je ne définis pas explicitement une librairie qu’elle n’est pas utilisée.

Scanner les artefacts déjà créés

Si vos applications sont déjà compilées, il existe souvent sur vos gestionnaires de librairies des solutions pour scanner ces derniers.

Par exemple, Docker Hub vous permet de scanner vos images à la recherche de la librairie.

Toutefois, ce n’est toujours pas suffisant. Sur vos serveurs, vous n’utilisez pas forcément que des packages que vous maitrisez et référencez vous-même.

Par exemple, vous pouvez exploiter une image AWS d’un éditeur sur le marketplace, ou avoir des applications tierces déployées dans votre infrastructure.

Scanner en continu vos serveurs

C’est là qu’entre en jeu le troisième niveau de scan : vous pouvez scanner en continu vos machines pour identifier rapidement les serveurs en danger.

Il existe pour cela des outils comme Nessus Tenable ou encore Rapid7 InsightVM. Le rôle de ces outils va être de scanner vos serveurs et vous remonter les machines en risque.

Une simple recherche avec l’identifiant d’une CVE vous permet d’identifier rapidement les serveurs impactés.

Comment j’ai vécu cette étape

Comme beaucoup dans l’infosec ces derniers jours, cette première étape a été compliquée. Même avec de l’outillage, on prend toujours le risque de passer à côté de certaines ressources.

Je travaille dans une petite équipe et nous avons réagi au mieux, mais vu le risque encouru avec cette vulnérabilité, nous refaisons plusieurs contrôles. Ce point est épuisant, car nous devons faire nombre d’actions manuelles, tout n’est pas forcément simplement automatisable.

C’est une étape laborieuse, épuisante (mentalement), mais indispensable et critique.

Une fois les serveurs identifiés je fais quoi ?

Maintenant que je sais quelles sont mes ressources touchées par la vulnérabilité log4j, je fais quoi ?

Première chose qu’on oublie souvent : on ne panique pas !

C’est un comportement que je vois souvent lors d’incidents de sécurité, pourtant il est d’autant plus important de garder la tête froide qu’une erreur peut couter cher !

Patcher, patcher, patcher…

La solution sera souvent la même ici : patcher ou mettre à jour l’applicatif. Néanmoins, à ce jeu, tous les éditeurs ne sont pas aussi sérieux.

Sur ce point, j’ai vu plusieurs comportements :

  • Les éditeurs très réactifs et transparents sur les risques
  • Les éditeurs qui indiquent qu’ils ne savent pas (ce qui n’est pas forcément pour me rassurer soit dit en passant).
  • Les éditeurs qui disent être impactés, mais mettent plusieurs jours à sortir une version avec le fix nécessaire
  • Ceux qui disent qu’ils ne sont pas impactés pour finalement indiquer le contraire
  • Ceux qui préfèrent indiquer qu’ils ne sont pas impactés alors qu’ils sont loin de java (par exemple HashiCorp et ses outils écrits en GoLang)

Dépendre d’autres équipes

À mon poste, je ne suis pas celui qui patche, mais dans l’équipe qui va identifier les risques, les mesurer et demander les actions nécessaires aux autres équipes (Dev, Ops, DataOps, etc.)

C’est une posture qui peut être frustrante, car on dépend de gens sur lesquels on n’a aucun pouvoir de priorisation et tout le monde ne perçoit pas forcément les risques de ces failles.

C’est pourquoi il est important d’avoir (une fois de plus) une posture pédagogue, et de bien expliquer les risques et pourquoi il est important de réagir vite.

Et c’est aussi à cette étape qu’il est important de bien tracer toutes les demandes et faire le suivi associé.

L’une des solutions temporaires peut parfois être de mitiguer le risque pour réduire autant que possible l’impact de la lenteur de tiers, cela peut passer : par des règles sur un WAF, des modifications de packages directement sur les machines (même si je ne suis pas fan de cette solution), changer l’exposition de certaines machines (passer des machines derrière un VPN par exemple) ou encore interrompre certains services temporairement.

La solution temporaire dépendant bien entendu de l’évaluation du risque associé.

Comment j’ai vécu cette étape

Comme je l’ai évoqué, j’ai eu un peu de frustration devant la non-réponse de certaines équipes, ou l’impression qu’on s’en f... . Pour certaines équipes, je suis un incident parmi d’autres déjà en cours, et je ne fais que rajouter une pièce dans la machine.

Cette étape n’est pas forcément simple, mais je trouve que cela reste plus simple qu’avoir l’inventaire.

L’après log4j

Pour l’instant la tempête log4j n’est pas encore finie, avec une faille découverte avant-hier à l’heure où j’écris ces lignes.

Investir dans la sécurité

Cette tempête comme d’autres avant elles (Spectre, Meltdown, Heartbleed, etc.) est l’occasion pour les équipes sécurité de rappeler l’importance de certains investissements :

  • Avoir une équipe sécurité qui se tient à jour
  • Avoir de l’outillage pour identifier rapidement les failles
  • Avoir un inventaire à jour
  • Sensibiliser les équipes à l’importance des bonnes pratiques de sécurité

J’ai même rappelé ce point (sur Twitter une fois de plus) dernièrement :

A tout ceux qui pensent que la #sécurité informatique est un coût... Vous avez tort!

La sécurité est un #investissement, très vite rentabilisé que ce soit sur des attaques évitées ou en image de marque.

C'est ce qui inspire confiance à vos clients/utilisateurs!

— Teddy FERDINAND (@TeddyFERDINAND1) December 10, 2021

Combattre le comportement prédateur des big Tech

Cette faille rappelle la dure réalité des projets open source : beaucoup de projets sont clairement exploités par de nombreuses énormes sociétés qui reposent dessus sans jamais contribuer que ce soit au code ou au moins financièrement.

Log4j est une librairie exploitée par des millions d’applications dans le monde, pourtant elle est maintenue par peu de personnes.

De nombreux Tech gravitant dans l’univers open source ont fait le même constat :

1/7 Depuis le début du week-end, une faille, nommée log4shell et jugée comme la plus importante faille de sécurité de ces 10 dernières années, agite le monde de la tech. L'immense majorité des entreprises de la tech est touchée, allant de Microsoft à Spotify en passant par Tesla. pic.twitter.com/o2gsKeORAy

— Olivier P🤫ncet (@ponceto91) December 13, 2021

Cela n’est pas sans rappeler des batailles récentes :

  • Elastic.co VS AWS
  • MongoDB VS AWS

Faute de trouver une solution viable, la solution est souvent de passer par la case légale en mettant des clauses empêchant l’utilisation par ces entreprises, car elles exploitent la richesse de ces projets sans jamais rien donner en contrepartie.

✇Marc D Anderson's Blog

Taking Advantage of the Content Type Inheritance Model in SharePoint

In my recent post Using Content Types in SharePoint’s Site Pages Library, I mentioned using interstitial Content Types, but didn’t explain what I meant.

Taking advantage of the Content Type hierarchy is an important part of a powerful information architecture, regardless whether you’re working with documents, list items, pages, etc. I’ve talked about this in conference sessions for years, but it doesn’t seem like I have a blog post about it.

Let’s use this slide from one of those sessions to illustrate the points.

SharePoint gives us the Document Content Type “out of the box”. Every Document Library you create in SharePoint (assuming you don’t use some fancy template) has the Document Content Type enabled for it. So many people just start dumping their files into the Documents (aka Shared Documents) library with every file becoming a Document and then wonder why no magic is happening.

In the example above, I have two interstitial Content Types. (Interstitial – or interstices – are spaces between things.) I create these interstitial Content Types, but never enable them in a Document Library; they generally only exist to create a strong hierarchy.

  • Org Base Document – When I start setting up the information architecture in a tenant, I almost always create a Content Type like this, usually putting the name of the organization in place of “Org”. You may never touch this Content Type again after you create it, but I’ve had it save my bacon multiple times when someone says something like, “let’s add X to ALL our custom Content Types”.
  • Contract – This is also a Content Type which I may not ever enable in a Document Library, but it allows me to search for Content Types which inherit from it.

These days, I’m most likely to create Org Base Document and Contract at the tenant level (in the Content Type Hub, via the Content Type Gallery in the SharePoint Admin Center). We use that enterprise level capability for Content Types which *may* be used in one or more sites. It gives us a central place to manage our information architecture – where it makes sense to do so. Since I’m going to inherit from Org Base Document for all my custom Document-derived Content Types, I create it at the tenant level.

When we set up a custom Content Type and inherit from an existing Content Type, there’s a brilliant logic under the covers. The out of the box Document Content Type at the tenant level has its ContentTypeId =0x0101. 0x0101 represents a Document in every tenant. (See: Base Content Type Hierarchy | Microsoft Learn for the full list of base Content Types in SharePoint.)

When I create the Org Base Document Content Type in the Content Type Gallery, it gets a ContentTypeId which starts with 0x0101 and then has a unique GUID-like part. Here is the full hierarchy tree for the Content Types with their ContentTypeIds in my Sympmarc tenant:

Content TypeInherits fromContentTypeId
Item[System]0x01
DocumentItem0x0101
Sympmarc Base DocumentDocument0x0101002FBDBE6A1A315F438E41F10681463A61
ContractSympmarc Base Document0x0101002FBDBE6A1A315F438E41F10681463A6101
Employment ContractContract0x0101002FBDBE6A1A315F438E41F10681463A610101
Real Estate ContractContract0x0101002FBDBE6A1A315F438E41F10681463A610102

As you can see, the inheritance model makes a lot of sense. Each inheritance appends something unique to the ContentTypeId. Once I’ve enabled the appropriate Content Types in Document Libraries (in this case), I can take advantage of the hierarchy using queries like:

IntentQuery
Show me all my custom Content Type -based documentsContentTypeId:0x0101002FBDBE6A1A315F438E41F10681463A61*
Show me all the ContractsContentTypeId:0x0101002FBDBE6A1A315F438E41F10681463A6101*
Show me all the Employment ContractsContentTypeId:0x0101002FBDBE6A1A315F438E41F10681463A610101*

Show me all the Contracts is the really powerful query here, IMO. By requesting all content with a ContentTypeId which starts with the Contract Content Type’s ContentTypeId (That’s what the asterisk does for us.), it doesn’t matter if I create a new Content Type inheriting from Contract. The query will automagically continue to do what I want because the next Content Type inheriting from Contract will have a ContentTypeId of 0x0101002FBDBE6A1A315F438E41F10681463A610103. In other words, the ContentTypeId:0x0101002FBDBE6A1A315F438E41F10681463A6101* query will just pick that new content up for me without any adjustment.

Pair this good information architecture with the PnP Modern Search Web Parts, and you can build search-driven experiences which are highly specific, easily maintained, and extremely reliable. This is NOT “just Google”. It’s you building solutions to match the user stories and content needs in YOUR organization.

If you extrapolate from these examples, you probably can imagine some potential hierarchies in your information architecture which may help you create more powerful solutions for your end users. I’m curious about your thoughts, so please comment if you have examples.

✇Marc D Anderson's Blog

Using Content Types in SharePoint’s Site Pages Library

In a modern SharePoint site, we only get one Site Pages library. We can’t create additional libraries which contain aspx pages which act like that special Site Pages library. If we could, we could meet a whole lot of interesting use cases, but it’s not an option.

One thing we *can* do is add additional Content Types to the Site Pages library. In many cases, I’ve seen people add a new column or two to the Site Pages library, but I don’t often see them adding additional Content Types. By using Content Types, you can take advantage of a richer information architecture which can span multiple sites, if needed.

Content Types are one of the primary building blocks for SharePoint, and I can’t gush about them enough. I do entire conference sessions just about Content Types! If you’re not using Content Types, you’re not holding SharePoint right, if you ask me.

I won’t go into how to create Content Types in general, but in this case, you’ll want to follow steps similar to this:

  • If the Content Type will be used only in the specific site (maybe a Benefits Overview in the HR site), then create the Content Type in the site. If there’s even a remote chance you’ll use the Content Type across sites (maybe Team Member Intro), then build it in the Content Type Hub in the SharePoint Admin Center.
  • To add a Content Type to the Site Pages library, you’ll most likely want to inherit from the out of the box Content Type called Site Page. This is the Content Type which is available in the Site Pages library by default.

In the example below, we’ve got three custom Content Types enabled on the Site Pages library: Productivity Tip, How To Guide, and Troubleshooting Guide. We’ve defined those Content Types at the tenant level: in the Content Type Gallery in the SharePoint Admin Center. Each of these Content Types inherits from an interstitial Content Type called Base [ClientName] Site Page, which inherits from Site Page. The reason we have the interstitial Content Type is so that we can say “show me all of the content which inherits from this Content Type”. That way, we can add additional peers to Productivity Tip, etc. without reconfiguring our result locations. We also have several Site Columns added to each of these Content Types so we can categorize the pages to improve findability.

Here’s what the Site Pages library looks like in one of our sites:

As you can see, the three custom Content Types are available there, and we can declare any Site Page as one of these special Content Types.

From here, we can use the PnP Modern Search Web Parts (my favorites!) to build powerful and sophisticated “slicing and dicing” for the content here or across multiple Site Pages libraries. But that’s a post for another day…

Caveats

  • If you change the Content Type of a page or set a column value, you’ve tacitly edited the page. That means you need to republish the page in order to make the change(s) visible – and even more importantly, to get the search crawler to pick up the change.
  • Because you’re adding Content Types into the Site Pages library, you may need to get creative with views in the library. At the very least, I generally change the default view from By Author (which is rarely helpful, anyway) to By Content Type. But build views which represent the tasks you want to complete: Pages which haven’t been reviewed, By Hardware Type, etc.
✇Marc D Anderson's Blog

SharePoint Content Management: Distributed vs. Centralized

In modern SharePoint, we have content management tools which have been honed over decades of SharePoint use. At the same time, our ideas about content management have evolved over that time. People are far more comfortable maintaining content on the Web than they were when SharePoint first was released. Back then, we were often transitioning from a printed content mindset, so many organizations simply tried to apply the same sort of processes and logic to Web content that they had been using with physical content for the prior decades. This often led to quite convoluted “requirements” in order to support that traditional way of thinking about content management.

These days most people are very comfortable with the Web. For many people in the workplace now, it’s the only thing they have known. Binders like this on bookshelves above desks would be an anathema to most of them.

See the source image

So, cutting to today, we can instantiate simpler content management rules, and we can also rethink content ownership.

Centralized Content Management

In a centralized content management scenario, a particular content type – and you should think about this on a content type level – is fully managed by a central group of people. Some examples might include:

  • All Policies are managed by the Human Resources department
  • Operations is the only department which can issue a Standard Operating Procedure
  • Any Standard having to do with money or timekeeping must be written by Finance

These are perfectly legitimate scenarios. However, they require a “pinch point” in that anyone in the organization who wants to issue a policy, for example, must work with Human Resources to create and publish it. It puts the policy content management egg into one basket.

In many cases, centralized content management has been the norm for many years. Some of this harks back to the print-to-Web transition and some of it harks back to the ways SharePoint and the Web worked in their earlier days.

Distributed Content Management

In a distributed content management scenario, we allow the people who understand the content best to manage it where they manage the rest of their content. Some common scenarios include:

  • All departments can publish Policies based on their operational oversight
  • Standard Operating Procedures are certainly published by Operations, but other departments can also publish them, as needed
  • While Finance controls all financial Standards, other groups can publish them as well

For this distributed publishing to work well, we need several things in place:

  • Each group (usually departments, but it can vary based on the Content Type) creates and vets the content in their own Team Site.
  • Team Site Owners can publish content from their Team Site to their Intranet site, simply using Copy to or, if a more rigid process is required, with that process implemented with appropriate tools.
  • Each site where a specific business object will be published has the proper information architecture (Site Columns, Content Types, Document Libraries) for that business object instantiated in it.
  • The metadata used in each Content Type should provide enough information – and not much more – that’s required to display the content in several different ways:
    • In a “content center” for that Content Type or family of Content Types
    • In search-driven experiences embedded in specific pages
    • Natively in the Document Library where the content is actually stored

Distributed Publishing Example

When we work with clients, we almost always use the example of Policies to illustrate distributed publishing. Policies are a common business object which is well-understood by most people in an organization. Some organizations have many policies, some have just a few. In most cases, each department has its own set of policies which it has created.

We choose a site to use as the starting point. Usually, it’s the first group which has said they need to post Policies. n almost all cases, we first create a “base document” content type – something like Base ClientName Document. All the custom Content Types we create for the organization inherit directly or indirectly from this Base ClientName Document Content Type. In that site, we create a Content Type called Policy, which either inherits from Base ClientName Document or another parent Content Type that makes sense for hierarchy.

For a Policy, the metadata may vary from organization to organization, but we usually hove some columns like:

  • Effective Date
  • Expiration Date
  • Applies To (maybe a set of geographies or departments)

Next, we create a Document Library called Policies and enable the Policy Content Type in it, removing the default Document Content Type. We create a Policy in the Policies library – singular and plural. At this point, there’s usually a little iteration on the metadata, etc. This is a good pause to take, so we can be sure we understand how best to construct Policy to serve its purposes.

Now that we have a Content Type and it is enabled in a library, we turn to PnP.PowerShell. With PowerShell, we can export the definition on the library as a Site Script unisng Get-PnPSiteScriptFromList, like so:

Get-PnPSiteScriptFromList -Url $fullPath | Out-File "./ListName.json"

where $fullPath is the full URL to the list, like “https://contoso.sharepoint.com/sites/teamsite/lists/MyList”. Note that PnP.PowerShell doesn’t care if we’re working with a list or library: under the covers, they are basically the same thing.

This gives us a JSON file which can be instantiated as a Site Script using Add-PnPSiteScript. Then we can bundle that one Site Script into a Site Template (nee Site Design) or include additional Site Scripts if we want with Add-PnPSiteDesign. I’m going to gloss over this a little bit and come back to it in a future post.

Now we have a Site Template we can apply to any site where we want to store Policies. Even if I’m going to include the Site Script in larger Site Templates, I may set up this simple Site Template to just instantiate the Policies library. I like the atomic approach to this.

When we choose to apply this Site Template to a site, we get the Policy Content Type (defined consistently, so to SharePoint it’s the same Content Type in each site) and a Policies library with it enabled.

Now each group of people with a site can create a Policy in their library – following their processes – and we can roll all the Policies up across the tenant or across sites associated with a Hub Site very easily. Most of the time this means a custom page built using the PnP Modern Search Web Parts (just about my favorite Web Parts!). We often call this something like the Policy Center.

End users can find a Policy where it’s published, perhaps by navigating into the HR site, or go to the Policy Center page we created above. We can also expose specific sets of Policies – maybe Policies which will expire in the next month – in experiences to help with central oversight.

If you’re thinking that this is a lot of work, it really isn’t. I do it all the time – with many more Content Types in each tenant in which I work – and this whole process can be as little as a few hours of effort. Compare that to the dreadful user experience you might have if you’re just dumping Policies into libraries as a Document Content Type, wherever you might choose. And believe me, it’s more work to clean all this up after you have a lot of content in SharePoint than it is up front, or at least early on.

Also note that starting at this level doesn’t mean you can’t layer more complex processes on top later. In fact, it makes it far easier when you get to that point; everything is neatly assorted so a Policy is a Policy is a Policy.


Taking this approach is also one important part of moving up the maturity model for Microsoft 365. Check out the Maturity Model for Microsoft 365 – Management of Content Competency in the Microsoft 365 Community Docs.

✇Marc D Anderson's Blog

Clean Up Unwanted Site Columns from Content Types and Lists/Libraries

Another day, another chunk of PowerShell.

Sometimes when we iteratively build out our information architecture, we’re over-zealous. It seems like we need a set of Site Columns to maintain metadata on lists or libraries, but in the end, we decide we want to trim away a few of the Site Columns we’ve created. Or, maybe you’ve migrated a bunch of metadata into SharePoint with a set of documents and it turns out that metadata is no longer valid or useful.

If the Site Columns exist in only one or two libraries, it’s not a big deal to do this manually.

Today, we decided to remove several Site Columns across a dozen or so Content Types, which are applied to a dozen or so libraries. Sure, I could have cleaned things up manually, but instead, I wrote some PowerShell to do it because I can see myself using this again.

When we want to clean up use of a Site Column – and we’re setting up our information architecture well – there are three main steps:

  • Remove the Site Column from all Content Types which have it.
  • Remove the orphaned Site Column from all lists/libraries which have it. When we remove a Site Column from Content Types which are enabled on lists or libraries, the orphaned Site Column remains. This makes sense, because you probably have some data in that column. To truly remove it, you need to remove the column in each list as well.
  • Remove the Site Column itself. This removes it from the site entirely.

Here’s the PowerShell I came up with.

# Import modules
Import-Module PnP.PowerShell

# Base variables
$siteURL = "https://tenant.sharepoint.com/sites/sitename"
$siteColumn = "EffectiveDate"
$reportOnly = $false # If $true, just report. If $false, take action.

# Connect to the tenant
$siteConnection = Connect-PnPOnline -Url $siteUrl -Interactive -ReturnConnection

# Remove the Site Column from all Content Types which have it
Write-Host -BackgroundColor Blue "Checking Content Types"

# Get all the Content Types. Here, I have all my custom Content Types in a Group called _ClientName.
$cts = Get-PnPContentType -Connection $siteConnection | Where-Object { $_.Group -eq "_ClientName" }

foreach ($ct in $cts) {

    Write-Host "Checking Content Type $($ct.Name)"

    $fields = Get-PnPProperty -ClientObject $ct -property "Fields" | Where-Object { $_.InternalName -eq $siteColumn }
    $field = $fields | Where-Object { $_.InternalName -eq $siteColumn }

    if ($field) {
        Write-Host -ForegroundColor Green "Found column $($siteColumn) in $($ct.Name)"
        if (!$reportOnly) {
            Write-Host -ForegroundColor Yellow "Removing column $($siteColumn) in $($ct.Name)"
            Remove-PnPFieldFromContentType -Field $field -ContentType $ct -Connection $siteConnection
        }
    }

}

# Remove the orphaned Site Column from all lists/libraries which have it
Write-Host -BackgroundColor Blue "Checking Lists"

# Get all lists/libraries in the site, but exclude System or Hidden lists
$lists = Get-PnPList -Connection $siteConnection | Where-Object { $_.Hidden -ne $true -and $_.IsSystemList -ne $true }

foreach ($list in $lists) {

    Write-Host "Checking list $($list.Title)"

    $field = Get-PnPField -List $list | Where-Object { $_.InternalName -eq $siteColumn }

    if ($field) {
        Write-Host -ForegroundColor Green "Found column $($siteColumn) in $($list.Title)"

        if (!$reportOnly) {
            Write-Host -ForegroundColor Yellow "Removing column $($siteColumn) in $($list.Title)"
            Remove-PnPField -Identity $field -List $list -Connection $siteConnection -Force
        }

    }

}

# Remove the Site Column itself
if (!$reportOnly) {
    Remove-PnPField -Identity $siteColumn
}

When I run this with $reportOnly = $true, I get output which looks something like this. The script just shows me where the Site Column is used.

Assuming the report above looks right, I can set $reportOnly = $false and take the actions required to remove the Site Column wherever it’s used.

✇Marc D Anderson's Blog

Crawled Properties Not Created From Site Columns in Modern Team Sites

You know that feeling where you’ve done something so many times and it’s worked and then one day it just doesn’t? Yeah, I just had one of those.

I’m still a big fan of the PnP Modern Search Web Parts, just like I was last week or last year. To really make them sing in your solutions, you’ll end up creating Site Columns and using Content Types. I love those things, too, but this post isn’t about why.

Over the last few weeks, when I have created Site Columns, made sure they are included in Content Types, and added content using those Content Types, the Site Columns have not shown up as Crawled Properties in the SharePoint Admin Center (More features / Search [Open] / Manage Search Schema). They simply never show up. I’ve given it overnight, then a week, then two weeks.

The sequence here is important, so to reiterate:

  • Create your Site Columns
  • Add the Site Columns to Content Types
  • Add content using those Content Types – This is the one that bites many people, including me. No content, nothing to crawl!
  • The Site Columns show up as Crawled Properties

I swear this has been a reliable way to go from Site Columns to Managed Properties (after mapping to Refinable[Type]NN Managed Properties) for years. The ultimate goal in my case is to use those Managed Properties in search-driven solutions using the PnP Modern Search Web Parts. But of course, Managed Properties have other benefits as well.

I’ve been doing this for years, and I sorta feel like I know what I’m doing. I’m not proud, so I headed over to my MVP channels, and tagged people like Agnes Molnar (@molnaragnes) and Mikael Svenson (@mikaelsvenson) in a post asking whether something had changed.

Agnes pointed out an old post from Joanne Klein (@JoanneCKlein) entitled Crawled & Managed Properties in Modern Team Sites. Turns out there’s a kooky hole in things. I have no idea why this hasn’t gotten in my way before.

If you are creating your IA (my shorthand from Site Columns and Content Types, among other things) in a modern Team Site, it’s not good enough to be an Owner. As Joanne wrote, you also need to add yourself as a Site Collection Administrator directly. (Site Permissions / Advanced permissions settings / Site Collection Administrators)

Event though you’re in the Owners group, and the Owners group is in the Site Collection Administrators, you still need to add yourself directly.

Do that, kick off a re-index of the site in question, and within moments practically, your Crawled Properties will be ready to use. None of us are quite sure why this is, but it worked in two tenants for me today, one right after the other.


In case you’re wondering, once you have the Crawled Properties in place (below, ows_SiteName, ows_ExaminerName, and ows_Jurisdiction are Crawled Properties), you can map them to Managed Properties (RefinableString00, RefinableString01, and RefinableString02 below). Those Managed Properties can then be used as filters (nee refiners) in the PnP Modern Search Web Parts or elsewhere.


Mikael also pointed me to his post Tech and me: Mapping or clearing crawled property to managed property mappings using PowerShell (or code). This looks like it might help with this problem, but more likely is most useful when the Crawled Properties are not showing due to a different bug.

Thank you Joanne, Agnes, and Mikael!

✇Marc D Anderson's Blog

Microsoft (SharePoint) Lists and Libraries Changes for Content Types

Thanks to eagle-eyed reader Markus Bütterhoff’s (@buetti) comment on my post showing how to Group By Content Type in Modern Lists and Libraries, I learned of some recent changes for Content Types in Microsoft (SharePoint) Lists and Document Libraries. I’m not sure when these rolled out, but it must have been in the last few weeks.

As far as I can tell, all of these new capabilities work the same way in both lists and Document Libraries. I’ll say “list” below, but everything applies the same for Document Libraries.

After you’ve enabled Content Type management on the list, when you click on the Add column dropdown you’ll see Content type as an option.

This takes you to a funky little screen focused on Content Types. From what I can tell, if you’ve only enabled out of the box Content Types, it doesn’t do anything for you.

If you’ve defined any customer Content Types, then you can enable them on the list with this screen. If you’ve enabled a custom Content Type, you get some info about the Content Type and a button to remove it, but it’s not clear what else is supposed to happen here. My guess is this is the beginning of a replacement for some of the List settings classic pages.

If you click to the Show/hide columns option, you can add the Content Type to the view – painlessly. In the past, we’ve needed to navigate to the classic View settings page.

The best thing I’ve found so far, though, is what Markus pointed out to me in his comment: we can easily group by Content Type with no more query string tricks that sometimes fall down.

So easy!

It’s great to see Content Types back as first class citizens in SharePoint lists.

❌