Vue lecture

Il y a de nouveaux articles disponibles, cliquez pour rafraîchir la page.
✇Office 365 for IT Pros

SharePoint Online Gets Closer to Azure AD

Azure AD B2B Collaboration and Guest Accounts for SharePoint Sharing

Two recent message center notifications highlight closer integration between SharePoint Online and Azure AD. MC526130 (11 March) says that new tenants created after March 31, 2023 will automatically enable the SharePoint Online integration with Azure B2B integration. Existing tenants aren’t impacted by this change. The associated update, also scheduled for roll-out in late March, is MC525663 (10 March). The news here is that SharePoint Online site sharing will use the Azure B2B Invitation manager instead of the legacy SharePoint Invitation Manager (Microsoft 365 roadmap item 117557).

Rationalization Around Azure AD

The two updates rationalize existing sharing methods with external users and focus on Azure AD as the driving force for managing invitations. The journey toward Azure AD B2B Collaboration started in 2021, so it’s been a while coming. The project makes a lot of sense for both customers and Microsoft (their gain is through reduced engineering expenses).

Ten years ago, it was reasonable for SharePoint to manage site sharing invitations. Today, when the site collection-based architecture is replaced by single-sites and most sharing occurs through Microsoft 365 groups and Teams, it’s illogical for SharePoint Online to have its own mechanism. 280 million monthly active Teams users create a lot of work for SharePoint.

Another factor is that site sharing with external users is a relatively uncommon action today. Most external users join groups or teams and gain access to the group-connected site. Although non-group connected sites do exist, they’re in the minority and some of those sites (like hub and communication sites) aren’t candidates for sharing with external people. And of course, even site owners might be blocked from sharing sites by a sensitivity label.

Time to Review Applicable Policies

Overall, I don’t think the change will disrupt many organizations. As Microsoft notes “You may want to review your Azure B2B Invitation Manager policies.” Two policies are worthy of note. The first is the Azure B2B Collaboration policy, which includes an allow or deny list (but not both) of domains.

The policy is now found under Collaboration restrictions in the External Identities section of the Azure AD admin center (Figure 1). It is commonly used to block sharing with consumer domains (deny list) or to restrict collaboration to a set of known domains belonging to partner organizations (allow list). If the organization already supports guest accounts, it’s likely that the collaboration policy already exists. Even so, changes like this are useful reminders of the need for regular review of any policy that affects how external people access tenant resources.

Azure AD B2B Collaboration policy settings
Figure 1: Azure AD B2B Collaboration policy settings

Azure AD cross-tenant access policies are a more powerful and flexible mechanism to control external access through both Azure B2B collaboration and Azure AD direct connect (used for Teams shared channels). Cross-tenant access policies are still relatively new and don’t need to be implemented unless required for a specific reason, so your tenant might not use them yet.

Although the Azure AD B2B Collaboration policy is likely to dominate for the immediate future, over time, I expect a slow transition to take advantage of the granular control available in cross-tenant access policies. When an organization changes over, SharePoint Online will take advantage. Leveraging advances made in Azure AD is an excellent reason for SharePoint Online to embrace Azure AD more fully.

Review Guest Accounts Too

Azure AD B2B collaboration works but that doesn’t mean that you don’t need to manage guest accounts. As more sharing happens, more guest accounts end up in your Azure AD. Some guest accounts are used once to share a document. Others are in ongoing use as guest members of groups and teams access shared documents. It’s a good idea to keep an eye on guest accounts and remove them as they become obsolete.


Support the work of the Office 365 for IT Pros team by subscribing to the Office 365 for IT Pros eBook. Your support pays for the time we need to track, analyze, and document the changing world of Microsoft 365 and Office 365.

✇Marc D Anderson's Blog

Goals for your IT Team When They Free Up Time Through Automation

Back in October, I was lucky enough to visit my friends at ShareGate, along with fellow MVPs Jasper Oosterveld (@jappie1981) and Maarten Eekels (@maarteneekels) We had several conversations with ShareGate’s Laurent St. Pierre (@laurent_sp), and those were recorded and released as a series of videos: The evolution of IT: Improving digital employee experience to boost productivity. The conversations have also led to ongoing asynchronous discussions about the things we said, for more elaboration and to expand on our thoughts.

Recently, ShareGate’s Rafael Spuldar did a new blog post: 5 IT Goals for Your Team When They Free up Time – ShareGate.

Emily Mancini (@eemancini) and I had kicked around the topic and came up with the following list of ideas. Some made it into Rafael’s post, and others didn’t, so I figured I’d post our full list here.

Let us know what you think in the comments!

  1. Clean up AD/AAD data – In most cases, targeting content to the right people is based on AAD data. This data determines which people belong in particular Microsoft 365 Group, especially if they are dynamic groups. If the organization can actually rely on that data being correct, they can build out much more personalized experiences. In most organizations, not only is the data wrong, but everyone knows it’s wrong and they can’t rely on it. No one even tries to get it fixed because they think it’s pointless. Spending time improving this data provides many benefits.
  2. Focus on consultative customer service – If you’re like many IT departments, people don’t come to you for advice and assistance because they can’t get your time. Set up an informal (or formal) consulting capability for the organization. Let anyone in the organization get in touch during office hours to help them think through technical issues and starting solutions for themselves. This consultative focus can also become “market sensing”, in that it tells you what the organization is doing and what they need that you aren’t providing. Unless you have an amazing help desk, they probably don’t fulfill this role. Help desks tend to focus on solving immediate problems (which everyone wants them to do), and not longer-term efforts. If nothing else, it’s a different mindset.
  3. Think about places you could solve problems – Imagine going out into the organization and saying something like “We know you struggle with people filling out so many of these forms. We’d like to help you automate and improve the process.” You’d be heroes! In other words, do external outreach in the organization: offering the very services you have capacity for – for free! You’ll be amazed at the goodwill this engenders.
  4. Search analysis – Take a look at the searches people are doing and what happens. How many searches lead to useful results, and how many fail? A failed search is a content opportunity, and a successful search means that content matters and may need a review. That doesn’t mean that you in IT need to do that review, but you’d be providing great information to the content owners to make their content more valuable. You have the tools to do this in Microsoft 365, but many organizations simply don’t.
  5. Run the assessment tool – The Microsoft 365 Assessment tool was created to help people move from classic to modern and from on prem to the cloud originally. It’s been expanded to help people understand how Microsoft Syntex might be a valuable toolset. But as part of the output, it gives you information about how to improve your information architecture. You need to be at least a SharePoint Admin to run the scanner, so running it for your Site Owners is a way to give them a gift to improve their content and its structure.
✇Maxime Rastello

Avoid certificate prompt for Azure Active Directory Certificate-Based Authentication (CBA)

Azure Active Directory Certificate-Based Authentication (Azure AD CBA) allows you to authenticate to Azure Active Directory using a certificate from your internal Public Key Infrastructure (PKI). To know how to implement Azure Active Directory CBA, please refer to the Microsoft doc.

Certificate authentication will happen on the URL https://certauth.login.microsoftonline.com. By default, your web browser will prompt you to select a certificate installed on your Personal User Certificate store.

To avoid the user to manually select a user certificate for authentication, you can use the following parameters with Microsoft Edge :

Configuration

Registry

Create the following registry key either in CURRENT_USER or LOCAL_MACHINE :

  • Type : REG_SZ
  • Name : 1 (or any following number if you already have parameters configured here)
  • Location :
    • User setting: HKEY_CURRENT_USER\SOFTWARE\Policies\Microsoft\Edge\AutoSelectCertificateForUrls
      OR
    • Device setting: HKEY_LOCAL_MACHINE\SOFTWARE\Policies\Microsoft\Edge\AutoSelectCertificateForUrls
  • Value : check below

Documentation

GPO or MDM

Create a GPO in Active Directory or a Settings Catalog profile in Microsoft Endpoint Manager and set the following parameter :

  • Parameter : Automatically select client certificates for these sites
  • Location : Administrative Templates / Microsoft Edge / Content settings
  • Value : check below

Parameter value

Here is a generic sample of the possible values for the parameter:

{"pattern":"https://www.contoso.com","filter":{"ISSUER":{"CN":"certificate issuer name", "L": "certificate issuer location", "O": "certificate issuer org", "OU": "certificate issuer org unit"}, "SUBJECT":{"CN":"certificate subject name", "L": "certificate subject location", "O": "certificate subject org", "OU": "certificate subject org unit"}}}

Make sure you customize the JSON parameters based on your needs and apply it to the pattern https://certauth.login.microsoftonline.com.

Here is my example:

{"pattern":"https://certauth.login.microsoftonline.com","filter":{"ISSUER":{"CN":"AZURE-CA"}}}

Replace AZURE-CA by the CN of your issuing CA

Validation

You can check that the setting is properly applied in Microsoft Edge using the tag edge://policy

To validate the automatication certificate selection:

  1. Restart Microsoft Edge
  2. Go to https://certauth.login.microsoftonline.com.
  3. You should be automatically authenticated and redirected to https://www.office.com.
✇Maxime Rastello

Manually re-enroll a Hybrid Azure AD Join Windows 10 / Windows 11 device to Microsoft Endpoint Manager without loosing the current configuration

Edit 01/06/2022 : updating this article to include Azure Virtual Desktop Windows 10 / Windows 11 multi-session enrollment command using Device Credential

——–

There are several ways to enroll a Windows 10 PC to Microsoft Intune:

Manually

  • During the Out-of-the-box Experience (OOBE), when starting a Windows 10 PC for the first time
  • In the Windows Settings, after the PC configuration

Manual enrollment will require that the user enters his Azure AD credentials.

Automatically

  • Using Azure AD Join + automatic Intune enrollment
  • Using Hybrid Azure AD Join + automatic Intune enrollment

Automatic enrollment can be triggered using a Group Policy, SCCM Co-Management or Windows AutoPilot.

Windows 10 automatic enrollment requires the creation of public DNS records enterpriseregistration and enterpriseenrollment. More info here.

However, sometimes it is possible that a Windows 10 PC is in an inconsistent enrollment state, with error “The sync could not be initiated“.

This can happen because:

  • The PC was shut down during a long time, and the Microsoft Intune certificate is expired (located in Local Machine / Certificates / Personal)
  • Someone manually deleted the Microsoft Intune certificate
  • The PC is enrolled in another Intune tenant

Prerequisites: check Hybrid Azure AD Join status

Before re-enrolling your device to Microsoft Intune, you need to make sure that the certificates for Hybrid Azure AD Join are not expired as well.

Follow this procedure to Manually re-register a Windows 10 / Windows 11 or Windows Server machine in Hybrid Azure AD Join.

Method 1: With data and configuration loss

The easiest way to unenroll a Windows 10 PC from Microsoft Intune is to disconnect the work or school account.

Just go to All settings > Accounts > Access work or school, select your corporate account and click Disconnect.

Important: this menu is not available on Windows 10 / Windows 11 multi-session edition for Azure Virtual Desktop.

However, the problem with this is that all data and configuration pushed by Microsoft Intune will be deleted from the PC.

Method 2: Without data or configuration loss

There is a way to manually re-enroll your Windows 10 PC without loosing all the current configuration and apps deployed by Microsoft Intune.

This method is not officially supported by Microsoft

As you may know, automatic enrollment can be triggered either by a Group Policy Object or by the SCCM client on a co-managed device.

In both cases, the feature will basically create a scheduled task to enroll the PC at next logon. The command is different if you are trying to enroll Windows 10 / Windows 11 Enterprise multi-session devices from Azure Virtual Desktop (using Device Credential) or a regular Windows 10 / Windows 11 device using User Credential:

Windows 10 / Windows 11 Enterprise (with User Credential)

Task launched in the SYSTEM context:

%windir%\system32\deviceenroller.exe /c /AutoEnrollMDM

Windows 10 / Windows 11 Enterprise Multi-session for Azure Virtual Desktop (with Device Credential)

Task launched in the SYSTEM context:

%windir%\system32\deviceenroller.exe /c /AutoEnrollMDMUsingAADDeviceCredential

To manually re-enroll the PC, we will need to clean up the environment and relaunch this command in the SYSTEM context to re-enroll the PC.

Here are the steps that you need to follow to make it work:

  1. Delete stale scheduled tasks
  2. Delete stale registry keys
  3. Delete the Intune enrollment certificate
  4. Restart the enrollment process

Step 1: Delete stale scheduled tasks

Follow this procedure:

  • Run the Task Scheduler as an administrator.

  • Go to Task Scheduler Library > Microsoft > Windows > EnterpriseMgmt. Write down the enrollment ID somewhere, you will need it for the cleanup.

  • Delete all the existing tasks the enrollment folder.

  • Delete the enrollment ID folder.

Step 2: delete stale registry keys

Use the previous enrollment ID to search the regitry:

  • Open the Registry Editor as an administrator.

  • Search for the enrollment ID you wrote in the following locations and if found, delete the key that is containing the ID:
    • HKEY_LOCAL_MACHINE\SOFTWARE\Microsoft\Enrollments\xxxxxxxxxxxxx
    • HKEY_LOCAL_MACHINE\SOFTWARE\Microsoft\Enrollments\Status\xxxxxxxxxxxxx
    • HKEY_LOCAL_MACHINE\SOFTWARE\Microsoft\EnterpriseResourceManager\Tracked\xxxxxxxxxxxxx
    • HKEY_LOCAL_MACHINE\SOFTWARE\Microsoft\PolicyManager\AdmxInstalled\xxxxxxxxxxxxx
    • HKEY_LOCAL_MACHINE\SOFTWARE\Microsoft\PolicyManager\Providers\xxxxxxxxxxxxx
    • HKEY_LOCAL_MACHINE\SOFTWARE\Microsoft\Provisioning\OMADM\Accounts\xxxxxxxxxxxxx
    • HKEY_LOCAL_MACHINE\SOFTWARE\Microsoft\Provisioning\OMADM\Logger\xxxxxxxxxxxxx
    • HKEY_LOCAL_MACHINE\SOFTWARE\Microsoft\Provisioning\OMADM\Sessions\xxxxxxxxxxxxx

DO NOT delete registry keys that are not in the list above. They will be overwritten after the new enrollment.

Step 3: delete the Intune enrollment certificate

Follow the procedure:

  • Search for the option “Manage computer certificates” or use the command certlm.msc as an administrator.

  • Go to Personal > Certificates and delete the certificate issued by either “Microsoft Intune MDM Device CA” or “SC_Online_Issuing” (depending on the date of the enrollment).

Step 4: Restart the enrollment process

To be properly executed, the enrollment command must be entered in a SYSTEM context. We will use the PSExec tool for that purpose.

  • Use PSExec to launch a Command Prompt as SYSTEM:
psexec /i /s cmd

  • In the Command Prompt, enter one of the following command depending on your enrollment type:

Windows 10 / Windows 11 Enterprise (using User Credential)

%windir%\system32\deviceenroller.exe /c /AutoEnrollMDM

Windows 10 / Windows 11 Enterprise Multisession for Azure Virtual Desktop (using User Credential)

%windir%\system32\deviceenroller.exe /c /AutoEnrollMDMUsingAADDeviceCredential

  • In the computer certificate store, check that a new Intune certificate has been enrolled for the device:

  • You are now ready to start a policy sync from the Windows Settings, and check that the connection with the Intune service is now OK:

✇Maxime Rastello

Manually re-register a Windows 10 / Windows 11 or Windows Server machine in Hybrid Azure AD Join

Hybrid Azure AD Join devices are machines under Windows 10+ or Windows Server 2016+ that are:

  • Joined to an on-premises Active Directory domain
  • Registered in Azure AD as a hybrid device

Having a Hybrid Azure AD Joined device enables the following features:

  • Automatic device enrollment in Microsoft Intune
  • Device-based conditional access for corporate devices
  • Backup of the BitLocker recovery key in Azure AD
  • Sync of some Windows settings by the Enterprise State Roaming

Sometimes, a machine can be in an inconsistent registration state in Azure Active Directory. This can happen because:

  • The machine was shut down during a long time, and the Azure AD device registration certificate is expired (located in Local Machine / Certificates / Personal)
  • Someone manually deleted the device registration certificate
  • Someone manually deleted the device object in the Azure AD portal
  • The machine is registered in another Azure AD tenant

Please note that this method will only succeed if your organization meets all the prerequisites for Hybrid Azure AD Join. For more information, please refer to this documentation.

Step 1: Unregister the device from Azure AD

Follow this procedure:

  • On the machine to unregister, launch a Command Prompt as an administrator and type the following command:
dsregcmd /leave

  • Make sure the certificates issued by “MS-Organization-Access” and “MS-Organization-P2P-Access [xxxx]” have been deleted from the local machine Personal certificate store:

  • Type the command dsregcmd /status in a Command Prompt, and make sure the following parameters have the appropriate values:
dsregcmd /status

+----------------------------------------------------------------------+
| Device State                                                         |
+----------------------------------------------------------------------+
AzureAdJoined : NO  <-----
EnterpriseJoined : NO
DomainJoined : YES  <-----

Step 2: Re-register the device as a Hybrid Azure AD Join

Follow this procedure:

  • On the machine to re-register, run the Task Scheduler as an administrator.

  • Go to Task Scheduler Library > Microsoft > Windows > Workplace Join and manually start the task “Automatic-Device-Join“.

  • Make sure the certificates issued by “MS-Organization-Access” and “MS-Organization-P2P-Access [xxxx]” have been created in the local machine Personal certificate store:

  • Type the command dsregcmd /status in a Command Prompt, and make sure the following parameters have the appropriate values:
dsregcmd /status

+----------------------------------------------------------------------+
| Device State                                                         |
+----------------------------------------------------------------------+
AzureAdJoined : YES  <-----
EnterpriseJoined : NO
DomainJoined : YES

  • Reboot the PC.

  • Start an Azure AD Connect delta synchronization.

✇ITProMentor

But have you turned multifactor authentication ALL the way on?

Do you remember just a short time ago, Microsoft would claim that switching on Multi-factor Authentication (MFA) prevents 99.9% of identity-based attacks? Well, the times they are a-changin. I do not know what they would report today for a percentage of attacks which are thwarted by MFA alone, but I can tell you it wouldn’t be 99.9%. I think most of you reading this blog have probably even experienced or heard by now of an attack where MFA was enabled, but the bad guy got in anyway.

The current state of affairs was inevitable of course: when we move our defenses up, the evildoers don’t just throw in the towel and go away, they simply adapt their methods. Thus, we have seen a steady rise during the pandemic years of more sophisticated phishing techniques, where users are tricked into giving up, approving, or passing time-bound access codes onto a third-party. We also see a rise of Man-in-the-Middle (MITM) attacks where a user interacts with fake (but very convincing) login pages that include MFA prompts and everything.

So what are we to do?

First, do not be discouraged: this process of “one-upmanship” is only natural. The good news is that having more than one proof of identity in place is still the foundation from which you must build. Moving away from passwords and towards MFA or even passwordless authentication is still the right path, but you have to be willing to stay nimble and introduce additional iterative changes as we move forward in time.

The tools to do the job are already available and waiting for you. In the world of Azure AD and Microsoft 365, this means revisiting our Conditional Access (CA) policies and reconsidering our authentication methods.

I assume most of my readers already know about the Security Defaults, or these four equivalent CA policies:

Once you have these basic scenarios covered, we have number of other holes to plug. In the following paragraphs, I will recommend some additional settings and policies to further cement your foundation and prevent some of the latest attack methods we have been seeing in the wild, with a bit of commentary explaining each.

1. Update your authentication methods (number matching, etc.)

Microsoft recommends updating your policies for the Microsoft Authenticator app so that users are required to do number matching when logging into cloud resources. In other words, instead of just tapping “Approve” when the app notification comes up (which many people will do quickly by automatic reflex, or eventually after a flood of continuous prompts), they will be forced to identify the correct number which is being displayed to them.

Number matching

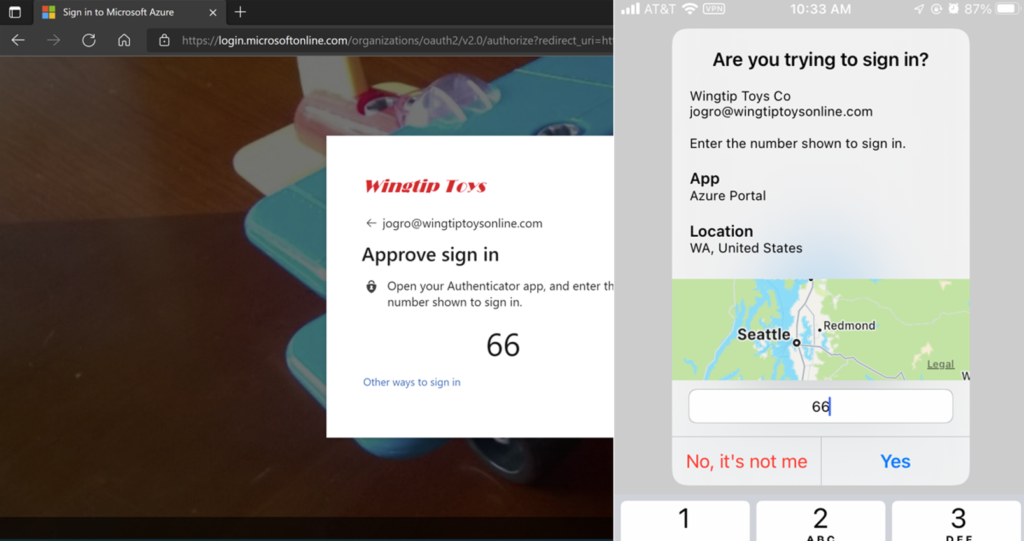
This helps prevent what Microsoft calls “MFA fatigue,” or illegitimate authorizations due to automatic muscle memory.

This setting will become the default experience on February 27 of 2023, but you can turn it on sooner if you like from Protect & secure > Authentication methods > Microsoft Authenticator in the Entra portal. On the Configure tab, you can move from Microsoft managed to Enabled.

Enable number matching

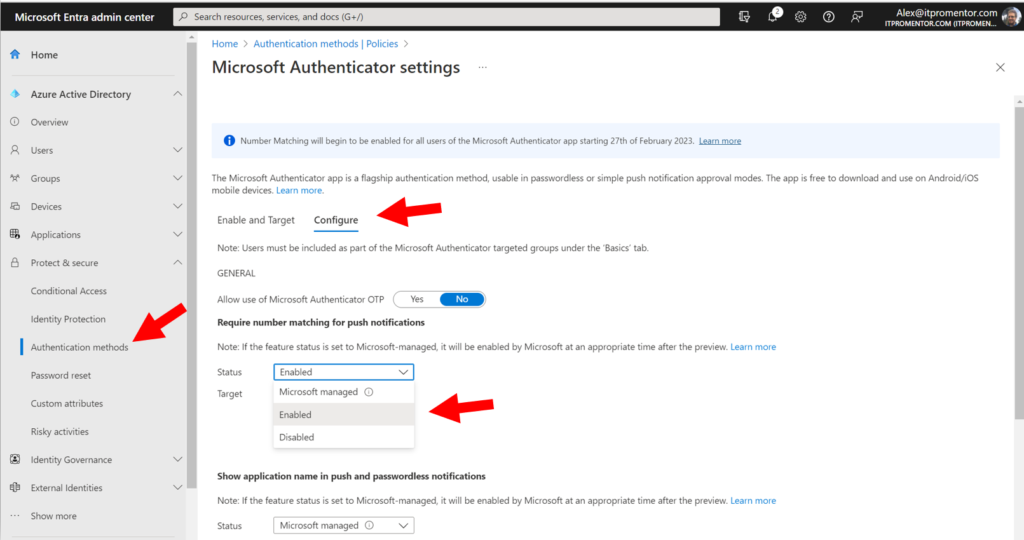
You can also choose to turn on Show the application name…, as well as the option to Show geographic location… These toggles will give the user more context about the sign-in attempt whenever an authenticator prompt occurs. Be sure to save any changes you make on this screen.

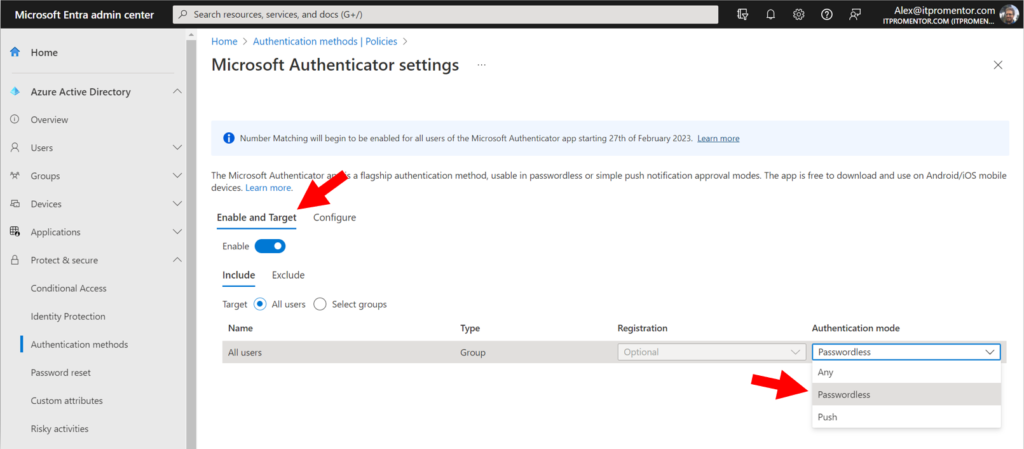
Back on the Enable and Target tab, you can optionally move to passwordless Authentication mode, where the authenticator app is the primary authentication method instead of the password. This experience will use the number matching challenge by default, and it will also reduce password prompts in general.

Move to passwordless

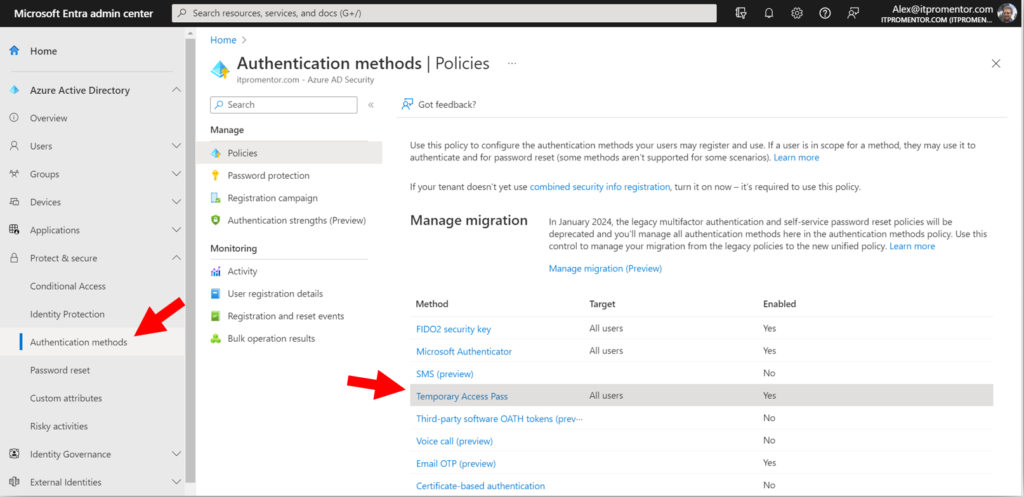
2. Enable Temporary Access Pass

I also recommend turning on Temporary Access Pass, which is also found under your Authentication methods. This allows administrators to grant time-bound access codes for sign-in purposes, particularly when the end user is unable to use their multi-factor device, or if they need to update their authentication methods at https://aka.ms/mysecurityinfo.

Temporary Access Pass (TAP)

For example, imagine that one of your users had to get a new phone and they no longer have access to the authenticator app from their old phone anymore.

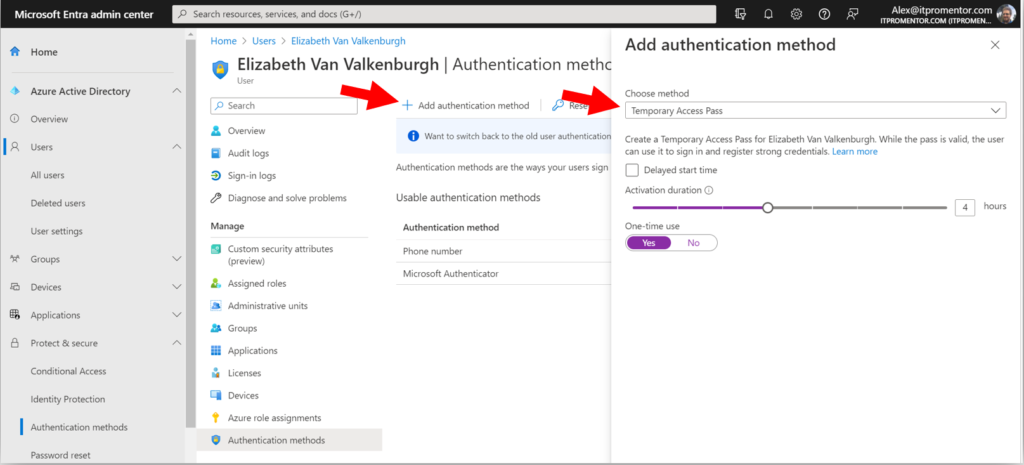
Once this policy is configured, administrators can go issue TAPs to any user right from the Azure AD or Microsoft Entra portal. The same process can also be used during the initial onboarding, when users go to set up their authentication methods for the first time.

Issuing a TAP

3. Protect registration of security information

If you enabled TAP as I suggested above, then you should also enable a Conditional Access policy called Securing security info registration, which means that in order to access the security info registration page, a user will need a valid TAP issued by their administrator. I suggest you also have a process in place for requesting and distributing these TAPs securely, in order to prevent illegitimate requests from going through; for example, confirmation of identity via a phone call or video chat with the helpdesk.

This policy is also available from the CA templates (under Identities):

Securing security info registration

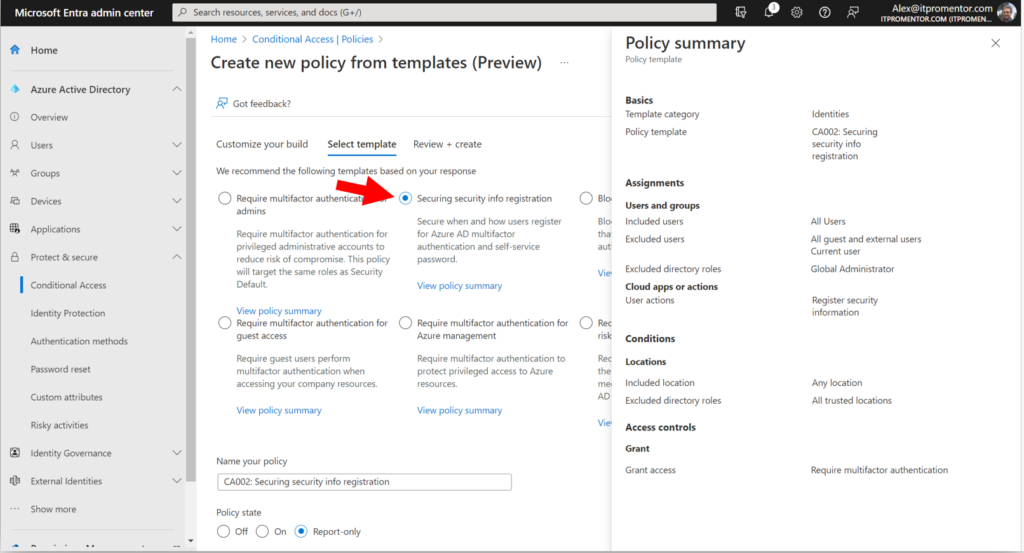
Note that the templated policy also excludes any trusted locations that you specified (so that users could set up their authentication methods from the corporate offices, but not from home or some other public wi-fi, for example).

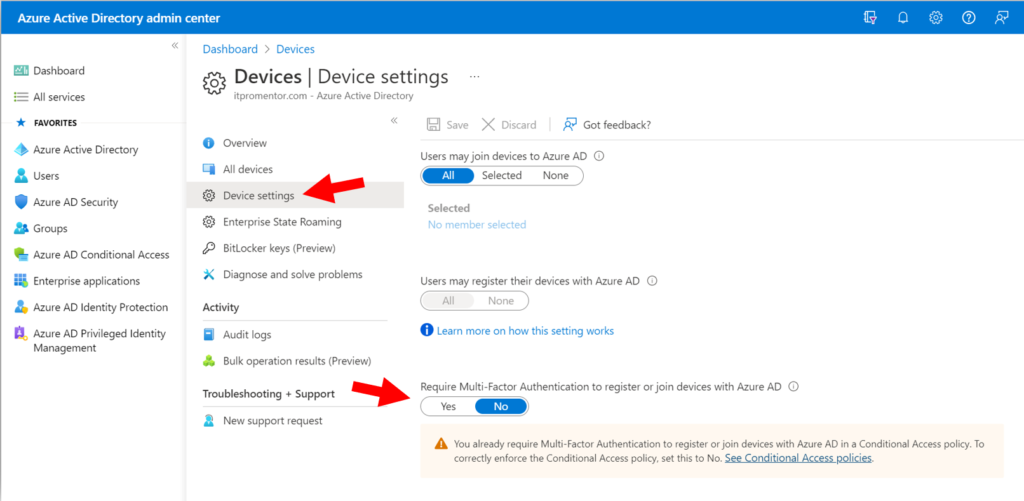
4. Require MFA to register or join devices

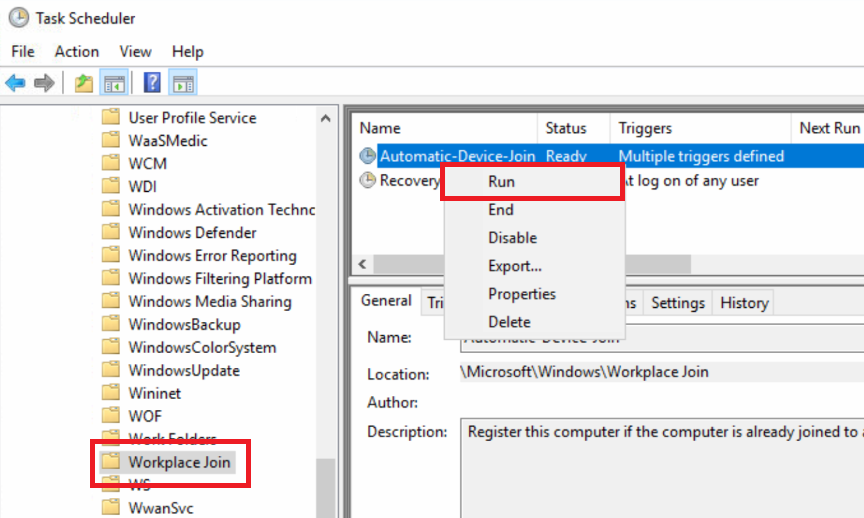
Certain scenarios are not covered by the CA policies outlined earlier. One such scenario is the registration or joining of devices to Azure AD. There is a special policy just for that purpose that you must deploy.

This can also be found as a setting under Devices > Device settings in the Azure AD admin center. But these days Microsoft recommends using the equivalent CA policy in its place (therefore the option on this page should be set to No rather than Yes).

Device setting to Require MFA (deprecated)

For some reason the required settings for this CA policy are not detailed on Microsoft Learn, even though Microsoft recommends moving to it, but here are the settings you will need:

  • Users: All users, exclude emergency access accounts
  • Cloud apps or actions: User action > Register or join devices
  • Conditions: None
  • Access Controls: Grant > Multi-factor authentication

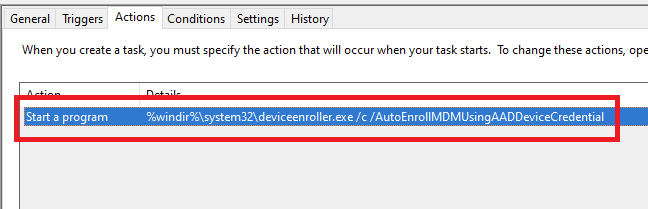
5. Require MFA for Intune enrollment

MFA for Intune enrollment is a separate requirement and not something that is completely covered by any of the above policies. For example, a device which has already been authenticated for another application may be able to enroll without being prompted again unless this policy is in place.

I spoke with someone on Microsoft’s DART team recently, and he explained how this loophole had been used in the wild: in many organizations where CA has been previously implemented, a managed device tends to have greater access than unmanaged devices, with fewer prompts for MFA. But if an unmanaged device has even a little bit of access already, it is possible in some cases to elevate the device by enrolling it without encountering another MFA challenge. At this point the sphere of access has been expanded. Keeping this next policy in place will prevent this unauthorized ‘escalation’ scenario.

  • Users: All users, exclude emergency access accounts
  • Cloud apps or actions: Cloud apps > Microsoft Intune Enrollment
  • Conditions: None
  • Access Controls:
    • Grant > Multi-factor authentication
    • Session > Sign-in frequency set to Every time

6. Add device-based CA policies

This is something I have long advocated for. I recommend turning on a device-based access policy for at least Office 365. This way, access to corporate resources such as email can become contingent on registering devices with Azure AD or even enrolling your devices with Intune. The two primary benefits here are:

  1. You get pretty decent assurances that the inventory of devices you see in the portal is reflective of the actual physical devices out in the world (having an accurate and up-to-date inventory is necessary for good security), and,
  2. many of the current Man-in-the-Middle attacks are instantly thwarted, because the “middle” devices that are being used by attackers are not part of your inventory of pre-registered or enrolled devices.

Therefore, even if an attacker successfully phishes someone in your organization and tricks your end users into round-tripping an MFA code or approval notification, the unauthorized access request access would be denied by the device authentication requirement.

There are a couple of different approaches to accomplish a device-based authentication policy, but most organizations will aim for “Require compliant devices,” which looks like this:

  • Users:
    • All users (or a targeted group of your choice)
    • Exclude emergency access accounts
  • Cloud apps or actions:
    • Cloud apps > Office 365
  • Conditions:
    • Device platform: Select the platforms you intend to protect
  • Access controls:
    • Grant > Require device to be marked as compliant

With this policy in place, it is also necessary to prepare Compliance policies within Intune for each device platform you intend to support. End users must then download and sign-in to the Company portal app in order to complete device enrollment. The details around setting up Intune and enrolling devices is beyond the scope of this article, but I can recommend my courses or written guides on these topics for more information.

However, we must recognize that some organizations are not yet ready to implement Intune, or even if they are, they will not be ready to require device compliance across the board right away, and that is okay. In this case, I can recommend another policy which will prevent unauthorized device access based on device filters. We call this policy “Block unregistered devices.”
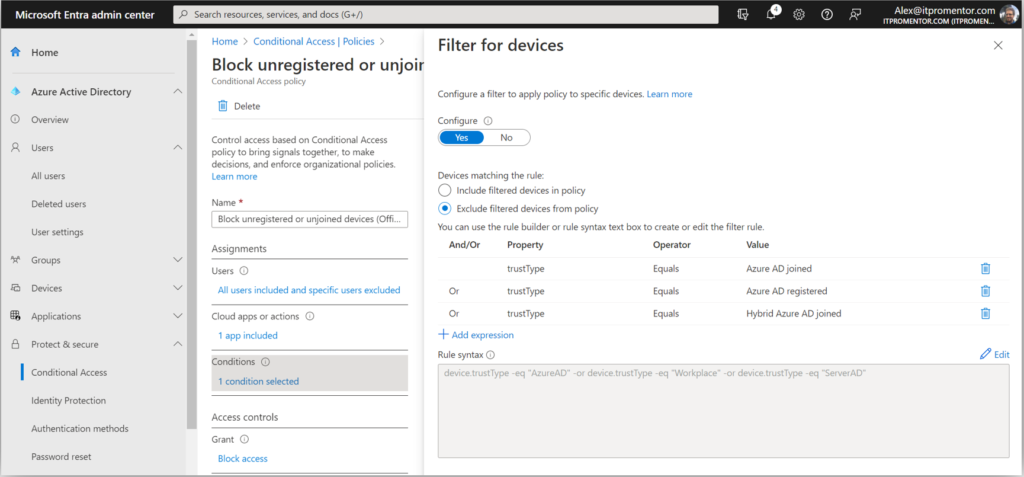
Block unregistered devices using filters

  • Users:
    • All users (or a targeted group of your choice)
    • Exclude Emergency access accounts and all Guest & External users
  • Cloud apps or actions:
    • Cloud apps > Office 365
  • Conditions:
    • Device filters:
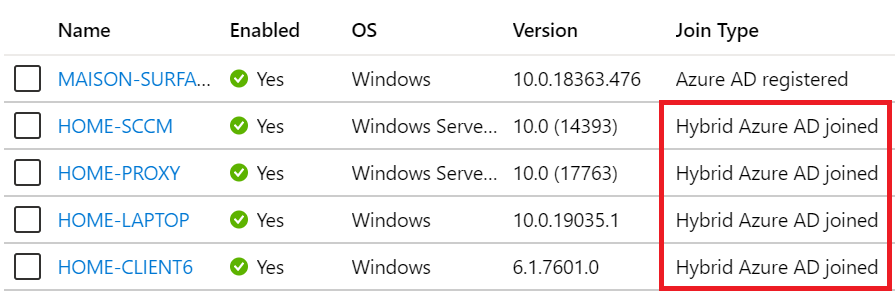
      • Exclude devices where trustType Equals Azure AD Joined, Azure AD Registered, or Hybrid Azure AD Joined
    • Access controls:
      • Block access

In this case you do not need to have devices enrolled with Intune, however, the devices must be registered or joined to Azure AD before they can gain access to data in Microsoft 365 services such as Exchange or SharePoint Online.

I also recommend blocking device platforms that you do not intend to support, which I have outlined here (Microsoft has also since added this to their “common” CA policies on Learn); this policy does not require enrollment or compliance checks, either. These policies are sometimes an easier place to start out.

7. MFA for guests

Generally speaking, I like to keep my “guest-specific” policies separate from my internal user policies. Therefore, any policies targeting internal users will normally exclude guest & external users. If I want to deploy policies specifically against guests, those will be their own policies that I can turn on or off without impacting my “standard user” CA policies.

MFA for guests

You will notice that there is one such policy available via the templates provided by Microsoft: Require multifactor authentication for guest access.

However, before enabling this policy, I tell all my customers to enable the cross-tenant MFA settings. In case you didn’t know about these, navigate in the Microsoft Entra portal to External Identities > Cross-tenant access settings. Click Edit inbound defaults then go to the Trust settings tab.

Cross-tenant MFA settings

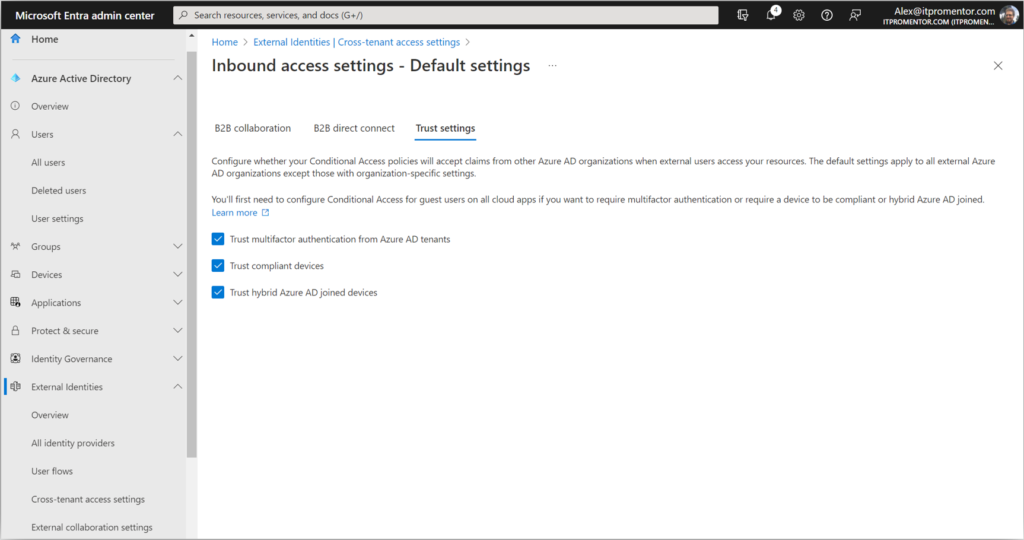
By checking these boxes, you are telling your tenant to respect MFA claims that have already been validated in other Azure AD tenants. In other words, if you deploy a Conditional Access policy in your own tenant that requires MFA for guests, those guests will not be double prompted if they have already satisfied MFA claims in their own (home) tenant. Completing this step also happens to be a pre-requisite for our last recommendation (though I have no idea why this is so).

8. Require stronger authentication

If your organization is ready to adopt passwordless methods of authentication using the Microsoft authenticator app, and/or FIDO2 keys such as Yubikey, then you have another option to consider. This past fall just prior to Ignite, we gained the ability to distinguish between authentication methods based on authentication strength.

Previously, any type of MFA was treated equally by Conditional Access requirements: so an SMS code was considered just as good as the authenticator app or even a FIDO2 key. But in reality, not all authentication methods are created equally. With a FIDO2 key for example, the key material is non-exportable. In other words, an attacker would have to physically steal your key in order to use it to gain access as you. It is therefore considered “phish resistant.”

I suggest taking a crawl-walk-run approach; if you are considering switching to stronger authentication you may want to identify specific use cases or groups to pilot the experience before pushing it out org-wide. For example, if you have to distribute physical keys, how does that process work? What happens if someone loses a key? Etc. These questions will be easier to sort out on a smaller scale, which will help you develop a system for more widespread adoption.

Here is an example of upgrading a policy where you require stronger authentication for specific admin roles:

  • Users: Select users and groups > Directory roles (select any groups or roles you require)
  • Cloud apps or actions: All cloud apps
  • Conditions: None
  • Access controls: Require authentication strength (select your desired strength)

Upgrade your authentication strength

Note that you may have additional steps to configure the passwordless or FIDO2 experiences before enabling these CA policies.

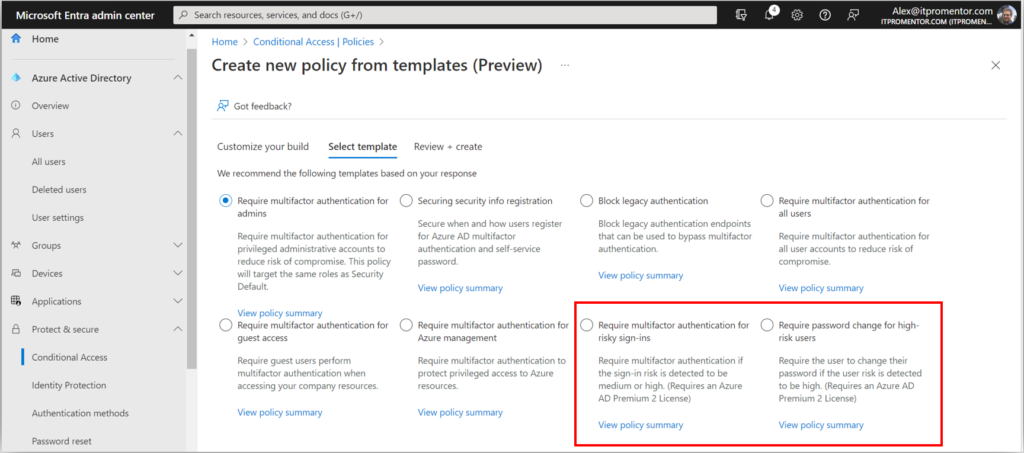
9. Fancier subscription, fancier options

If you are the lucky owner of the more expensive E5 subscription, then you also have access to “risk-based” Conditional Access policies, as well as a bunch of other upgrades that are well beyond the scope of this article. Once again, the Conditional Access templates are the easiest way to get moving on some of these features.

E5 risk-based policies

Note: If you buy licenses to support these features for just your administrator accounts (as some organizations do), just be sure that when you deploy the policies, they are scoped to only those users who are licensed for the features. This way, you stay in compliance with Microsoft’s licensing guidelines.

Conclusion

The principles of Zero Trust remain unchanged. In the past, we would have simply enabled MFA, or the equivalent of Security Defaults, and felt that we had fulfilled the spirit of the “Verify Explicitly” pillar, but as we have seen, that may not be enough anymore on its own.

Zero Trust Principles

As the game has changed, so have our tools. In order to have more confidence that our “Verify Explicitly” principle is being met, we just want to put in place a few additional measures, for example:

  • get users to slow down by adding a number-matching requirement on the Authenticator app
  • better protect the MFA registration process itself with Temporary Access Pass
  • require a strong authentication challenge anytime a device is registered, joined or enrolled for management
  • evaluate the device as part of your authentication challenge
  • even require a stronger level of authentication such as phish-resistant, hardware-based FIDO2 keys

And of course, do not forget to address the other two pillars of Zero Trust, either! I will soon release updates to my famous Best Practices Checklists and other written guides to reflect more of what we learned over the last year. If you already own a copy, then congrats! Your free updates will be arriving sometime in the next month or so. If you want to join thousands of other happy readers, I encourage you to subscribe, check out the store, or even consider joining our SquareOne community.

We are living in a different world now than the one we had 10 or even just 5 years ago. I wonder what it will look like 5 or 10 years from now? It’s part of what makes our jobs stay evergreen, I suppose. Staying up to date in the day-to-day and month-to-month, of course, is going to be the key challenge for most of us. I suppose this article, too, could go out of date pretty quickly after its printing. But do not be discouraged: it just means that we must always be aware, ready, and willing to make iterative changes over time.

If you see any omissions in the policies or settings I discussed in this article, be sure to comment below! We would love to learn from you out there in the audience, as well!

The post But have you turned multifactor authentication ALL the way on? appeared first on ITProMentor.

✇ITProMentor

Reader Question: How can I set up a “Deny-by-Default” Conditional Access Policy?

It has been a while since I took a question from a reader and turned it into a blog post. It is one of my favorite things to do here on ITProMentor, but the “busy-ness” of life has taken me away from the keyboard a lot in recent months. Now that I am (mostly) settled in a new home, I plan to rekindle some of these old joys.

This one came from Devin, who lives in the U.K.:

Hi Alex, I hope this message finds you well. I watched a recorded presentation of yours where you compared Conditional Access to a “Firewall for the Cloud,” but you mentioned that there are important differences. Specifically, you made the point that most firewalls have a “deny-all” rule by default, and it is up to the administrator to open the inbound ports that are necessary. In Conditional Access, you said it is almost the exact opposite, where everything is open by default, and you have to tell the system what you want closed.

This got me thinking, wouldn’t it be possible to start by creating a “deny-all” rule and then add other rules in front of that, to open the specific applications and access scenarios that you wanted, and no more? Wouldn’t this be more in line with the whole ‘Zero Trust’ concept?

Thanks for your insights!

–Devin, U.K.

Great question Devin, and I am glad that you asked it. No analogy is perfect, and it is actually because of these imperfections that the “firewall” comparison can be so illuminating. This will give us the chance to clarify a few things about Azure AD Conditional Access in general, and as well, offer some potential solutions to certain problems.

The first thing to remember is that Conditional Access differs from firewalls in another important way: there is no “ordering” to the rules. I cannot place one rule “in front of” another. All rules are evaluated simultaneously in Conditional Access. So, if I create a rule that says, “Block X,” it does not matter if that rule is located further up or down in my list. It will always be evaluated the same way. “X” will always be blocked.

This also implies that any “block” control always will always win over any “grant” control. Therefore, if I created one rule that said, “Block access to Email” (scoped to All users) and another one that said, “Grant access to email but require MFA” (either scoped to All users, or enabled for a specific security group), then guess what happens? Access is still blocked. In order to get the desired effect with these two policies, you would need to create a security group called something like “Email allowed users” and add that security group to the “Exclude” tab on the Block access… policy.

So, the answer to your question is both yes and no: it is possible to create “Deny-by-default” rules, but not exactly in the way you suggested. But in fact, this type of design (writing explicit block rules for everything then making many exclusions) would be unnecessary for most organizations. I will explain why shortly.

First, just notice that writing your “default deny” rule or rules quickly increases the complexity of your implementation. For example, you would need to manage double the policies and several security groups and exclusions for every access scenario you wanted to open/allow.

  • Deny mobile access for all users / Allow mobile access for approved users
  • Deny browser access from the desktop / Allow browser access from the desktop
  • Deny client app access from the desktop / Allow client app access from the desktop
  • Deny access to administrative services / Allow admin access
  • Deny all guest access / Allow guest access to approved apps
  • Etc.

I think these designs tend to get messy very quickly. You might say, so what? Why not do it this way?

Before we answer that question, let’s take a closer look at one of the other concepts I normally address during my talks on Conditional Access: the two so-called “Architecture types.”

Open (or targeted) architecture: This means targeting your policies to address specific access scenarios.  For example: “Require MFA for access to Office 365,” or “Require managed devices for access to Email.” In this architecture, you are putting specific requirements around certain applications or access scenarios, while leaving others “open” or unguarded (i.e.. you do not have policies covering “All cloud apps”).

Closed (or universal) architecture: This means targeting your policies as broadly as possible, for example All users / All cloud apps, e.g.: “Block legacy authentication globally,” or “Require MFA for all users.”

Closed architecture is better aligned to the concepts of Zero Trust since you are not leaving any “holes” or scenarios free of the constraints imposed by the policy. Note that it is also possible to combine these architecture types into a single policy set. For example, you may have a universal requirement for MFA across all cloud apps, but you only require managed devices for access to email, or certain other applications. That is completely fine and up to each individual organization.

Why Closed Architecture is more like Deny-By-Default

Now, let’s assume your goal is ultimate Zero Trust protection across all cloud apps, and that you want to impose both a multi-factor as well as a managed device requirement everywhere. In this case we require multiple policies for various reasons (e.g., easier troubleshooting, better for making more granular exclusions, and covering various access scenarios).

To begin, we need several policies enforcing the MFA requirement:

  • Block all legacy authentication: legacy authentication is vulnerable to password spray and replay attacks, and it does not support MFA challenges, so we should eliminate it for all users and all cloud apps.
  • MFA required for all admins: it is a best practice to have a policy covering this scenario even if you plan to place the same requirement against all users; that way, if the policy for standard users changes or needs to be temporarily disabled, admins are still protected.
  • MFA required for all users: This is your universal MFA requirement for everyone
  • MFA to register/join devices: We have a separate “User action” to control this behavior, as it is not covered by the “All cloud apps” selection above.
  • Secure the security info registration page: We have a separate “User action” to control this behavior, as it is not covered by the “All cloud apps” selection above. Also, it is recommended to enable the Temporary Access Pass option so that users can still get in to edit authentication methods with help from an administrator, even in the absence of another factor such as a mobile app or hardware token.
  • MFA for guests: Note that we can also trust MFA claims from other tenants, so that users are not double-prompted. If you have a policy for the guest access scenario, be sure to modify your default trust settings from Azure AD > External identities > Cross-tenant access settings.

And we need another policy set enforcing device-based requirements, for example:

I suggest that this configuration achieves the “Deny-by-default” posture that we want, without needing to add another “Block” policy on top of it, with additional exceptions, etc. Let me explain why.

When you create a policy with access controls that say, “Grant access” and “Require X, Y or Z” then you could also read this policy as saying,  “Access is denied unless X, Y or Z can be met/satisfied.” Therefore, if you do not satisfy MFA, or do no have a managed device, and your policy explicitly says those things are required, then guess what? No access for you!* This is already “deny by default.”

(*By the way, if you target “All cloud apps” with a compliant device requirement, then you must also exclude the Intune enrollment app or else you will be unable to enroll new devices. It’s like a chicken-and-egg problem: you can’t get enrolled in the first place to become evaluated for compliance if there is a compliance requirement in order to get enrolled. Note there may be other impacts as well with other cloud apps when enabling closed policies.)

Additional Deny-by-default rules

Another popular policy set is to have broad “location-based” rules that “deny-by-default” except from approved countries or locations. Example:

  • Block access from non-domestic countries: this policy is usually scoped to All cloud apps (closed), with a Block access control placed against All locations, excluding a named location containing the domestic country (e.g. USA, or wherever you live). Optionally, you can also use filters for devices to exclude managed devices (that way you can travel with devices that are already enrolled/managed)

And you can apply this concept to device platforms as well:

Anecdotal story

Let me briefly relate another story that hopefully clarifies the point further. This one combines the concepts of Open architecture with a “Deny-by-Default” policy (for a specific application: email).

Recently a non-profit organization contacted me with a very particular request. They wanted to use Closed architecture for their core policies (i.e., block legacy auth & require MFA), and at the same time use Open architecture for their device-based policies, especially for personal (mobile) devices. The main concern was around corporate email on personal devices. Okay, that’s no problem, and in fact is very common. Here is the catch. They had a very specific on-boarding process whereby a user would not be allowed to gain access to their corporate email using a mobile app until they had completed an E-safety training module. HR would assign them to a security group shortly after passing the exam, and they would thereupon be granted access (but not before then). It was basically a carrot for completing the course material.

They did not want a closed architecture because the scope for this requirement was no wider than email (Exchange Online). However, they still needed a “fail closed” policy set for this application because they did not want a user to gain access on mobile devices before passing the exam. So here is what we did: We implemented the usual policy set for block legacy auth, MFA requirements, etc. Then for the device-based requirement, we only targeted Exchange Online, and used a security group called “Allowed to access email on mobile devices.” We then created two policies:

The first policy was called “Block access to email on mobile devices” and it was configured as follows:

  • Users and groups:
    Include: All users
    Exclude: Allowed to access email + Emergency access accounts
  • Cloud apps: Office 365 Exchange Online
  • Conditions: Device platform > iOS & Android
  • Access controls: Block access

Then the second policy was called “Allow access to email on mobile and desktop apps” and it was configured as follows:

  • Users and groups:
    Include: All users
  • Exclude: Emergency access accounts
  • Cloud apps: Office 365 Exchange Online
  • Conditions: Client apps > Mobile apps and desktop clients
  • Access controls: Grant access w/ Compliant device or Approved App or App protection policy

Remember that all other access scenarios around this application are already covered by our “closed architecture” design for the MFA requirement, etc. This is an additional requirement that says access is granted only when the device is managed (MDM), or the app is protected (MAM), and when the user belongs to the proper security group (indicating they passed the E-safety course).

Now, in my opinion this configuration is not any “safer” or “more secure” than simply deploying the second policy and forgoing the first policy altogether. The reason we deployed both policies wasn’t “because security” or “because deny-by-default,” rather, we did this specifically to enable the custom workflow that they wanted to have, with the training pre-requisite. That’s it.

Conclusion

If your goal is to align your Conditional Access strategy as closely as possible with a ‘Zero Trust’ model, then you should probably be aiming for Closed architecture. However, a closed architecture approach may not be right for every organization and every application/access scenario. Whenever I implement Conditional Access, I always push closed policies for the basics: blocking legacy auth and enforcing MFA. After that, I think it is a good idea to begin evaluating device-based policies with regard to corporate email access specifically, and go further where it makes sense, even all the way to a closed policy set, especially in high-sensitivity or high-security environments. Just be aware there may be other impacts to certain applications (e.g. Intune enrollment, etc.).

Hopefully this cleared up the confusion for you, Devin. Thanks for writing in.

The post Reader Question: How can I set up a “Deny-by-Default” Conditional Access Policy? appeared first on ITProMentor.

✇ITProMentor

Updated Migration Advice: Remove the last Exchange Server?

The last time I published articles on the topic of email migration was in the long, long ago: in the before time. Yes, before pandemics and novel coronaviruses, but also before we had the option to remove the last Exchange server. Some have asked me if I would change any of my instructions or advice for migrating from Exchange on-premises to Exchange Online in light of these recent developments.

My short answer is: it depends, and even then, only if you want to.

For the longer version, read on.

Do you really need hybrid?

The first thing to note is that the new process for removing the last Exchange server is only going to be applicable to a minority of SMB tenants who require long-term hybrid identities with directory synchronization. Why? Because the vast majority of SMB’s should be focused on removing traditional AD anyway, and migrating toward cloud-only identities in Azure AD (as many have already done).

When someone says they absolutely cannot get rid of the local AD, that usually means there is either some legacy thinking, or a legacy Line of Business application standing in your way. This blog has often dedicated articles to dismantling the barriers related to the former problem, but when it comes to the latter (LOB apps), how should we address them?*

First, determine if there are actually dependencies here or not. For example, there may be web-and-mobile friendly alternative apps of which the stakeholders are unaware. If not, and you have to stick with the existing app, next you must ask: Does the application rely on Active Directory or Exchange mail attributes in any way? If so, you may have a legitimate reason to keep these systems around, if not, then proceed accordingly. Most of the time, the perception is different than the reality: most apps do not actually have a hard requirement for AD.

In some circumstances (where supported), legacy apps can be hosted in a virtual desktop environment by a service provider, or in Azure, leveraging Azure AD DS or a standalone pair of small-sized VM’s promoted as DC’s, along with Azure Virtual Desktop or similar. And of course, there is always the old refresh your server on-premises if none of these other options appeal to you.

Assuming you have exhausted your other choices (e.g. drop-and-shop) and you’re still stuck with a legacy AD (either on-prem or in the cloud), then your next step is to decide how important it is for you to keep the same credentials for this legacy app as you have for say, your email and cloud-based applications. Very important? Then consider keeping a hybrid connection. Not so important? Perhaps it is time to isolate this app from the rest of your (more modern) environment.

And what about legacy file shares?

Another place people get stuck is on larger-sized file migrations, particularly where there are lots of really large files like CAD drawings, etc. In this case you have similar choices to make. Just think of this requirement no differently than other legacy LOB apps.

How much of this storage is “current” and how much is just archival and can be pushed to an alternative cloud platform such as Azure Files or even a third-party cloud storage solution? Or, if you are going to elect to keep a local file system, will it be Windows-based and connected to the same identity/credentials as your email and other cloud apps? Or should you isolate this on a separate, purpose-driven system or alternative solution?

These choices will be up to you. Again I want to point out that this a niche case, and that the demand for this kind of solution is going to be an exception, not the rule. Most SMB’s with typical information workers can simply move files to OneDrive/SPO/Teams, and/or Dropbox, Box, Citrix ShareFile, or similar. In other words, cloud-based apps that can be connected to Azure AD for SSO and better security.

The hybrid path (only if you need to or want to)

Most of the time, small organizations are coming from older systems, such as Windows Small Business Server 2011, or Windows Server Standard 2008R2, 2012, 2012R2, or 2016, with Exchange Server 2010, 2013 or 2016 installed on top of one of those systems. If you are coming from anything older than that, then I would recommend a third-party tool to assist in the migration process. Otherwise, hybrid or “remove move” migrations will be the best migration option for you (or you can still use third-party tools if you prefer).

Once you are done with the migration, then you can either keep an Exchange 2016 or 2019 server around for hybrid purposes (like we have always done), or, now, you can choose to get rid of it. But for this option you will need to have Exchange Server 2019: so if you came from say 2016, add a 2019 server and run the latest cumulative update before executing the process to remove the 2016 as well as the last 2019 server. Remember that even after you “remove” the last Exchange server (really you’re just shutting it off forever), you are still dependent on the local AD for your identities and specifically for all the mail related attributes: the source of authority is still on-premises, and the Azure AD Connect synchronization must still remain in place just as before (so not that much has changed, really).

Review this Microsoft docs article for more details on how this “Exchange Server Free” hybrid environment looks in practice. Two main differences:

  1. You will no longer have to maintain a server with Exchange installed on it for hybrid management purposes
  2. You will no longer have the Exchange management web UI, and instead you will only have some PowerShell cmdlets with which to manage the attributes

Actually, Steve Goodman over at Practical 365 has provided a graphical web-based tool for managing the Exchange attributes after removing the last 2019 server. See this article for more details.

Okay, so the proper migration steps would be:

  1. Make sure your source environment has latest available cumulative updates
  2. Add your domain name(s) to Microsoft 365, verify (add TXT) but do not cut over MX yet
  3. Configure Azure AD Connect to sync identities & on-premises passwords to the cloud
  4. Run the Hybrid Configuration Wizard (HCW) / alt: third-party tool setup
  5. Create your remote move migration batches / alt: third-party migration batch setup
  6. Migrate public folder data (if applicable, usually try to replace w/ Groups, Teams, etc. instead)
  7. Finalize your migration batches
  8. Cut over MX records, SMTP relays, etc.
  9. New post-migration and clean-up tasks:
    1. If needed, add or upgrade to Exchange server 2019 (latest CU)
      • Remove older Exchange servers as applicable
    2. Follow the process to shutdown the last Exchange 2019 server permanently (optional)
      • Moving forward, update processes to manipulate mail attributes using the new cmdlets
    3. Consider configuring Hybrid Azure AD Join for your PC’s and configure device-based Conditional Access to improve security

Similar to how we have always done things, with a few extra items tagged onto the end.

Cloud-only identity (the preferred path)

As always, I encourage you to strongly consider severing your ties to that old beast known as Active Directory. Most folks can get by just fine (better actually) without it. In this case your migration looks very similar to the above, except that your post-migration tasks will include a different subset of items:

  1. Remove Azure AD Connect + Exchange hybrid
  2. Move shared files & other apps to the cloud or cloud-based alternatives (and setup SSO to Azure AD wherever possible)
  3. Join PCs to Azure AD and configure device-based Conditional Access
  4. Move DHCP from AD to firewall or router
  5. Shut down the AD domain forever

In this configuration you are in the best possible position to implement additional security & compliance capabilities, and take full advantage of the other goodness the cloud has to offer, without carrying any of the baggage of days past.

I really do think that the hybrid path appeals to a dwindling subset of SMB organizations: the vast, vast majority of you should be looking to cut ties and go toward cloud-only identities, even if it means managing a separate credential set/security boundary for a legacy app in some cases (especially if it is going to be temporary). But, if you are one of those “special case” customers, we now have the option to maintain a hybrid environment, without necessarily keeping that old Exchange server around. Some may still prefer to keep the Exchange server, and that’s totally fine as well.

If I were forced to keep a legacy AD around, I personally would choose to kill the directory synchronization and just maintain a separate security boundary for that application specifically. But that is due to my own preferences and risk tolerances. You may come to a different conclusion. I won’t shame you for it, as everyone has a right to be wrong. At least now you know how to do the wrong thing the right way.

:)

The post Updated Migration Advice: Remove the last Exchange Server? appeared first on ITProMentor.

✇Maxime Rastello

Avoid certificate prompt for Azure Active Directory Certificate-Based Authentication (CBA)

Azure Active Directory Certificate-Based Authentication (Azure AD CBA) allows you to authenticate to Azure Active Directory using a certificate from your internal Public Key Infrastructure (PKI). To know how to implement Azure Active Directory CBA, please refer to the Microsoft doc.

Certificate authentication will happen on the URL https://certauth.login.microsoftonline.com. By default, your web browser will prompt you to select a certificate installed on your Personal User Certificate store.

To avoid the user to manually select a user certificate for authentication, you can use the following parameters with Microsoft Edge :

Configuration

Registry

Create the following registry key either in CURRENT_USER or LOCAL_MACHINE :

  • Type : REG_SZ
  • Name : 1 (or any following number if you already have parameters configured here)
  • Location :
    • User setting: HKEY_CURRENT_USER\SOFTWARE\Policies\Microsoft\Edge\AutoSelectCertificateForUrls
      OR
    • Device setting: HKEY_LOCAL_MACHINE\SOFTWARE\Policies\Microsoft\Edge\AutoSelectCertificateForUrls
  • Value : check below

Documentation

GPO or MDM

Create a GPO in Active Directory or a Settings Catalog profile in Microsoft Endpoint Manager and set the following parameter :

  • Parameter : Automatically select client certificates for these sites
  • Location : Administrative Templates / Microsoft Edge / Content settings
  • Value : check below

Parameter value

Here is a generic sample of the possible values for the parameter:

{"pattern":"https://www.contoso.com","filter":{"ISSUER":{"CN":"certificate issuer name", "L": "certificate issuer location", "O": "certificate issuer org", "OU": "certificate issuer org unit"}, "SUBJECT":{"CN":"certificate subject name", "L": "certificate subject location", "O": "certificate subject org", "OU": "certificate subject org unit"}}}

Make sure you customize the JSON parameters based on your needs and apply it to the pattern https://certauth.login.microsoftonline.com.

Here is my example:

{"pattern":"https://certauth.login.microsoftonline.com","filter":{"ISSUER":{"CN":"AZURE-CA"}}}

Replace AZURE-CA by the CN of your issuing CA

Validation

You can check that the setting is properly applied in Microsoft Edge using the tag edge://policy

To validate the automatication certificate selection:

  1. Restart Microsoft Edge
  2. Go to https://certauth.login.microsoftonline.com.
  3. You should be automatically authenticated and redirected to https://www.office.com.
✇Maxime Rastello

Manually re-enroll a Hybrid Azure AD Join Windows 10 / Windows 11 device to Microsoft Endpoint Manager without loosing the current configuration

Edit 01/06/2022 : updating this article to include Azure Virtual Desktop Windows 10 / Windows 11 multi-session enrollment command using Device Credential

——–

There are several ways to enroll a Windows 10 PC to Microsoft Intune:

Manually

  • During the Out-of-the-box Experience (OOBE), when starting a Windows 10 PC for the first time
  • In the Windows Settings, after the PC configuration

Manual enrollment will require that the user enters his Azure AD credentials.

Automatically

  • Using Azure AD Join + automatic Intune enrollment
  • Using Hybrid Azure AD Join + automatic Intune enrollment

Automatic enrollment can be triggered using a Group Policy, SCCM Co-Management or Windows AutoPilot.

Windows 10 automatic enrollment requires the creation of public DNS records enterpriseregistration and enterpriseenrollment. More info here.

However, sometimes it is possible that a Windows 10 PC is in an inconsistent enrollment state, with error “The sync could not be initiated“.

This can happen because:

  • The PC was shut down during a long time, and the Microsoft Intune certificate is expired (located in Local Machine / Certificates / Personal)
  • Someone manually deleted the Microsoft Intune certificate
  • The PC is enrolled in another Intune tenant

Prerequisites: check Hybrid Azure AD Join status

Before re-enrolling your device to Microsoft Intune, you need to make sure that the certificates for Hybrid Azure AD Join are not expired as well.

Follow this procedure to Manually re-register a Windows 10 / Windows 11 or Windows Server machine in Hybrid Azure AD Join.

Method 1: With data and configuration loss

The easiest way to unenroll a Windows 10 PC from Microsoft Intune is to disconnect the work or school account.

Just go to All settings > Accounts > Access work or school, select your corporate account and click Disconnect.

Important: this menu is not available on Windows 10 / Windows 11 multi-session edition for Azure Virtual Desktop.

However, the problem with this is that all data and configuration pushed by Microsoft Intune will be deleted from the PC.

Method 2: Without data or configuration loss

There is a way to manually re-enroll your Windows 10 PC without loosing all the current configuration and apps deployed by Microsoft Intune.

This method is not officially supported by Microsoft

As you may know, automatic enrollment can be triggered either by a Group Policy Object or by the SCCM client on a co-managed device.

In both cases, the feature will basically create a scheduled task to enroll the PC at next logon. The command is different if you are trying to enroll Windows 10 / Windows 11 Enterprise multi-session devices from Azure Virtual Desktop (using Device Credential) or a regular Windows 10 / Windows 11 device using User Credential:

Windows 10 / Windows 11 Enterprise (with User Credential)

Task launched in the SYSTEM context:

%windir%\system32\deviceenroller.exe /c /AutoEnrollMDM

Windows 10 / Windows 11 Enterprise Multi-session for Azure Virtual Desktop (with Device Credential)

Task launched in the SYSTEM context:

%windir%\system32\deviceenroller.exe /c /AutoEnrollMDMUsingAADDeviceCredential

To manually re-enroll the PC, we will need to clean up the environment and relaunch this command in the SYSTEM context to re-enroll the PC.

Here are the steps that you need to follow to make it work:

  1. Delete stale scheduled tasks
  2. Delete stale registry keys
  3. Delete the Intune enrollment certificate
  4. Restart the enrollment process

Step 1: Delete stale scheduled tasks

Follow this procedure:

  • Run the Task Scheduler as an administrator.

  • Go to Task Scheduler Library > Microsoft > Windows > EnterpriseMgmt. Write down the enrollment ID somewhere, you will need it for the cleanup.

  • Delete all the existing tasks the enrollment folder.

  • Delete the enrollment ID folder.

Step 2: delete stale registry keys

Use the previous enrollment ID to search the regitry:

  • Open the Registry Editor as an administrator.

  • Search for the enrollment ID you wrote in the following locations and if found, delete the key that is containing the ID:
    • HKEY_LOCAL_MACHINE\SOFTWARE\Microsoft\Enrollments\xxxxxxxxxxxxx
    • HKEY_LOCAL_MACHINE\SOFTWARE\Microsoft\Enrollments\Status\xxxxxxxxxxxxx
    • HKEY_LOCAL_MACHINE\SOFTWARE\Microsoft\EnterpriseResourceManager\Tracked\xxxxxxxxxxxxx
    • HKEY_LOCAL_MACHINE\SOFTWARE\Microsoft\PolicyManager\AdmxInstalled\xxxxxxxxxxxxx
    • HKEY_LOCAL_MACHINE\SOFTWARE\Microsoft\PolicyManager\Providers\xxxxxxxxxxxxx
    • HKEY_LOCAL_MACHINE\SOFTWARE\Microsoft\Provisioning\OMADM\Accounts\xxxxxxxxxxxxx
    • HKEY_LOCAL_MACHINE\SOFTWARE\Microsoft\Provisioning\OMADM\Logger\xxxxxxxxxxxxx
    • HKEY_LOCAL_MACHINE\SOFTWARE\Microsoft\Provisioning\OMADM\Sessions\xxxxxxxxxxxxx

DO NOT delete registry keys that are not in the list above. They will be overwritten after the new enrollment.

Step 3: delete the Intune enrollment certificate

Follow the procedure:

  • Search for the option “Manage computer certificates” or use the command certlm.msc as an administrator.

  • Go to Personal > Certificates and delete the certificate issued by either “Microsoft Intune MDM Device CA” or “SC_Online_Issuing” (depending on the date of the enrollment).

Step 4: Restart the enrollment process

To be properly executed, the enrollment command must be entered in a SYSTEM context. We will use the PSExec tool for that purpose.

  • Use PSExec to launch a Command Prompt as SYSTEM:
psexec /i /s cmd

  • In the Command Prompt, enter one of the following command depending on your enrollment type:

Windows 10 / Windows 11 Enterprise (using User Credential)

%windir%\system32\deviceenroller.exe /c /AutoEnrollMDM

Windows 10 / Windows 11 Enterprise Multisession for Azure Virtual Desktop (using User Credential)

%windir%\system32\deviceenroller.exe /c /AutoEnrollMDMUsingAADDeviceCredential

  • In the computer certificate store, check that a new Intune certificate has been enrolled for the device:

  • You are now ready to start a policy sync from the Windows Settings, and check that the connection with the Intune service is now OK:

✇Maxime Rastello

Manually re-register a Windows 10 / Windows 11 or Windows Server machine in Hybrid Azure AD Join

Hybrid Azure AD Join devices are machines under Windows 10+ or Windows Server 2016+ that are:

  • Joined to an on-premises Active Directory domain
  • Registered in Azure AD as a hybrid device

Having a Hybrid Azure AD Joined device enables the following features:

  • Automatic device enrollment in Microsoft Intune
  • Device-based conditional access for corporate devices
  • Backup of the BitLocker recovery key in Azure AD
  • Sync of some Windows settings by the Enterprise State Roaming

Sometimes, a machine can be in an inconsistent registration state in Azure Active Directory. This can happen because:

  • The machine was shut down during a long time, and the Azure AD device registration certificate is expired (located in Local Machine / Certificates / Personal)
  • Someone manually deleted the device registration certificate
  • Someone manually deleted the device object in the Azure AD portal
  • The machine is registered in another Azure AD tenant

Please note that this method will only succeed if your organization meets all the prerequisites for Hybrid Azure AD Join. For more information, please refer to this documentation.

Step 1: Unregister the device from Azure AD

Follow this procedure:

  • On the machine to unregister, launch a Command Prompt as an administrator and type the following command:
dsregcmd /leave

  • Make sure the certificates issued by “MS-Organization-Access” and “MS-Organization-P2P-Access [xxxx]” have been deleted from the local machine Personal certificate store:

  • Type the command dsregcmd /status in a Command Prompt, and make sure the following parameters have the appropriate values:
dsregcmd /status

+----------------------------------------------------------------------+
| Device State                                                         |
+----------------------------------------------------------------------+
AzureAdJoined : NO  <-----
EnterpriseJoined : NO
DomainJoined : YES  <-----

Step 2: Re-register the device as a Hybrid Azure AD Join

Follow this procedure:

  • On the machine to re-register, run the Task Scheduler as an administrator.

  • Go to Task Scheduler Library > Microsoft > Windows > Workplace Join and manually start the task “Automatic-Device-Join“.

  • Make sure the certificates issued by “MS-Organization-Access” and “MS-Organization-P2P-Access [xxxx]” have been created in the local machine Personal certificate store:

  • Type the command dsregcmd /status in a Command Prompt, and make sure the following parameters have the appropriate values:
dsregcmd /status

+----------------------------------------------------------------------+
| Device State                                                         |
+----------------------------------------------------------------------+
AzureAdJoined : YES  <-----
EnterpriseJoined : NO
DomainJoined : YES

  • Reboot the PC.

  • Start an Azure AD Connect delta synchronization.

❌