Teams Profanity Filter Looks for Obscene or Profane Words
When I read message center notification MC537415 (5 Apr 2023, Microsoft 365 roadmap item 113412) about the “newly introduced toggle to turn on/off profanity filtering in live captions” in Teams settings (Figure 1), I wondered about how much usage this feature will get. I can imagine that it will be popular and useful in education settings (hopefully, those running the meetings will take control if profanities abound), but the corporate world is slightly more robust.
Figure 1: Setting the Teams profanity filter to On
Deployment of the profanity toggle started to targeted release tenants in early April. After completing this phase, standard release tenants will see the feature in early May. Full deployment to commercial and GCC tenants should be complete by mid-May. GCC High and DoD tenants should see it in mid-July.
Filter Inserts Masks for Bad Words
The profanity toggle controls whether Teams inserts ***** masks when the transcription of a meeting to generate live captions detects that a spoken word is profane (Figure 2). In this respect, I believe that Teams looks for words deemed to be vulgar or obscene rather than irrelevant or unsanctified.
Figure 2: The effect of the Teams profanity filter
Some corporate executives I have direct experience of, including some at Microsoft, were prone to dropping a few f-bombs during meetings to emphasize a point or stress just how they felt about a discussion. This is the kind of behavior that I think Teams will seek to filter out.
If you don’t turn the toggle on, you see every word Teams generates for a caption. This is the default, so you need to turn the toggle on if you think that you’re in danger of being offended by seeing a profane caption. Of course, if you’re listening to the meeting, you’ll hear the objectionable term in its full glory because Teams doesn’t filter the audio feed.
Factors Affecting Detection
Another thing to consider is that the generation of live captions depends on the transcription engine being able to recognize words. When seeking to identify profanities, the engine must first recognize the word and then determine it to be profane. Quite how this process will deal with local accents, argots, and slang remains to be seen. My experience when testing the Teams profanity filter was that it detected some words and ignored others. Your mileage might vary depending on the clarity of enunciation by meeting participants and quality of microphones. A whispered expletive is unlikely to be picked up by live captions.
A further challenge exists for live translated captions (one of the four features moved to Teams premium in January 2023). I do not know how effective the profanity filter will be in a meeting where participant contributions are in multiple languages or if the filter will be able to handle concurrent translation of profanities from multiple languages. That would be an interesting test to run.
Improvements for Live Captions
MC538737 (April 8) notes that users will be able to choose colors, height, position (left or bottom) and font size for live captions. There’s no facility to highlight profanities in a different color. This update will roll out in mid-May 2023.
Personal Choice
Opting to use the Teams profanity filter is very much a personal choice. Some won’t care at all if someone’s contribution is on the edge while others will be very offended at terms that some consider unremarkable. There’s no way to set the control programmatically with PowerShell or the Graph that I can see to allow administrators to enable the filter for users. Maybe it’s best to leave this option for individuals to make up their own mind.
Support the work of the Office 365 for IT Pros team by subscribing to the Office 365 for IT Pros eBook. Your support pays for the time we need to track, analyze, and document the changing world of Microsoft 365 and Office 365.
This Power Apps tutorial will walk you through several examples of how to filter the Power Apps collection based on various scenarios.
Recently, we encountered a requirement while working with the Power Apps Canvas app to filter a collection within the Power Apps.
It will also cover how to filter the Power Apps collection, which contains the following items:
Power Apps collection filter SharePoint list
Power Apps collection filter contains
Power Apps collection filter with OR
Power Apps collection filter with AND
Power Apps collection filter by date
Power Apps collection filter and sort
Power Apps collection filter by user
Power Apps collection filter by current user
Power Apps collection filter by dropdown
Power Apps filter collection by another collection
Power Apps collection filter year
PowerApps filter not in collection
Power Apps collection filter multiple condition
How to filter a Power Apps collection using the SharePoint list
In this section, we will see how to filter a Power Apps collection that builds from the SharePoint list based on a certain condition.
Suppose, we have a SharePoint list having various types of columns including random data shown below:
Power Apps collection filter SharePoint list
Let’s use the above SharePoint list to create a Power Apps collection, and then filter the collection to display only data whose “Product type is Laptop.” To achieve this requirement, the following steps are necessary:
On the Power Apps screen, add a button control and set the Text property as Create Collection.
Insert the below expression on the OnSelect property to create a collection using the above Sharepoint list.
OnSelect = Collect(ProductColl, 'Product Model')
where ProductColl is the name of the new collection to store the retrieved data from the SharePoint list, and “Product Model” is the name of the SharePoint list.
Next, add a data table control to the Power Apps screen, connect the data table to the collection as a data source, and add the fields to display the collected data.
When we click the button, the collected data appears in the Power Apps data table shown below:
PowerApps collection filter SharePoint list
Now, we will filter this above collection that will collect only those data whose Product type is Laptop. For this, insert another button control to the Power Apps screen and set the Text as Collect Filter Data.
Add the mentioned expression on the button’s OnSelect property. As a result, when the user clicks on the button, a collection will create based on the condition.
In this section, we will see how to build a Power Apps collection that will filter the items if they contain some specific word or text.
The Power Apps covers a range of built-in functions and operators. Unfortunately, developers and consultants with relevant programming experience are familiar with some functions that may be missing from Canvas apps. One such function is Contains().
However, the in and exactin operators serve the same purpose as contains(). Suppose, using the above SharePoint list, we are going to create a filtered collection that will store only those data whose Title contains the specific text (Ex-Apple)
To achieve this need, the following steps are:
On the Power Apps screen, add a button control and set a Text property to the button.
Insert the below expression on the button’s OnSelect property.
OnSelect = ClearCollect(ProductColl, Filter('Product Model', "Apple" in Title))
where ProductColl is the name of the existing collection that we have created to store the data from the SharePoint list. “Product Model” is the name of the SharePoint list, and “Title” is the name of the SharePoint column.
PowerApps collection filter contains
Let’s click on the button while clicking on the Alt key. Then add a data table and connect it with the ProductColl collection. Also, add the fields to display the collected and filtered data as shown below:
Filter Power Apps collection contains
This is how to filter a Power Apps collection that contains a specific text.
Power Apps collection filter with OR
In this section, we’ll look at how to use the OR operator to work with the Power Apps collection filter. That is, we will create a Power Apps collection that will display data by filtering the SharePoint list with the Product value of the Laptop or Mouse.
To work with this requirement we are going to use the above SharePoint list i.e., Product Model, and the following steps are:
On the Power Apps screen, add a button control and give the Text to the button as per your need. (Ex- Mouse OR Laptop)
Insert the below expression on the button’s OnSelect property. So that the collection will create, once the button is clicked.
Where ProductColl is the name of the existing collection, ‘Product Model’ is the name of the SharePoint list, Product is the column name, and “Laptop” and “Mouse” are the column values based on which the collection will filter.
Power Apps collection filter with OR
Let’s press the button control to create the filtered collection. Add a data table control to the Power Apps screen to display the collected data.
Connect the data table to the collection, i.e., ProductColl, and add the fields to it.
PowerApps collection filter with OR
This is how to filter a Power Apps collection with OR operator.
Similarly, in this section, we will see how to use the AND operator to filter a Power Apps collection. For this, we are going to use the above SharePoint list and the collection that we have created i.e., ProductColl.
Assume we are going to create a collection that will only display data that has the word “Apple” in the product title and the product value is equal to Mobile.
For this, the following steps are:
Add a button control to the Power Apps screen.
Insert the below expression on the button’s OnSelect property.
OnSelect = ClearCollect(ProductColl, Filter('Product Model', Product = "Mobile" && "Apple" in Title ))
Next, add a data table control to display the collected data. Connect it with the ProductColl collection and add the respective fields to the data table.
Once the button is clicked, we can see the corresponding filtered data will display on the data table.
Power Apps collection filter with AND
We can see the above data table will display will one data as it satisfied the filter condition. This is how to filter a Power Apps collection with AND operator.
Power Apps collection filter by date
Do you ever filter a Power Apps collection by date? If not, then follow this example where we will show how to filter a Power Apps collection based on date.
We are going to use the above-mentioned collection, where we will filter the data based on date value. That means the collection will display only those records whose Purchase date is smaller than a specific date. (Ex- 11/10/2022). The following steps must be taken to accomplish this:
Add a button control to the Power Apps screen.
Insert the below expression on the button’s OnSelect property.
Where ‘Purchase Date’ is the name of the date column of the SharePoint data source.
Power Apps collection filter by date
Add a data table control to the screen and connect it with the collection i.e., ProductColl. Once the button is clicked, the filtered data will display on the data table as shown below:
PowerApps collection filter by date
On the above data table, we can see that it only displays those records whose purchase date falls before 10/11/2022 (mm/dd/yyyy). This is how to filter a Power Apps collection by date.
Here, we will see how to sort filtered data within the Power Apps collection. Let’s take the above collection, where we will sort the purchase date in descending order.
To implement this need, the following steps are:
Add a button control to the screen.
Set the Text property (Ex- Filter and Sort By Date).
Insert the below expression on the button’s OnSelect property.
To display the filtered data in sorting order, add a data table control to the Power Apps screen. Connect the data table with the collection, i.e., ProductColl, and add the fields to the data table.
Next, click on the button while clicking on the Alt key.
PowerApps collection filter and sort
This is how to filter and sort within the Power Apps collection.
Power Apps collection filter by user or current user
Let’s see how to filter a Power Apps collection by the current user. That means the collection will be filtered and displayed based on the current user.
Within the Power Apps collection (i.e., ProductColl) that was created from the previously mentioned SharePoint list, there is a people column. We will use that collection to filter the data so that it only displays where the people column, i.e., ‘OrderBy,’ equals the current user.
For this, the following steps are:
On the Power Apps screen, add a button control.
Give a text to the button.
Insert the below expression on the button’s OnSelect property.
In this section, we will see how to filter a Power Apps collection by dropdown. That means the Power Apps collection will be filtered based on the dropdown selection.
Assume we’re going to use the above collection to create a dropdown control that displays all of the tenants’ users. The Power Apps collection will be filtered based on the dropdown selection. To work with the scenarios, the following steps are:
Connect the canvas app with the Office356Users.
Add a dropdown control, to the Power Apps screen.
Insert the below expression on the dropdown’s Items property to display all the users.
Items = Office365Users.SearchUser()
Next, add a button control to the Power Apps screen.
Insert the below expression into the button’s OnSelect property.
Where Users_dropdown is the dropdown control’s name.
Power Apps collection filter by dropdown
Next, add a data table control and connect it with the collection i.e., ProductColl. Also, add the fields to the data table.
Let’s select a user’s name from the dropdown control and click on the button. We can see the filtered data will be visible on the Power Apps data table as shown below: (Ex- Sonam Subhadarsini)
PowerApps collection filter by dropdown
This is how to filter a Power Apps collection via a drop-down control.
Power Apps filter collection by another collection
In this section, we’ll look at how to use Power Apps to filter a collection by another collection. Assume we have two collections and want to make another collection out of them. This new collection will only show items that are shared by both collections.
For this, the following steps are:
On the Power Apps screen, we have created two collections on the buttons’ OnSelect property such as CollProduct1 and CollProduct2.
In this section, we will see how to filter a Power Apps collection by year. Suppose, we have a SharePoint list named Workers having a people column and a date column. We will create a collection using that SharePoint list and also, and we will build a dropdown that will display the list of years.
When the user selects any year from the dropdown control, the collection will filter based on the selected value. To work with the scenarios, the following steps are:
On the Power Apps screen, add a button control.
Give a name to the button control (Text: Create Collection)
Insert the below expression to create the collection.
OnSelect = Collect(Colworkers, Workers)
Where Colworkers is the name of the new collection and Workers is the name of the SharePoint data source.
Power Apps collection filter year
Add a dropdown control to the Power Apps screen and insert the Items such as:
Items = [2018, 2019, 2020, 2021, 2022]
Add another button control to the screen and insert the below expression on the button’s OnSelect property.
where Colworkers is the name of the existing collection, JoinDate is the name of the date column, and Year_Dropdown is the name of the dropdown control name.
PowerApps collection filter year
Next, add a data table control and connect it with the Colworkers collection, and add the fields to display the filter data.
First, click on the Create Collection button, then select a year from the dropdown control(ex: 2020), and finally click on the Filtered Data button to show the data on the Power Apps data table as shown below:
PowerApps collection filter by year
This is how to filter a Power Apps collection by year.
Power Apps filter not in collection
In this section, we’ll look at how to use the Power Apps filter, not in the collection. That is, there are two collections from which we will extract the items that are not in the other collection.
Suppose, we have created two collections (i.e., CollTimeSlot and CollBookedSlot.) by inserting the below expressions on the buttons’ OnSelect properties.
Insert the below expression in the first button’s OnSelect property:
In this example, we will see how to filter a Power Apps collection using multiple conditions. That means we will filter a Power Apps collection based on multiple criteria.
Let’s take the above example of the SharePoint list(i.e., Product Model) and build a collection using that SharePoint data source. Then we will filter that collection based on multiple conditions such as the collection will display only those data whose product value is equal to Laptop or Mouse, and the purchase date should be less than 10th November 2022.
For this, the following steps are:
On the Power Apps screen, add a button control and insert the below expression on the OnSelect property to build the collection.
Where ProductModelCol is the name of the new collection to store the SharePoint data. Once the button is clicked the data will be stored in the collection.
Again add another button control and insert the below expression on the OnSelect property to store the filtered data with multiple conditions.
OnSelect = ClearCollect(ProductModelCol, Filter('Product Model', Product = "Mouse" Or Product = "Laptop" And 'Purchase Date' < Date(2022,11,10)))
Power Apps collection filter multiple conditions
Add a data table control to the Power Apps screen and connect it with the collection i.e., ProductModelCol.
PowerApps collection filter multiple condition
This is how to filter a Power Apps collection using multiple conditions.
Conclusion
From this Power Apps Tutorial, we learned how to filter a Power Apps collection. Also, we have covered below topics such as:
Power Apps collection filter SharePoint list
Power Apps collection filter contains
Power Apps collection filter with OR
Power Apps collection filter with AND
Power Apps collection filter by date
Power Apps collection filter and sort
Power Apps collection filter by user
Power Apps collection filter by the current user
Power Apps collection filter by dropdown
Power Apps filter collection by another collection
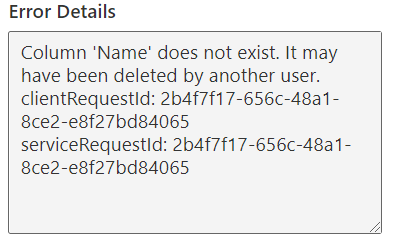
I encountered an issue when trying to filter a a file by filename, that was in a SharePoint document library.
When needing to get a specific SharePoint file ID. It can be troublesome to filter the Files. For example Using a 'Get files' action we can see that the properties of the file are encased inside {} meaning that SharePoint is using some calculation on the Document Library to create these fields.