With Agent 365 now generally available, we are beginning to see the arrival of new capabilities related to Agent 365, or features that are made available subject to meeting certain licensing requirements. This is the case with Shadow AI, which allows us to detect Shadow AI scenarios on devices managed by Intune.
Shadow AI is available in an organization if two conditions are met:
The organization is part of Microsoft’s Frontier program.
At least Microsoft 365 E3 licensing is in place; that is, while the feature is still in Preview, Agent 365 licenses are not yet required.
Once these prerequisites are met, a new Shadow AI section will appear under Agents.
In this new section, agents or tools that can be deployed on corporate devices will start to appear, such as OpenClaw (note: at the moment, this is the only one available).
For each agent or tool, we can click on Start detection, which allows us to configure Intune policies to monitor Shadow AI signals.
In the configuration panel, we simply enable the policies that apply to our specific scenario.
Como parte de la integración nativa de la IA en Microsoft 365 en general y particularmente en SharePoint y OneDrive, Microsoft está liberando el soporte nativo de archivos de markdown. Este soporte nativo viene de la mano de una extensión del visor universal de archivos de Microsoft 365 que para el caso de archivos de markdown:
Permite no solo visualizar este tipo de archivos, sino también editarlos. Por defecto la visualización muestra el código de markdown y como se vería el archivo formateado (Visualización dividida).
Podemos pasar al modo edición o al modo visualización formateada en cualquier momento.
La barra de edición del visor permite que apliquemos formato a los nuevos contenidos que vayamos añadiendo sin tener que saber markdown aunque es también una buena oportunidad para aprender/reforzar nuestros conocimientos de markdown.
El pasado 21 de marzo tuve el honor gracias por una parte a la invitación de la organización y por otro a mi empresa RICOH que fue patrocinador platino de participar en el Global Power Platform Bootcamp edición de Barcelona donde participé en 3 sesiones:
Lleva tus Sitios de SharePoint al siguiente nivel: Agentes de Conocimiento en Sitios de SharePoint
Mesa redonda sobre Seguridad para la IA y Agentes junto con Mar Llambí, Toni Granell, Ricardo Rincón y Eickhel Mendoza.
Del Low Code al Smart Code: Cómo la IA y Power Platform están democratizando el desarrollo
Podéis descargaros los materiales de mis sesiones desde este enlace.
We finally have the ability to promote Microsoft 365 Copilot agents created with Agent Builder to Copilot Studio Agents:
Once the copying process is complete, we can continue editing and configuring the Agent in Copilot Studio, and also review how Copilot Studio ‘interprets’ or adapts it. As an example, here is a screenshot of an agent created with Agent Builder that has been migrated to a Copilot Studio Agent:
Several points to keep in mind:
The Agent is created as a new Agent (note the name).
Since it originates from an Agent created with Agent Builder, all of its “behavior” appears in the Copilot Studio Instructions.
The copied Agent is placed in the Common Data Service solution of the Default environment.
If you need a distribution list in Exchange that includes both internal organization contacts and external contacts—without requiring external users to be invited as guest accounts—there’s a simple way to achieve this.
In Exchange Online, external contacts are referred to as Mail Contacts. These allow you to add external email addresses to your organization’s address book, making them available for inclusion in distribution lists. By leveraging Mail Contacts, you can create a fully functional distribution list that includes both internal users and external recipients while keeping everything manageable within Exchange.
Managing email distribution lists efficiently is crucial for organizations that need to communicate with both internal and external contacts. While Exchange Online allows us to create Mail Contacts programmatically using PowerShell scripts or the Exchange Online Management API, automating this process is key—especially when integrating it with Dynamics 365 Marketing Lists.
The Automation Challenge
In my case, I wanted to automatically add new contacts from a specific Dynamics 365 Marketing List to a corresponding Exchange Distribution List. Initially, I considered using Power Automate to invoke a PowerShell script, but that introduced additional complexities:
Using Power Automate to trigger an Azure Automation Runbook
Managing authentication and execution permissions
Handling execution timing and monitoring
A More Efficient Approach: Logic Apps
Instead of relying on Power Automate, I found a better and more streamlined approach—using Azure Logic Apps. Unlike Power Automate, Logic Apps offer built-in functionality to create and execute Runbook Jobs directly within Azure Automation.
What This Blog Covers
In this post, I’ll walk you through: Setting up an Azure Automation Account Creating a Runbook to execute a PowerShell script that adds Mail Contacts Using Azure Logic Apps to trigger the Runbook Handling authentication across these services
By the end, you’ll have an end-to-end automation setup that seamlessly adds external contacts to Exchange Distribution Lists as soon as they join a Dynamics 365 Marketing List—without requiring manual intervention.
2. Click on Create, Select your Subscription and Resource group, and type in the Automation Account Name
2. Then click the Advanced Tab, and on the Managed Identities, select User Assign; we will set up the User Managed Identity in the next steps.
3. Click Review and Create.
Step 2: Setup the User Managed Identity
A common challenge for developers is the management of secrets, credentials, certificates, and keys used to secure communication between services. Managed identities eliminate the need for developers to manage these credentials.
A common challenge for developers is the management of secrets, credentials, certificates, and keys used to secure communication between services. Managed identities eliminate the need for developers to manage these credentials.
While developers can securely store the secrets in Azure Key Vault, services need a way to access Azure Key Vault. Managed identities provide an automatically managed identity in Microsoft Entra ID for applications to use when connecting to resources that support Microsoft Entra authentication. Applications can use managed identities to obtain Microsoft Entra tokens without having to manage any credentials.
So Let’s see how to setup the account with the Required Permissions!
On the Search, Type Managed Identities
2. Click Create, Select the subscription, Resource group, and give it a name
3. Then Press Review and Create
4. Open the automation account that we have created in Step no. 1
5. Search for Identity, open the link, select user assigned, and click Add.
6. Add the managed identity that we have just created.
7. Next comes setting the Permissions for the Managed Identity, so go back and open the Managed Identity.
8. Go to Azure Role Assignments and add the Automation Contributor Role; this is required to enable the Logic app to execute the RunBook (we will be creating this in the next step) on the automation account.
9. Grant the Exchange.ManageAsApp API permission for the managed identity to call Exchange Online, Unfortunately, this step can’t be done through the Azure / Entra Portal, so we will be using Graphy API Explorer to achieve this.
Get the Managed Identity’s Object ID
Get Exchange Online Service Principal ID
Open Grap API Explorer, Login ,and run the below query and grap the Exchange online service Principal ID
10. Assign Microsoft Entra roles to the managed identity; you will need to assign the Exchange Administrator Role
In the Search type role and select Microsoft Entra Roles and administrators
11. Open Exchange Administrator Assignments and add the user Managed Identity by clicking the Add Assignments Button .. Global administrator privileges will be required for this.
Step 4: Import Exchange Management Modules
Open the Automation Account that we have created in step 1
Navigate to Shared Resources -> Modules
Click Add Module
4. Click Browse from gallery
Open the Automation Account
Navigate to Process Automation -> Runbooks
Search for PackageManagement and select and choose the Runtime Version 5.1
4. Repeat for Add PowerShellGet and choose Runtime Version 5.1
5. Repeat for ExchangeOnlineManagement and choose Runtime Version 5.1
Step 5: Create a runbook in Azure Automation
Open the Automation Account
Navigate to Process Automation -> Runbooks
Click on Create a runbook. Make sure you are using Runtime Version 5.1 because PowerShell works only for this Version
4. Open the Run Book and click Edit in Portal.
5. Paste the below Powershell Script that connects to exchange
//The below piece of code sets parameters on the run book so that when called from a logic app we can pass these parameters to the run book.
param (
    [string]$MailContactName,
    [string]$MailContactEmail,
    [string]$DistributionList
)
// Connects to Exchange online via the managed Identity that have been setup in step 3
Connect-ExchangeOnline -ManagedIdentity -Organization Organisationdomain.onmicrosoft.com -ManagedIdentityAccountId {Managed Account Identity ID}

//Creates a mail contact in Exchange
New-MailContact -Name $MailContactName -ExternalEmailAddress $MailContactEmail

//Add mail Contact to the Distribution List
Add-DistributionGroupMember -Identity $DistributionList -Member $MailContactEmail
6. After that Click Save and Publish
7. You can then test the runbook by clicking the Test Pane on the Edit in Portal Screen of the runbook, entering the parameters and clicking start.
Step 5: Create the Logic App
So the Logic app will be created in a schedule and can query any enterprise connector like dataverse and then call the runbook that has been created in Step 5
From the Azure Portal , Look for Logic Apps and click Add
Choose the Hosting Plan, and here you can select the Consumption plan
3. Select the subscription, the Resource Group and add the logic app name
4. Click Review and Create and then Create
5. On the created Logic app, search for Identity, Navigate to user assigned and add the Managed identity created in step 2
5. Navigate to the Logic app designer. On the Add Trigger step, choose schedule and set the recurrence schedule. Then, add Action and look for Create Job and select the one under Azure Automation
6. Set the Connection Name and Choose the Authentication Type as Logic Apps Managed Identity
7. Select the Subscription, Resource Group, Automation Account, Run book and pass the required Parameters
I came into a business requirement where I needed to override two out of the box actions to open a custom page instead of the normal out of the Box Quick create or Main form the two scenarios are as below:
Scenario 1:
Overriding the New Record button from a sub grid which usually opens a quick create but in my case I need to open a custom page.
To achieve this please follow the below steps:
Create your custom page and Add to your Model Driven App.
Create a new web resource to add the functions that open the custom page sample code is as below:
It depends on your scenario you can pass parameters in my scenario I want to pass the parent record Id, so I am passing the execution context and in the next step I will show how we can pass this parameter through the xrmtoolbox.
function OpenCustomPageDialog(executionContext) {
    let formContext = executionContext;
    //Initiating Web Resource Parameter.
    let pageInput = {
        pageType: "custom",// Set pageType as "custom"
        name: "Prefix_CustomPageName", // Custom Page Name
        entityName: "prefix_entityname", // Entity Name
        recordId:  formContext.data.entity.getId().replace(/[{}]/g, '')
    };
    //Declaring HTML Page Dimensions.
    var navigationOptions = {
        target: 2,
        position: 1,
        height: 800,
        width: 1200,
        title: "Transfer Case"
    };
    //Using navigateTo Client API.
    Xrm.Navigation.navigateTo(pageInput, navigationOptions).then(
        function success() {
            // Run code on success
            formContext.data.refresh();
        },
        function error() {
            // Handle errors
            formContext.data.refresh();
        }
    );
}
3. In this scenario we will need to use the XRMToolbox Ribbon workbench as currently we can’t modify the existing commands using the new command bar.
4. So to do this create a new solution and just add your table in the above example it will be the contact as this is the sub grid we need to override its behavior.
5. Load the solution using the Ribbon Work Bench
6. Then navigate to the sub grid select the Add New Button, Right click and choose customise button
7. Go to the command and then go to Actions and remove the existing Out of the box action choose your web resource and add you JS function name and pass the primary control which will be the execution context of the parent record in my case it is the account.
8. Publish your customisation and then you can open the dialog of your custom page , you can choose the position of the dialog and choose whether you need it inline – centre or on the side.
More details on using the navigate to function you can find here.
Scenario 2:
Overriding the the event when selecting a record to open a custom page instead of the normal Main form
For this we need to follow the same steps from the previous scenario step 1 to 5
On your sub grid you need now to add a new button and Hide it and the whole idea is to use a magic word in the command of the hidden button that does all the magic
On the ribbon select the button from the left navigation and drag to the subgrid
4. Right click on the button and select customise command, Set the Id of the new command to: Mscrm.OpenRecordItem the magic word , choose the javascript in the below step and use the parameter: selectedcontrolallitemsid to pass the selected record Ids
5. Same way we need to reference a new JavaScript function and we pass whatever parameters accordingly in this case I am going to pass the record Id which is item is passed from the step above as selectedcontrolallitemsid
function OpenExistingCustomPageDialog(item) {
    //let formContext = executionContext;
    //Initiating Web Resource Parameter.
    let pageInput = {
        pageType: "custom",// Set pageType as "custom"
        name: "prefix_custompagename", // Custom Page Name
        entityName: "contact", // Entity Name
        recordId: item[0]
    };
    //Declaring HTML Page Dimensions.
    var navigationOptions = {
        target: 1,
        position: 1,
        height: 800,
        width: 1200,
        title: "Update Transfer Case"
    };
    //Using navigateTo Client API.
    Xrm.Navigation.navigateTo(pageInput, navigationOptions).then(
        function success() {
            // Run code on success
            //formContext.data.refresh();
        },
        function error() {
            // Handle errors
         //   formContext.data.refresh();
        }
    );
}
6. On the command we need to add an enable rule as below to make sure that the button is always hidden.
7. Now go back to the button and rename the button Id to Mscrm.OpenRecordItem and choose the command we have just created in step 5:
8. Publish customisation and watch the magic happens!
Thanks to the amazing Scott Durrow for the amazing ribbon work bench as well as the details youTube Video on achieving the above, I have just blogged it for easy reference mainly to myself.
The new power pages styling is really nice and easy to use but i have tried every option and I could not figure out how to change the font Colour of the label of a field on my form and the magic way to do this is using a custom CSS and F12.
So follow the below steps to achieve this:
Login to make.powerpages.com , Select your environment and then Select your site from Active sites and click Edit
2. In the left navigation -> Navigate to Styling.
3. You can customise your Theme by adding colours to the colour and modifying in the theme and everything gets reflected as you change the colours which is very nice and very handy as you can see how things looks like.
4. Now to add a custom CSS file , Click the 3 horizontal dots on your selected them and click Manage CSS.
5. Navigate down and click Upload Custom CSS.
6. Upload your custom CSS and then Click Edit Code this opens the file in Visual studio Code, you can edit your CSS file there easily and once you save and click Sync Configuration.
7. Now comes the tricky part where you will need to have the discovery yourself which is trying to figure out the class name that you need to override. So to do so you need to use the preview on your portal so you can browse and then click F12 which opens your developer tools.
8. Using the developer tools you can navigate to the html component using the Ctrl+Shift+C , in my example I was trying to change the colour of the field label on the form, so i have picked the class name which is field_label
9. In Visual studio code , edit the class field_label, save and sync configuration and your changes will be reflected automatically
I will add here some of the class names I have used:
Power Fx is a low-code language that makers can work with directly in an Excel-like formula bar or Visual Studio Code text window.
Power Fx are the main coding language in Canvas apps and have been extended to Model Driven apps as well to be used from the Command bar to execute actions in addition to JavaScript, and is used as well as a new column type similar to calculated columns.
In this quick article we will see how we can clone a contact record directly by clicking a button on the form command bar:
Add your model driven app in a solution and open
Navigate to Pages->Contacts View-> Click the 3 horizontal dots and choose Edit Command Bar ->Edit
3. Select Main Form and click Edit
4. Select New -> New Command from the commands left Navigation.
5. You will be promoted with a question whether you want to create a Power FX command or JavaScript for Power Fx it will need to create a component library to enable you to use the Power FX formulas -> Choose Power FX and click Next
6. Give you new command a label “Clone Contact“, in the Action shows to run Formula and you will see the Formula Bar is opened by default on the On Select Event, you can also change the visibility to run based on a formula
7. For the actual command we need to use the very popular Patch function and the key thing here is how to access the fields in the current form so it is very easy using the below expression:
Self.Selected.Item
This expression gives you access to the current object and then you can access the fields easy as
Self.Selected.Item.'Last name'
The below command will be cloning the first name, last name and company name which is a lookup to the account table.
“On each error I must restart the whole flow, is it possible to build a ‘restartable’ approval flow that’ll continue from the failed step in Power Automate?”
When building approval flows in Power Automate, you probably put all the steps in a single flow in a sequence. Assign an approval task to a user and once completed assign another one to the next approver. The same steps over and over again until everyone completes their approval task. But what if such flow fails? What if 2 approvers already approved and it failed during the 3rd approval? How do you restart this flow without creating the tasks for the first two approvers again?
Use a ‘state machine’ in your flow
Since you don’t want to create the same approval tasks for the users, you’ll need two things. Firstly, you must keep the information about the current approval step. Secondly, your flow must act based on this information when started.
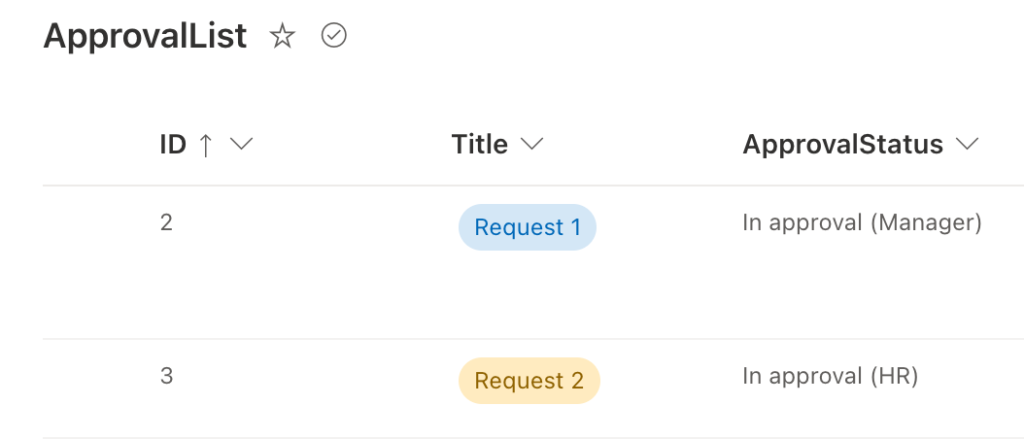
The first prerequisite is simple – this article is about an approval flow, and each approval flow should utilise some ‘Status’ column with such information. If you don’t have a unique status for each approval step, you should add it now.
The second part of the solution is a bit more complicated. As already mentioned, the flow must act differently based on the stored information, in this case the approval status. Once it’s started it must check the current status to know where to continue – a use case for a state machine!
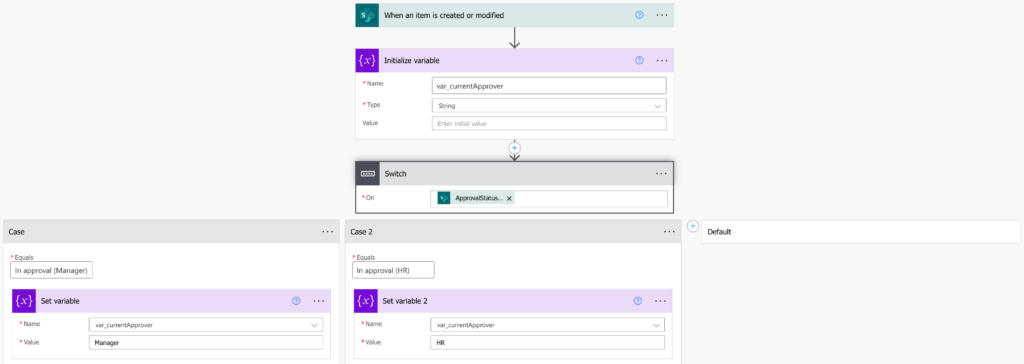
Following the state machine principle, you can build a flow that’ll trigger on a change in the status column. Depending on the approval status value a ‘Switch’ will store the current approval role in a variable.
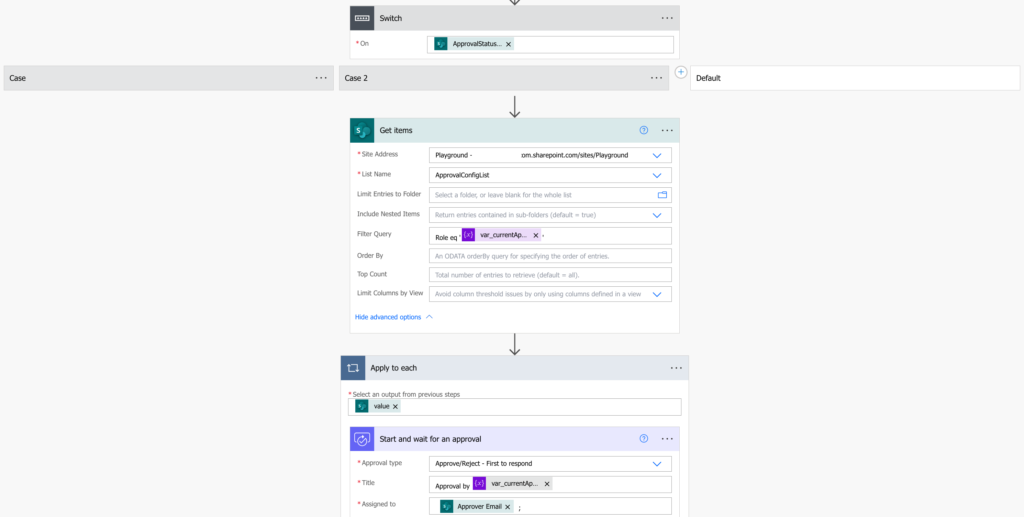
Use it to find the current approver in a configuration list and assign the task. Once completed store all the information back to the item itself and set the next approval status.
A new instance of the flow will trigger, checking the new status and creating a new approval task for the next approver.
Summary
When building a restartable approval flow in Power Automate, you must somehow deal with the steps that were already completed. In this article it was done using a state machine, a repeated flow that’ll trigger multiple times during an approval process, each time creating task for a different user.
Just remember that the flows don’t share any information. If there’s any information that should be shared between the approval steps, e.g. the approval history, you must store it in the item itself as part of the flow.
Do you struggle with the various expressions, conditions, filters, or HTTP requests available in Power Automate?
I send one email per week with a summary of the new solutions, designed to help even non IT people to automate some of their repetitive tasks.
All subscribers have also access to resources like a SharePoint Filter Query cheat sheet or Date expressions cheat sheet.
“I’d like to send the request back and forth, to return it back to previous approval steps etc, how can I do some state machine in Power Automate?”
Some flows are not a simple, straightforward approval process. Sometimes you need more than just approve or reject, but also the ‘return to previous step’ option. How do you build such flow in Power Automate? A flow that doesn’t move only forward, but can occasionally move also backwards? Something like a state machine that can move between different states?
Utilise the infinite trigger loop
While the infinite trigger loop is often a painful issue, when building a state machine it’s quite useful. Since Power Automate doesn’t have a dedicated state machine logic, you’ll have to build it yourself. And for this you can benefit from the infinite trigger loop.
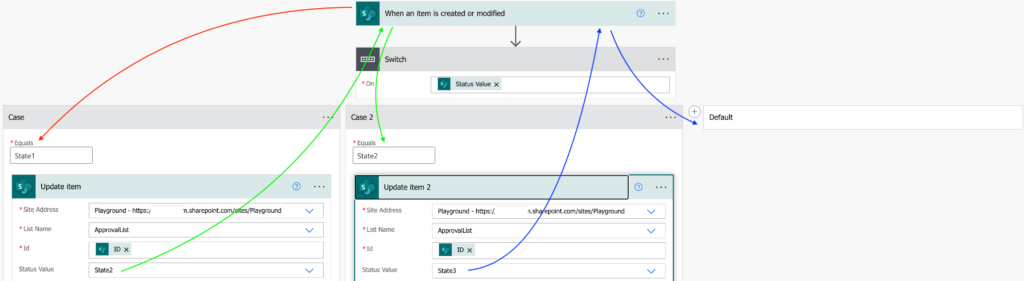
Instead of a real state machine where you can skip between branches, you can build a flow that’ll be started repeatedly. A flow that’ll contain e.g. a switch, and depending on the request status it’ll go through one of the branches. Once the branch is finished, update the item with the new status. The infinite trigger loop will start another instance of the flow, this time going through a different path.
Since it’ll be multiple flows instead of one, you’ll have to store the ‘shared’ information somewhere in the list. But that’s a small downside for being able to go back and forth in your flow.
Summary
When building a state machine in Power Automate, you can benefit from the infinite trigger loop – once you update an item, it’ll start another instance of the flow. And since it’s a new instance, it can go any of the available paths, depending on some value. Start the flow, do what’s necessary, and change the status. The flow will run again and do the tasks for this new status.
Do you struggle with the various expressions, conditions, filters, or HTTP requests available in Power Automate?
I send one email per week with a summary of the new solutions, designed to help even non IT people to automate some of their repetitive tasks.
All subscribers have also access to resources like a SharePoint Filter Query cheat sheet or Date expressions cheat sheet.
“I’d like to check whether a user with specific email address exists in our company’s Active Directory, can I use Power Automate to do that?”
When you’re working with email addresses, there’s always a difference whether it’s an internal or an external address. If it belongs to a user from your company, you can retrieve all his information from the Active Directory. On the other side, external email address is all you get, there’s no place to learn more about the user. But how do you check whether the user belongs to your company or not? Whether you can get this extra information?
Use ‘Run after’ after the ‘Get user profile’ action
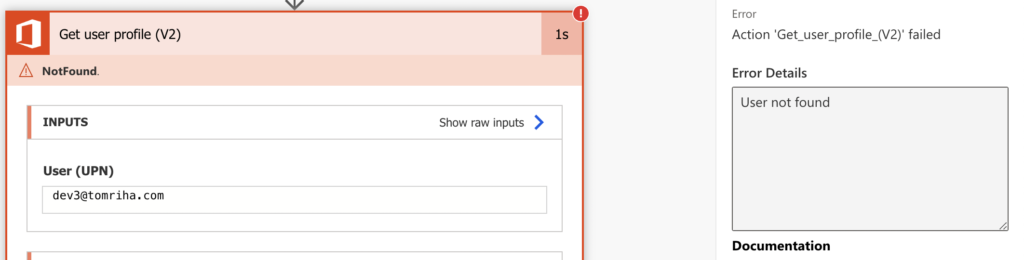
If you know the user email address or his id, you can use the ‘Get user profile’ action. The small problem with this action is that it’ll fail for non-existing users.
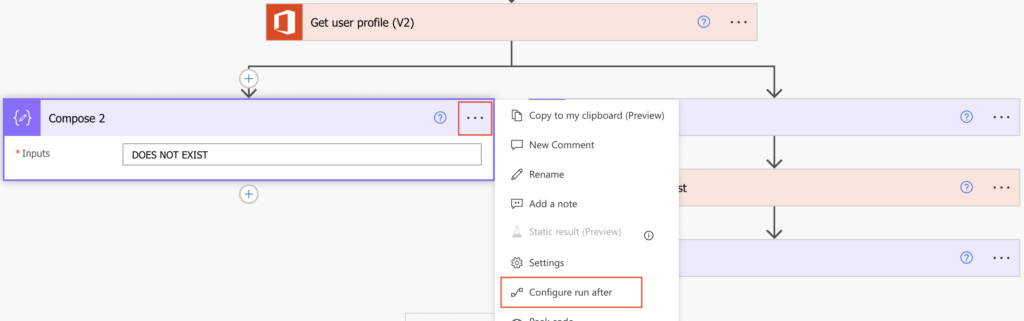
But you can take it as a valid result (as when updating files) using the ‘Configure run after’ settings on the following actions.
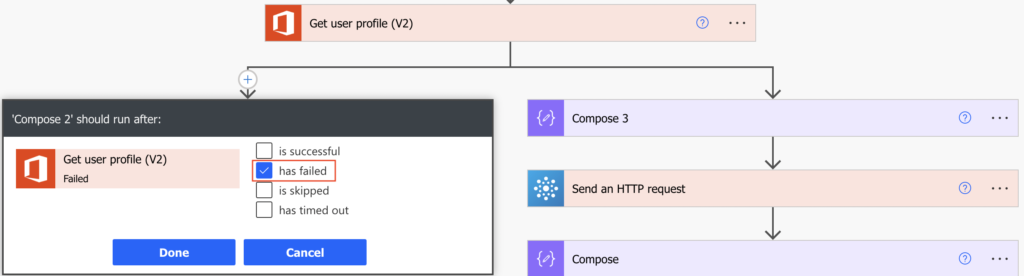
Set the action to run after the ‘Get user profile’ has failed and define what to do when the user doesn’t exist.
Search for the user with an HTTP request
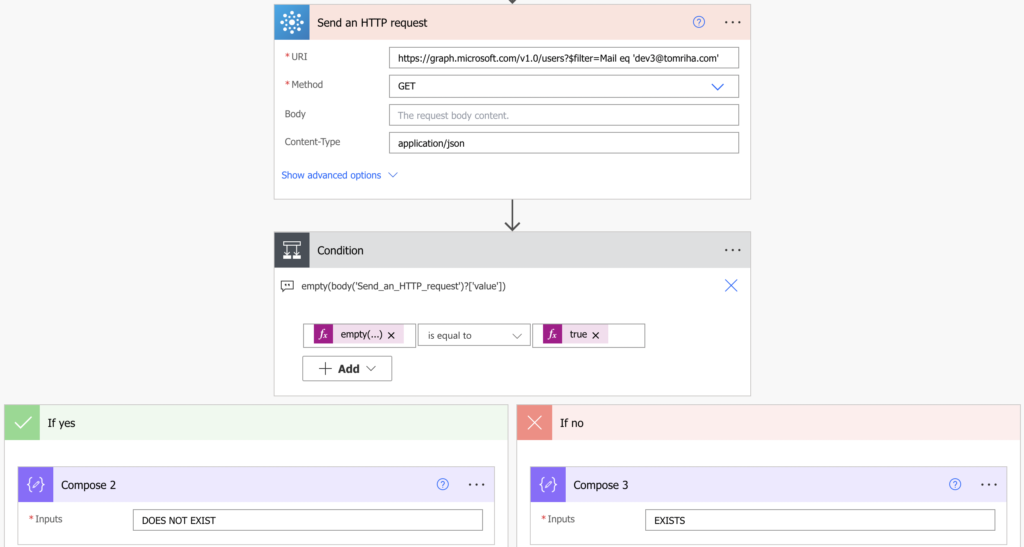
The second option, if you don’t want to deal with the ‘Run after’ settings, is to use an HTTP request. As explained in the previous article, you can search for a user using more properties than just his email or id. The HTTP request won’t fail for non-existing users, it’ll return either the user or an empty array.
Method: GET

Uri:
https://graph.microsoft.com/v1.0/users?$filter=<property> eq '<value>'
You’ve got two options how to check whether a user exists using Power Automate – a dedicated action or an http request. If you use the dedicated action, you’ll have all the information available as dynamic content, but you must use the not so common ‘run after’ settings. The HTTP request evaluation is simpler with a condition, on the other side you must extract the user information from the response JSON.
Do you struggle with the various expressions, conditions, filters, or HTTP requests available in Power Automate?
I send one email per week with a summary of the new solutions, designed to help even non IT people to automate some of their repetitive tasks.
All subscribers have also access to resources like a SharePoint Filter Query cheat sheet or Date expressions cheat sheet.
“The flow takes tens of minutes, even hours to complete, why is Power Automate so terribly slow? Can I do something about it?”
When you run a flow, it always takes a while until the flow completes. It can be a few seconds for the simple flows or many days for flows including some manual task. And then there’re all the flows in between, running tens of seconds, minutes, hours… some of them running much longer than you’d wish/expect. Why does that happen? What’re the most common causes of a slow flow?
It’s mainly about the ‘Apply to each’
If your flow is running really slow, take a look on what loops it contains. The more ‘Apply to each’ actions, especially ‘Apply to each’ inside another ‘Apply to each’, the slower the flow.
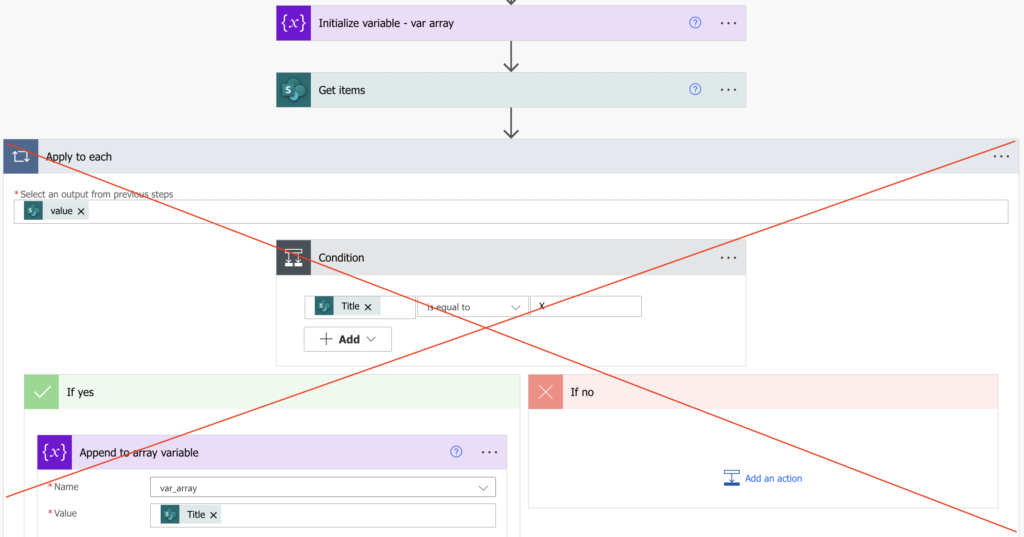
Loop to select a specific value
One example I’ve recently seen is a flow designed as below. The goal is to take all items, and from each item select a specific value and store it in a variable.
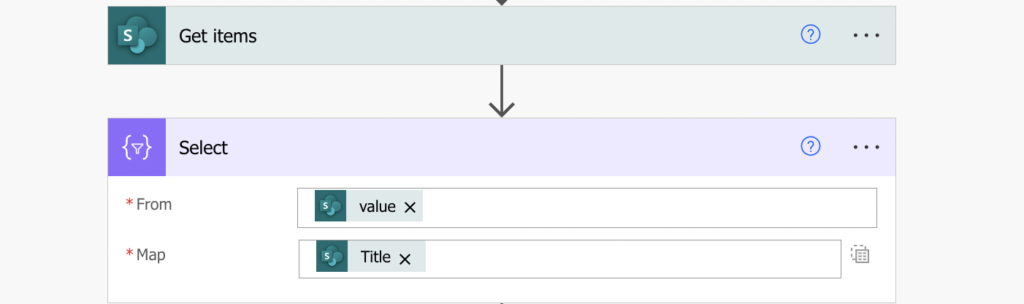
The more items there is, the more loops it’ll contain, and the longer will the flow run. It’s always better and many times faster to use the ‘Select’ action instead of such ‘Apply to each’ and ‘Condition’.
Loop to process only some of the items
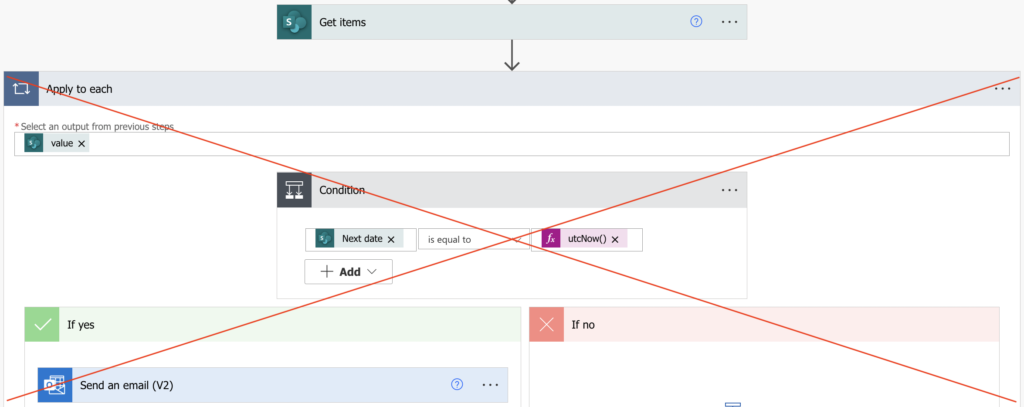
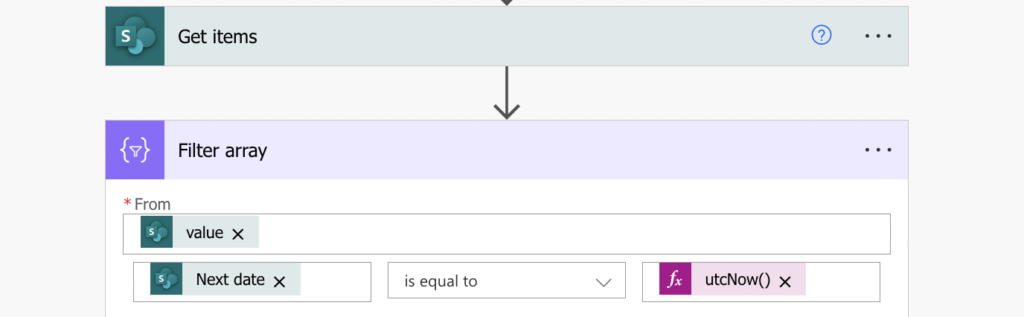
Another example of a useless loop is to process only specific items. For example, send an email for items where some date is today.
If you use a ‘Condition’ inside ‘Apply to each’ to filter the items, you’ll end up processing all the items. All items in the specific data source just to find a few of them: always use filters instead of these loops.
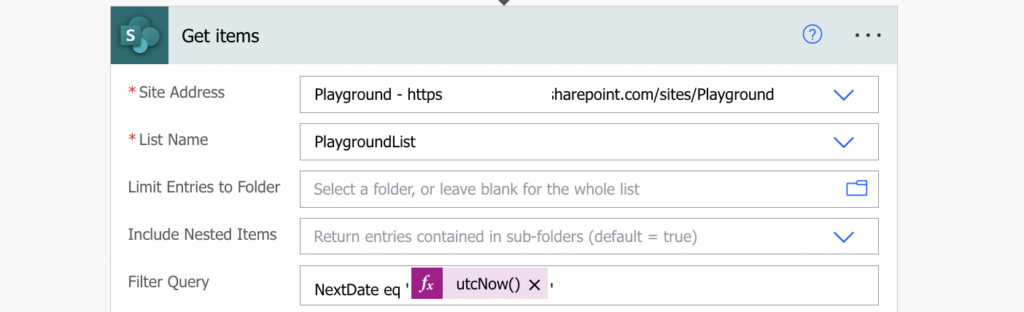
It can be a filter directly in an action, e.g. in ‘Get items’ or ‘List rows…’ or any other action with such possibility.
If there’s no such option there’s still the ‘Filter array’ action to filter the items/rows/anything later.
Loop to create / delete many items
The last type of loop that can be improved is when it just has a lot of work to do. It’s not selecting anything, it’s not possible to filter, but it needs to repeat some action many times. For example, create or delete thousands of items.
This is a bit more complicated than the two points before, but at the same time it’s not that common. I’m mentioning it mainly to show you that there’re also other options to reduce the number of loops.
Summary
If you feel that your Power Automate flow is running too slow, it’s very often due to some ‘Apply to each’. The more items you send in a loop, the longer it’ll take to process them, in some cases even hours. Most of such flows can be improved following just the first two concepts – ‘Select’ to select some value(s) for further processing and filter whenever possible. You’ll still have some ‘Apply to each’ in the flow, but that’s fine as long as you don’t send more items than necessary inside. A few ‘Select’s and a few ‘Filter array’s and your flow can run 8 minutes instead of 20 hours…
Do you struggle with the various expressions, conditions, filters, or HTTP requests available in Power Automate?
I send one email per week with a summary of the new solutions, designed to help even non IT people to automate some of their repetitive tasks.
All subscribers have also access to resources like a SharePoint Filter Query cheat sheet or Date expressions cheat sheet.
As organizations generate more and more data, managing knowledge and information becomes an increasingly important task. SharePoint Online is an excellent platform for managing knowledge and information because it offers powerful document management features, a robust search engine, and intuitive collaboration tools. In this post, we’ll explore how to manage knowledge and information in SharePoint Online and discuss best practices.
Create a Document Library
The first step in managing knowledge and information in SharePoint Online is to create a document library. A document library is a central repository for all types of files, including documents, spreadsheets, presentations, and images. A document library can be customized to suit the needs of a particular team or department, and it can be secured to ensure that only authorized users can access it.
Organize Content with Metadata
Once documents are added to a document library, it’s essential to organize them so that they can be easily found. Metadata is an excellent tool for organizing content in SharePoint Online. Metadata allows users to add descriptive information to documents, such as author, date, and keywords, making it easier to search and find content.
Use Version Control
Version control is a critical feature of SharePoint Online that allows teams to manage changes to documents effectively. When changes are made to a document, SharePoint Online automatically creates a new version, allowing team members to track changes, revert to earlier versions if necessary, and collaborate on documents without the risk of overwriting each other’s work.
Leverage the Power of Search
SharePoint Online offers a powerful search engine that allows users to find content quickly and easily. By using metadata and other search features, users can search for specific documents or content, making it easier to find the information they need.
Collaborate with Others
Collaboration is a critical aspect of managing knowledge and information. SharePoint Online offers several collaboration tools that make it easy for teams to work together, such as co-authoring, comments, and alerts. By using these tools, teams can work together in real-time, provide feedback on documents, and stay informed of updates and changes.
Enable Content Approval
Content approval is an essential feature of SharePoint Online that allows organizations to control the quality of content that is added to a document library. By enabling content approval, administrators can ensure that all content meets the organization’s standards and policies before it’s made available to users.
Train Users on Best Practices
Effective knowledge and information management require training and education. It’s essential to ensure that all users understand how to use SharePoint Online effectively and follow best practices. Training can be provided through online tutorials, webinars, or in-person training sessions.
Managing knowledge and information in SharePoint Online requires careful planning and execution. By creating a document library, organizing content with metadata, using version control, leveraging the power of search, collaborating with others, enabling content approval, and training users on best practices, organizations can effectively manage knowledge and information in SharePoint Online. With the right tools and practices in place, SharePoint Online can become a powerful platform for knowledge management, improving productivity, and driving business success.
SharePoint lists are a powerful tool for managing data and information, but they can be challenging to collaborate on. By using Microsoft Teams, you can collaborate on SharePoint lists in real-time and streamline your workflows. In this blog post, we’ll explore how to use Teams to collaborate on SharePoint lists.
Creating a SharePoint List
Before you can start collaborating on a SharePoint list in Teams, you need to create the list in SharePoint. Here are the steps to create a SharePoint list:
Open your SharePoint site and navigate to the ‘Site Contents’ page.
Click on the ‘New’ button in the upper-left corner of the page and select ‘List’ from the dropdown menu.
Select a list template that fits your needs or choose ‘Custom List’ to create a list from scratch.
Customize your list by adding columns, views, and other settings.
Collaborating on SharePoint Lists in Teams
Now that your SharePoint list is set up, you can start collaborating on it in Teams. Here are the steps to do so:
Navigate to the channel where you want to collaborate on the SharePoint list and click on the ‘+’ button to add a tab.
Select ‘SharePoint’ from the list of available apps.
Choose the SharePoint list you want to collaborate on and click ‘Save’.
Now you can collaborate on the SharePoint list in real-time with your team members. You can add, edit, and delete items directly from Teams, and changes will be reflected in SharePoint as well.
Best Practices for Collaborating on SharePoint Lists in Teams
Here are some best practices for collaborating on SharePoint lists in Teams:
Use Views: Views are a powerful tool for organizing and filtering list data. Use views to create customized lists for different team members or purposes.
Set up Alerts: Set up alerts to receive notifications when changes are made to the list. This can help you stay on top of important updates and changes.
Use @mentions: Use @mentions to tag team members in comments and discussions related to the list. This can help ensure that everyone is aware of important updates and changes.
Customize Columns: Customize columns to fit your team’s specific needs. This can include adding calculated columns, dropdowns, and more.
Manage Permissions: Use SharePoint’s powerful security controls to manage permissions for your list. By setting permissions, you can ensure that only the right people have access to sensitive information.
By using Teams to collaborate on SharePoint lists, you can streamline your workflows and increase productivity. With proper setup and management, SharePoint lists can be a powerful tool for managing data and information. By following these best practices, you can create a powerful and efficient platform for your team to work from.
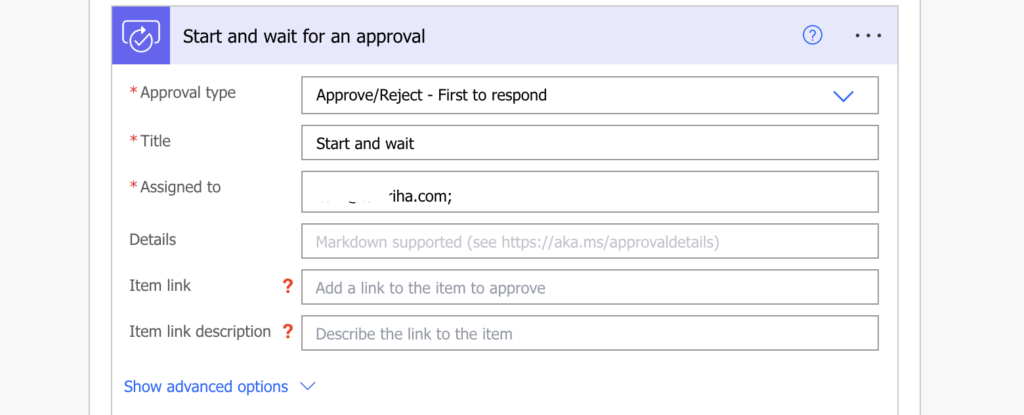
“The Power Automate approval action gives me only one field for a link, what if I need to add multiple links to the task?”
If you use the standard Approvals feature in Power Automate to handle approval tasks, you’ll notice that it has some specifics. The task attachments have a different format than email attachments, you can’t use html in the description, and the link to item field will allow you to add just a single link. But what if there’re more links related to the task? If you want to provide more information to the approvers?
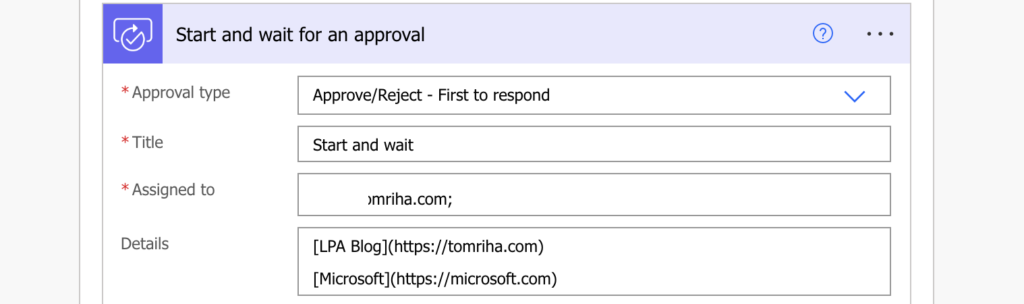
Add the other links to the description
Since the action won’t let you add multiple links in a field, you’ll have to add them to the task description. Yet again, you can’t use html code for the hyperlink as it doesn’t support html, you must use the markdown language.
As you can see in the linked documentation, hyperlinks use the following format.
[<linkText>](<linkUrl>)
Note: <…> are placeholders, replace them including the < and >.
It’s a plain text, no expression, and it can look as below, one link one line:
[LPA Blog](https://tomriha.com)
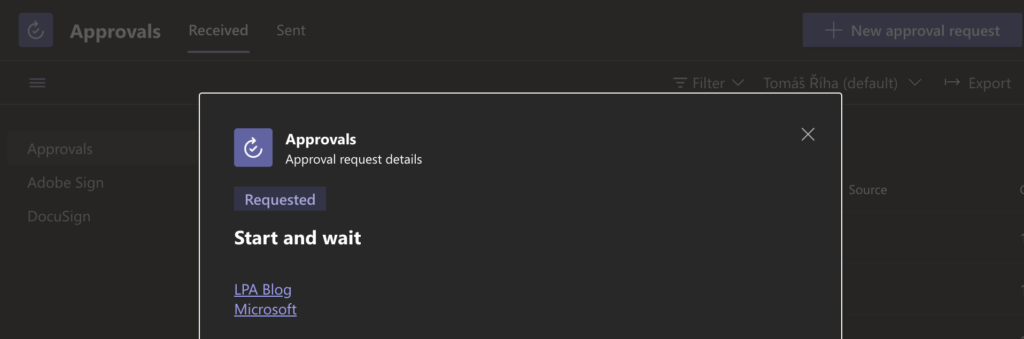
That’s it, you just added another hyperlink in the approval task. It’ll be in a different place than the standard link, but it’ll be there. And since it’s in the description there’s no limit on how many links you can add.
Summary
The standard approvals functionality in Power Automate has some specifics given its different language, but once you learn the basics you can add so much more in the task description, even multiple links.
If you use approval tasks I’d recommend checking the whole Microsoft documentation to learn more about all the possibilities.
Do you struggle with the various expressions, conditions, filters, or HTTP requests available in Power Automate?
I send one email per week with a summary of the new solutions, designed to help even non IT people to automate some of their repetitive tasks.
All subscribers have also access to resources like a SharePoint Filter Query cheat sheet or Date expressions cheat sheet.
“I need to find a user by his job title but Power Automate keeps asking for email or id, how can I use his role property instead?”
When you’re looking for more information about a user, you probably use the ‘Get user profile’ action. You input the user email or his id, and it’ll return his whole user profile. But what if you don’t have his email nor user id? What if you’ve got e.g. his job title, or a unique user code in your organisation? How do you find such user?
Use an HTTP request via Graph API
Since the default action won’t help (unless you want to get all users and then filter with the ‘Filter array’ action) you’ll have to look elsewhere. And the place to look is an HTTP request.
You’re looking for a user, meaning the endpoint to call is /users.
Method: GET

Uri:
https://graph.microsoft.com/v1.0/users
But such request would give you all the users, you don’t want that. You want only the users that fit a condition, a filter in the format below:
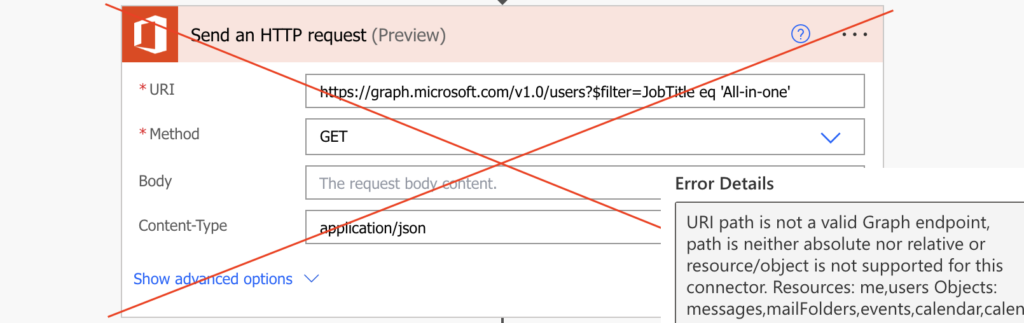
While you might be tempted to use this request in the Office 365 Users action ‘Send an HTTP request’, don’t. At the time of this article it’s not working.
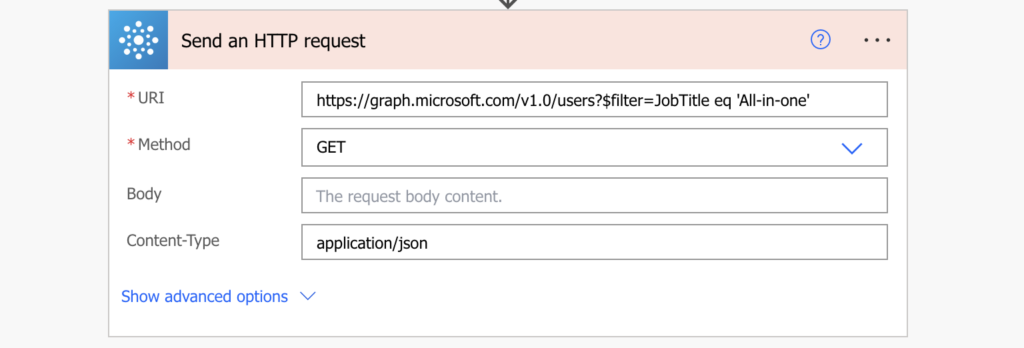
Use the ‘Send an HTTP request’ action from the Office 365 Groups instead.
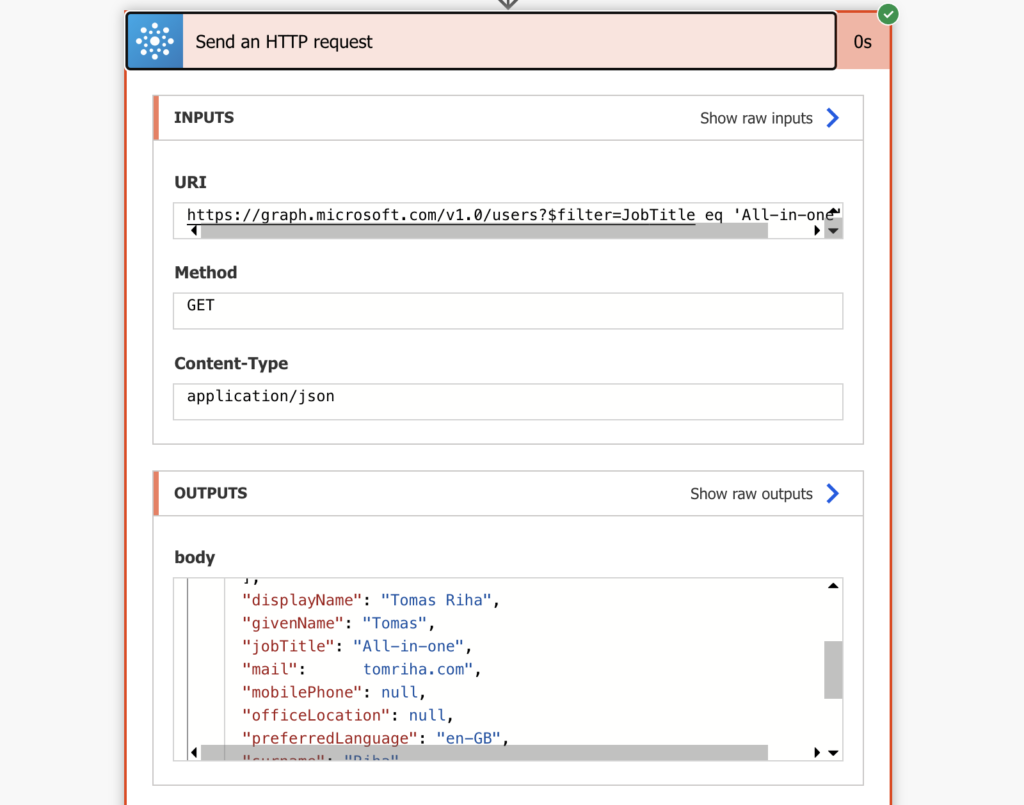
When an action won’t help, use an HTTP request. While Power Automate has an action to get user profile, you can’t use it to find users using a different property than email or id. Luckily there’s a workaround by adding the filter directly into a request to Graph API. Add the $filter parameter, pick which property it should search in, and the value to look for.
Do you struggle with the various expressions, conditions, filters, or HTTP requests available in Power Automate?
I send one email per week with a summary of the new solutions, designed to help even non IT people to automate some of their repetitive tasks.
All subscribers have also access to resources like a SharePoint Filter Query cheat sheet or Date expressions cheat sheet.
I came around an interesting topic in the community forums where the issue was about the inability to delete a created table because of the dependency of type ‘app action’.
What is app action?
App action is created when you create a new command bar button using Power FX Formula and a component library gets created.
To demonstrate what this means follow these steps:
Create a table called Table 1
Create a model driven app called Test Dependencies Issues.
Add the table to your Model Driven app by adding a new page.
Click Edit command Bar on your Table
Add a new button and name it Test Command.
When you choose to create a new command of type powerFx formula you get the below message which means a new component library will be created for your button, Save an publish.
7. Now you can go to dependencies and check there will be a dependency on the Model Driven app and this is easy by removing button and the table from the model driven app and another dependency which is the app action.
How to get rid of this dependency?
This dependency is not available through the UI and so you need to use the Rest Builder tool to identify the Id highlighted in the above image and then delete it using the rest builder tool.
Open the Dataverse Rest Builder tool of the XRM toolbox, Perform a Retrieve Multiple Request on the Primary Entity appaction and click create request to view the results.
2. Identify the Id of the app action related to your table and then using the Delete action on the Dataverse Rest Builder , delete the app action and hence you delete the dependency.
Kudos goes to Prakash4691 and his awesome topic answer here.


 Setting up an Azure Automation Account