SharePoint Online is a powerful collaboration tool that enables organizations to store, share, and manage content and documents securely in the cloud. However, with the integration of Power Platform, SharePoint Online becomes a robust platform for creating powerful solutions that can automate business processes, build custom applications, and integrate with other services.
Power Platform is a suite of tools that includes PowerApps, Power Automate, and Power BI. These tools are designed to enable users to create custom applications, automate workflows, and gain insights from data. By combining the capabilities of SharePoint Online and Power Platform, organizations can create powerful solutions that address their unique business needs.
Here are some of the ways that SharePoint Online and Power Platform can be used to create powerful solutions:
Automating workflows
Power Automate, formerly known as Microsoft Flow, is a cloud-based service that enables users to create automated workflows between different applications and services. With SharePoint Online, users can create workflows that automate tasks such as document approval, notifications, and reminders. These workflows can be triggered automatically based on specific conditions, such as when a document is added or modified.
Building custom applications
PowerApps enables users to build custom applications without any coding knowledge. With SharePoint Online, users can create custom forms and applications that integrate with SharePoint lists and libraries. This enables users to create custom solutions that automate business processes, such as managing customer information or tracking inventory.
Integrating with other services
Power BI is a business analytics service that enables users to analyze data and share insights. With SharePoint Online, users can create dashboards and reports that integrate with Power BI. This enables users to gain insights from data stored in SharePoint Online and other services, such as Excel or Dynamics 365.
Creating chatbots
Power Virtual Agents is a service that enables users to create chatbots without any coding knowledge. With SharePoint Online, users can create chatbots that provide quick access to information stored in SharePoint lists and libraries. This enables users to create conversational interfaces that automate common tasks and provide answers to frequently asked questions.
In conclusion, SharePoint Online and Power Platform can be used to create powerful solutions that automate business processes, build custom applications, and integrate with other services. These tools enable organizations to work more efficiently, gain insights from data, and provide better service to customers. If you’re not already using SharePoint Online and Power Platform, it’s worth exploring how these tools can help you achieve your business goals.
Microsoft Teams has quickly become one of the most popular collaboration tools for businesses around the world. However, when it comes to managing documents and files, Teams has its limitations. In this blog post, we’ll explore how to use SharePoint as a document repository for Teams and discuss best practices for managing files and documents.
Understanding SharePoint as a Document Repository:
SharePoint is a powerful document management system that can be used to store, manage, and share documents and files. It provides a range of features and capabilities, including version control, co-authoring, and security controls. By using SharePoint as a document repository for Teams, you can take advantage of these features and provide a centralized location for all of your files and documents.
Setting Up SharePoint for Teams
Before you can use SharePoint as a document repository for Teams, you need to set it up properly. Here are the steps:
Create a SharePoint Site:
First, you need to create a SharePoint site where you’ll store your documents. This site should be configured with the appropriate permissions and security controls.
Create Document Libraries:
Next, you need to create document libraries within your SharePoint site. These libraries should be organized in a logical manner and should reflect the way your team works.
Connect SharePoint to Teams:
Once your SharePoint site and document libraries are set up, you can connect them to Teams. This can be done by adding the SharePoint site as a tab in a Teams channel.
Managing Documents in SharePoint
Now that your SharePoint site is set up and connected to Teams, you can start managing your documents. Here are some best practices for managing documents in SharePoint:
Use Version Control:
SharePoint provides version control, which allows you to keep track of changes made to a document over time. This is especially useful when multiple people are working on the same document.
Co-Author Documents:
SharePoint also provides co-authoring capabilities, which allow multiple people to work on a document at the same time. This is useful when collaborating on a document with your team.
Use Metadata:
Metadata can be used to categorize and organize documents within SharePoint. By using metadata, you can make it easier for team members to find the documents they need.
Set Permissions:
SharePoint provides a range of security controls that allow you to set permissions for your documents. By setting permissions, you can ensure that only the right people have access to sensitive documents.
By using SharePoint as a document repository for Teams, you can take advantage of its powerful document management capabilities and provide a centralized location for all of your files and documents. With proper setup and management, SharePoint can be a valuable tool for any team looking to collaborate on documents and files.
SharePoint and Teams are two powerful collaboration tools in the Microsoft suite. SharePoint is a content management and collaboration platform that provides organizations with document libraries, lists, workflows, and other features that make it easy to share and manage content. Teams is a chat-based collaboration platform that brings together people, conversations, and content in a virtual workspace. By integrating these two platforms, you can unlock even greater collaboration capabilities. In this blog post, we’ll explore how to integrate SharePoint and Teams and discuss best practices for using them together.
Understanding the Benefits of Integrating SharePoint and Teams:
The integration of SharePoint and Teams provides a seamless collaboration experience, allowing users to work together in one unified environment. Here are some of the benefits of integrating SharePoint and Teams:
Access SharePoint Content in Teams:
With the integration of SharePoint and Teams, you can easily access SharePoint content within Teams. This means that you can collaborate on documents, lists, and other content without having to leave Teams.
Collaborate on SharePoint Content:
You can collaborate on SharePoint content with your team members in real-time within Teams. This enables team members to work together more efficiently, and it ensures that everyone is on the same page.
Improved Communication:
With the integration of SharePoint and Teams, you can communicate with team members using Teams chat, voice, and video features. This makes it easier to collaborate on content and discuss ideas in real-time.
Setting up the Integration Between SharePoint and Teams:
To integrate SharePoint and Teams, you need to set up a few things. Here’s a step-by-step guide:
Set up a SharePoint site:
The first step is to set up a SharePoint site that you want to integrate with Teams. You can do this by going to SharePoint Online and creating a new site.
Create a Team:
Next, you need to create a new Team in Teams. This will be the virtual workspace where you and your team members will collaborate.
Add the SharePoint site to Teams:
Once you have created the Team, you need to add the SharePoint site to it. You can do this by selecting the “Add cloud storage” option within the Files tab of the Team.
Collaborate on SharePoint content in Teams:
Now that you have set up the integration between SharePoint and Teams, you can collaborate on SharePoint content within Teams. You can access SharePoint files and lists from the Files and Lists tabs of the Team. You can also create new documents and lists directly from within Teams.
Exploring the Capabilities of the SharePoint and Teams Integration
The integration of SharePoint and Teams provides a wide range of capabilities that can enhance collaboration in your organization. Here are some of the key capabilities of the integration:
Co-authoring:
With the integration of SharePoint and Teams, you can co-author documents in real-time with your team members. This means that multiple people can work on the same document at the same time, making collaboration more efficient.
Access control:
SharePoint provides powerful access control features that allow you to control who can access and edit content. With the integration of SharePoint and Teams, you can apply these access control features to the content that you collaborate on in Teams.
Mobile access:
With the integration of SharePoint and Teams, you can access SharePoint content from anywhere using the Teams mobile app. This means that you can collaborate on content with your team members even when you’re on the go.
Integrating SharePoint and Teams provides a powerful collaboration experience that can enhance productivity and improve communication in your organization. By following these best practices for integrating SharePoint and Teams, you can collaborate on content in real-time, improve communication, and achieve better results.
SharePoint modern lists are one of the most powerful tools that allow you to create, manage, and share information with your team in a highly customizable manner. With the latest updates, it has become even easier to use SharePoint modern lists and customize them to suit your needs. In this blog post, we will take a look at some tips and tricks for using SharePoint modern lists efficiently and formatting them to your liking.
Tips for Using SharePoint Modern Lists Efficiently
Use Custom Views
One of the most efficient ways to use SharePoint modern lists is to create custom views. Custom views allow you to filter, sort, and group your data to suit your needs. For example, if you have a large list of sales data, you can create a custom view that only shows sales from a particular region or salesperson. This makes it easier for you to analyze your data and identify trends.
Use Quick Edit Mode
SharePoint modern lists come with a built-in Quick Edit mode that allows you to edit data directly in the list. This is a faster and more efficient way to update your data, especially if you need to make multiple changes at once. To use Quick Edit mode, simply click on the Quick Edit button on the toolbar.
Use Column Formatting
Column formatting allows you to customize the appearance of your list columns. You can use column formatting to change the font size, color, and background color of your data, as well as add icons and images. This makes it easier for you to visualize your data and identify important information at a glance.
Formatting SharePoint Modern Lists
Use the Column Settings Menu
To format your SharePoint modern list, you can use the Column Settings menu. The Column Settings menu allows you to modify the display settings of your list columns, such as the column name, data type, and default value. You can also use the Column Settings menu to create custom validation rules and set up calculated columns.
Use JSON Customization
JSON customization allows you to create highly customized SharePoint modern lists. With JSON customization, you can modify the appearance and behavior of your list, such as changing the background color, font size, and alignment of your data. To use JSON customization, you will need to have some programming knowledge, but there are many resources available online that can help you get started.
Use Power Apps
Power Apps is a powerful tool that allows you to create custom apps and forms for your SharePoint modern lists. With Power Apps, you can customize the appearance and behavior of your list to suit your needs. For example, you can create a custom form that only shows certain fields based on the user’s role, or create a custom app that allows users to view and edit data on their mobile devices.
SharePoint modern lists are a powerful tool that can help you manage and share information with your team. By using custom views, Quick Edit mode, and column formatting, you can use SharePoint modern lists more efficiently. And by using the Column Settings menu, JSON customization, and Power Apps, you can customize the appearance and behavior of your list to suit your needs. With these tips and tricks, you can become a master of SharePoint modern lists and take your team’s productivity to the next level.
SharePoint Online provides a powerful search engine that enables users to quickly find the information they need. However, the quality of search results depends largely on how well the site is optimized for search. In this blog post, we’ll explore some best practices for optimizing your SharePoint Online site for better search results and also discuss PowerShell scripts that can help you achieve this.
Use Managed Metadata:
Managed metadata is a hierarchical collection of centrally managed terms that can be used to tag content in SharePoint Online. By using managed metadata, you can ensure that your content is consistently labeled, which can improve the accuracy of search results. PowerShell script can be used to create and manage term sets and terms.
Customize Search Refiners:
Search refiners are used to filter search results based on specific criteria such as file type, author, or date. By customizing search refiners, you can make it easier for users to find the information they need. PowerShell script can be used to create custom refiners based on managed metadata.
Optimize Page Titles and Descriptions:
The page titles and descriptions are used by the search engine to index the content of the page. By optimizing these elements with relevant keywords, you can improve the visibility of your pages in search results. PowerShell script can be used to update page titles and descriptions.
Use Friendly URLs:
Friendly URLs are human-readable web addresses that are easy to remember and type. By using friendly URLs, you can make it easier for users to find your content and improve the visibility of your site in search results. PowerShell script can be used to set friendly URLs for pages and sites.
Enable Searchable PDFs:
PDF files are a common format for documents, but they are not always searchable by default. By enabling the searchability of PDF files, you can ensure that their content is included in search results. PowerShell script can be used to enable PDF search in SharePoint Online.
By following these best practices and using PowerShell scripts, you can optimize your SharePoint Online site for better search results. PowerShell scripts can help you automate the process of managing and optimizing your site for search, making it easier and more efficient to achieve your search optimization goals.
SharePoint is a powerful platform for building custom solutions that meet the unique needs of your business. One way to extend SharePoint’s functionality is by creating custom web parts. A web part is a modular component that can be added to a SharePoint page to display information or perform a specific function. In this blog post, we’ll explore how to create custom web parts in SharePoint to build custom solutions for your business needs.
Planning Your Custom Web Part
Before you begin building your custom web part, it’s important to plan out the requirements and functionality you need. This includes identifying the data sources, user interface, and any other features that you want your web part to include. Some questions you may want to consider during the planning phase include:
What data sources will your web part use?
How will users interact with your web part?
Will your web part require any custom logic or functionality?
Creating Your Custom Web Part Using Out-of-the-Box Features
SharePoint provides several out-of-the-box web parts that you can use as a starting point for your custom web part. These web parts include the Content Editor, Image Viewer, and Script Editor web parts, among others. You can customize these web parts by modifying their properties or adding your own code. To create your custom web part using out-of-the-box features, follow these steps:
Navigate to the page where you want to add your web part and click the Edit button.
Click the Insert tab on the ribbon and select the web part you want to modify.
Modify the properties of the web part or add your own code using the Script Editor web part.
Creating Your Custom Web Part Using PowerApps
PowerApps is a low-code platform that allows you to create custom web parts without writing code. With PowerApps, you can create custom forms, dashboards, and other components that can be added to a SharePoint page. To create your custom web part using PowerApps, follow these steps:
Navigate to the PowerApps portal and create a new canvas app.
Design your app by adding screens, forms, and other components.
Publish your app to SharePoint by selecting the PowerApps option on the Insert tab in the SharePoint ribbon.
Creating Your Custom Web Part Using SPFx
The SharePoint Framework (SPFx) is a modern development framework that allows you to build custom web parts using modern web technologies such as React, Angular, and TypeScript. With SPFx, you can create powerful, dynamic web parts that can be added to any SharePoint page. To create your custom web part using SPFx, follow these steps:
Install the necessary tools and dependencies for SPFx development.
Create a new SPFx web part project using the Yeoman generator.
Develop your web part by adding components, styling, and logic.
Deploy your web part to SharePoint by packaging it as a SharePoint solution and uploading it to the SharePoint app catalog.
Creating custom web parts in SharePoint can be a powerful way to extend SharePoint’s functionality and build custom solutions for your business needs. Whether you use out-of-the-box features, PowerApps, or SPFx, you have the flexibility and power to create web parts that are tailored to your organization’s unique requirements. By planning out your requirements and following best practices for development, you can create web parts that deliver real value to your organization.
We’re thrilled to welcome Heidi Jordanto Episode 89 of the Microsoft 365 Voice. Heidi is one of our newest Microsoft MVPs, an advocate for Women in Technology, and a Power Platform superstar!
Topics covered in this episode:
A SharePoint girl in a Power Platform world. Heidi’s evolution from working in the SharePoint space to expanding into Power Platform (Power Apps, Power Platform, etc.)
Leaning into community. History on how Heidi got involved in the community by speaking, blogging, attending events, etc.
Building your personal brand. Heidi shares how she’s identified herself in the SharePoint and Microsoft 365 community, how she evolved the topics and sessions she likes to present on, etc.
Getting started with process automation. Heidi discusses her approach to identifying business process automation needs for the organizations she works with. She recommends breaking down manual processes into the basics of who/what/when/where/why. Once you define the key process needs and validate what’s most important, you can identify the core requirements for your Power Platform solutions.
Taking a visual approach to designing Power Automate workflows. Heidi talks through her process to visually map out business processes using Visio, PowerPoint, etc. Once she drives agreement on the desired flow, it’s easy to ingest that into Power Automate to create workflows.
The importance of change management and adoption. Business process automation requires buy-in from the information workers that are managing the day-to-day processes you’re automating. Building out features, enhancements, and solutions that make life easier for these information workers will lessen their burden and get them excited to work with you. Take the time to ask them for their wish list items — it’s worth it!
Break your large processes down into smaller chunks. Heidi discusses how she breaks down work processes into smaller Power Automate workflows.
A big thank you to Heidi for joining us. We hope you enjoy this episode as much as we did!
Have a Microsoft 365 question? Submit it online! Your question may be featured in a future podcast episode.
As an admin, you will only know too well, that if a user deletes a flow, you will need to raise a call with Microsoft to restore that flow to Power Automate. Until May 2022 that is, when the Restore-AdminFlow cmdlet was released.
There are native actions in Power Automate for adminstering flows but there is no current timescales for releasing an action to restore flows directly. If you were wondering if it was possible to restore flows from Power Automate or Power Apps using the Platform, then I have a solution for you – Azure Runbooks. I have a blog post showing you how I built a Runbook to change the sharing options of SharePoint using Power Automate.
It’s worth noting at this point, that the Restore-AdminFlow cmdlet can only restore non solution aware flows!
Deleting your flows
Accidentally or intentionally, if you delete flows from Power Automate, you will not be able to restore them. You now have up to 28 days to action a restore using PowerShell.
In order to restore a flow you must either know the FlowName, i.e. the GUID or the DisplayName, i.e. the friendly name you have given your flow. My demonstration below will return both by determining the flows that have been deleted on a specific enviroment and will use the GUID to restore them.
Using PowerShell to restore a flow
You will first need to install the PowerShell support for PowerApps, available in the guide here. You will also need to be an environment admin for the environment that you wish to restore flows. This is not for end users to restore their own flows but for your IT department, who could adopt this solution to allow self service as I will demonstrate.
I have created two basic PowerShell scripts. The first of which will determine an array of flows that have been deleted in the past 28 days. This is achieved by comparing two tables of data from the Get-AdminFlow CmdLet and outputting either a JSON array for an automated RunBook and Power Automate integration or as a comma seperated string of FlowNames (the flow GUID). The second script will accept a comma seperated list of FlowNames (i.e. GUIDs) and restore each of those flows using Restore-AdminFlow CmdLet. Restored flows will be disabled by default.
#DamoBird365
#PowerShell script to demo how to retrieve an array of deleted flows from a default environment
#Official Docs https://docs.microsoft.com/en-us/powershell/module/microsoft.powerapps.administration.powershell
#www.DamoBird365.com
#www.youtube.com/c/DamoBird365

param (
    [string]$EnvironmentName = "Default-rg70379a-th7f-45c9-b7d4-hn207c7ca554"
)

#Credentials if using RunBook
#$myCredential = Get-AutomationPSCredential -Name 'PPEnvironmentAdmin'
#$userName = $myCredential.UserName
#$securePassword = $myCredential.Password
#$password = $myCredential.GetNetworkCredential().Password

#Sign In To PowerApps PowerShell
Add-PowerAppsAccount # -Username $userName -Password $securePassword #If using RunBook

#Get ALL Flows (excluding deleted)
$NonDeletedFlows = Get-AdminFlow -EnvironmentName $EnvironmentName

#Get ALL Flows (including deleted)
$AllFlowsIncDeleted = Get-AdminFlow -EnvironmentName $EnvironmentName -IncludeDeleted $true

#Compare non with all to get deleted
$DeletedFlows = Compare-Object -ReferenceObject $NonDeletedFlows -DifferenceObject $AllFlowsIncDeleted -Property FlowName -PassThru

#Format Result as JSON
$DeletedFlowsJSON = $DeletedFlows | Select-Object -Property FlowName, DisplayName | ConvertTo-Json

Write-Output ($DeletedFlowsJSON)

#If you want a comma seperated string of FlowNames for Testing in PowerShell
$combined = $DeletedFlows | ForEach-Object { $_.FlowName }
$result = $combined -join ','
Write-Output ("")
Write-Output ($result)
#DamoBird365
#PowerShell script to demo how to restore deleted flows from a default environment
#Official Docs https://docs.microsoft.com/en-us/powershell/module/microsoft.powerapps.administration.powershell
#www.DamoBird365.com
#www.youtube.com/c/DamoBird365

param (
    [string]$FlowsToRestoreString = "59d1cdd1-542e-4c13-8a59-b729221ebef5,7cf92a9d-c345-456b-9123-ce83291ab4b0",
	[string]$EnvironmentName = "Default-rg70379a-th7f-45c9-b7d4-hn207c7ca554"

)

#Credentials if using RunBook
#$myCredential = Get-AutomationPSCredential -Name 'PPEnvironmentAdmin'
#$userName = $myCredential.UserName
#$securePassword = $myCredential.Password
#$password = $myCredential.GetNetworkCredential().Password

#Sign In To PowerApps PowerShell
Add-PowerAppsAccount # -Username $userName -Password $securePassword #If using RunBook

#Split string into an array
$FlowsToRestore = $FlowsToRestoreString.split(",");

#For each FlowName in the array, restore the flow
$FlowsRestored = foreach ($Flow in $FlowsToRestore)  { Restore-AdminFlow -EnvironmentName $EnvironmentName -FlowName $Flow; Start-Sleep -Seconds 1 }

Write-Output ($FlowsRestored)
I demo how to use these scripts in my video. Note that I have commented out the credentials as used by the RunBook which is perfectly fine if all you want to do is run the PowerShell locally to restore flows ad-hoc.
RunBook Automation
For my Power Automate and subsequent Power App solution, I built two Azure RunBooks using the above scripts. One is appropriately called GetDeletedFlows and will return a JSON Array of deleted flows, the second RestoreFlows, will restore those deleted flows as determined by an input of FlowName GUIDs.
I have configured Credentials within my Automation Account so that I can call these from the RunBook. I have also installed the PowerApps admin module which is a requirement of running these PowerShell scripts online.
Restore Flows via Power Automate
To restore flows via Power Automate, you need to use the Premium action Create Job and Get Job for Azure Automation. The RunBook accepts a default environment which you can retrieve from the URL of your Maker Portal and you need to make sure you select “Wait for Job” under advanced. Get Job will then retrieve the JSON Array of deleted flows and it’s with this data that I have simply converted the FlowName GUID’s into an array. You could of course filter this array by Display Name at this point if required and only restore select flows.
With the FlowName (GUIDs) as an Array, we can simply join() them to form a comma seperated list of GUIDs and this can be passed back to the second RunBook to restore those flows. The second RunBook will accept both the default environment and of course the comma seperated list of flows to restore.
View Deleted Flows and Restore via Power Apps
Using the same actions above we can simply take the JSON array output from an equivalent flow called directly from PowerApps and convert to a collection. This can then be displayed within a PowerApp as a Gallery. From the Gallery we could in theory allow multiple selections and restore multiple flows, but for the purpose of my demo I have a flow that will restore a single flow based on the current item being selected. To restore multiple flows, all we need to do is pass a comma seperated list of FlowName GUIDs.
The first Flow triggered from the app will return the JSON array as an output back to the app. As there is no native way to convert a JSON array to a collection, I have used the technique as described in the following post on the Microsoft Forum.
The second flow is triggered by selecting an item on the gallery and the FlowName GUID of the current item is sent to the flow as input in order to pass this to the RunBook.
The app in terms of appearance is rather basic and includes a Gallery where the items are based on the collection retrieved from the first Power Automate Flow. I trigger this on a manual button press but it could be onvisible of the current screen. The restoration of flows is triggered by selecting a current item and upon completion, I remove the current item from the collection and then refresh the data source. The restored flow should no longer be in the returned data source as the flow has now been restored. Note that it can take up to 30 seconds for the whole process to complete.
This Power Apps tutorial will walk you through, how to remove all items from a collection in PowerApps. We will also see several examples of how to remove one or more columns or items from the Power Apps collection within apps.
I recently received a request while working in a canvas app to remove an item(s) from the Power Apps collection and display the remaining items. As a result, I conducted extensive research and created this tutorial on how to remove column(s) from the Power Apps collection.
It will also be discussed how to remove items from the Power Apps collection, which includes the following items:
Remove all items from a Power Apps collection
How to remove all except one column from a collection in Power Apps
Remove a column from a collection in Power Apps
How to remove multiple columns from a Power Apps collection
Power Apps remove a row from a collection
How to remove duplicates from a Power Apps collection
Power Apps collection Remove() function
First, we will discuss what a Remove function is and how to use this function to remove items, rows, and columns from the collection as well.
In Power Apps, there is an inbuilt function named Remove() that removes a specific record or multiple record(s) from the data source.
The syntax for the Power Apps remove function is:
Remove(Collection, items,...)
Remove all items from a collection Powerapps
Similarly, in this section, we will see how to remove all items from the Power Apps collection. That means we can remove all the collection items via a button click.
To implement this need, we will create a collection on the button’s OnSelect property by using the below expression. So that, when the button is clicked a collection will create.
Country and Captial are the names of the collection’s columns.
Next, add a vertical gallery to display the collected data and connect that vertical gallery to the collection i.e., ColCapial. Once the button is clicked the items will be visible in the vertical gallery.
Power Apps removes all from collection
Next, to remove all items from the collection, add another button control to the screen and make sure to place the button outside of the gallery.
Set the text property as Clear All.
Insert the below expression on the button’s OnSelect property.
OnSelect = Clear(ColCapital)
Where ColCapital is the name of an existing collection that we previously created.
Power Apps collection remove all
Now preview the app and we can see all the items will be removed from the collection once the button is clicked.
PowerApps collection remove all
This is how to remove all items from a Power Apps collection.
How to remove all except one column from a Power Apps collection
In this section, we’ll look at how to remove all columns from the Power Apps collection except one. That means there is a collection with multiple columns, and we will remove all but one of them.
To meet this requirement, the following steps are:
On the Power Apps screen, add a button control and set the Text as
Insert the below expression on the button’s OnSelect property to create the collection when the button will click.
CollProduct is the name of the new collection name.
Product, Manufacture, and Quantity are the name of the collection’s columns
Power Apps collection remove all except one column
Add a Power Apps data table to the screen, and set the Items as CollProduct to display the collected data.
Initially, it will not display the collected data. For this, click on the ‘Create Collection’ button while clicking on the Alt key. Now, it will display the collected data within the Power Apps data table control.
PowerApps collection remove all except one column
Similarly, add another button control to the screen.
Set the text as “Show one Column“.
Insert the below expression on the OnSelect property.
Where CollProductOne is the name of a new collection, CollProduct is the name of the existing collection, and “Manufacture” is the name of the existing collection’s column to keep in the new collection.
How to remove all except one column in PowerApps collection
Similarly, add another data table control to display the collected data.
Set the Items’ property as CollProductOne.
Click on the button control while clicking on the Alt key. We can see the collected data will come with a single column.
PowerApps collection remove all column except one
This is how to remove all columns except one within the Power Apps collection.
As per the above expression, the new collection i.e., CollProductRemove will remove the Quantity column and will display the rest two columns.
How to remove one column from Power Apps collection
Next, add a Power Apps data table to the screen and set the Items as CollProductRemove. Then click on the button and it will display the collected data within the data table shown below:
Power Apps collection remove one column
This is how to remove one specific column from the Power Apps collection.
Remove more columns from a Power Apps collection
Similarly, here we will see how to remove more columns from a Power Apps collection. let’s take the above example to implement this requirement. The required steps are:
Insert the below expression on the button’s OnSelect property.
CollProduct is the name of the existing collection.
“Quantity” and “Product” is the name of the columns that will remove from the collection.
How to remove more columns from PowerApps collection
Add a data table control and set the Items as CollRemove to display the collected data. Once the button is clicked the collected data will display on the data table shown below:
Power Apps collection remove more columns
This is how to remove more columns from a Power Apps collection.
We’ll see how to remove a specific row from the Power Apps collection in this section. That means we have a collection of Power Apps with some columns. Now, we’ll use the existing collection to create another collection that will remove the specified row and display the remaining rows.
For this, the required steps are:
On the Power Apps screen, we have built a collection on the button’s OnSelect property. Also, display the collected data within a Power Apps Data table shown below:
CollProduct is the name of the existing collection.
ProductNo is the name of the collection’s column.
Similarly, add another data table to display the newly collected data and set the Items as CollRemove. Once we click on the button, we can see the collected data within the Power Apps data table.
Power Apps collection remove specific row
This is how to remove a specific row from the Power Apps collection.
In this section, we’ll look at how to remove duplicate values from the Power Apps collection. Assume we have a collection called “BookCollection” with columns like “Name” and “Author,” as well as the following repeated items:
Power Apps collection remove duplicates
But, as per the requirement, we want to remove the duplicate items from the above collection and only display the unique values.
To meet the requirement, add a button control to the screen. Insert the below expression on the button’s OnSelect property.
Where CollUnique is the name of the new collection, BookCollection is the name of the existing collection, and Name is the column that provides the distinct operation. That means we will remove the duplicates from the Name column.
PowerApps collection remove duplicates
Next, add a data table to display the distinct values. Set the Items as CollUnique. We can see the data table will display only unique values.
PowerApps collection shows unique
This is how to display the unique values within the Power Apps collection.
Conclusion
From this Power Apps tutorial, we learned all about how to remove column(s), and specific items from the Power Apps Collection. Also, we covered the following things based on different situations.
Power Apps collection remove item
Power Apps collection remove all
Power Apps collection remove all except one column
Power Apps collection remove one column
Power Apps collection remove more columns
Power Apps collection remove a row
PowerApps collection removes duplicates
You may also like the following Power Apps tutorials:
Uploading data from Power Apps can be scary on a security standpoint, since the user will need access to the Data Source. Lets use Child Flows to get around this, and use any connection we want.
So today I got a question on the PowerApps community on how to display a Pie chart based on DataVerse tables.
So the Scenario is as below, Locations Table and Visits where location is a lookup and on the pie chart we need to display the number of Visits per Location, I thought initially this should be easy the same as it should be on model driven app, so added the pie chart on on the Items I thought it would be as easy as linking it to visits and use the location column in the series but this did not work as expected as the Lookup (Location) was not showing up so I ended up by doing the solution described below, so this is the steps to create the data and do the pie chart!
Let’s Go!
1. I have created a Table called Location Primary column Name is Location Name
2. Visits Table where location is a lookup
To be able to get the pie chart working I had to do a Join using Add Columns , then Group BY , Then Add Columns again to get the row counts, this is the final expression:
In this blog article I will be pointing out the most important features from my point of view for Power Apps that will be released from October 2022 through March 2023 .
#1 Grid Control – Further Enhancements
Public Preview: October 2022 General Availability: Not Defined
Nested Grids: Expand a row to see a grid of related records. Multiple rows in the grid can be expanded simultaneously, which is a very nice features and give the drill through capabilities.
Grouping: Organizing data by a specific column for example Category or Date columns.
Aggregation: Select one or more columns and define an aggregation function like Sum, Min or Max
#2 Power BI quick reports in Power Apps
Early Access: August 2022 General Availability: October 2022
Using this feature is actually very handy as you can start a power BI Report from a View in a Model Driven app with just one click and you can start exploring your data
With Visualize this view option on all grid pages, you can:
Create a Power BI quick report, starting from a view with just one button-click. The Power BI service generates visuals and a layout intelligently based on the underlying data.
Make any necessary modifications to visuals or the filters or the columns (or any combination of all three) using the display name of the columns on the quick report.
Save the Power BI report to a workspace of your choice, so you can access it anytime and customize it for your needs
You can start exploring some of these features in Preview by enabling through the settings on your model driven app.
#3 Form Component Control Enhancements
Early Access: August 2022 General Availability: October 2022
This features allows makers to build complex multi form entities in model driven apps without having to navigate away from the main form through the form component control which is now extending the ability to customize the command bar, Business Process flow, header and Tabs, So you have more control on the embedded form like saving it separately outside the context of the main form. An Example if you have an Account and Primary Contact so from within the account form you can control the primary contact form and move the business process, show/hide tabs ,etc.
#4 DataVerse tables integrated inside Power Apps Studio
General Availability: October 2022
This feature will allow you to create, interact with new /existing DataVerse tables directly from withing PowerApps studio and with the introduction of Power FX formulas , it can be easier for non citizen developers to easily create their columns using the Excel Style formulas they kind of used to.
It is very similar to the ability to create new tables directly through power pages
# 5 Connect to external data from Dataverse
Public Preview: October 2022 General Availability: January 2022
This feature allows you to connect to external data sources from and interact with it within DataVerse , these external data sources can be Excel , SQL, One Drive , etc this is what was called Virtual Tables but with these release the setup will be more easier to use by leveraging simple connections to these external data sources.
# 6 Appointment Description Supports Rich Edit
Early Access: August 2022 General Availability: October 2022
Add links, lists, and other rich text in your appointment description with the new rich text editor control. This feature is now automatically enabled for all apps and can be disabled in Power Platform admin console under the environment settings. Previously, the feature was an opt-in setting in the environment.
# 7 View only relevant activities in dropdown
Early Access: August 2022 General Availability: October 2022
In the activities drop down you can now see only the activities defined within the Model Driven App Metadata.
One of the great values of using Dataverse Model-driven apps is the ability to use the out-of-the-box forms. These forms supply the user interface to the tables and data within our app and can be customized to meet requirements without having to learn code or incur technical debt. The out-of-the-box forms can be added and customized as part of a solution and if called for new ones created. In this post, we will walk through adding an existing form to a solution; customizing the form and creating a new form.
There are four types of forms in Dataverse:
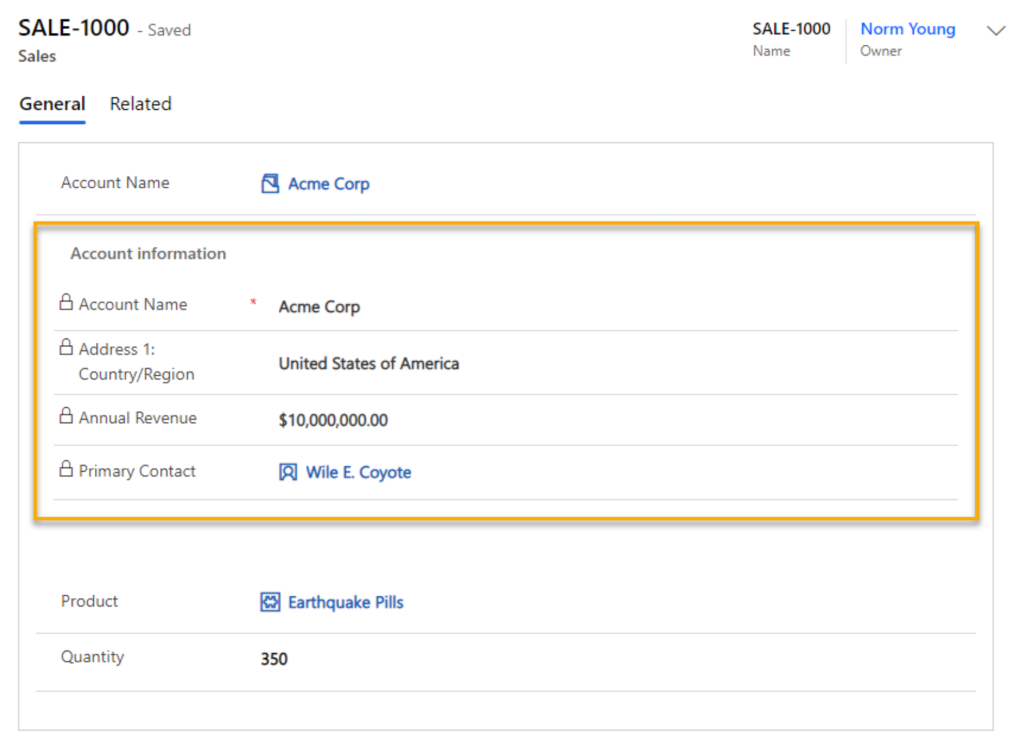
Main is the default Model-driven app user experience when viewing and editing data. In the sample image below, we see the Main form for the Account table.
Quick Create is a simplified version of the Main form and is used for in-context record creation without having to switch between table forms. In the sample image below, we see the Quick Create form for the Account table supplied in-context while in the Contact table.
Quick View forms are embedded into a Main form and show related read-only information on the record being viewed. In the sample image below, we see the Quick View Account form while in the main Sales table form.
Card forms are light-weight forms that are used in views for mobile experiences. In the sample image below, we see the Account Card in a mobile device experience.
Adding an existing form
Adding an existing form to an existing table is relatively simple. From your Power Apps solution, expand Tables,select your target table and then click Add existing.
Select Forms, select your target form and then click Add.
Our existing form is now added to the table forms within our solution.
Update an existing form
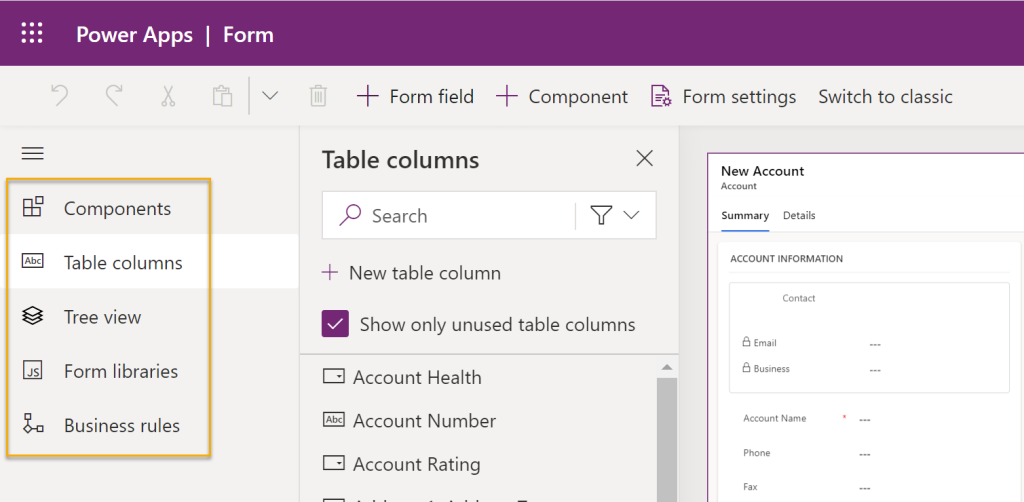
After adding an existing form, you can customize it through the Edit option in the Commands menu.
The form opens and you can add Components (UI elements), Table columns (fields), Form libraries (code components) and Business rules (data driven actions).
Add a column is a simple as clicking the target field and then rearranging it on the form. In the example images below, I am adding the “Account Health” column to the form and then position it as I see fit.
There are quite a few Components worth exploring and adding as needed to your forms. The image below shows the out-of-the-box components. I like to use the 1-column section and 3-column tab to group like content and to split out subject matter on larger forms. For related tables I like to use the Quick view control to display relevant information from the “parent” to the “child” record.
Form libraries and Business rules are too complex of a subject to explore in this blog post but are worth learning more about if you have the need.
Create a new form
Add a new form is a simple as clicking New form, select your form type and then design as desired.
When you create a new Main form, it will use the existing Main form for a starting point. In the sample image below, I have created a new Main form, customized to it only show address information.
You can switch between forms by clicking the drop down menu next to the table name.
As a non-developer I can’t say enough good things about Dataverse Model-driven apps. The platform allows me to focus on understanding business problems and solve for them without having to put the tool in front of the problem. Knowing how to add, customize and create new forms is part of the Model-driven app experience that adds tremendous value with low investment of time and no technical debit.
If you want to get started with Dataverse but do not have a license available get a Power AppsDeveloper Plan. The Developer Plan gives you Power Apps, Power Automate and Dataverse for non-production use. Learn more at: https://powerapps.microsoft.com/en-us/developerplan/
You have two options for signing up:
Get started free, use this choice if are you not using Power Apps, Power Automate or Dataverse.
Existing user? Add a dev environment, use this choice if you are already using Power Apps, Power Automate or Dataverse.
The setup experience in both cases looks like the images below. Important: a work or school account is needed.
Click Get started free or Existing user? Add a dev environment.
Enter your work or school email address and click Next.
Select your country or region, enter your phone number and click Get started.
Click Get Started to confirm the confirmation details.
You will be prompted to select you country again and then click Accept.
Your new development environment will open in the Power Apps maker experience. The environment will be your full name in plural “Environment”. For example, “Norm Young’s Environment”. You cannot change this name. Outside of dataflows you get all of the standard and premium features.
Not every organization will have access to Dataverse. Using the Power Apps Developer Plan will give you opportunities to discover the feature set and prove the value to your organization prior to buying more licenses. Sign-up today and get developing!
Thanks for reading.
NY
image-38
nyoung30
Power Apps Developer Plan signup options
Enter your work or school email address and click Next.
Select your country or region, enter your phone number and click Get started.
Click Get Started to confirm the confirmation details.
You will be prompted to select you country again and then click Accept.
Despite this blog post’s catchy title there is no magic upgrade button to move Microsoft Lists to Dataverse for Teams. There may be in the future but until then migration translates to rebuild. A list rebuild to Dataverse will most likely be caused by a design requirement that Lists is not suited to, like setting up complex table relationships or custom security configurations in the data. In this post I am redesigning my list to have a more normalized structure. I am using a customized version of the Microsoft Lists Issue Tracker template in this demo and will split the list into multiple tables. The Issue Tacker list structure lends itself to capturing process transactions. The Issue Source column stores the related apps and services that might have issues that need tracking. Moving Issue Source to a related table allows us to add more metadata about the source like person responsible, standardizes data entry and makes for a better user experience by moving away from manual data entry to a lookup experience. In a relational design view Issue Source will have a 1-to-many relationship to the Issue Tracker table.
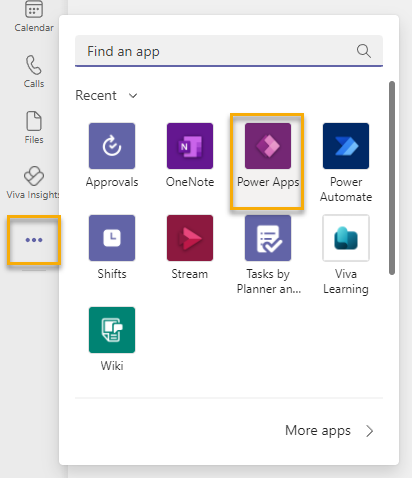
To get started with our list migration connect to Microsoft Teams, click More added apps and then select Power Apps.
ClickStart now on the How to create an app for your team screen.
Select your target team and then click Create.
Power Apps will create the Dataverse for Teams database and send you an email when complete. After the provisioning is complete you are prompted to supply an app name in the Power Apps Teams maker experience. Enter an app name and click Save.
We will create our new tables, Source and Issue Tracker , by clicking on With data on the Start this screen form.
Our Source table has a 1-to-many relationship with the Issue Tracker table, this means we should build Source first. Enter a table name and click Create. Notice that Dataverse tables names are usually named in singular form and then given a plural name within the create table experience.
We can add columns to our table by clicking the Add column button. I like to add an “ID” column to all of my tables using the Auto number column type with a string prefix. If the Name value changes in the table, I can supply data continuity through the ID column. To create the column, click Add column and set:
Name to “Source ID”
Type to “Auto number”
Autonumber type to “String prefixed number”
Prefix to “SRC”, this can be any value but should reflect the table name in some form
Minimum number of digits to “4”, this value should reflect the max number of entries you expect in this table
Seed value to “1000”, this can be any value and in is usually influenced by a business requirement
Max length to “100”, this value should reflect the max number of entries you expect in this table
Click Create
The Source table will include a service owner column. Unlike Microsoft Lists there is no Person column, and we will use the Email column instead. Click Close when complete to save the table changes and return back to Power Apps.
Our next step is to create the Issue Tracker table.
Add the following columns shown below:
Column name
Column type
Issue ID
Auto number with: – Autonumber type set to “String prefixed number” – Prefix set to “ISS” – Minimum number of digits to “4” – Seed vale set to 1,000 – Max length to 100
Folder Location
URL with max length 255
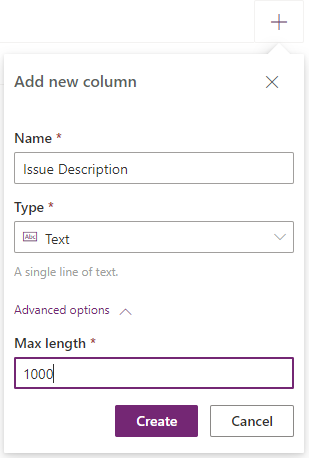
Issue Description
Text with max length 1,000
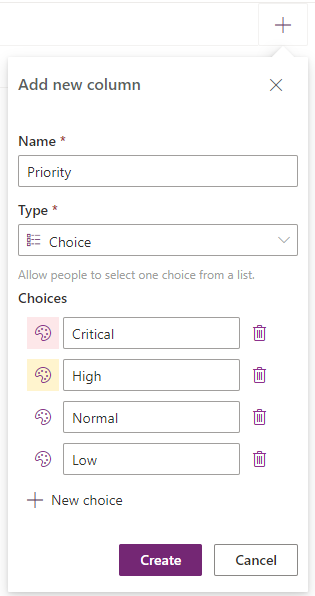
Priority
Choice with the following choices: Critical, High, Normal, Low
Status
Choice with the following choices: Blocked, In progress, Completed, Duplicate, By design, Won’t fix, New
Assigned To
Email with max length 100
Date Reported
Date with default options
Due Date
Date with default options
Days Old
Number with default options
Issue Source
Lookup with related table set to Source
Column creation images are shown below.
Click Close when complete to save the table changes and return back to Power Apps.
Back in Power Apps, click With data in the Start this screen and select “Issues” to build our starter app.
Our starter app looks good but requires a few modifications to make it work for our design.
Click EditForm1and then click Fields.
We will add the Issue Source column to our form by clicking Issue Source and then click Add. Use the Columns and Layout controls to layout the form in your preferred way.
With very little modification our starter app is simple, clean and looking good.
We need to publish the app to Teams for general use. Click Publish to Teams and update the Name, Icon and fill colors as desired.
Our finished app looks like the image below.
Microsoft Lists are great, and I use them every day in my professional life. When requirements exceed what Lists are capable of then migrating to Dataverse for Teams is a smart choice. You don’t have to be a developer to take advantage of what is possible with the out-of-the-box Dataverse for Teams functionality. In future posts we will extend the functionality of our app with Power Automate and Power Apps.
Thanks for reading!
NY
Update: Soon after posting this article, Scott McKenzie let me know that: “Dataflows for Dataverse Teams is now available in preview. If you create a new Dataflow utilizing your existing SharePoint List, you have the ability to create the Entity with matching Fields and transfer the data rather than having to build the Entity and Fields from scratch.” If I were doing straightforward List to Dataverse for Teams migrations I would definitely look into Dataflows.
image-33
nyoung30
Add Power Apps to Microsoft Teams
How to create an app for your team screen
Select your target team and then click Create.
Enter an app name and Save.
Start this screen With Data
Create a table experience
Source ID column definition
Populated Source ID column.
Owner column using the email column type.
Issue ID column using Autonumber`
Folder Location column using URL column type
Issue Description column using the Text column type
Priority column using the Choice column type
Date Reported column using the date column type
Issue Source column using the Lookup related table column type
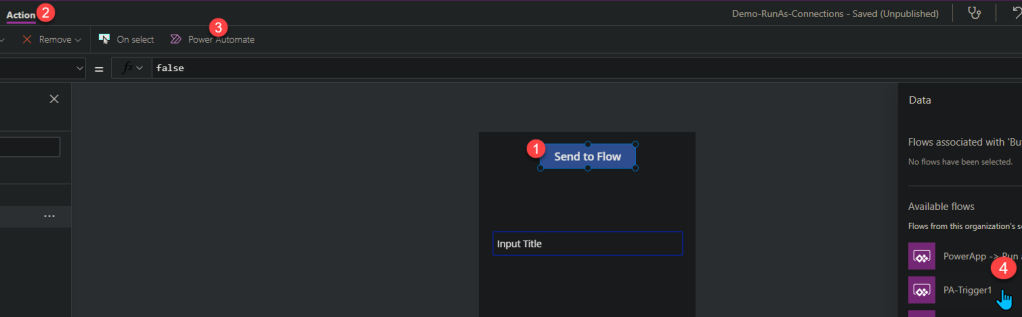
One of the cool things you can do from a canvas Power App is call a Power Automate flow. This is a great way to do something simple – like sending an email – or many more complex things you might want to trigger from the Power App. Many have written about how to implement these sorts of things, so I won’t cover that ground here.
Once you’ve got it set up and time goes by, your users may start to see an error message similar to this when they take the action to trigger the flow in the Power App. It might be a button click, changing a number in a field – it can really be anything where you can connect to an event in the Power App.
That’s:
{"code": "InvokerConnectionOverrideFailed", "message": "Failed to parse invoker connections from trigger 'manual' outputs. Exception: Could not find any valid connection for connection reference name 'shared_office365_1' in APIM tokens header."}
The contents of the error you see may be a little bit different, but every report I saw mentioned InvokerConnectionOverrideFailed.
This is a post which shouldn’t need to exist, in my opinion. Once we have the connection between the Power App and the Power Automate flow, it should just work going forward. But after some indeterminate amount of time has passed, you may start to see the error above. The two tools somehow lose their connection.
We had this happen at a client recently, so I went off to the InterWebs to see if I could find an answer. There are multiple posts about it with multiple answers. I’ll summarize the one I found that worked for me here.
In my particular case, the Power App enables event signups. Each event has one or more available time slots with a maximum number of registrations. When the event is coming up, the admins may need to provide a roster for each time slot to the event organizers, who are often outside the organization. We have a button in the Power App visible only to the admins which triggers a flow. That flow creates an export of a set of the specific event’s signup data in an Excel spreadsheet and the admin is notified via an email with a link to the Excel file when it is complete.
Here’s the sequence that solved the issue for me:
Export the existing flow. The old flow was named CSRRosterExport1.
Import the exported flow’s ZIP file with a new name, but everything else exactly the same. The new flow’s name was ExportEventRoster.
In the Power App, add the newly instantiated flow as a connection. To do this, from the top menu, choose Action/ Power Automate and specify the Flow you’d like to call.
Replace all calls to the old flow with calls to the new flow. In this case, it was the onSelect events for two buttons, each of which passed slightly different parameters to the flow. It amounted to changing the CSRRosterExport1.Run() instances with ExportEventRoster.Run().
Now that I know the fix, it probably takes about 10 mins – at most. When our users see the error message, we can easily Band-Aid the problem. Of course, this issuE shouldn’t happen in the first place, so let’s hope Microsoft fixes it before we ever see the error again.
This is a little one, but sort of cool. I’m building a Power App which takes orders for shipment between stores. The person filling out the form can request a delivery date, but we want to give them a decent default. (It would be great if we could set minimum or maximum date in a date picker, but we can’t.)
Generally, something requested today can be delivered tomorrow, so we want a tomorrow which is smart about weekends, regardless what day of the week it is.
I came up with this little formula to set the DefaultDate for the form’s Requested Delivery Date date picker:
It’s best practice from a security point of view to disable users from creating security groups or Microsoft 365 groups. Users can create security groups in Azure portals, API or PowerShell by default. The below setting will also prevent users from creating teams in Microsoft Teams as this will create a Microsoft 365 group.
In this post we will be creating a Power App and workflow to allow users to create teams on our terms. We will be letting users choose what type of Team they need and it will be provisioned. At the end I’ll be listing a few best practices regarding usability and security of this solution.
Prevent users from creating teams
The first step is preventing users from creating teams by switching the option to create groups to “No”. The user is able to create teams by default.
Switching the slider will show the following for users when trying to create a team
Create your Power App / Power Automate flow
You can create a Power App to you liking. I’ve just create a simple app with a few buttons.
The Power Automate flow is just as simple which will create a Team and add a user to this team.
Clicking on the button will create the default team
Best practices
Control and naming conventions
Adding an approval to the flow will give administrators control on which Teams are being created. Using the app you can use your own naming convention to know which teams have been created and filter based on them.
Service Account
Run / create the flow using a non-personal (service) account. This will make sure that the application will stop working when the account who created it is deleted.
Logic apps
This flow is created directly from the Power App where it’s also possible to use an Azure Logic App. This allows administrators additional monitoring. The behaviour of the logic app can be exported to a Log Analytics Workspace. An alert can also be created should the Logic App or an action in the Logic App fail.