Vue lecture

Il y a de nouveaux articles disponibles, cliquez pour rafraîchir la page.
✇Waldek Mastykarz

The easiest way to test how your app handles API errors

The easiest way to test how your app handles API errors

How would you test this code?

async function getData() {
  try {
    const result = await fetch('https://contoso.com/api/data');
    if (result.ok) {
      return await result.json();
    }
  }
  catch (e) {
    // handle API errors here
  }
}

More specifically, how would you verify that the code in the catch clause, responsible for handling errors is working properly?

What if your API-handling code is more elaborate? What if you want to use rate limiting headers to back off and avoid getting throttled? And when you get throttled, you want to wait for the designated period and retry the request automatically? How do you verify that your code works correctly?

Using APIs is hard

It's hard to imagine an app that's not connected to an API these days. We use APIs for everything: from authentication, to data storage, to integrating AI. APIs are literally everywhere. And yet, it's surprising to see how hard it still is to build robust apps that use APIs.

The APIs we use in our apps are built by different vendors. Each API works differently than the other. But that's fine. Using their docs, we can integrate these APIs in our apps just fine. We can even go as far as to automate testing different scenarios relevant to our app. But not all of them.

While it's easy to get APIs to work, it's hard to break them. Yes, you can easily send an invalid request and see it respond with an error, but that's hardly something you'd see in production, unless you missed something fundamental. What is really hard about working with APIs is simulating different error states, like rate limits, throttling or servers getting overloaded.

What makes it even harder, is that vendors who publish APIs, often spend more time in their docs communicating how their APIs work rather than how their APIs behave when they fail. "It's a matter of perception" - you could say. But if you've worked with APIs a bit, you know that API failure is not a matter of "if" but "when". And having proper docs that describe erroneous behavior makes all the difference.

How developers handle API errors

Handling API errors is hard. Here's how developers typically deal with it.

Wrap the whole request in a try..catch

Probably the most frequently used solution out there is to wrap the whole web request in a try..catch clause. If calling an API fails for whatever reason, the app catches the error and shows a generic error. I bet you've seen an error similar to An error has occurred. Reload the page more than once. This is exactly, because developers used a generic try..catch statement.

Using this approach gives you an easy way out. After all, as a developer, you don't have to care about the exact API error. Something went wrong in an API you don't own, so you can't do nothing about it, right? So you show a generic error to the user, asking them to retry. What else can you do, right?

Use a dependency

There are dependencies that you can use in your project to help you handle API errors. Their functionality can be as simple as handling basic OData errors to handling throttling with exponential back offs. Thanks to these dependencies you can be smarter and automatically recover when possible without bother the user.

While it sounds great, what makes you so sure that the dependency will work properly with the APIs that you use in your app? Have you actually checked it? How would you though?

Make the API fail

When developers want to see how their app behaves when it gets throttled, they sometimes overload the API on purpose. They'll keep calling it until they exceed the quota or force a server error due to too high resource consumption.

It's far from perfect for both the API vendor and the developers. API vendor loses precious resources sometimes even leading to service outage, and developers incur additional costs. But how else would you verify how the app actually behaves when it gets one of these elusive errors?

Simulate API errors with mocks

More experienced developers, especially when they build a product, might go as far as mock APIs they use. Rather than calling the actual API, they simulate API responses in code what allows them to test different edge cases. This isn't trivial to do.

First, you need to have a thorough understanding of the API that you're using and its different behaviors. Can you get throttled? Does the API communicate rating limits? What other error states could the API communicate that you should consider? When do these errors occur and what is the shape of the error response that your app gets?

Once you know all of this, then you need to setup the necessary infrastructure to mock API calls and simulate the different errors. Simulating simple errors isn't hard. But it gets complicated when you get to simulating more complex behaviors like rate limiting that spans a series of requests.

And after you figured it all out, you also need to keep this in sync with the actual behaviors of the APIs that you use in your app.

Using APIs properly is hard

There's more to using APIs than meets the eye. A 200 OK response is just the tip of the iceberg. If you want to build robust apps that use APIs, you need to properly handle possible errors, and you have to verify that you're doing it correctly. This has nothing to do with your app's functionality, but what's the alternative? Hoping for the best while knowing that it's just a matter of time until your app breaks and loses someone's work?

See for yourself how your app will behave when APIs fail

The good news is, that there's a better way for you to see how your app will behave when the APIs that it uses fail. It allows you to see not just regular API failures, but rate limiting, throttling and any other type of error that an API might return. And you can do it without changing a single line of code in your app or standing up specific testing infrastructure and elaborate tests. Here's how.

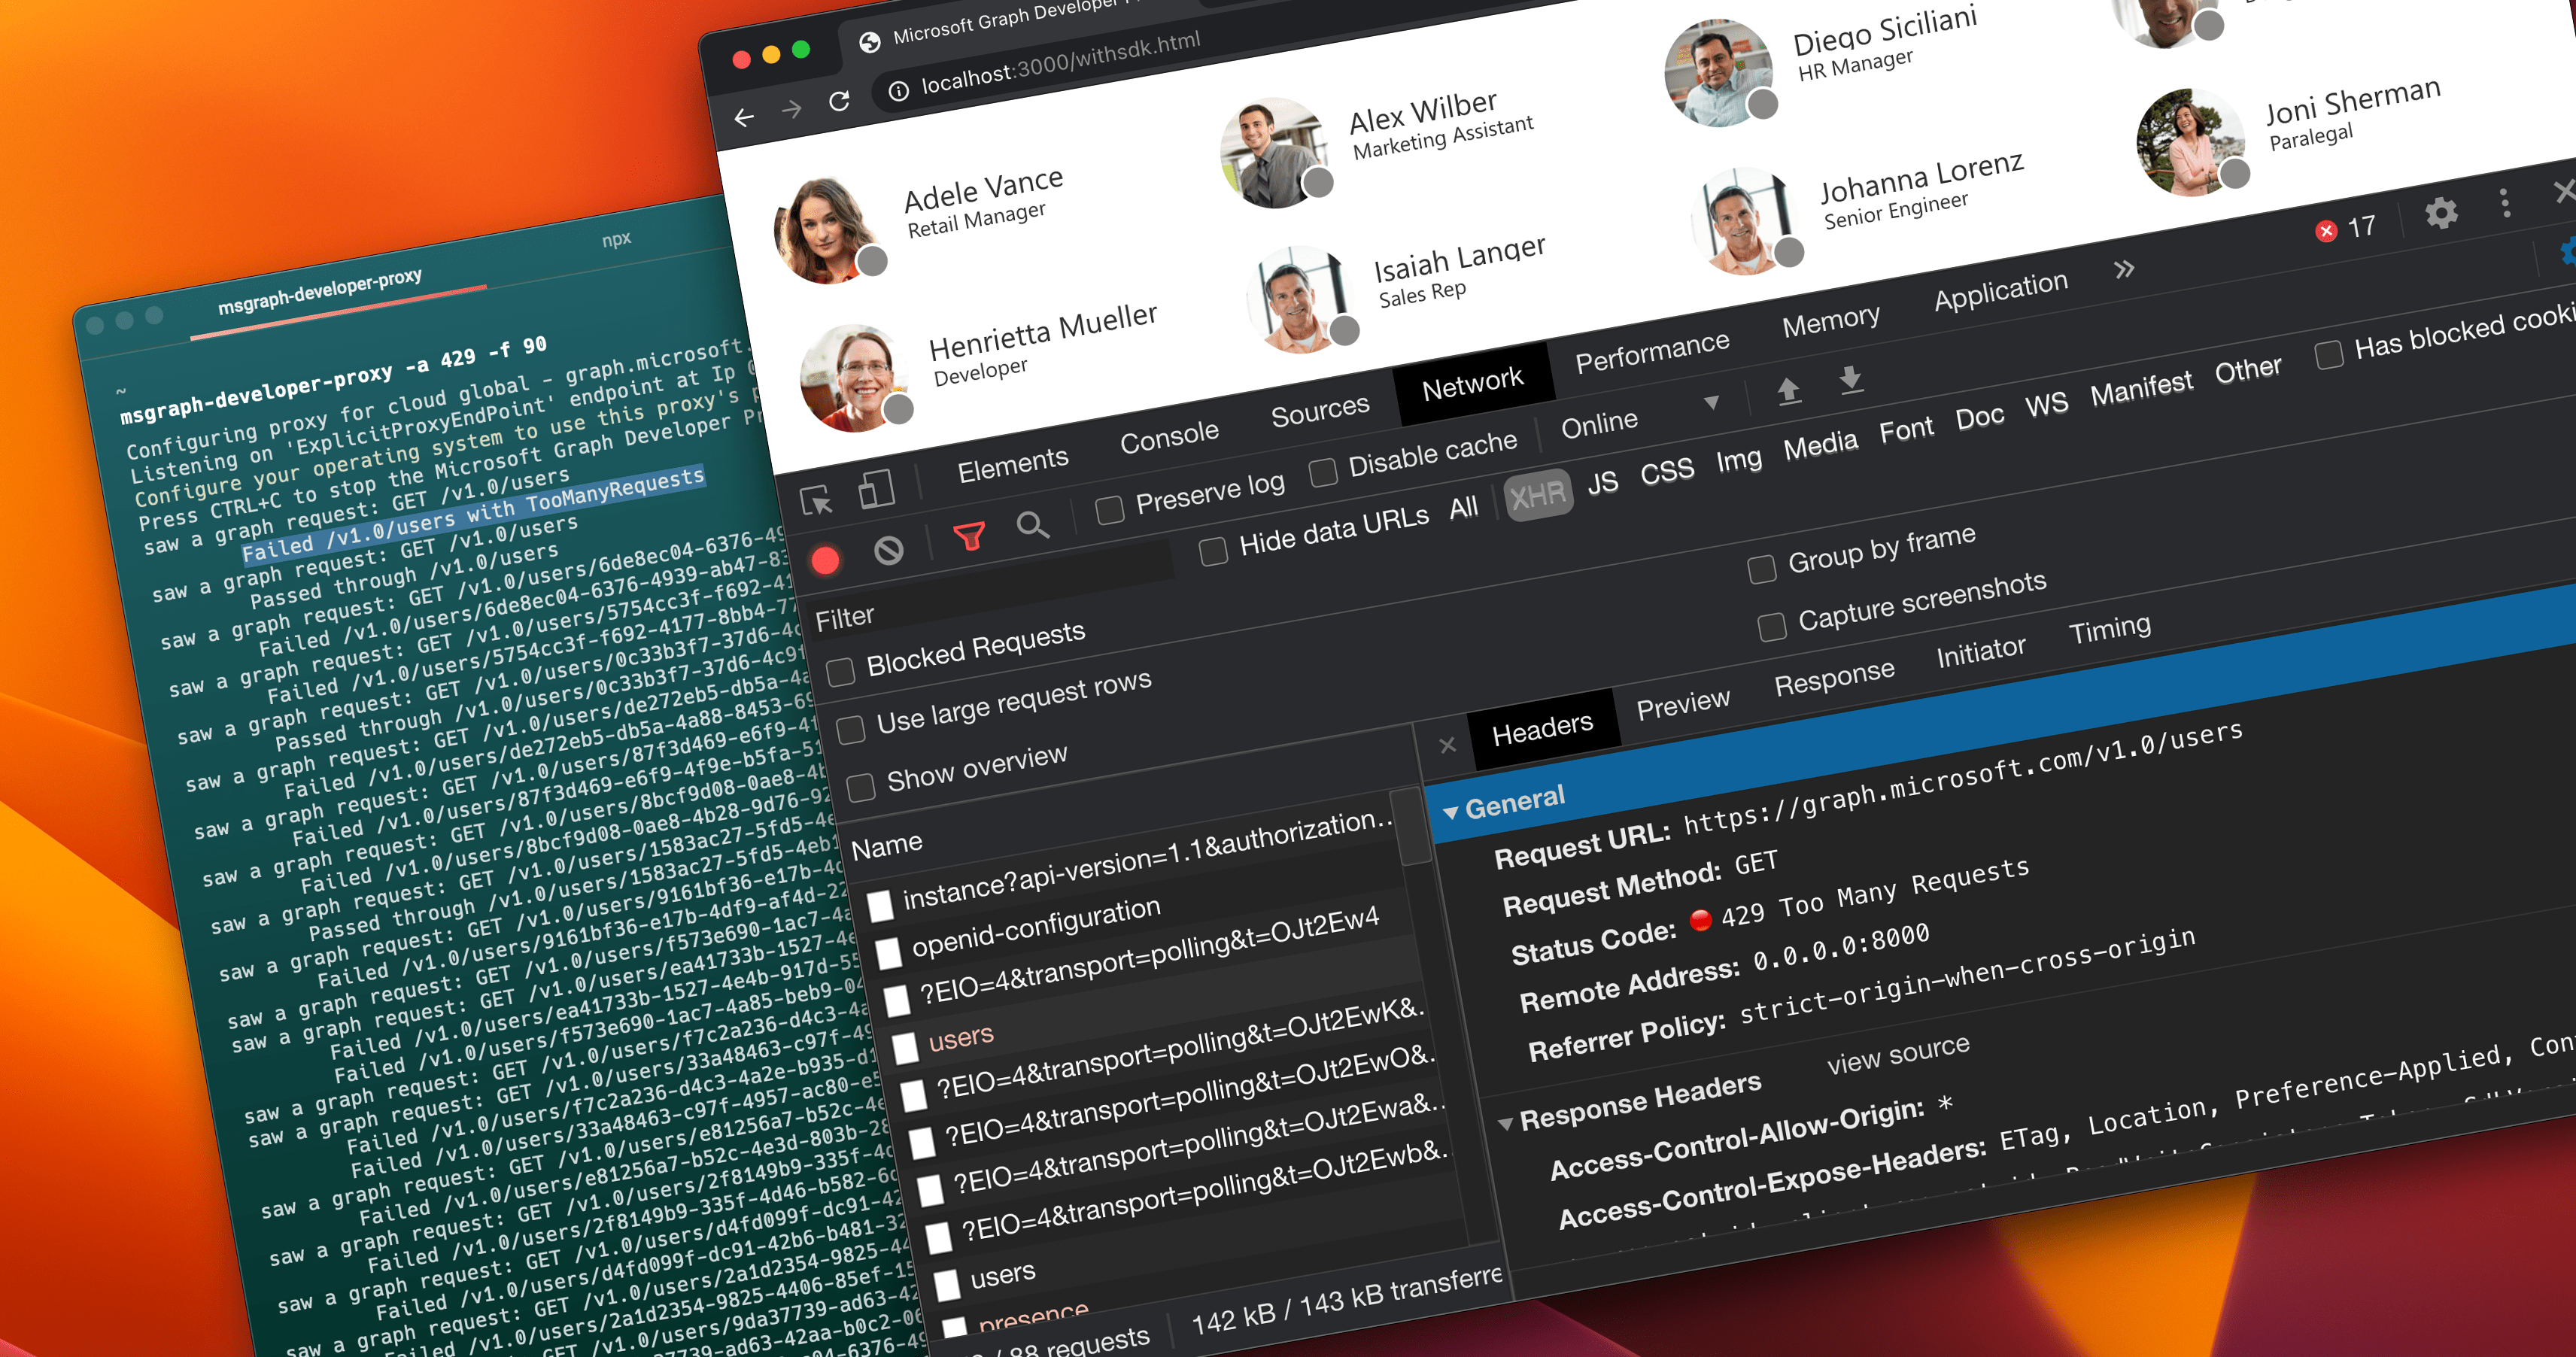
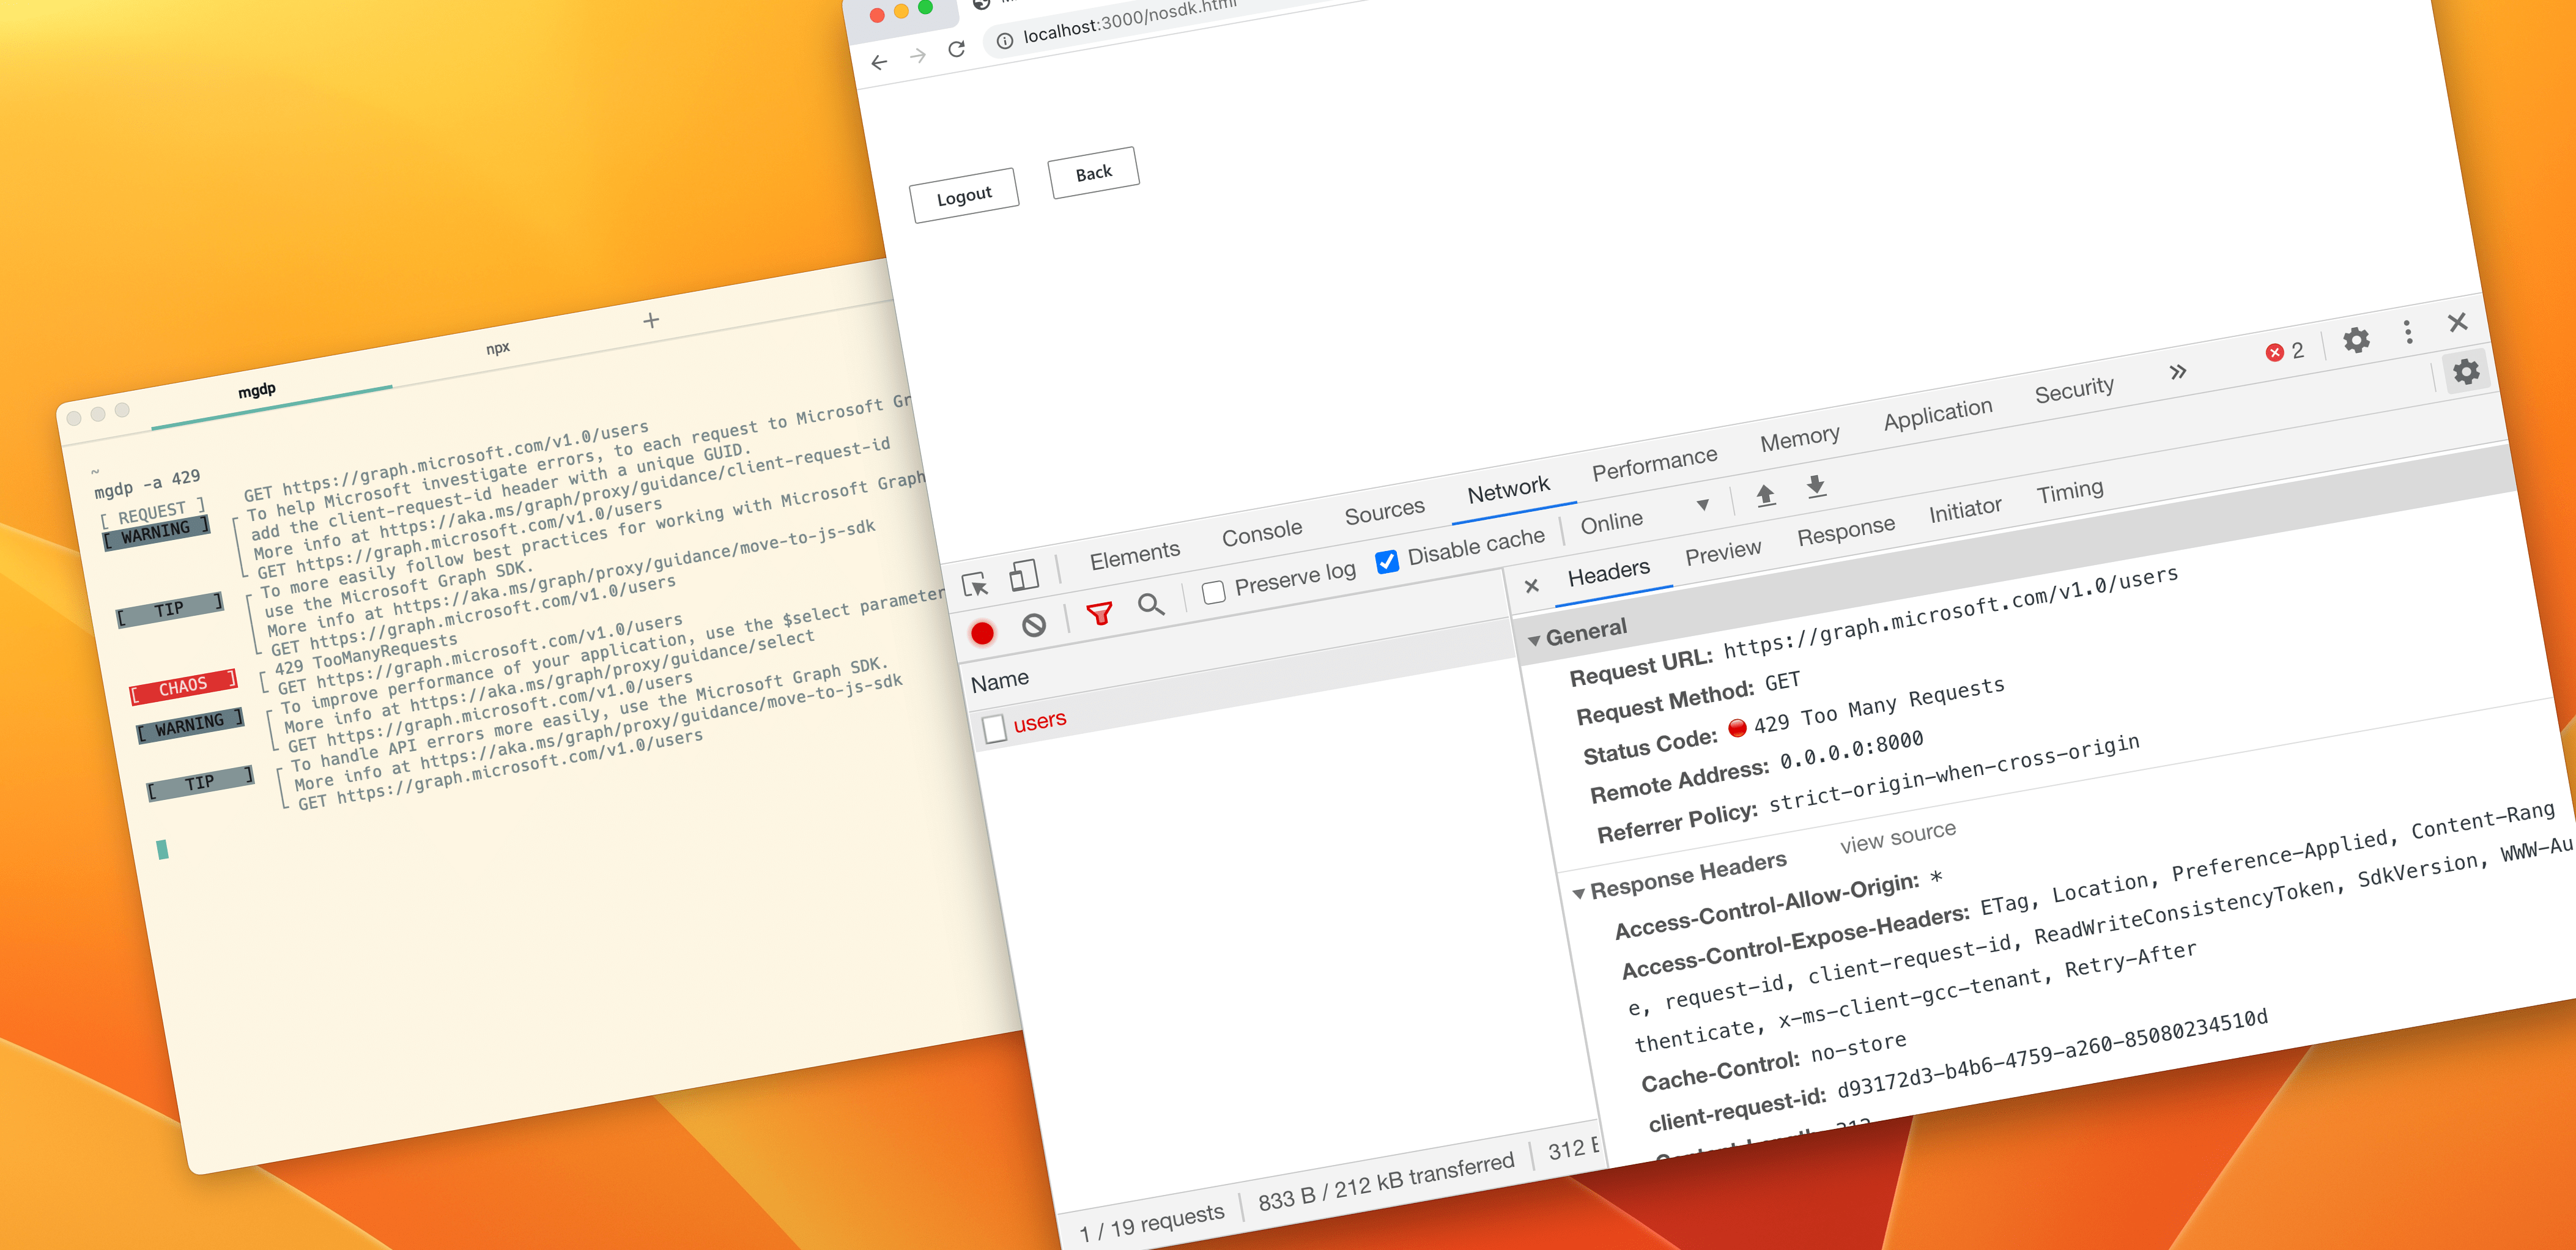
Microsoft Graph Developer Proxy - an open-source proxy from Microsoft, allows you to simulate API errors. When you start it on your developer machine, it intercepts web requests from your app and returns simulated errors. You can use the Developer Proxy for simulating simple errors and more complex behaviors like throttling on any API. And because it's a proxy, you can use it with any type of app, build on any technology stack.

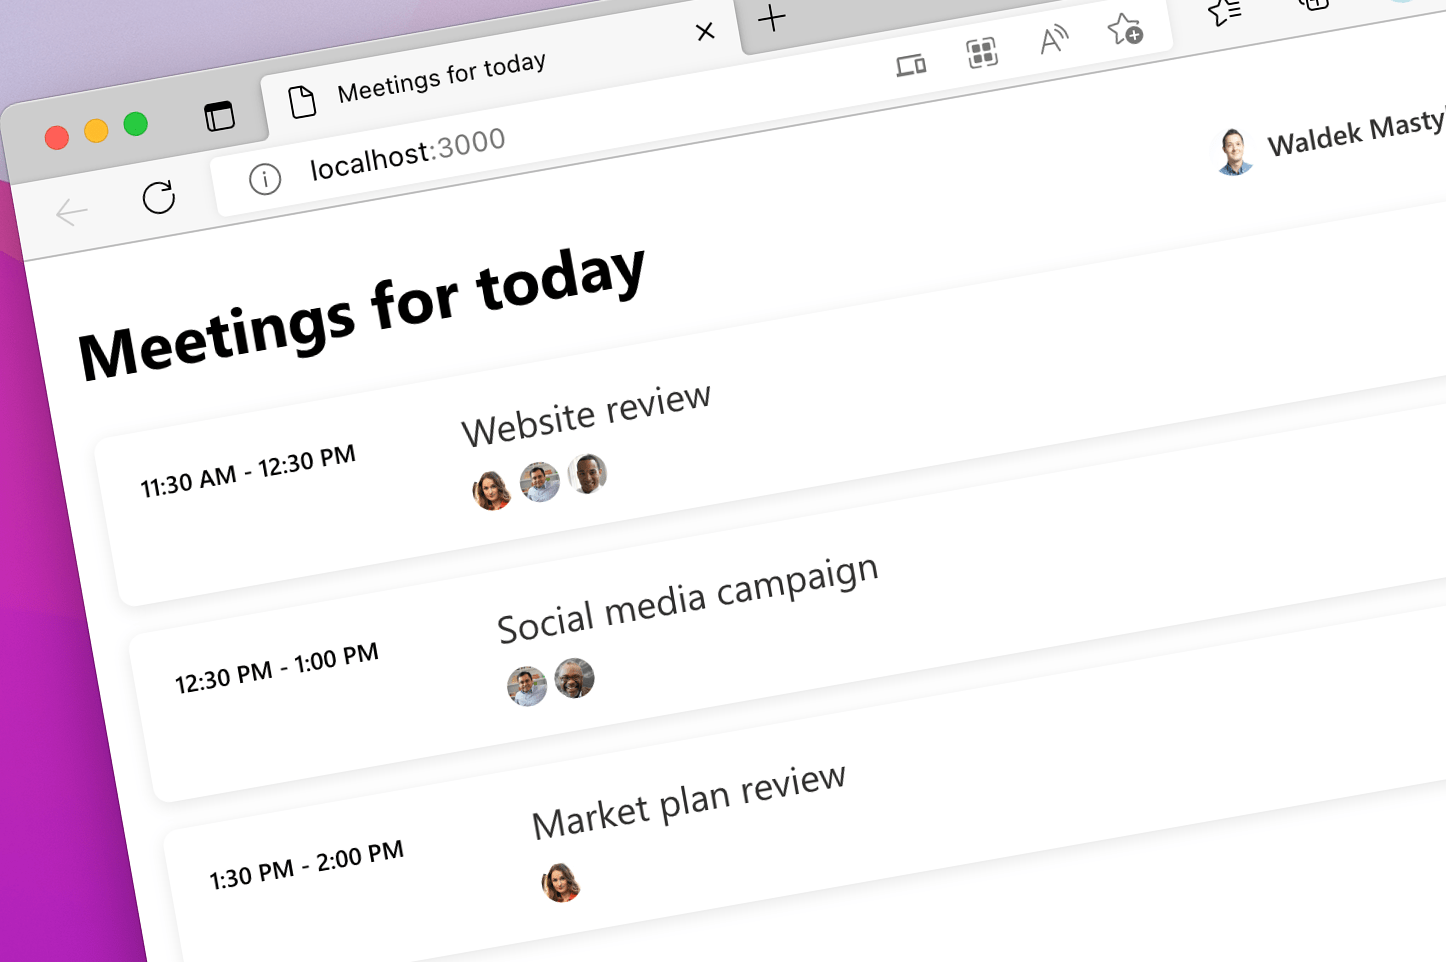
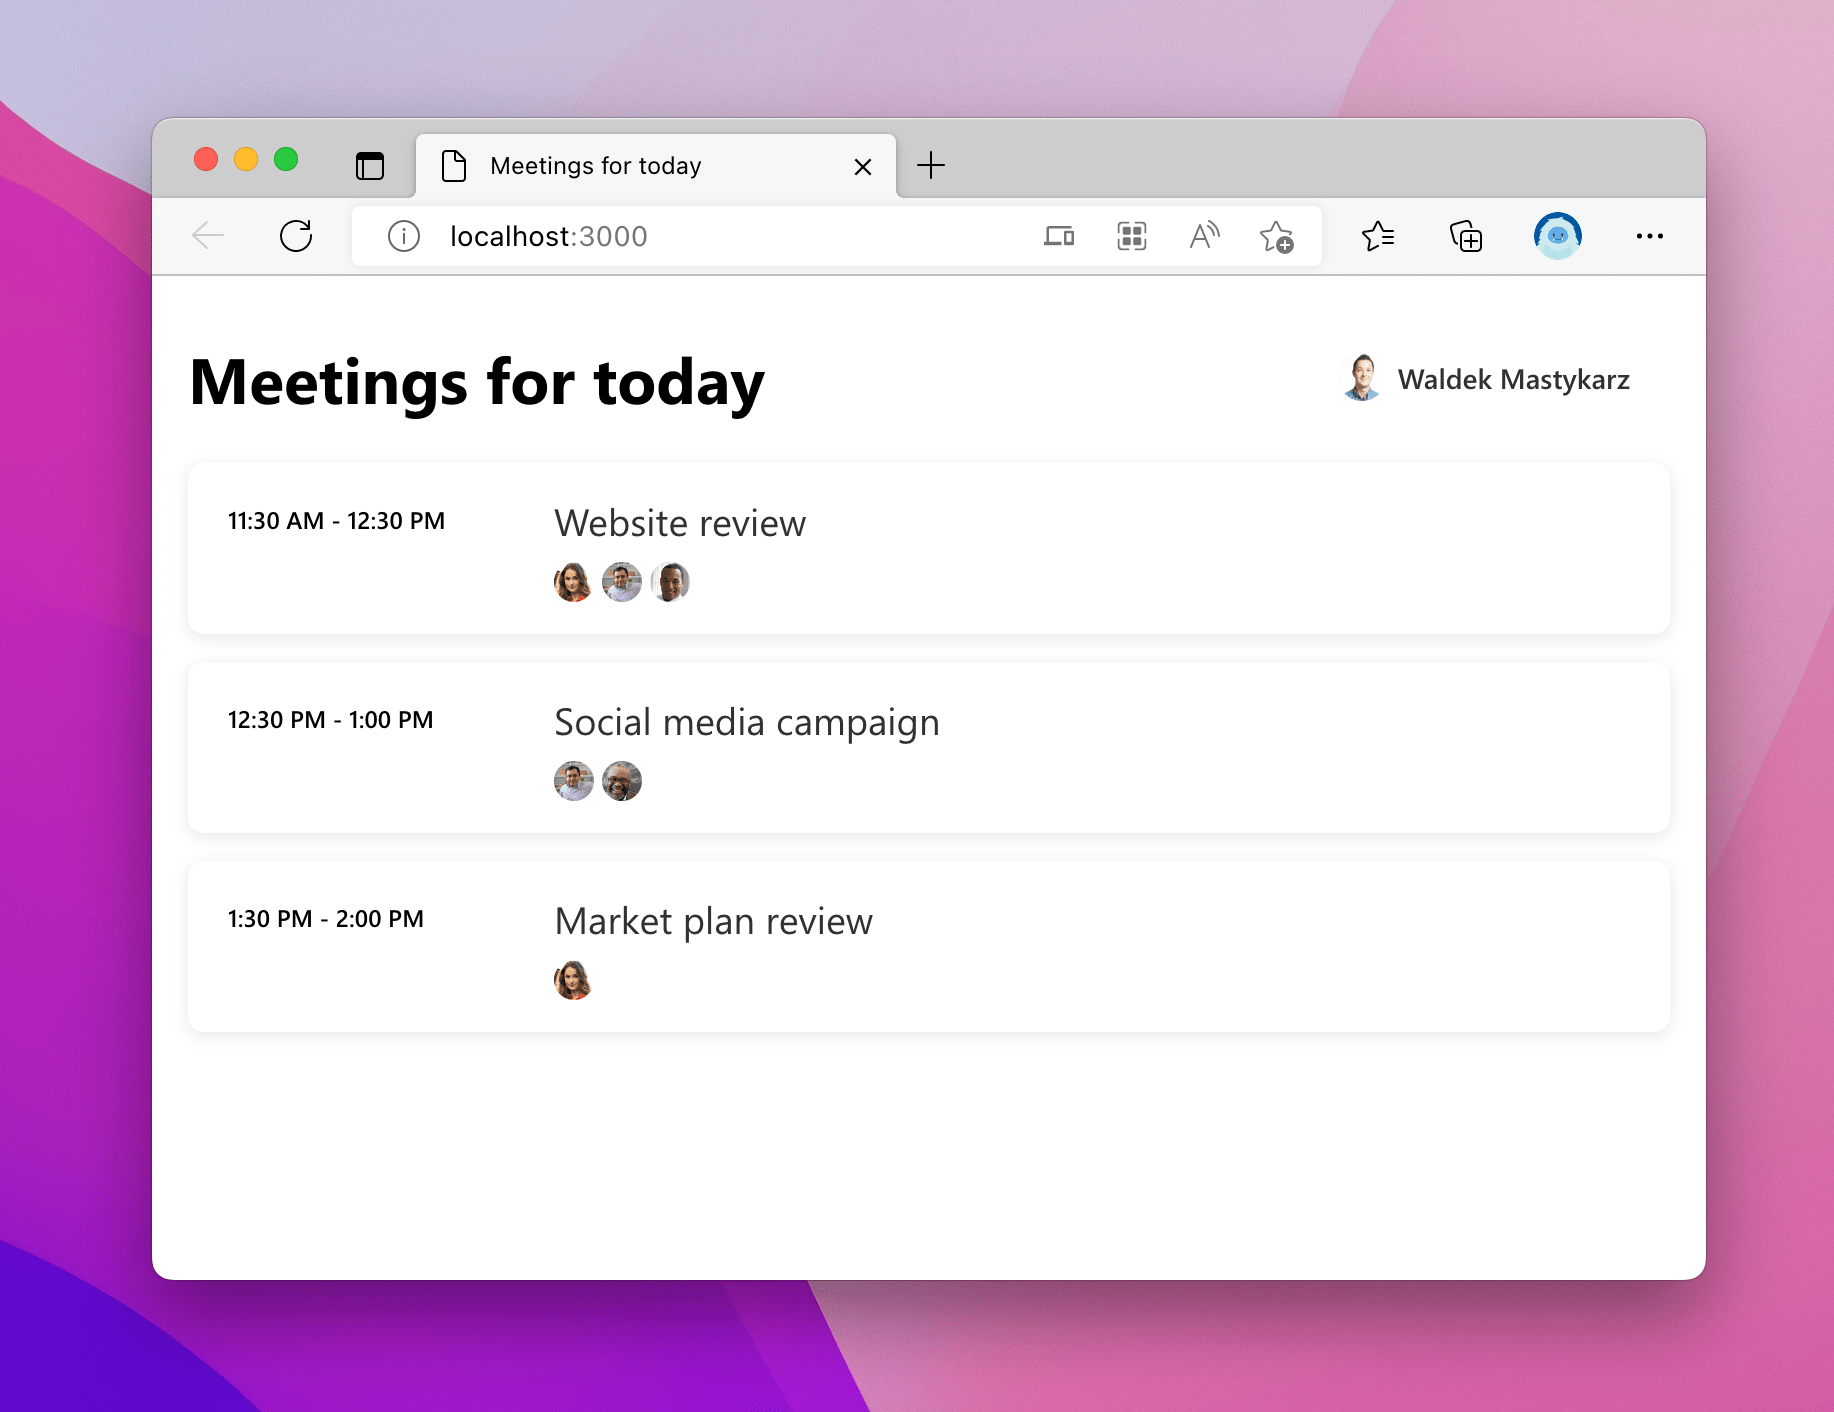
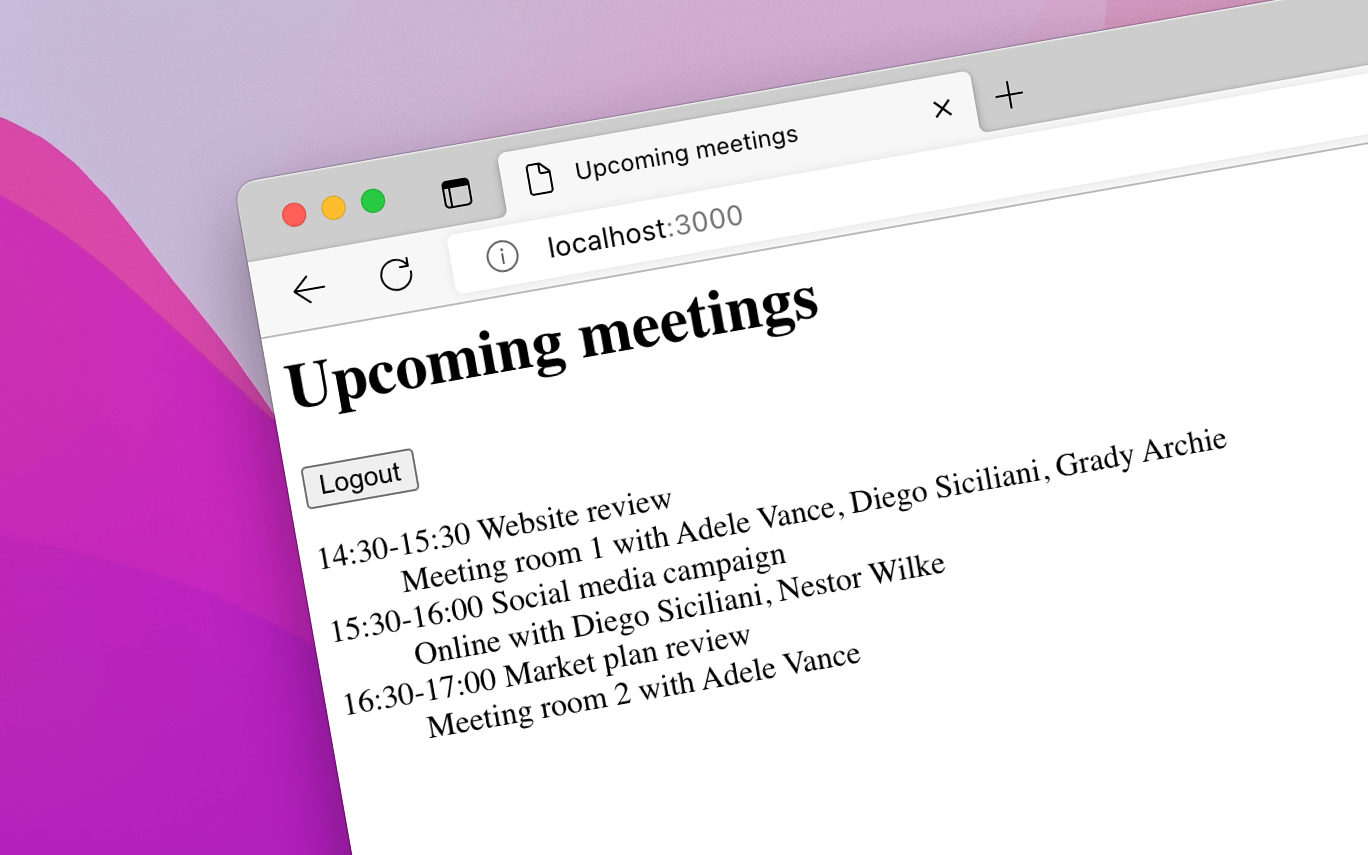
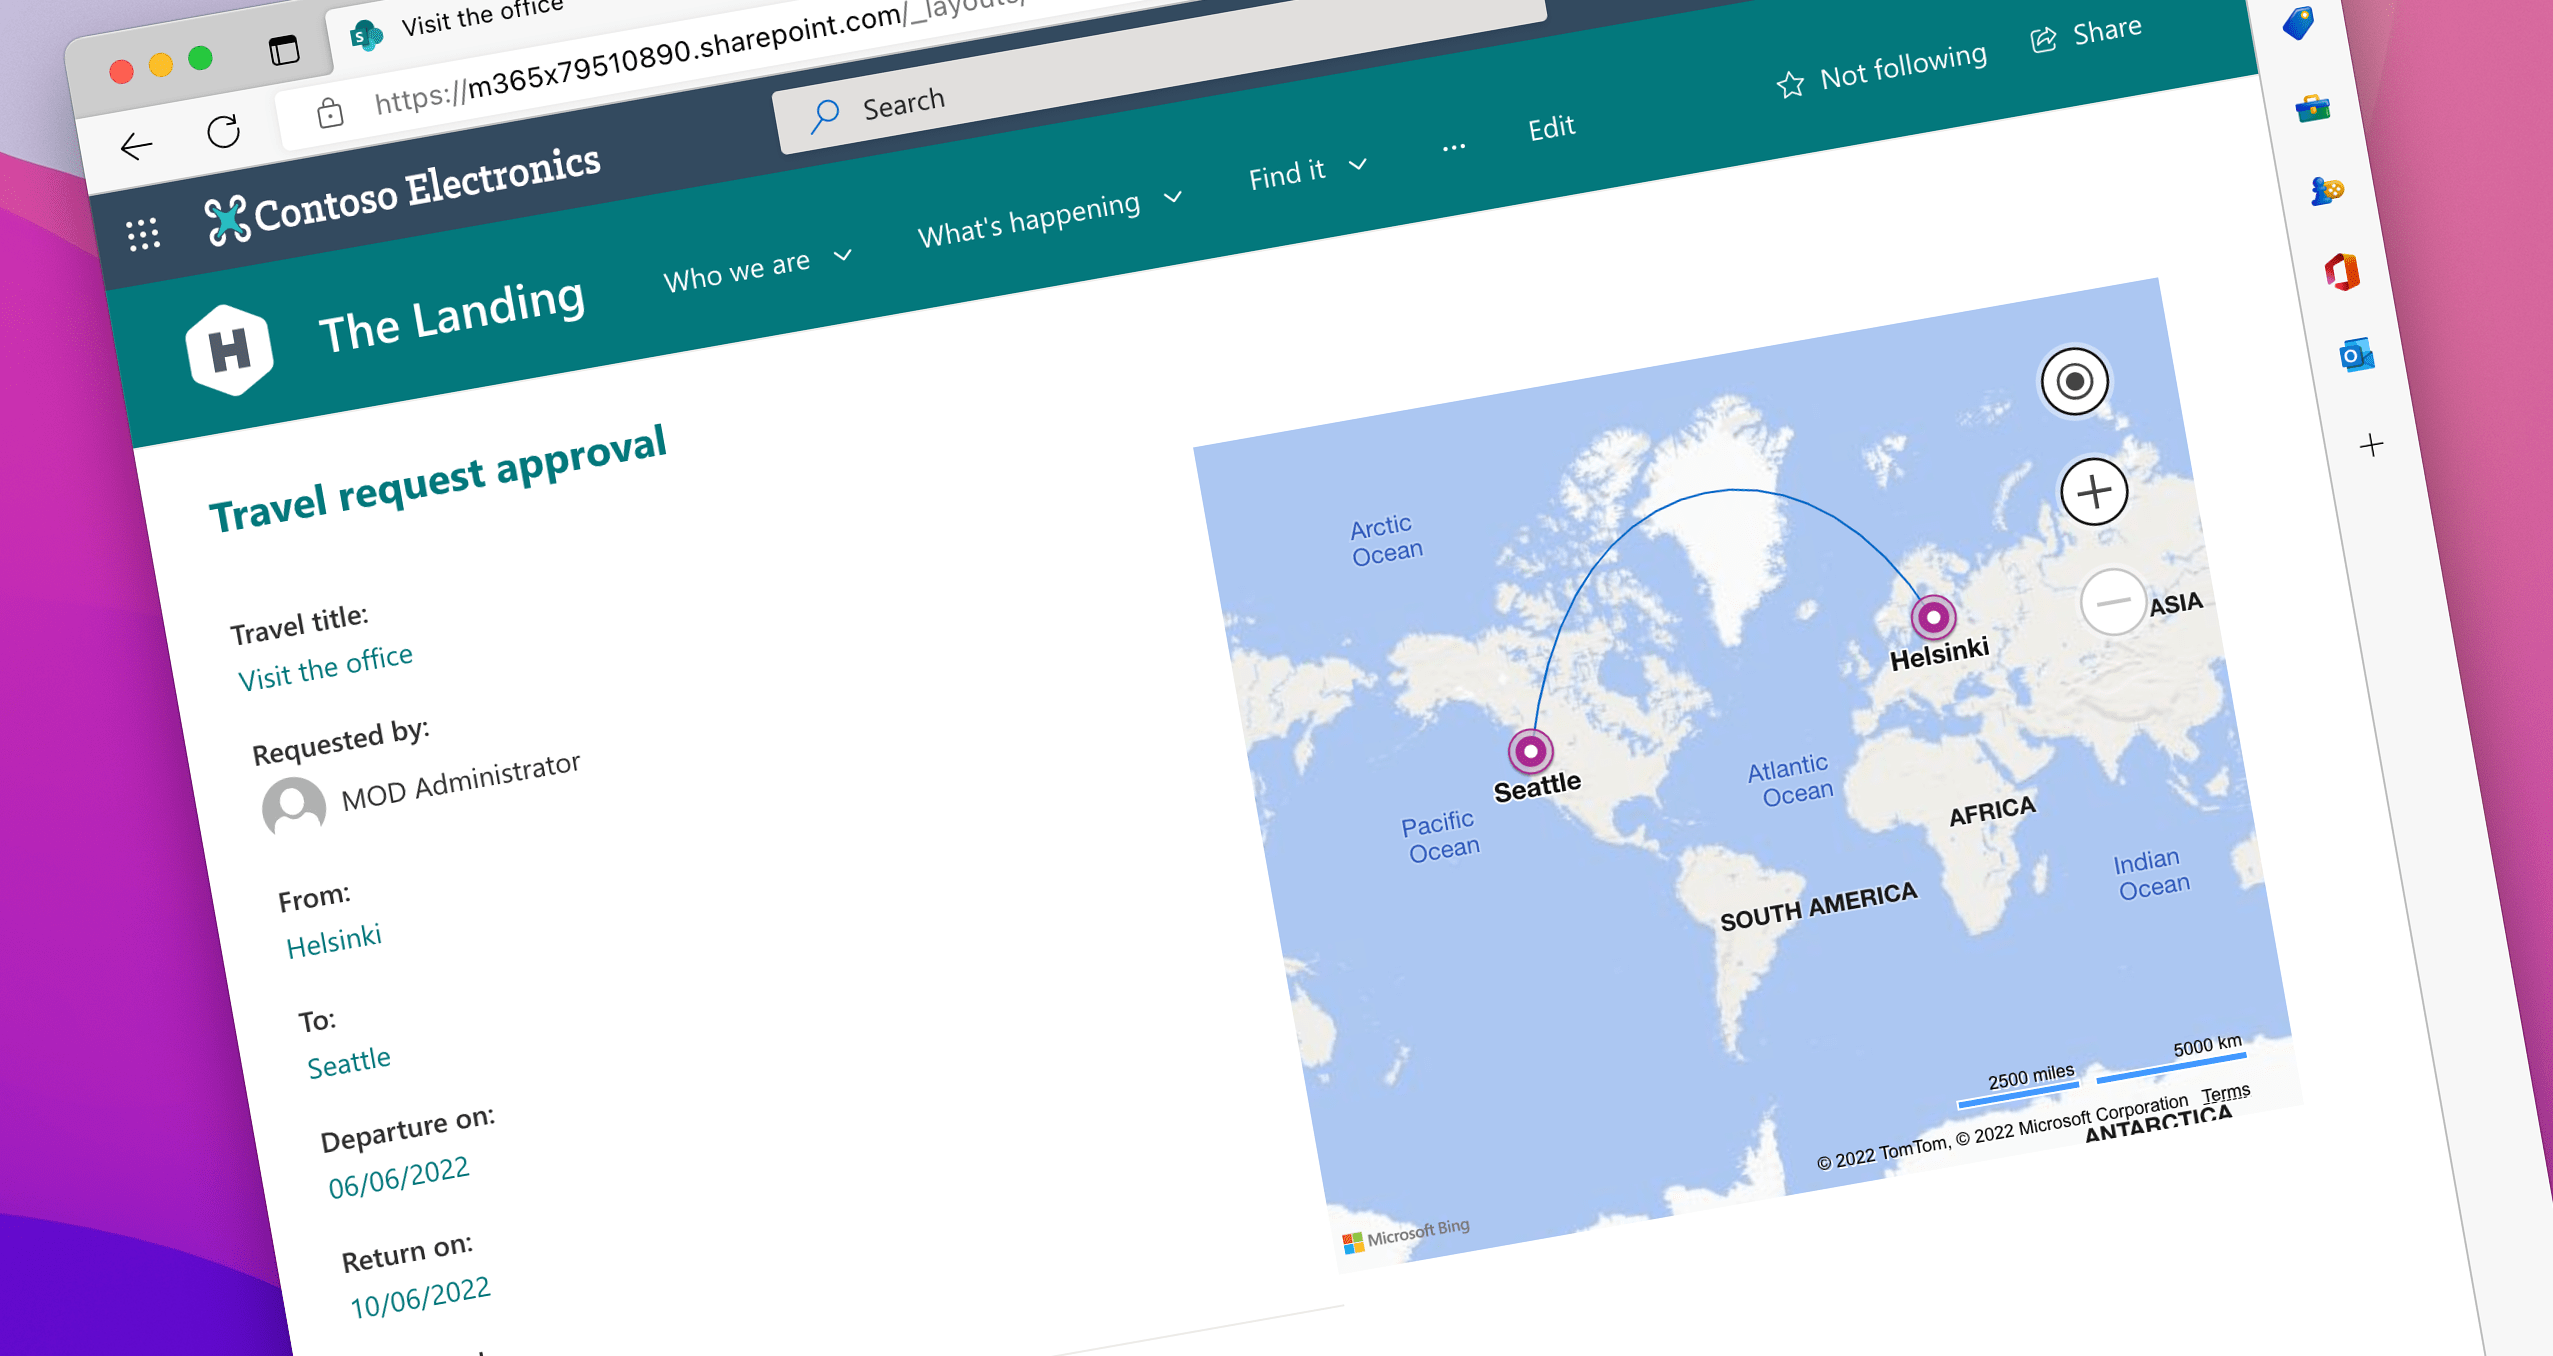
Check out this single-page app connected to Microsoft Graph that shows you information about people. At first, it seems to work just fine:

Web application showing photos and names of people

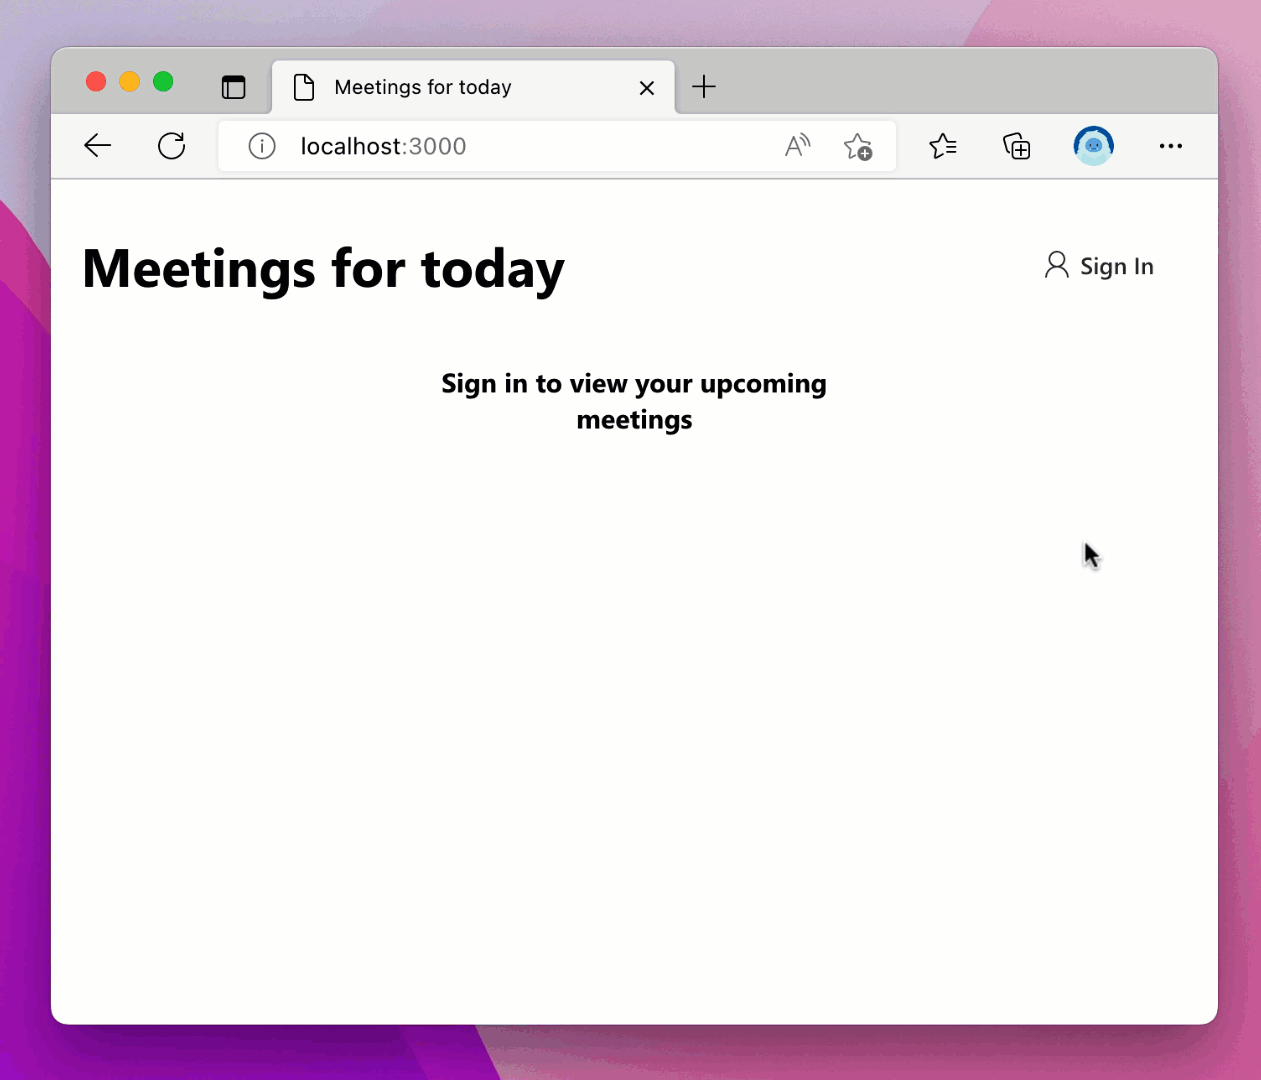
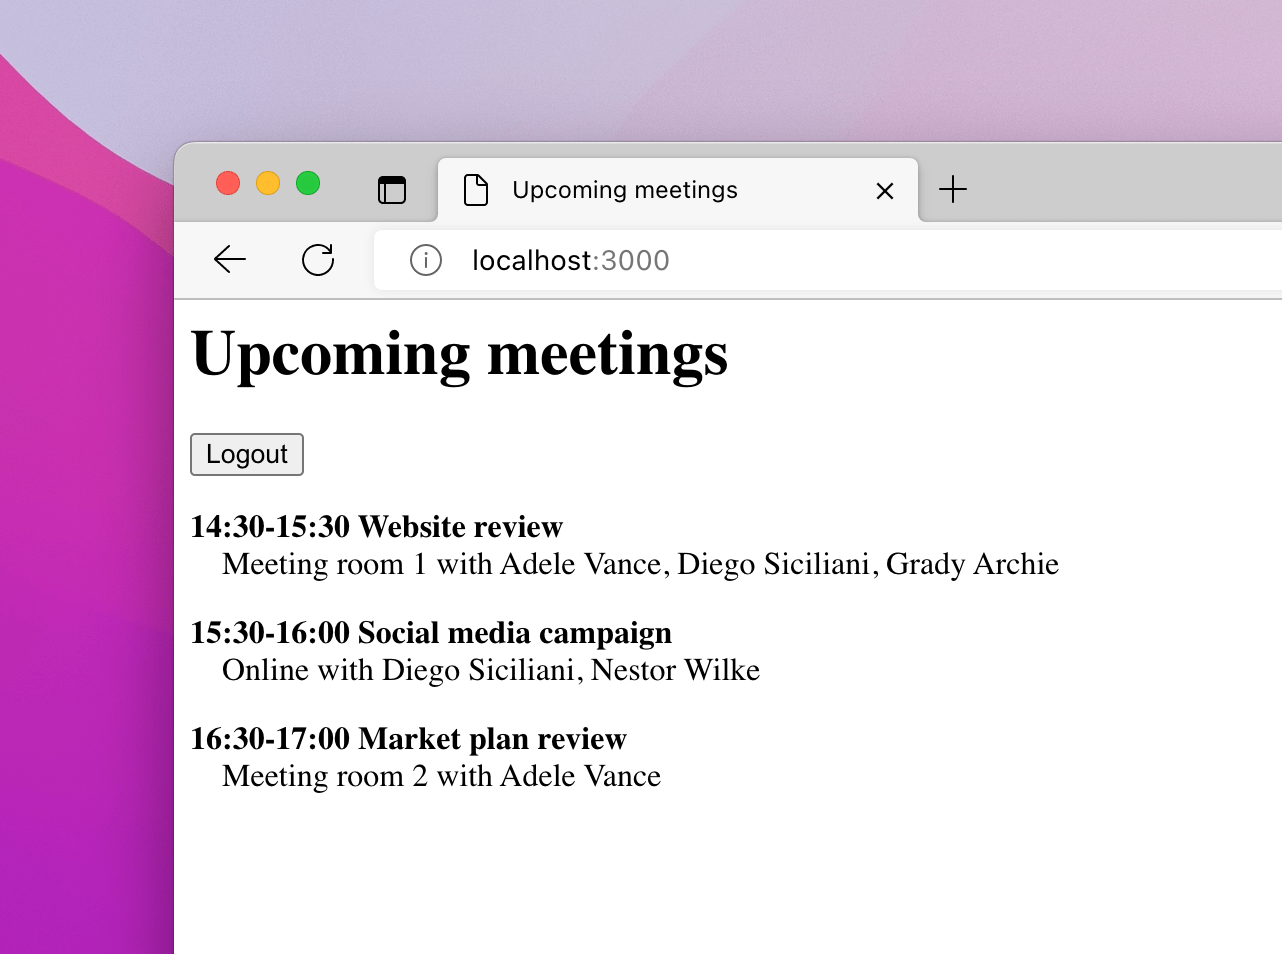
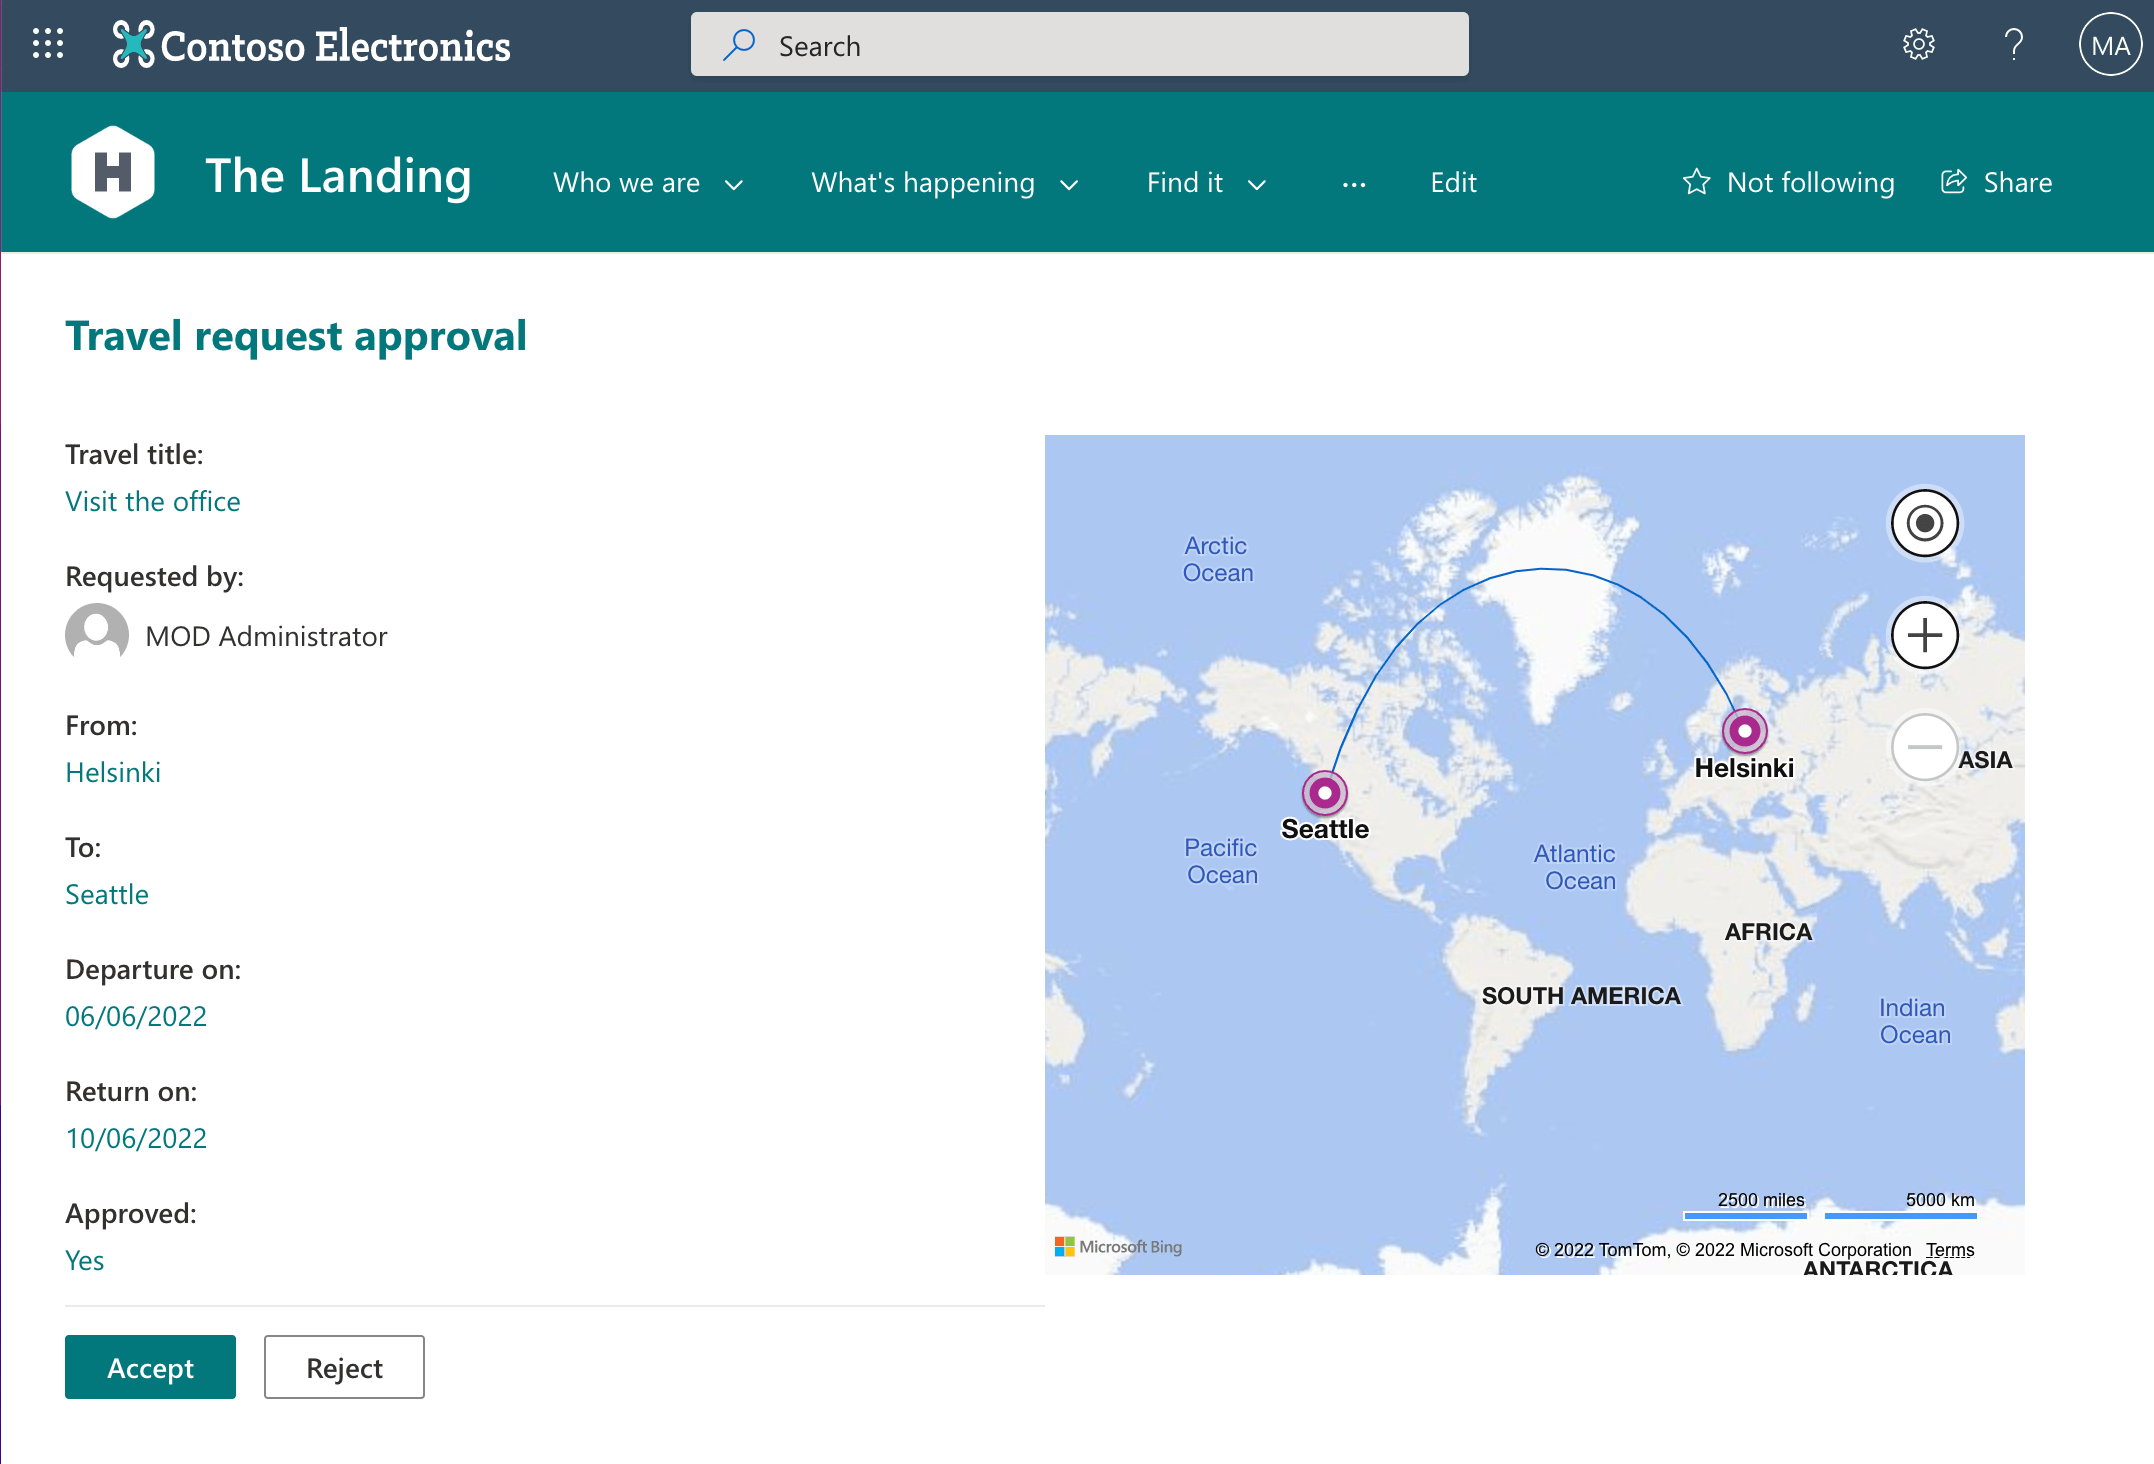
Let's see what happens, when one of the API calls would fail:

Empty page in a web browser. Next to it, a terminal window with Microsoft Graph Developer Proxy simulating API errors

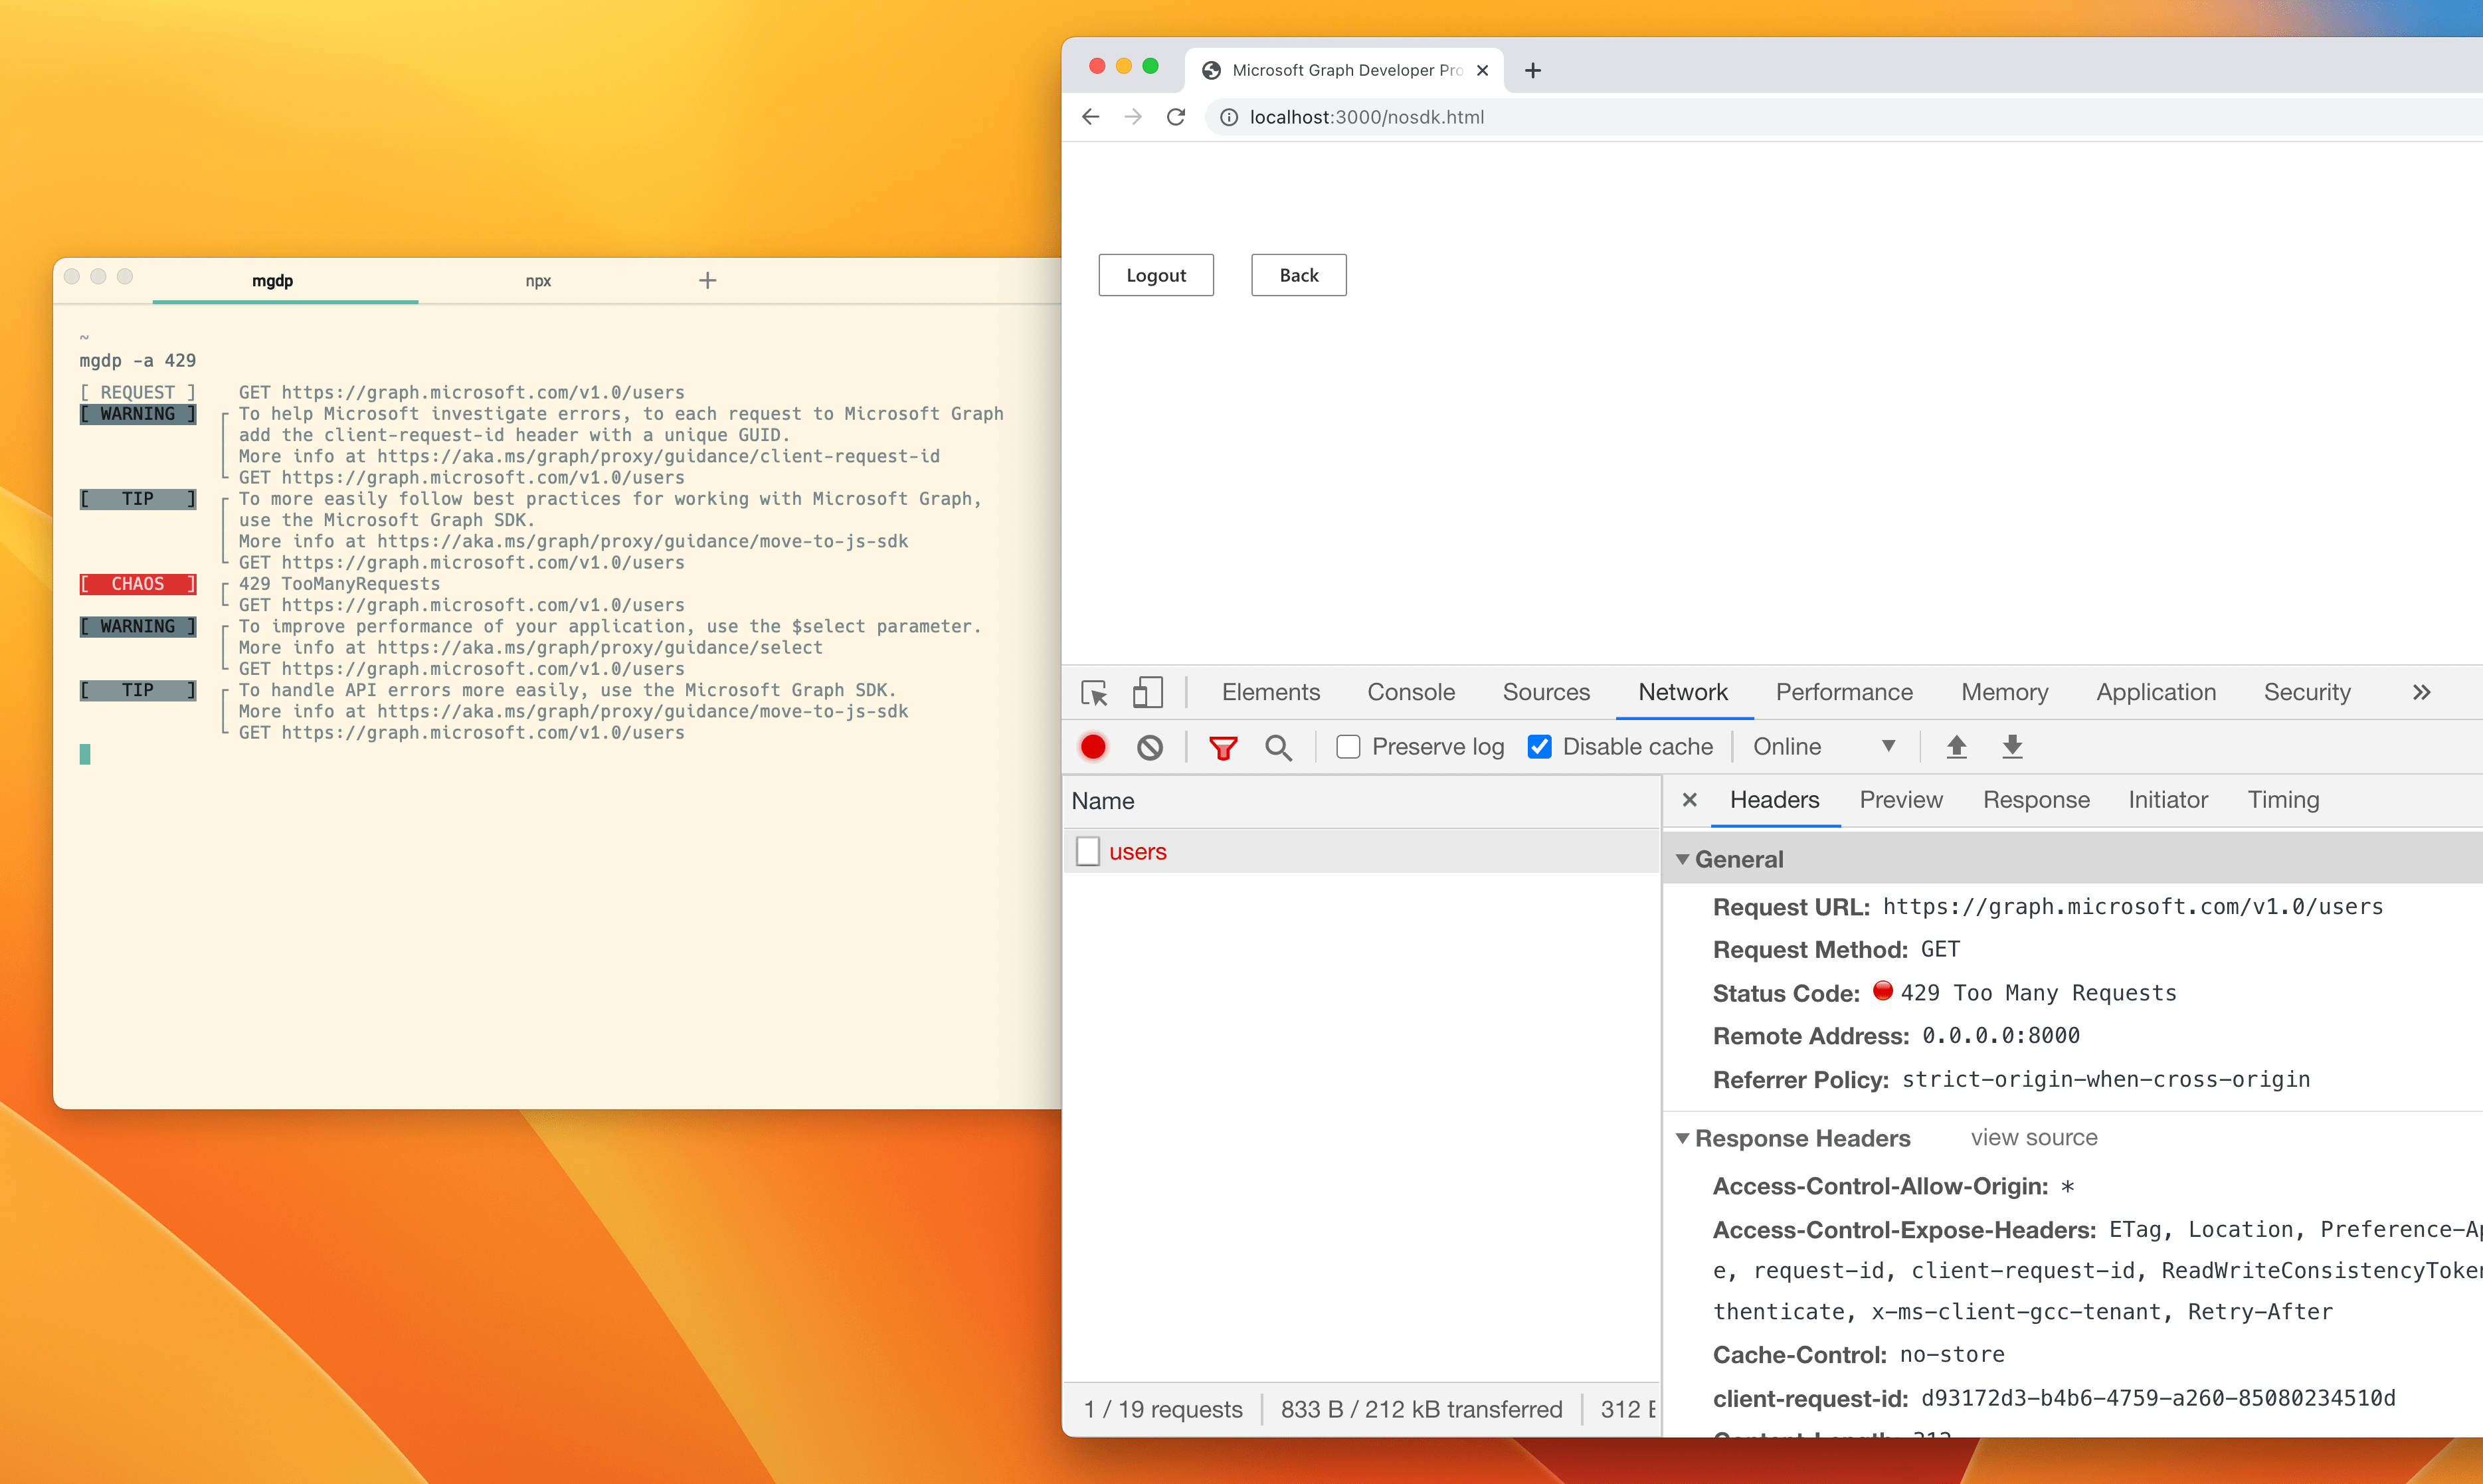
Because the developer didn't implement any error handling, as soon as an API call failed, the whole app failed leaving the user with an empty screen. And remember what we discussed: it's just a matter of time before calling an API fails, so you better be prepared for it.

See how quickly we were able to find a flaw in this app? Notice, that we didn't have to change anything about the app or stand up any testing infrastructure. All we did was start the Developer Proxy and run the app. That's it.

Using the Developer Proxy, you'll find all kinds of issues related to using APIs in your apps:

  • How does your app behave when calling an API fails? Can it handle the error gracefully or will it crash losing the user's work?
  • Is the error message that you show to the user relevant to the type of error that occurred?
  • Do you even need to show an error message to the user or can you automatically recover, for example by retrying the failed request after some time?
  • When loading data takes longer than expected, is it clear to the user that your app is still working?
  • Could you cache data to use as fallback in case calling the API fails?

These are just some examples of insights about your app that you'll get when you test it with Microsoft Graph Developer Proxy.

Building robust apps that use APIs doesn't have to be hard. Microsoft Graph Developer Proxy allows you to see for yourself how your app will behave when calling APIs that it uses fails. With Microsoft Graph Developer Proxy, you can test any kind of app, using any API. Break your app on your box, handle errors gracefully and deploy your app to production with confidence. Your customers will thank you.

Get started at https://aka.ms/graph/proxy.

✇REgarding 365 - Medium

In celebration of Women’s History Month

March is Women’s History Month, a time to reflect on, appreciate, and celebrate the contributions women have made to change and improve our lives. As a female technologist, I’m passionate about encouraging and mentoring our #WomenInTech every day. Our female technology leaders face unique challenges. We’re often outnumbered by our male counterparts and can face an uphill journey to prove ourselves. But we bring strengths to the tech workplace: communication and critical-thinking skills, diverse life perspectives, and distinctive ways of solving traditional technology challenges.

This month we’re thrilled to welcome Edith Young to Episode 92 of the Microsoft 365 Voice. Edith is an IT leader with extensive experience in the Microsoft space. She also serves as a mentor and board member for TeamWomen, an organization dedicated to helping women and girls rise together.

We had a great discussion with Edith on the importance of leadership and mentoring. Key topics discussed include:

  • Be OK being uncomfortable. How to lean into discomfort when you’re starting a new role, stretching to take on a new project, etc.
  • Find your truth-tellers. Build relationships with those that will give you an unvarnished perspective on your performance, your personal brand, etc.
  • Build partnerships. Identify the key individuals, leaders, and teams to invest in building strategic partnerships with.
  • Look for leadership inspiration. Join a mentorship circle, take a leadership class, read books on leadership to gain new perspective and ideas.
  • Lean into new opportunities (especially the scary ones). When an unexpected opportunity to stretch and grow comes your way, lean into it.

A big thank you to Edith for joining us. We hope you enjoy this episode as much as we did!

Have a Microsoft 365 question? Submit it online! Your question may be featured in a future podcast episode.

Originally published at http://blog.splibrarian.com on March 9, 2023.


In celebration of Women’s History Month was originally published in REgarding 365 on Medium, where people are continuing the conversation by highlighting and responding to this story.

✇TechGenix

Trend Micro’s Investigation into GitHub Codespaces Reveals Malware Vulnerability

An image of a combination lock on top of a laptop keyboard.
This time, a GitHub vulnerability has been identified proactively, not retroactively.
Source: Pixabay

A Trend Micro investigation revealed that the “port forwarding” feature within GitHub Codespaces could allow cybercriminals to host and deliver malware. The researchers found that it’s possible to exploit the public sharing of forward ports to create a malware server. To do this, threat actors need a legitimate GitHub account to avoid getting flagged as suspicious. However, no incident exploiting the security vulnerability has occurred in the wild so far. 

GitHub Codespaces, available since Nov. 2022, has been a popular choice among developers and large tech companies. It provides them with a container-based environment equipped with tools and dependencies for completing projects. Developers deploy Integrated Development Environment (IDE) platforms inside these virtual containers. This allows them to write, edit, and test code directly within the web browser. 

GitHub Codespaces has over 94 million developer accounts and is used by large companies such as DuoLingo and Vanta. Upon registering, each developer gets to create at least two codespace instances for free. 

GitHub Codespaces Public Port Vulnerability

A snapshot from GitHub Codespaces showing how ports can easily be set to public visibility.
Setting ports to public can drastically increase the chances of a cybercrime event.
Source: Trend Micro

While private ports forwarding requires cookies or tokens for authentication, a public port is available to just about anybody with access to the URL. According to Trend Micro’s investigation, the trouble with GitHub Codespaces is that when it allows public port forwarding via Transmission Control Protocol (TCP) for users to view and test applications, it also allows cybercriminals a means of entry

This enables threat actors to bypass suspicion from threat intelligence platforms. On GitHub Codespaces, ports are forwarded using HTTP. HTTP is less secure than HTTPS. With no malicious history showing, the malware flies under the radar. In Trend Micro’s simulated attack, researchers forwarded the port 8000 using forwardPorts property. Then, they ran a Python-based HTTP server on each successful container startup using the postStartCommand property. 

Consequently, the researchers demonstrated how a cybercriminal could run a Python web server, upload malicious scripts to Codespace, and open a public web server port. After that, they used the URL to distribute malware to end users. Throughout the process, GitHub Codespaces didn’t start any authentication procedures.

This process is similar to how cybercriminals distribute malware on other reputable services, such as Microsoft Azure, Google Cloud, and Amazon AWS.

Using Dev Containers to Enhance Efficiency

An image of a diagram denoting how cybercriminals would upload malware to GitHub Codespaces.
Threat actors used the efficiency of GitHub Codespaces to further their own aims.
Source: Trend Micro

Since dev containers within GitHub have all the tools and dependencies used in projects, developers have come to rely on them for rapid deployment. But, at the same time, the same dev containers also help cybercriminals create a malicious web server on GitHub Codespaces within minutes, with zero checks. 

“Using such scripts, attackers can easily abuse GitHub Codespaces in serving malicious content at a rapid rate by exposing ports publicly on their codespace environments. Since each created codespace has a unique identifier, the subdomain associated is also unique. This gives the attacker enough ground to create different instances of open directories,” read the Trend Micro report. 

Usually, the platform deletes codespaces within 30 days, allowing threat actors a month to use a URL. While this particular security vulnerability hasn’t been exploited yet, cybercriminals will waste no time once they’ve figured it out. Their predilection for exploiting free services, such as Dropbox, GitHub, Azure, OneDrive, and more, is well-known and documented. Sadly, these vulnerabilities expose unsuspecting users to the possibility of downloading malware from these platforms. 

GitHub Under Fire

A snapshot from the official GitHub Codespaces website with a black background.
It’s easy to start coding instantly with GitHub Codespaces. It’s easy for cybercriminals to do the same.
Source: GitHub Codespaces

In recent years, GitHub has dealt with a spate of cybercrimes directed toward it. Part of this is due to its growing size and popularity, making it an attractive target for cybercriminals. In response, GitHub is upgrading its security features to deal with these threats. The latest among these actions is GitHub’s step in making 2FA and free secret scanning mandatory for all users. 

As companies unwarily leave access to their code open to the public on GitHub, they’ve been left reeling from the fallout. For instance, Toyota left a publicly available access key on GitHub for 5 years. They later regretted it when cybercriminals compromised the personal information of 296,000 of its customers. 

Similarly, in January 2021, Nissan North America experienced a breach where cybercriminals exposed 20 GB of sensitive information. The security breach occurred due to default access credentials on a Git server (Git is not the same as GitHub, but has similar features). Moreover, in December 2022, Okta authentication provider was targeted via GitHub repositories — but these were private, not public, repositories. 

Business owners who manage software teams must secure the environment where developers contribute code. Preferably, They can do this with some form of multi-factor authentication (MFA) for all commits to restrict access. In addition, businesses must set ports to private — a practice that will reduce the variety of possible attack vectors. These are simple solutions that work like a charm against many lethal threats. Leaving an open public port is a rookie mistake, but it’s often the obvious cause of serious compromises. 

Software Development Environments Need to Step Up

The lesson here is that user authentication should be paramount. It’ll help avoid the consequences emanating from a leak at the top of the software supply chain that can cascade to users and organizations all the way down the line. 

Even though cookies and tokens can make it harder for cybercriminals to breach such spaces, multi-factor authentication (MFA) vastly increases web security. This shows why businesses should take pains in implementing additional security protocols. Ultimately, passkeys will have to replace clunky passwords and MFA in the software world. Nothing at the moment is as important as this shift in the industry, which can finally stem the tide of cybercrime. 

The post Trend Micro’s Investigation into GitHub Codespaces Reveals Malware Vulnerability appeared first on TechGenix.

✇MS Technology Talk

Add Multiple control in SPFX Web Part Property Pane

Developing custom components require technical skills but to make it reusable, one need to add configurations to it and this might require a few lines of extra code but will make the component leverage to do customizations on the fly instead of redeploying the component again and again and can be used as a reusable component

Today I will share the scripts to add different type of controls in an SPFx web part which could help to perform different actions and configurations in your web part. I will be using SPFX and PnP property pane controls. For PnP controls, you need to install PnP control module to your solution.

Today I will be sharing Below components to the Property Control

  • Text Field – PropertyPaneTextField
  • SharePoint List Picker Control – PropertyFieldListPicker
  • Date Field – PropertyFieldDateTimePicker
  • Number Field – PropertyFieldNumber
  • Dropdown – PropertyPaneDropdown
  • Checkbox – PropertyPaneCheckbox
  • Color picker – PropertyFieldSwatchColorPicker

Text Field – PropertyPaneTextField Control

This is the most simple control which you can see when you create a new spfx web part, a default Text field control is added to the property Pane.

Import Section

import {
  IPropertyPaneConfiguration,
  PropertyPaneTextField
} from '@microsoft/sp-property-pane';

Declare property in Export interface

export interface ISpfxDemoWebPartProps {
  title: string;  
}

Code Snippet

 PropertyPaneTextField('title', {
                  label: "Enter Title"
                
})

SharePoint List Picker Control – PropertyFieldListPicker Control

This control shows all the SharePoint list and libraries under current SharePoint site

Import Section

import { PropertyFieldListPicker, PropertyFieldListPickerOrderBy } from '@pnp/spfx-property-controls/lib/PropertyFieldListPicker';

Declare property in Export interface

export interface ISpfxDemoWebPartProps {
  listId?: string;
}

Code Snippet

PropertyFieldListPicker('listId', {
                  label: 'Select List',
                  selectedList: this.properties.listId,
                  orderBy: PropertyFieldListPickerOrderBy.Title,
                  includeHidden: false,
                  onPropertyChange: this.onPropertyPaneFieldChanged.bind(this),
                  properties: this.properties,
                  context: this.context,
                  deferredValidationTime: 0,
                  key: 'listId'
                })

Date Field – PropertyFieldDateTimePicker Control

This control will help you to select the Date and time.

Import Section

import { PropertyFieldDateTimePicker, DateConvention, TimeConvention, IDateTimeFieldValue } from '@pnp/spfx-property-controls/lib/PropertyFieldDateTimePicker';

Declare property in Export interface

export interface ISpfxDemoWebPartProps {
   defaultDate?: IDateTimeFieldValue;
 }

Code Snippet

PropertyFieldDateTimePicker('defaultDate', {
                  label: 'Default Date',
                  initialDate: this.properties.defaultDate,
                  dateConvention: DateConvention.Date,
                  onPropertyChange: this.onPropertyPaneFieldChanged,
                  properties: this.properties,
                  deferredValidationTime: 0,
                  key: 'defaultDate'
                })

Number Field – PropertyFieldNumber Control

This control allows you to select a numeric value from property pane. You can also set min and max value for the control.

Import Section

import { PropertyFieldNumber } from '@pnp/spfx-property-controls/lib/PropertyFieldNumber';

Declare property in Export interface

export interface ISpfxDemoWebPartProps {
  repeatValue?: number;
}

Code Snippet

PropertyFieldNumber("repeatValue", {
                  key: "repeatValue",
                  label: "Select Repeat Value",
                  description: "Number field ",
                  value: this.properties.repeatValue,
                  maxValue: 10,
                  minValue: 1,
                  disabled: false                  
                })

Dropdown – PropertyPaneDropdown Control

The control is used to select a value from a choice of list, you can add custom values to it as I am using it for language selection.

Import Section

import { PropertyPaneDropdown } from '@microsoft/sp-property-pane';

Declare property in Export interface

export interface ISpfxDemoWebPartProps {
  language?: string;
}

Code Snippet

PropertyPaneDropdown('language', {
                  label: "Select Language",
                  options: [
                    { key: 'Eng', text:'English'},
                    { key: 'Ur', text:'Urdu'},
                    { key: 'Ar', text:'Arabic'}
                  ]
                })

Checkbox – PropertyPaneCheckbox Control

This control is available with sp-property-pane module. It is used to show a checkbox on the control which could be use for multiple reasons. I used it for enabling logs in my solution.

Import Section

import { PropertyPaneCheckbox } from '@microsoft/sp-property-pane';

Declare property in Export interface

export interface ISpfxDemoWebPartProps {
  showlogs?: string;
}

Code Snippet

PropertyPaneCheckbox('showlogs',{  
                  checked:false,  
                  disabled:false,  
                  text: 'Show log'  
                })

Color picker – PropertyFieldSwatchColorPicker Control

This control allows you to pick a color and you can define a list of color to be available for selection.

Import Section

import { PropertyFieldSwatchColorPicker, PropertyFieldSwatchColorPickerStyle } from '@pnp/spfx-property-controls/lib/PropertyFieldSwatchColorPicker';

Declare property in Export interface

export interface ISpfxDemoWebPartProps {
  bgColor: string;
}

Code Snippet

PropertyFieldSwatchColorPicker('bgColor', {
                  label: 'Select Background Color',
                  selectedColor: this.properties.bgColor,
                  onPropertyChange: this.onPropertyPaneFieldChanged,
                  properties: this.properties,
                  colors: [
                    { color: '#ffb900', label: 'Default Yellow' },
                    { color: '#fff100', label: 'Light Yellow' },
                    { color: '#d83b01', label: 'Orange'},
                    { color: '#e81123', label: 'Red' },
                    { color: '#a80000', label: 'Dark Red'},
                    { color: '#5c005c', label: 'Dark Magenta' },
                    { color: '#e3008c', label: 'Light Magenta'},
                    { color: '#5c2d91', label: 'Purple'},
                    { color: '#0078d4', label: 'Blue'},
                    { color: '#00bcf2', label: 'Light Blue' },
                    { color: '#008272', label: 'Teal'},
                    { color: '#107c10', label: 'Green'},
                    { color: '#bad80a', label: 'Light Green' },
                    { color: '#eaeaea'},
                    { color: 'black', label: 'Black'},
                    { color: '#333333', label: 'Neutral'},
                    { color: 'rgba(102, 102, 102, 0.5)', label: 'Half Gray' }
                  ],
                  key: 'bgColor'
                })

The post Add Multiple control in SPFX Web Part Property Pane appeared first on MS Technology Talk.

✇ITProMentor

Selling the Digital Transformation Journey: Security & Compliance

When I talk to customers about their Digital Transformation Journey, I always like to give them the “10,000 foot view” so to speak. I suggest that we explore two different angles or “big pictures”  in order to paint an image that customers can then imagine themselves into. The first picture is Security & Compliance, and the second is Productivity & The Modern Workplace. Let’s start by examining the first.

With regard to Security & Compliance, we have to set the stage a bit: why should customers care about this stuff? After all, cybersecurity initiatives typically struggle to get funding and other traction, especially in the small and mid-sized business where resources are more scarce to begin with.

The structure of your pitch

You will often see security vendors at conferences begin their presentations with scary statistics about how many breaches occur each year, and how the cost of an average breach has been steadily increasing year-over-year; I find this type of information to have a very limited effect on people. If something like that is going to be your angle, it is far more effective to relate real-life stories, and the “closer to home” each story hits, the better (yet some orgs will refuse to act until it is their own home which is hit, and they become one of those stories you end up telling to others).

But selling customers on the importance of security & compliance should not be based on scare tactics, anyway. You also have to paint a picture of value. Give them a preview of what it looks like to live in the new world you want to guide them into. Remember that all changes are going to be met with some resistance (this is only natural), yet these changes are ones that must take place sooner or later. Plus, you can highlight new features such as Sensitivity labels, which grant users new superpowers they’ve never had before. In general, it is much more difficult to prod people from behind into the darkness than it is to coax them into the light, leading from the front. In other words, carrots are better than sticks.

The corollary in this message which you must communicate explicitly is that you have already walked this path yourself, and you have no regrets about doing so. You will also take them down this path, and it will go just as smoothly, or even better, since you already know the pitfalls and dangers that lie along the way. As you paint this canvas, also be sure to highlight how the new tools or capabilities would have prevented or mitigated the problems you shared earlier in your anecdotal stories.

In addition to sharing relatable anecdotes and painting the preview or picture I want them to inhabit, I normally make it very clear that this past decade has seen such a radical shift in the cyber landscape, that I can no longer afford to waste my time with customers who will not take this journey seriously. If they cannot even be bothered to implement a basic level of cyber hygiene such as CIS Implementation Group 1, then they are essentially begging to be compromised, and simply I cannot give my precious attention to folks who will not even address the most essential of risks, and therefore any further engagement is off the table. This is also why I suggest beginning your new engagements from Security & Compliance rather than Productivity & The Modern Workplace.

Let me be clear: this might mean you have to fire some existing customers, even long-standing ones. But that’s okay: you are going to replace them with better ones (the ones who will actually listen to you and trust your recommendations). Notice this is different from either a stick or a carrot. It is more like a “filter” or disqualifier.  Holding up this barrier is only fair to them, and enormously helpful for you, plus it sends a very strong message (it projects confidence in your own practice).

So let’s review: you should plan your Security & Compliance pitch using these key components:

  1. Relatable anecdotes from the wild (and the closer to home the better)
  2. A preview or “picture” of where your customer is heading and the new capabilities you will bring to them
  3. An ultimatum / disqualifier

So what does good look like?

Once you have a prospect’s attention, you will need a simple and engaging way to explain your Security & Compliance offering to them. If you are primarily selling solutions built on top of Microsoft 365, as I am, then I suggest leveraging the concepts, marketing and language that Microsoft themselves have already produced. For example you will see them speak and write frequently about “Zero Trust,” and what that phrase means to them.

They have also published some detailed documentation such as the Zero Trust Deployment Plan, which is targeted for Enterprise (read: E5) customers. You can simplify this for SMB a bit further, as I have done here:

Follow our simple 3-tiered approach to Zero Trust

There is no need to reinvent the wheel (that’s what Microsoft’s materials are there for). Plus, if a customer decides to “spot check” your pitch, they would find solid validation with a quick Google search.

Aren’t Security and Compliance different things? Why not two offerings?

You can sell separate offerings if you want to, sure. Remember that a “compliant” environment is not necessarily a secure one. On the other hand, the items that are generally called for in a high-regulation, compliance-intensive scenario most often exist because of concerns around data security. For this reason, I always suggest that you approach your engagements from a “Security-First” mindset. When you build a good, secure foundation, you will very often find that compliance is a breeze thereafter, and this is because most compliance requirements will map back to common cybersecurity frameworks such as NIST anyway.

And yes, I am aware that in some cases “compliance requirements” actually contradict the latest cybersecurity guidance. The most common example I see thrown around is password complexity & rotation requirements, which are moot after the implementation of a good Zero Trust baseline including Multi-Factor Authentication and other identity protection systems. Look, I have gotten into with auditors before: I have found that the spirit behind the law is more important than meeting the letter of the law itself. So with regard to this particular example, the point is not to put people through the discomfort of changing passwords every 90 days, the point is to protect them from credential theft and identity compromise. We have better, more sophisticated ways of doing that now which are more comfortable, so why would we go backwards? I have fought this battle and won on more than one occasion (so that we could end password rotations), and I won because I supported my claims with reputable references.

Anyway, my original point is that you can splinter off a cybersecurity essentials baseline offering, and then have “compliance” add-ons for helping organizations meet more specific requirements such as PCI, HIPAA, GDPR, etc. as needed. Some service providers will specialize around a particular vertical, and get to know their requirements really well, and then just focus on those (then a single, flat-rate Security & Compliance offering makes a lot of sense). How you bundle this stuff and sell it to your customers is largely up to you. I would not say there is just one right answer here.

Conclusion

Once your customer has committed to the Security & Compliance journey, then you are off to a very good relationship indeed. From here, you can begin to explore the next big picture, which is improving productivity and modernizing outdated, tired business practices. This will require a new change of frame, so to speak, and another pitch. But this second journey is going to be taking place against a more secure background than what you had before (this actually makes life easier and less stressful for both you and your customer). Without the first journey, you could jeopardize all of your subsequent efforts in the second: the modern workplace transformation should be undergirded by that Security-first foundation.

If you enjoyed this blog post and would like to see more content like it, which goes into greater detail and gives you an opportunity to work with myself and other peers who are implementing these solutions for customers, I would suggest you check out our SquareOne Practice Development Group.

After you get your customers onboarded to your “Security-First” services, the next step is helping them to complete their digital transformation and maximize the value they invested into the modern workplace. But that is a topic for another day.

The post Selling the Digital Transformation Journey: Security & Compliance appeared first on ITProMentor.

✇Waldek Mastykarz

#66 Will your app fail when throttled?

#66 Will your app fail when throttled?

On a tenant of one, your app never fails. Calling Microsoft Graph and other APIs on Microsoft 365 just works. But when it gets used at scale in production, only then you get to see if you built it correctly.

When you build a great application, and it gets widely adopted, it's used a lot. Depending on the size of your organization, your app might be used by hundreds or thousands of simultaneous users, issuing even more requests to Microsoft Graph and other APIs. Microsoft Graph can handle a lot, but even it has its limits, and when you reach them, by calling Graph APIs too often, instead of a response with data, you'll get errors like 429 Too Many Requests. You're throttled.

Throttling is temporary. It's a mechanism to help servers resume regular service operation. By instructing clients to back off for a bit, servers hosting cloud APIs get a chance to get back to normal operation. That's the good news. The bad news is, that, unless you use an SDK that does it for you, you need to handle throttling yourself.

The problem with throttling is that it's elusive. It occurs only in certain conditions. This makes it really hard to test how your app will react when throttled: will it back off and wait as instructed, or will it break with an exception?

This is exactly why we built the Microsoft Graph Developer Proxy: a tool to help you test how your apps respond to API errors. Seeing is believing for a reason. With the Graph Developer Proxy, you no longer need to hope for the best. You can verify, even on your tenant of one, how your app will react when suddenly Graph APIs will return errors.

🙋‍♂️ Download the Graph Developer Proxy, test your apps, and I'm looking forward to hearing what you learned.

PS. You can use Microsoft Graph Developer Proxy with any type of app: client-side apps running in the browser or back-end services running on a server.

✇Waldek Mastykarz

#65 Find meeting times and schedule a meeting using Microsoft Graph

#65 Find meeting times and schedule a meeting using Microsoft Graph

In my last newsletter, I shared with you a few resources to help you get started building apps for Microsoft 365. If you work with an organization that uses Microsoft 365 for work, you've got a great opportunity to use your developer skills and bring data and insights stored on Microsoft 365 into your work apps.

Recently I've been working on another app that shows how you'd find meeting times and schedule a meeting for you and other people in your organization. This is a common scenario for work apps, and while it's available in Outlook, having it directly in the work app helps your colleagues stay in the flow of work.

📝 Check out the article I published about this scenario on freeCodeCamp.

📺 Here's also a recording from a recent community call where I showed the app in action.

👾 And if you're interested in digging into it some more, here's the code.

Remember, the best way to check the app out, is to see it running. Follow the setup steps in the readme and run it on your tenant.

I've got some more ideas for new demos that I'll be working on in the coming weeks, so stay tuned for more updates. Meanwhile, if you've got any questions, don't hesitate to reach out by leaving a comment.

✇Waldek Mastykarz

Find a meeting time and schedule a meeting on Microsoft 365

Find a meeting time and schedule a meeting on Microsoft 365

Many work apps need the ability to schedule a meeting with others in their organization. Here's how to do it for apps connected to Microsoft 365.

Work apps need work data

Work apps serve a specific purpose: they help you track projects, follow orders or manage resources. But rarely do they contain all the information that users need to complete their work. Typically, information about people, their calendars, or communication is stored elsewhere, like in Microsoft 365. And that's a shame because completing a task requires users to switch between different apps, which is detrimental to their productivity. Unless of course, you bring work data into your work app.

Find a meeting time and schedule a meeting on Microsoft 365

A common scenario for work apps is to schedule a meeting with others in the organization. While it sounds trivial, the app must be able to access attendees' calendars, find a suitable meeting time and schedule the meeting. And that's where Microsoft Graph comes in.

Recently I published an article on freeCodeCamp that shows you how to build an app connected to Microsoft 365 that can find a meeting time and schedule a meeting.

The app shows you how to make the best use of features available in the Microsoft Graph Toolkit and Microsoft Graph to build a UI that you could integrate with another app.

Check it out, and I'm looking forward to hearing what you think!

✇Waldek Mastykarz

Show upcoming meetings for a Microsoft 365 user with Microsoft Graph Toolkit

Show upcoming meetings for a Microsoft 365 user with Microsoft Graph Toolkit

Recently, I showed you how you can build in under 10 minutes a simple personal assistant that shows users meetings they have left for the day. Here's an even easier way to do it using the Microsoft Graph Toolkit.

Show upcoming meetings for a Microsoft 365 user

Showing upcoming meetings is a common scenario when integrating Microsoft 365 in work applications. Using Microsoft Graph, your app can connect to Microsoft 365 and access a user's calendar. By building a specific query, you can retrieve meetings between now and the end of the day.

Recently, I walked you step by step how to complete this scenario in under 10 minutes using the Microsoft Graph JavaScript SDK. But there's an even easier way to do it using the Microsoft Graph Toolkit.

The easiest way to connect to Microsoft 365

Microsoft Graph Toolkit (MGT) is a set of components and authentication providers connected to Microsoft 365. MGT takes away the complexity of implementing authentication, loading data from Microsoft Graph, and showing it in your app. And if anything goes wrong, it also properly handles exceptions. Microsoft Graph Toolkit's components are highly customizable so that you adjust them to your app.

A quick comparison: signing in to your app

To understand the benefits of using Microsoft Graph Toolkit, let's have a look at an example: let users sign in to your app using their Microsoft 365 account.

Typically, you'd need code similar to the following:

<html>
<head>
  <title>Upcoming meetings</title>
  <script src="https://alcdn.msauth.net/browser/2.28.3/js/msal-browser.min.js"></script>
</head>
<body>
  <h1>Upcoming meetings</h1>
  <div id="auth"></div>
  <script>
    (() => {
      const scopes = ['Calendars.Read'];
      const msalConfig = {
        auth: {
          clientId: '021aa7bb-9aaa-4185-92ad-c7b75a7fb9d2'
        }
      };
      const msalClient = new msal.PublicClientApplication(msalConfig);

      function render() {
        msalClient
          .handleRedirectPromise()
          .then(response => {
            const accounts = msalClient.getAllAccounts();

            if (accounts.length === 0) {
              document.querySelector('#auth').innerHTML = '<button>Login</button>';
              document.querySelector('#auth button').addEventListener('click', login);
            }
            else {
              document.querySelector('#auth').innerHTML = '<button>Logout</button>';
              document.querySelector('#auth button').addEventListener('click', logout);
            }
          });
      }

      function login(e) {
        e.preventDefault();
        msalClient.loginRedirect({
          scopes
        });
      }

      function logout(e) {
        e.preventDefault();
        msalClient.logoutRedirect();
      }

      render();
    })();
  </script>
</body>
</html>

In comparison, here's the same functionality built using Microsoft Graph Toolkit:

<html>
<head>
  <title>Upcoming meetings</title>
  <script src="https://unpkg.com/@microsoft/mgt@2/dist/bundle/mgt-loader.js"></script>
</head>
<body>
  <h1>Upcoming meetings</h1>
  <mgt-msal2-provider client-id="021aa7bb-9aaa-4185-92ad-c7b75a7fb9d2" scopes="Calendars.Read"></mgt-msal2-provider>
  <mgt-login></mgt-login>
</body>
</html>

See the difference? And we didn't even get to the good part yet: calling Microsoft Graph!

With Microsoft Graph Toolkit you can focus on building your app and solving problems for your customers. Microsoft Graph Toolkit takes care of the rest.

Show upcoming meetings with Microsoft Graph Toolkit

To give you a more complete comparison, I rebuilt the same scenario using Microsoft Graph Toolkit.

The best way to check out the app is to run the app locally by following the instructions in the README.

Browser window with a web page showing upcoming meetings for a user

Because retrieving the data using MGT is so simple, I added some extra UI to differentiate between the different states of the app.

The MGT Agenda component, which I use to show the upcoming meetings offers different templates to customize the UI. When loading the data, I show a simple text message:

<mgt-agenda>
  <template data-type="loading">
    <div class="loading">Loading...</div>
  </template>
  <!-- trimmed for brevity -->
</mgt-agenda>

When there's no data to show, I take into account the fact that there might be no data because the user hasn't signed in to the app yet, or that the user might have no upcoming meetings:

<mgt-agenda>
  <template data-type="loading">
    <div class="loading">Loading...</div>
  </template>
  <template data-type="no-data">
    <div class="no-data" data-if="mgt.Providers.globalProvider.state === mgt.ProviderState.SignedIn">
      <!-- No upcoming meetings -->
    </div>
    <div class="no-data" data-else>
      <p>Sign in to view your upcoming meetings</p>
    </div>
  </template>
</mgt-agenda>

I use for this the conditional rendering capability in MGT.

To show upcoming meetings, for simplicity, I use the default template provided with the Agenda component.

Animated gif showing signing in to the app with a Microsoft 365 account and viewing upcoming meetings

Summary

Microsoft Graph Toolkit is a great way to build apps that connect to Microsoft 365. It takes away the complexity of connecting to Microsoft 365 and provides a set of components that you can use to build your app and bring in the data and insights from Microsoft 365. Because MGT components are highly customizable, you can seamlessly integrate them in your app.

Run the sample app locally and see for yourself how easy it is to build apps that connect to Microsoft 365 using Microsoft Graph Toolkit.

✇Waldek Mastykarz

#64 Build your first app for Microsoft 365

#64 Build your first app for Microsoft 365

Learning something new is often daunting, especially when it's something like developing for a new platform. Building for a platform comes with all kinds of specific knowledge like what tooling, SDKs, and APIs to use, how to integrate your app, and how to package and distribute it. The great thing is though, that platforms are multipliers that allow you to tap into an existing audience. Yes, you need to learn a lot to truly benefit from a platform, but the great thing is that you can start small and build your way up.

🥇 Get started

To help you get started, I recently published a tutorial that shows you how to build your first app for Microsoft 365 in under 10 minutes. Literally. This tutorial is a great place to start, either for yourself or the new developers you're onboarding in your organization.

Check it out: How to build your first app for Microsoft 365 in 10 minutes .

📆 First scenario: show upcoming meetings

After you've built your first app, you're ready to work on a simple scenario: show upcoming meetings for the signed-in Microsoft 365 user. It's not overly complex, but it teaches you a common scenario that you might need when integrating work apps with Microsoft 365.

Check out the tutorial: How to show upcoming meetings for a Microsoft 365 user.

🚀 Supercharge your app with Microsoft Graph Toolkit

Both tutorials use the Microsoft Graph JavaScript SDK which gives you the most robust way to connect to the Microsoft Graph API. If you're looking for an even quicker way to integrate with Microsoft Graph, you should check out the Microsoft Graph Toolkit: a collection of web components and auth providers to connect your apps to Microsoft 365.

See how I built the upcoming meetings apps using the Microsoft Graph Toolkit.

💯 Extra!

As a subscriber to my newsletter, I'll give you a sneak peek at something I've been working on in the last few days: a single-page app connected to Microsoft 365 that allows you to find a meeting slot for a few attendees who are on Microsoft 365.

Check it out here: Find meeting times and schedule a meeting using Microsoft Graph Toolkit.

It's similar to the functionality that you get in Outlook but which you could integrate into your work apps.

The best way to learn is to run these apps and see them in action!

If you're building apps for Microsoft 365, I'd love to hear about them. Leave a comment and I'm looking forward to hearing from you.

✇Waldek Mastykarz

Show upcoming meetings for a Microsoft 365 user

Show upcoming meetings for a Microsoft 365 user

Learn how you can build a simple personal assistant in under 10 minutes that'll show a Microsoft 365 user the meetings they have left for the day.

Show upcoming meetings for a Microsoft 365 user

Recently, I published an article on freeCodeCamp that shows you how you can build in just 10 minutes a simple personal assistant that shows upcoming meetings for the signed-in user.

Browser window with a web page showing upcoming meetings for a Microsoft 365 user

Showing upcoming meetings is a common scenario when integrating Microsoft 365 in work applications. It shows you how to get information from the user's calendar and check their availability for a particular time slot. And it's also a great way to get started with building apps on Microsoft 365.

The tutorial shows you the basics of setting up auth in a single-page app and using the Microsoft Graph JavaScript SDK to connect to the Microsoft Graph API. It also demonstrates working with calendar views and formatting dates.

Give it a try, and I'm looking forward to hearing what you think.

✇Waldek Mastykarz

Reference sample: Single Page App connected to Microsoft 365

Reference sample: Single Page App connected to Microsoft 365

When building apps connected to Microsoft 365, before you can bring in data from Microsoft 365, you need to set up authentication. Here's a reference sample of a Single Page App that shows how to do that.

Work apps need work data

Microsoft 365 is a popular set of applications that organizations across the world use to facilitate collaboration and communications. It's also a platform that you can use to build apps for work and streamline how people work together.

Types of apps that you can build on Microsoft 365 grouped into extensions and custom apps

These apps can show up inside Microsoft 365, bringing information from line of business systems into the apps that people use every day. They can also be standalone web-, desktop-, and mobile apps that combine data and insights from Microsoft 365 with data from other systems.

No matter which type of app you choose to build, you need to start with connecting to Microsoft 365, which means you need to set up authentication.

Reference sample: Single Page App connected to Microsoft 365

Because you can build many types of apps connected to Microsoft 365, there are many ways to set up authentication. And if you're just starting building apps for Microsoft 365, it might not be quite clear for you what it is exactly you need and how to combine the different parts together.

To help you get started, I built a sample Single Page Application that shows you how to:

  • setup authentication with Microsoft 365 in a Single Page Application
  • let users sign in and -out with their Microsoft 365 accounts to your app
  • retrieve data from Microsoft 365 using Microsoft Graph
  • register your app with the Microsoft identity platform

The sample app is built using plain JavaScript, which lets you reuse the code in any JavaScript framework. In the repo, you'll find the app built in two ways, using immediately invoked function expressions (IIFE) and using ES modules (ESM). It's largely a matter of preference which one you choose to use, but I wanted to show you both approaches.

If you want to see how I built the app step by step, check out my recent article on freeCodeCamp.

✇Waldek Mastykarz

Build your first Microsoft 365 app in 10 minutes

Build your first Microsoft 365 app in 10 minutes

Learning something new is often daunting, especially when it's something like developing for a new platform. But that doesn't have to be the case. Let me show you, how you can build your first Microsoft 365 app in just 10 minutes.

Building for a platform

Building for a platform isn't trivial. It comes with all kinds of specific knowledge you have to have like what tooling, SDKs, and APIs to use, how to integrate your app, and finally how to package and distribute it. And I haven't even mentioned auth.

It's a lot to learn, and it's easy to get overwhelmed. The trick is though, that you don't have to learn everything about everything at once. Often, you can start simple and build up from there.

Build your first Microsoft 365 app in 10 minutes

Recently, I published an article on freeCodeCamp that shows you how you can build your first Microsoft 365 app in just 10 minutes.

Browser window with a web page showing Microsoft 365 user profile information

Sure, the app is simple and doesn't do much, but when building it, you'll learn the fundamental concepts of building apps on Microsoft 365. And after these 10 minutes, you'll have a functional app that works and retrieves data from Microsoft 365, and which you can use as a starting point for more complex apps.

Give it a try, and I'm looking forward to hearing what you think.

✇Waldek Mastykarz

Customize list forms with SharePoint Framework form customizers

Customize list forms with SharePoint Framework form customizers

Last week at the Viva Connections & SharePoint Framework Community Call I had the pleasure of presenting how to use the SharePoint Framework to customize list forms. Here's a quick overview of the topics we covered.

Form customizers - a new type of SPFx extension

In SharePoint Framework (SPFx) v1.15, which was released in July '22, Microsoft introduced form customizers - a new type of extension that allows you to extend list forms. Using form customizers, you can build a custom experience for New, Edit, and View forms of a list.

Anatomy of an SPFx form customizer

Form customizers are in essence SPFx extensions: they have the onInit method, to initialize data, and the render method to build the UI. Additionally, form customizers have two methods that you need to call, to notify the SPFx page runtime of how the user interacts with the form: this.formSaved(), when the data has been changed and saved, and this.formClosed() when the user closed the form without modifying the data.

export default class HelloWorldFormCustomizer
  extends BaseFormCustomizer<IHelloWorldFormCustomizerProperties> {

  public onInit(): Promise<void> {
    // Add your custom initialization to this method. The framework will wait
    // for the returned promise to resolve before rendering the form.
    Log.info(LOG_SOURCE, 'Activated HelloWorldFormCustomizer with properties:');
    Log.info(LOG_SOURCE, JSON.stringify(this.properties, undefined, 2));
    return Promise.resolve();
  }

  public render(): void {
    // Use this method to perform your custom rendering.
    this.domElement.innerHTML = `<div class="${ styles.helloWorld }"></div>`;
  }

  public onDispose(): void {
    // This method should be used to free any resources that were allocated during rendering.
    super.onDispose();
  }

  private _onSave = (): void => {
    // You MUST call this.formSaved() after you save the form.
    this.formSaved();
  }

  private _onClose = (): void => {
    // You MUST call this.formClosed() after you close the form.
    this.formClosed();
  }
}

To allow you to optimize the performance of your solution, form customizers don't load the data for the underlying list item. Instead, you need to load the item yourself and choose which information you want to load in the onInit method. When building an Edit form, you also need to load information about the ETag, to ensure that you're not overwriting data that has been changed by another user.

export default class BasicsFormCustomizer extends BaseFormCustomizer<IBasicsFormCustomizerProperties> {
  // item to show in the form; use with edit and view form
  private _item: {
    Title?: string;
  };
  // item's etag to ensure the integrity of the update; used with the edit form
  private _etag?: string;

  public onInit(): Promise<void> {
    if (this.displayMode === FormDisplayMode.New) {
      // we're creating a new item so nothing to load
      return Promise.resolve();
    }

    // load item to display on the form
    return this.context.spHttpClient
      .get(this.context.pageContext.web.absoluteUrl + `/_api/web/lists/getbytitle('${this.context.list.title}')/items(${this.context.itemId})`, SPHttpClient.configurations.v1, {
        headers: {
          accept: 'application/json;odata.metadata=none'
        }
      })
      .then(res => {
        if (res.ok) {
          // store etag in case we'll need to update the item
          this._etag = res.headers.get('ETag');
          return res.json();
        }
        else {
          return Promise.reject(res.statusText);
        }
      })
      .then(item => {
        this._item = item;
        return Promise.resolve();
      });
  }

  // trimmed for brevity
}

Previewing a Form Customizer

When you scaffold a Form Customizer, the SharePoint Framework Yeoman generator adds 3 configurations to your serve.json file, that allow you to quickly preview your Form Customizer with the New, Edit, and View form.

To preview your Form Customizer, run in the command line:

gulp serve --config helloWorld_NewForm

where helloWorld is the alias of your Form Customizer and NewForm is the form display mode that you want to preview. For the list of available serve configurations, check the config/serve.json file in your project.

Separate- vs. one form customizer

When building form customizers, you can choose to build a separate Form Customizer for each form display mode, or you can build one Form Customizer that supports all display modes. You can also choose to override only a specific display mode and use the default behaviors for other display modes. This gives you flexibility about how you organize your code and what kind of experience you want to build for your users.

Deploy your Form Customizer

After you built your Form Customizer, you need to deploy it by associating it with a content type. You can associate it with an instance of a content type in a specific list or a site content type. If you want the Form Customizer to be used with all instances of the content type in your tenant, associate it with the content type in the content type hub site from which it will be synced to other sites in your tenant.

To register a Form Customizer with a content type, set the ID of the Form Customizer component (the value of the id property from the Form Customizer's manifest) in the ContentType.DisplayFormClientSideComponentId property of the content type. If your Form Customizer is configurable, you can pass its configuration as a JSON string in the ContentType.DisplayFormClientSideComponentProperties property. This set of properties is also available for the New- (NewFormClientSideComponentId, NewFormClientSideComponentProperties) and Edit (EditFormClientSideComponentId, EditFormClientSideComponentProperties) form.

You can set these properties declaratively using the Feature framework in the SPFx solution, but the preferable way is to do it programmatically using the REST or CSOM APIs, through remote provisioning solutions.

What can you build with form customizers?

Form customizers are a great way to extend the user experience on top of lists. By combining them with list formatting, you can build applications that are hosted on SharePoint and don't require any additional resources.

Because you own the full canvas of the list form, you've got a lot of flexibility when it comes to rendering the form. And since form customizers are powered by SPFx, you've got access to Microsoft Graph and line of business APIs to bring in additional data.

Sample application for approving travel requests, showing trip information and a map with the departure and destination, built using a SharePoint Framework Form Customizer

Here's the full recording of the community call starting with the form customizers section.

Once again, thanks to everyone for joining us, and don't hesitate to reach out if you have any questions.

What are you going to build with form customizers?

✇Waldek Mastykarz

Work apps need work data

Work apps need work data

When you use apps for work, they rarely show you all the data that you need to get the full context of your work. And that's a shame because that information is often readily available to you, and could be integrated into your app.

It's all about the context

Say you're asked to build an app to manage projects for your organization. You build a web app, and host it in the cloud. Using the app you can store information about projects, customers, and project teams. Your organization uses another app for communication, and another for storing files, so rather than duplicate the functionality you point to existing apps for easy access.

Your app works, but is it convenient to use? Way too often you see your colleagues switch back and forth between your app, and other apps to get the full context of their work: information about the project, recent emails to the customer, project team communication, project files, and people who work on the project. What could you have done differently?

Bring work data into your app

Say, your organization uses Microsoft 365. The project information is stored in your app. To communicate with the project team, they need to go to Teams. To get the project files, they need to go to SharePoint. Communication with the customer is in email in Outlook, and information about people is accessible via Teams, Outlook, or SharePoint, depending on where they are at the moment. Instead of switching between all these different apps, why not bring the relevant data to your app?

Work apps need work data. Even though your app has a specific purpose, like managing projects, people using it will need more information to get the full context of their work. Projects are commissioned by a customer and run by a project team. While you work on projects, you create files, and communicate about them. The same goes for managing orders, or any other business scenario. So why should that work context be fragmented? Why not offer your colleagues all the information they need right where they need it: in your app?

If you use Microsoft 365, information about people, and files is readily available to you, and accessible using Microsoft Graph - the API for Microsoft 365. Instead of requiring your users to jump between the different apps, you can use Graph to bring contextually relevant information to your app. You can bring in emails sent to, and received from the customer. You can bring in project files that the project team has recently worked on. You can show information about the project team members, their location, and time zones right in your app. You can have all this information, and more available in the context of your app so that your colleagues spend more time working, and less time switching contexts.

The great thing about using Microsoft Graph is that it allows you to tap into data, and insights that are stored in Microsoft 365. You get to benefit from all functionality from Microsoft 365, such as storage, access management, or disaster recovery, and at the same time, can integrate it in a contextually relevant way with your app.

Bringing work data to your app doesn't need to come at the cost of a lot of extra work. If you're on Microsoft 365, use Microsoft Graph, and tap into organizational data, and insights stored in Microsoft 365 that are relevant to your app. Check out what's possible using Microsoft Graph.

❌