In my previous blog, I explained how to create a modern calendar view in SharePoint Online/Microsoft Lists. In this blog we will see how to add the modern calendar to a SharePoint online page.
We have a List web part in SharePoint online which allows you to display a list from your site on a page. But currently it doesn’t support modern calendar views. So, you will need to use below workaround to add Modern Calendar to a SharePoint Online page.
Workaround
We can use Embed web part in SharePoint online to add modern calendar to a page.
Follow below steps to embed modern calendar to a page:
1. Go to your SharePoint list and open the calendar view.
2. Copy the URL of calendar view from browser and note it down as we will use it in later steps.
3. Go to your modern SharePoint page and open it in Edit mode by clicking Edit button from top right corner.
4. Add Embed web part on your page and open it in edit mode.
5. Construct the embed code using the <iframe> tag in below format:
If you are in the Microsoft Teams public preview program, you will have access to the Try the new Teams toggle right away once Microsoft Teams administrator turns ON the preview of the new Microsoft Teams Windows client. However, if you are in the Targeted release program, you will have access to the preview of new Microsoft Teams starting mid-April 2023.
Turn ON the Preview of new Microsoft Teams Windows client
As a Microsoft Teams administrator, you can control which users can see the Try the new Teams toggle to use the new Microsoft Teams. You can use the new setting available in Microsoft Teams admin center named as Use New Teams Client to enable the new Microsoft Teams Public Preview for users in your organization.
Follow below steps to roll out the Preview of new Microsoft Teams via Microsoft Teams admin center:
2. Select Teams > Teams updatepolicies from the left navigation as shown in below image:
3. You can select + Add to create a new policy or select an existing policy to open Update policy panel. For this blog post, we will select existing update policy named as Global (Org-wide default) which applies to all users in your organization:
4. Choose the appropriate option for Use new Teams client setting from drop down:
Not enabled: This option hides the new Teams toggle switch. Users won’t be able to opt in to the new Teams.
Users can choose: This option shows the new Teams toggle switch allowing users to opt into the new Teams, and switch back if they need to.
Microsoft controlled: This is a default option. This lets Microsoft control whether the new Teams toggle switch is shown or not based on product readiness.
5. Select Apply to save the changes
When you update the policy setting from Microsoft Teams Admin Center, the new setting will be applied to respective users immediately. The users don’t need to restart the Microsoft Teams desktop client.
In this article, I will demonstrate how to provision a SharePoint online modern site using a Power automate flow. As there is no standard Power automate action for creating a SharePoint site (previously called “site collections”) using SharePoint connector, we will use the Send an HTTP Request to SharePoint action and SharePoint REST API in Power automate flow.
Follow below steps to create a SharePoint online modern communication site using Power Automate flow:
1. Go to make.powerautomate.com and create a new Instant cloud flow with Manually trigger a flow trigger.
2. Add Send an HTTP request to SharePoint action in Power automate flow.
3. Use configurations for Send an HTTP request to SharePoint action in below format:
{
	"request": {
		"Title": "My Communication Site",
		"Url": "https://contoso.sharepoint.com/sites/MyCommSite",
		"Description": "My Communication Site created using Power Automate flow",
		"Owner": "gsanap@contoso.com",
		"Lcid": 1033,
		"WebTemplate": "SITEPAGEPUBLISHING#0",
		"SiteDesignId": "6142d2a0-63a5-4ba0-aede-d9fefca2c767",
		"ShareByEmailEnabled": false
	}
}
Where,
Url
URL for the new SharePoint online modern site (site collection)
LCID
Locale identifier (LCID) for the site language. 1033 is for English language, check LCID for other languages at: Language.Lcid property
WebTemplate
WebTemplate property is used to specify which type of SharePoint site to you want to create. You can use following values for this property:
Communication Site: SITEPAGEPUBLISHING#0
Team Site (not connected to M365 group): STS#3
SiteDesignId
SiteDesignId property is used to apply site template (previously called “site design”) to newly created SharePoint site.
If you want to apply an out-of-the-box available site template, use the following values:
Topic: 96c933ac-3698-44c7-9f4a-5fd17d71af9e
Showcase: 6142d2a0-63a5-4ba0-aede-d9fefca2c767
Blank: f6cc5403-0d63-442e-96c0-285923709ffc
ShareByEmailEnabled
If this property is set to true, it will enable sharing SharePoint files via Email.
Your final Power automate flow should look like this:
Create a SharePoint online site using Power Automate flow
4. Save your flow and Run it using Test > Manually options at the top right corner. After flow run completes successfully, navigate to the site URL mentioned in Send an HTTP request to SharePoint action in Power automate flow and you will see a newly created SharePoint online modern communication site like:
SharePoint online modern communication site created using Power Automate
Microsoft is currently rolling out the calendar view feature for SharePoint Online and Microsoft lists, Roadmap. In this blog I will explain how to create a calendar view in SharePoint Online modern list or Microsoft lists.
Create a modern Calendar view
Follow below steps to create a calendar view:
1. Go to your list. If you don’t have a list then Create a list with date columns as per your requirements.
2. From list view, click on Switch view options dropdown from command bar and select Create new view.
Create new view
3. Give name to list view, select Calendar under Show as option and then Select Start date & End date columns from dropdowns.
4. You can make this a public view using Make this a public view checkbox. Public views can be visited by anyone with access to this list.
5. Click on More options to select Title of items on calendar. Select appropriate column from dropdown as this column will be shown as the title of items on calendar view.
6. Click on Create button.
Create a modern calendar view
The new modern calendar view will be created in a list as given below:
Modern calendar view
Calendar view shows the current events at the right hand side in Events Pane when you select a date from calendar. You can show/hide the events pane using icon button given at top of events pane (Highlighted in above image).
Set calendar view as the default view
If you want to show the calendar view by default when user navigate to SharePoint Online or Microsoft list then you have to set it as the default view.
Follow below steps to set the newly created calendar view as the default view:
Click on Switch view options dropdown from command bar and select the name of the view that you want to make as the default view.
Click on Switch view options dropdown again and select Set current view as default.
Set calendar view as a default view
Next Step: After creating a calendar view in SharePoint list, you would want to add this modern calendar to a SharePoint page. For more information about this, check:
In my earlier blog, add modern calendar to a SharePoint online page, I explained how you can show modern calendar list view on SharePoint Online modern pages using Embed web part. I used embed web part because modern calendar views were not supported in SharePoint out of the box List web part at that time.
Fortunately, Microsoft is rolling out a new feature which will support modern calendar views in List web part. This feature is associated with Microsoft 365 Roadmap ID 70750. In this blog we will see how to add the modern calendar view to a SharePoint online page using List web part.
4. Click on List web part from Search results. It will add the List web part to your modern page.
5. Initially the List web part shows all the lists available on your SharePoint site. Click on the list name where you created a modern calendar view OR you can also select a list from web part configuration property pane which opens when you click on Edit web part button
Select a desired list in “List” web part
6. By default the List web part will load the default view of your SharePoint list. If you have set newly created Calendar view as your default view, skip this step. Else, select your calendar view from Switch view options dropdown as shown below:
Select modern calendar list view from views dropdown
7. Click on Publish/Republish button to save the changes.
You will see the final output on SharePoint page as shown below:
Modern calendar list view added to a SharePoint online modern page
Microsoft is introducing a new Board view feature in SharePoint online/Microsoft Lists. This Kanban like Board view allow users to work with list items in a board with swimlanes that represent their current progress. This view is ideal when users want to track items as they move forward in a process or workflow.
The board view in lists will allow users to drag & drop items through the stages of process or workflow.
Users will be able to configure which columns from the list are displayed in the cards and in what order.
This feature will roll out both on desktop and web. Currently Microsoft Planner also allows creating Kanban boards using content-rich tasks.
This feature is associated with Microsoft 365 Roadmap ID: 85634.
Release Timeline
Microsoft will begin rolling out board view feature in mid-January and expects to complete the rollout in late February (previously early February).
How this will affect your organization
After the feature rollout, you will see the Board as an option during creation of new views for a SharePoint online list / Microsoft Lists. Additionally, there will be a dropdown to choose a column to organize the board by. Presently, the board can be organized by any Choice or Boolean column that exists in the list.
Kanban Board view in SharePoint online/Microsoft Lists
What you need to do to prepare
No action is required to enable this feature. You may consider notifying users about this new capability and update your training and documentation as appropriate.
Now Microsoft is introducing this new feature, Unscheduled Pane, which will allow users to review all the list items not yet appearing in the calendar view due to missing dates. These items will appear on the Unscheduled tab within the events pane to the right of the Calendar view.
This feature is associated with Microsoft 365 Roadmap ID: 93223.
Release Timeline
Microsoft began rolling this out in mid-April 2022 and expected to complete the rollout by late April 2022 – Rollout completed.
How this will affect your organization
You will now see a new Unscheduled tab within the events pane to the right of the Calendar view. The items with missing start and/or end dates and those with start date later than the end date would appear on this pane. You may select the items to open the edit form and make appropriate edits or you can drag and drop the items on calendar view to schedule these items.
Unscheduled Pane in Microsoft Lists Calendar Views
What you need to do to prepare
No action is required to enable this feature. But you may consider notifying users about this new capability and update your training and documentation as appropriate.
Now Microsoft is introducing item drag and drop feature for calendar views which will allow users to easily reorganize list items in a calendar view. Users will be able to reschedule items by dragging and dropping them from one day to another day in a Calendar view, or by pulling an item from the Unscheduled pane that appears on the right, within Calendar view.
This message is associated with Microsoft 365 Roadmap ID: 93285.
Release Timeline
Microsoft began rolling this out in mid-May 2022 and expected to complete the rollout by late May 2022 – Rollout completed.
How this will affect your organization
After rollout of this item drag and drop feature, users will be able to:
Reschedule list items by dragging them from one date to another date in the calendar view canvas
Un-schedule items (remove the saved dates) by dragging from calendar canvas and dropping them in the Unscheduled pane
Schedule items by dragging them from the Unscheduled pane and dropping them on any date in calendar view canvas
Microsoft Lists: Calendar view item drag and drop
What you need to do to prepare
No action is required to enable this feature. You may consider notifying users about this new capability and update your training and documentation as appropriate.
Last year in the month of July, Microsoft announced a new dynamic view feature along with bunch of other features in Microsoft Teams (See video below). Dynamic view is a redesigned and optimized meeting stage that will optimize your experience of consuming shared content and engaging with video and audio participants.
Dynamic view automatically optimizes shared content and video participants in Microsoft Teams meetings. This feature also enables new controls for you to personalize the view to suit your preferences and needs, such as the ability to show shared content and specific participants side-by-side.
Microsoft will begin rolling out this feature at the end of May and expected to complete by mid-June. Currently this feature is available in Microsoft Teams public preview.
New Microsoft Teams Meetings innovations and experiences
How this will affect your organization
Once this feature releases, all users will get a new optimized visual experience in Teams Meetings. This feature allows users to have more control over how they experience video meetings in Microsoft Teams.
Dynamic view in Microsoft Teams meetings will enable:
Video and audio participants to be shown separately, with audio participants appearing as avatars (avatars can be either initials or a profile picture).
Shared content to appear larger, with more participants being visible
Users to pin or spotlight particular people in the meeting and make them appear larger than other participants
You to view Together Mode alongside shared content
Users to pin the participants gallery at the top of their screen
What you need to do to prepare
Users will need to restart their clients to enable the change after release.
You might want to notify your users about this new capability and update your training and documentation as appropriate.
SharePoint’s JSON formatting capabilities empower users to customize the look and feel of SharePoint lists and libraries effortlessly. One common customization request is to remove the column name from the group header in a grouped SharePoint list view. In this blog post, we’ll explore why you might want to remove the column name and provide a step-by-step guide on achieving this using SharePoint JSON formatting.
Why Remove the Column Name?
When organizing data in SharePoint lists, you may find that the default group headers display the column names. While this is useful in many scenarios, there are times when you might prefer a cleaner, more streamlined view. Removing the column name from the grouped header can help reduce visual clutter and focus on the column value for each group.
How to Remove Column Name from Group Header?
Follow below steps to remove the column name from group header in SharePoint online or Microsoft Lists’ list view:
1. First, navigate to the SharePoint list for which you want to apply the JSON formatting. Click on the “Switch view options” drop down from top right corner of the list and select the view where you want to remove the column name from the group header.
2. Once in the desired list view, click on the “Switch view options” drop down again and select the “Format current view” option, which opens the list formatting pane.
3. Within the list formatting pane, locate the “Advanced mode” option and click on it to access the JSON formatting editor. Here you can modify the JSON to achieve the desired customization.
4. To remove the column name from the group header, copy below JSON and paste it in the JSON formatting editor:
5. Click on the “Save” button within the JSON list formatting pane to apply the changes.
Once saved, the SharePoint list view will reflect the updated formatting, with the column name effectively removed from the group header.
Note
If you have applied the “Group by” on Person or Group (people field) OR Lookup column, [object object] will appear in the group header after applying above JSON. In that case, you will have to modify above JSON slightly as per the following table:
Type of grouped column
Part of the JSON to be changed
Change to
Person or Group
@group.fieldData.displayValue
@group.fieldData.title
Lookup
@group.fieldData.displayValue
@group.fieldData.lookupValue
Also, if you have grouped your SharePoint list view based on two columns (for example: person or group and single line of text column), you can change the text to show (txtContent) based on display name of column like:
By following these steps, you can harness the power of SharePoint’s JSON formatting capabilities to achieve a cleaner and more tailored presentation of your grouped list view data.
I hope this guide has been helpful in demonstrating how to remove the column name from the group header in a SharePoint list view using JSON formatting.
SharePoint Online and Microsoft Lists offers a multitude of features to enhance collaboration and streamline data management. One such feature is the Quick Property Editing (Edit in Grid view), which allows users to bulk edit metadata for multiple list items directly from the list view. While this feature can improve efficiency, there are scenarios where disabling it becomes necessary. In this blog post, we’ll explore various methods to achieve this in SharePoint Online.
From SharePoint UI
Follow below steps to disable quick edit (Edit in grid view) from SharePoint list UI:
1. Go to your SharePoint Online list.
2. Click on Settings (gear icon) from the top right corner and select List settings.
3. Click on Advanced settings link from List settings page.
4. From Advanced settings page, scroll down and set Quick property editing (Allow items in this list to be edited using Quick Edit and the Details Pane?) to No.
5. Click OK button at the bottom of advanced list settings page.
Using PnP PowerShell
You can use below PnP PowerShell script to disable Quick property editing (Grid view) from SharePoint Online list or document library:
# Display name of SharePoint online list or document library $listName = "My SharePoint List"
# SharePoint online site URL $siteUrl = Read-Host -Prompt "Enter your SharePoint site URL (e.g https://contoso.sharepoint.com/sites/pnppowershell)"
# Connect to SharePoint online site Connect-PnPOnline -Url $siteUrl -Interactive
# Disable Quick property editing (Grid view) from SharePoint list Set-PnPList -Identity $listName -DisableGridEditing $true
PURVIEW | Sensitivity labels absent from the Office 365 suite La mise en place des étiquettes de sensibilités peut être très pratique pour classifier les documents depuis la suite Office 365. Pour cela, nous avons mis en place dans Purview, une étiquette et une stratégie pour affecter ces dernières à certains utilisateurs.Nos utilisateurs utilisent des… Continue reading PURVIEW | Les étiquettes de sensibilité absentes dans la suite Office 365
As of August 17, 2021, Microsoft 365 apps and services no longer supports Internet Explorer 11 (IE 11). As a result, Microsoft recommends using the OneDrive sync app to sync SharePoint files with your computer, rather than using View in File Explorer feature in IE11. The OneDrive sync client provides Files On-Demand, which helps you to work with all your cloud files in File Explorer without having to download all the files and use storage space on your device.
In some special cases, some customers may still have a need to use View in File Explorer feature to access modern document libraries. So, starting in Microsoft Edge Stable version 93, you can enable the View in File Explorer capability on SharePoint Online for Modern Document Libraries. For this experience to be visible and work for your users, you will need to enable the Microsoft Edge policy “Configure the View in File Explorer feature for SharePoint pages in Microsoft Edge” and update your SharePoint Online tenant configuration.
Configure View in File Explorer with Microsoft Edge
After enabling the feature, you can find the View in File Explorer option by navigating to the DocumentLibrary > Select the Library View Menu on the right-hand side > Select View In File Explorer.
View in File Explorer feature in SharePoint Online document library
Release Timeline
Targeted Release: This feature will start rolling out in early October.
Standard Release: This feature will begin rolling out in early November and complete by the end of November.
What you need to do to prepare
By default, there will be no impact to your organization and the View in File Explorer menu option will not be visible to admins and end users on the SharePoint Online modern document library interface. Microsoft recommends using the OneDrive sync app to sync SharePoint files with your computer, rather than using View in File Explorer feature.
However, if your organization has a need for the “View in File Explorer” feature in SharePoint Online modern document libraries, admins will be able to opt-in to turn on this feature in their tenant, to work on Edge browsers.
Note
While View in File Explorer feature will be available, it is not recommended to use this feature always. Whether you’re using Google Chrome, Microsoft Edge, or another browser, Sync feature is a faster and more reliable method for putting SharePoint files into folders you can see in File Explorer. To learn more, visit SharePoint file sync.
une fois n’est pas coutume, une entreprise me demande de supprimer les données OneDrive de tous ses utilisateurs si ces derniéres ont plus de 30 Jours. Rendez vous dans Microsoft Purview (https://compliance.microsoft.com/) pour établir une stratégie de suppression. Une fois dans Purview je sélectionne l’option du menu suivant Data lifecycle management puis Retention Policy. Puis… Continue reading 0365 : Supprimer les données One Drive Aprés 30 Jours
Approvals… We always need to approve something. In the corporate world, you can’t do much without obtaining approval from your boss, project team, Finance, or Legal department. Luckily, we have a few quick ways to request Document approvals in SharePoint. The below post summarizes both options.
Use Cases for Document Approvals
There are plenty of use cases when you might want to obtain approval for a document. These are just a few from my good old corporate days…
Obtain approval from Finance for an invoice before processing it
Obtain approval from Legal for a contract before sharing it with the customer
Obtain approval for a budget from your boss
Obtain approval for a project Charter from Project Owner/Sponsors
Obtain approval from a project team for meeting minutes and action items
How to obtain document approval in SharePoint Online
There are two ways for you to obtain approvals in SharePoint. You can do so via SharePoint document library or an Approval Team Apps. I document both below. Both options vary in terms of user experience but rely on the same Power Automate logic.
Option 1: Document Approval via SharePoint document library
The first option to approve documents is via the SharePoint Document Library. You can easily check the box next to the document and Request Sign-Off. I provided step-by-step instructions here.
Option 2: Document Approval via Approval App in Teams
The second option is a bit more “elegant” and is possible thanks to a recent addition to Teams – the Approval App. I once again documented the process in this article.
Which option to choose?
Use SharePoint Request Sign-Off if…
You primarily access documents via the SharePoint interface and not Teams
You primarily need to request sign-off from documents in a specific document library
You prefer that recipients approve via Email (Outlook) rather than the Teams interface
Use Teams Approvals App if…
You primarily live in Teams, rather than SharePoint or Outlook
You primarily need to request approvals from various sources (document libraries)
You prefer that recipients approve via Teams rather than Email (Outlook)
I am presenting at the Master Microsoft Teams at our Teams Takeover 2023 with a workshop! The topic is Take Back Control: Teams Governance And Change Management. You can find more information by clicking here. Hope to see you there!
I am super excited to be speaking at Experts Live EU 2023 for the first time. Hereby my session details: Ensure your compliance in Microsoft Teams with Microsoft Purview Microsoft Teams enables organizations to stay connected and access shared content at any time to learn, plan, and innovate—together. Although these advantages improve internal and external collaboration, organizations have serious concerns about being and staying compliant. Jasper Oosterveld, Microsoft MVP & Modern Workplace Consultant, is going to discuss the available Microsoft 365 Purview toolset to ensure and maintain your organizational compliance while working with Microsoft Teams. Click here to learn more about the event and I hope to see you there!
W tym krótkim poście pomogę Ci zbudować przepływ pracy w Nintex for Office 365, który pozwoli Ci skopiować załączniki, które zostały dodane do zadania, do załączników powiązanego elementu listy. Element listy jest oczywiście tym, wokół którego działa cały przepływ pracy.
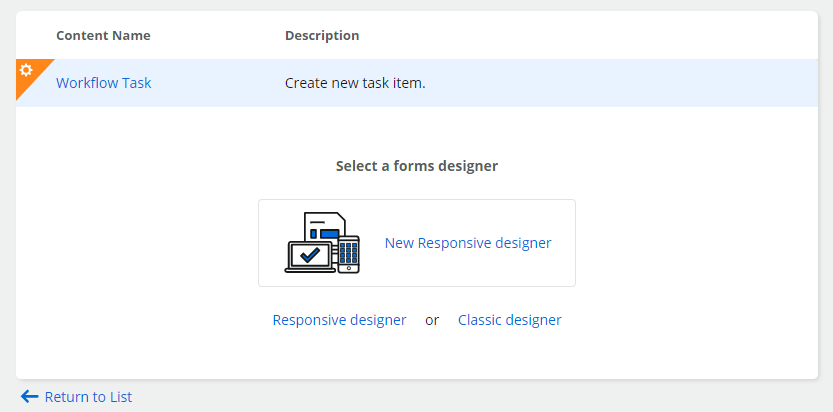
Formularz zadania
Najpierw musisz zbudować formularz zadania.
To naprawdę nie ma znaczenia, który typ designera wybierzesz – każdy pozwala na użycie kontrolki załączników (zaś w „New responsive designer” – kontrolki nazwanej „File upload”):
Skonfiguruj formularz tak, jak potrzebujesz. Po zakończeniu wróć do akcji zadania.
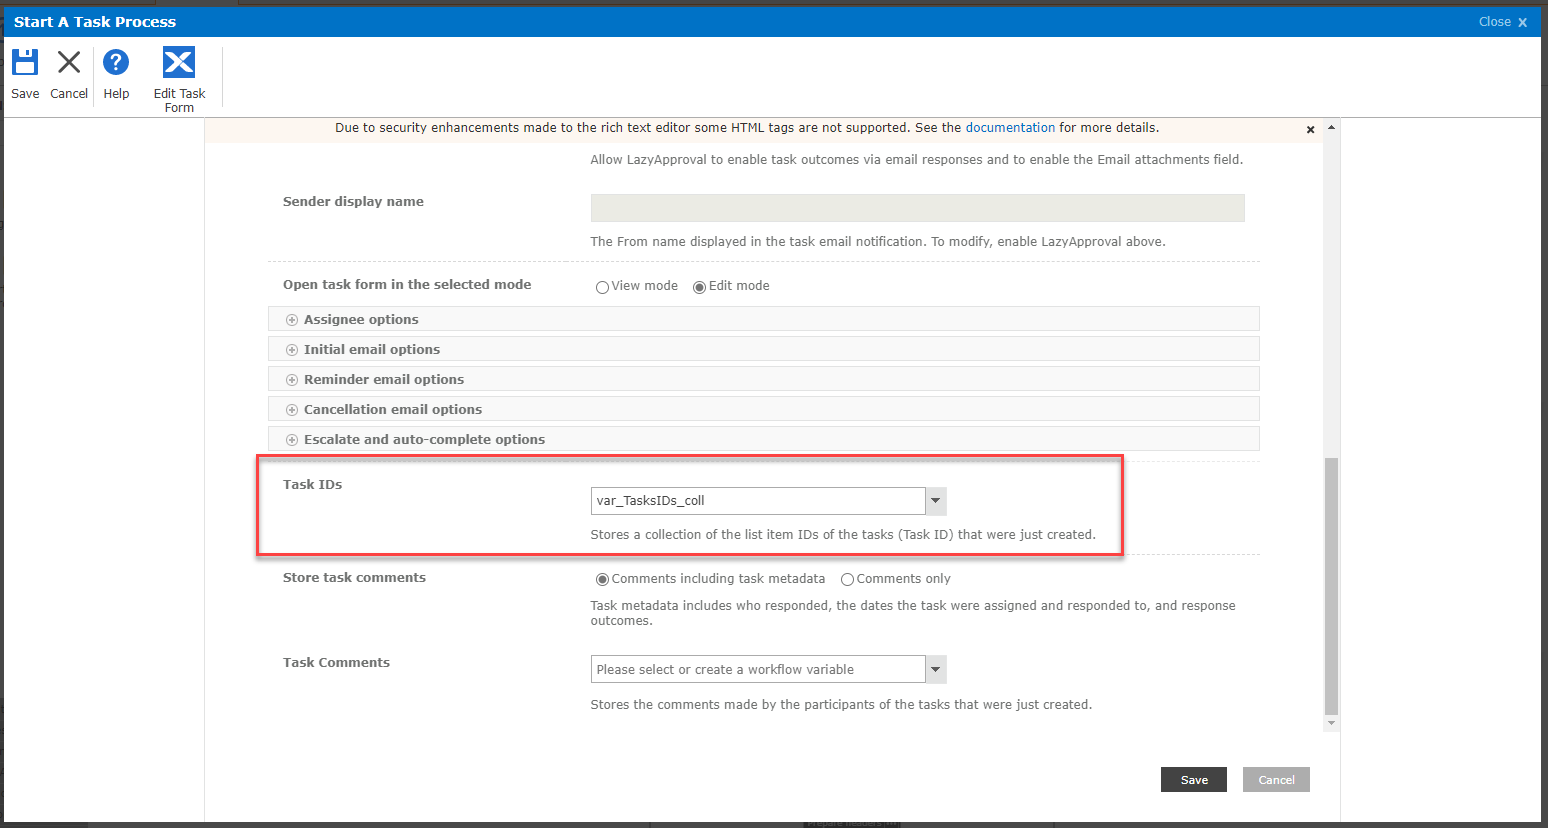
Akcja zadania
Niezależnie od tego, czy korzystasz z akcji „Assign a task”, czy „Start a task process”, musisz skonfigurować pole, które zwraca identyfikator zadania (lub zadań):
Później użyjesz tych identyfikatorów, aby pobrać załączniki z powiązanych zadań (lub zadania).
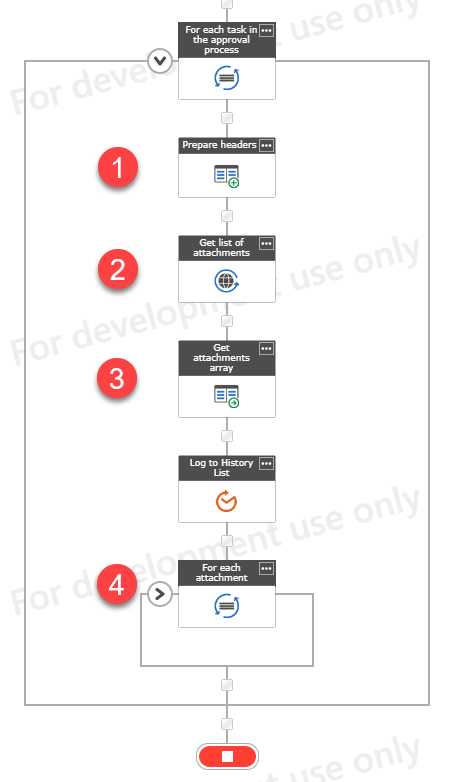
Workflow
Po zakończeniu zatwierdzania daj przepływowi pracy chwilę oddechu. Zauważyłem, że czasami workflow był wznawiany znacznie szybciej niż załączniki były ładowane do elementu zadania. W rezultacie wznowiony workflow posiadał info m.in. tylko o jednym załączniku z 3 przesłanych.
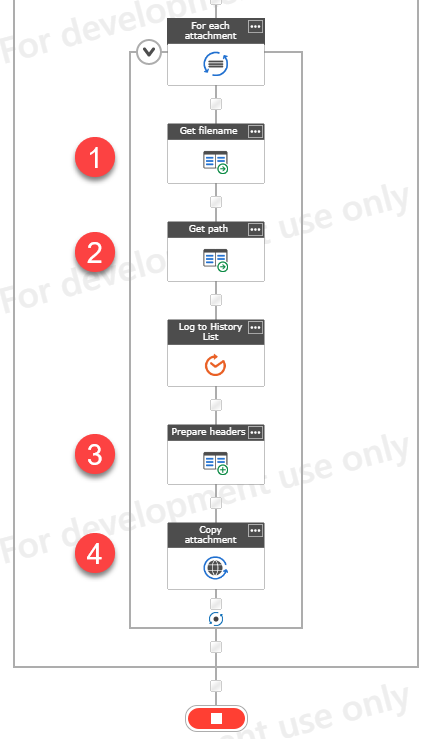
Następnie dla każdego zadania wykonaj poniższe kroki:
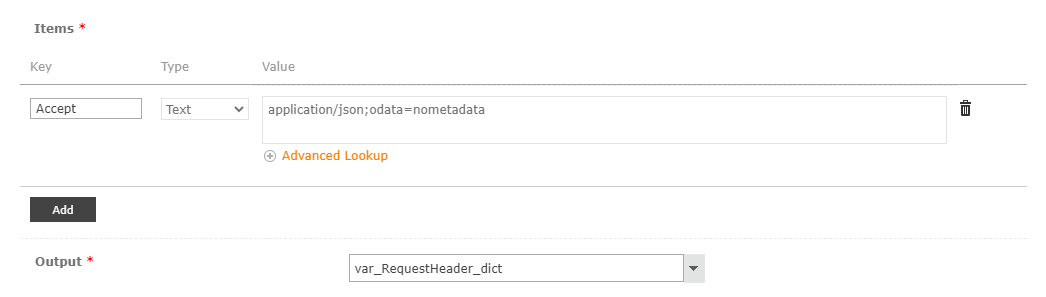
Przygotuj nagłówek żądania HTTP
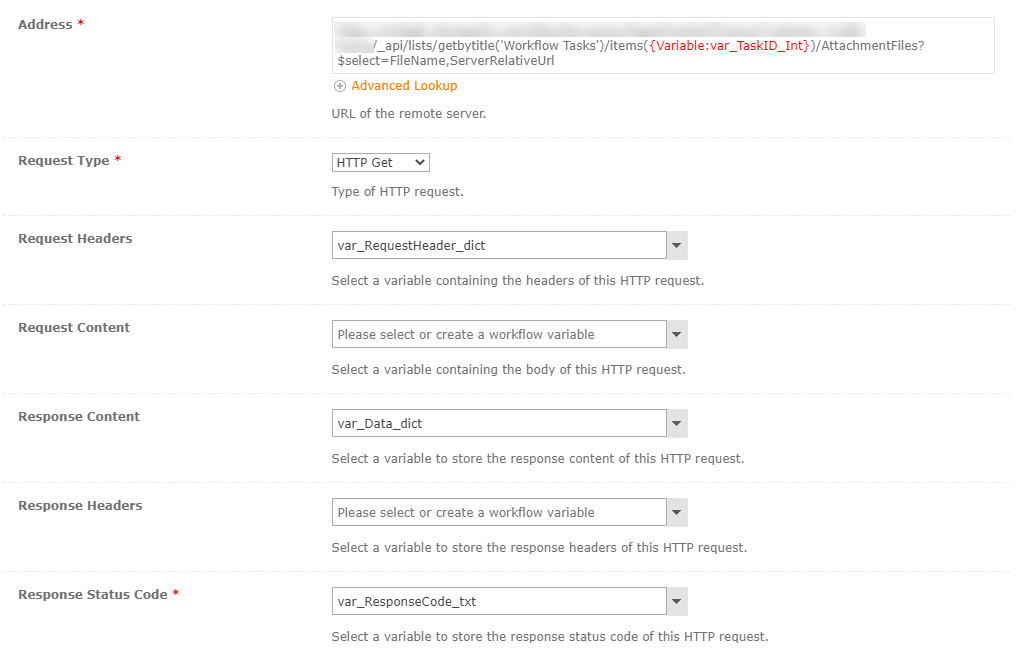
Wykonaj żądanie GET HTTP do poniższego adresu URL:
{ADRES URL WITRYNY}/_api/lists/getbytitle('Workflow Tasks')/items(TASK ID FOR CURRENT LOOP RUN)/AttachmentFiles?$select=FileName,ServerRelativeUrl
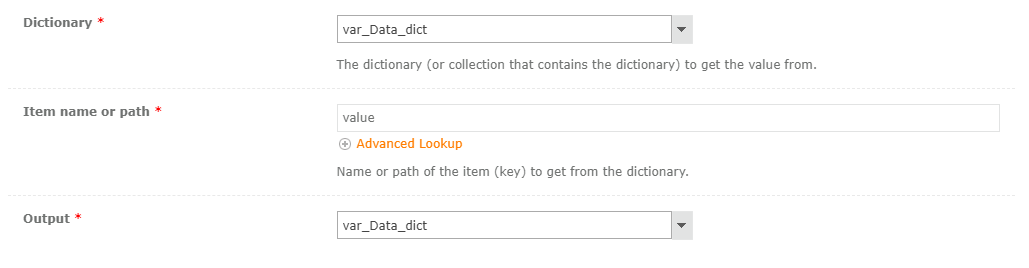
Zwrócony wynik będzie posiadać poniższą strukturę JSON: {"value": [{"FileName": "xyz.jpg", "ServerRelativeUrl": "somepath/xyz.jpg"}]} – musisz wyciągnąć jedynie tabelkę.
Następnie wykonaj poniższe kroki dla każdego elementu w tabelce.
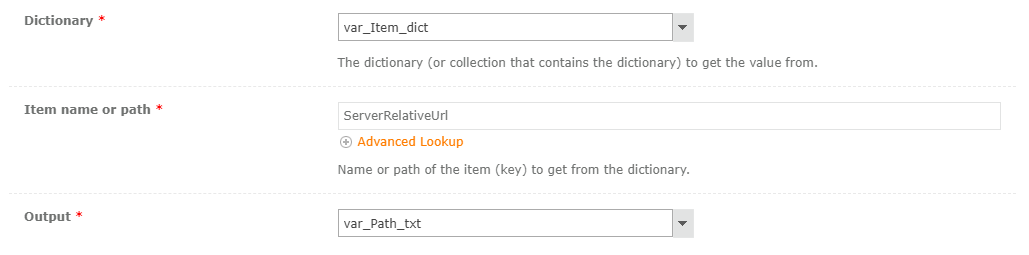
Następnie dla każdego wyodrębnionego załącznika (w pętli iteruj po słowniku var_Data_dict i zapisz element jako np. var_Item_dict):
Pobierz ze słownika nazwę pliku
Pobierz ze słownika ścieżkę
Przygotuj słownik z nagłówkiem żądania (jak powyżej, opcjonalnie możesz dodać linię z Content-Type: application/json)
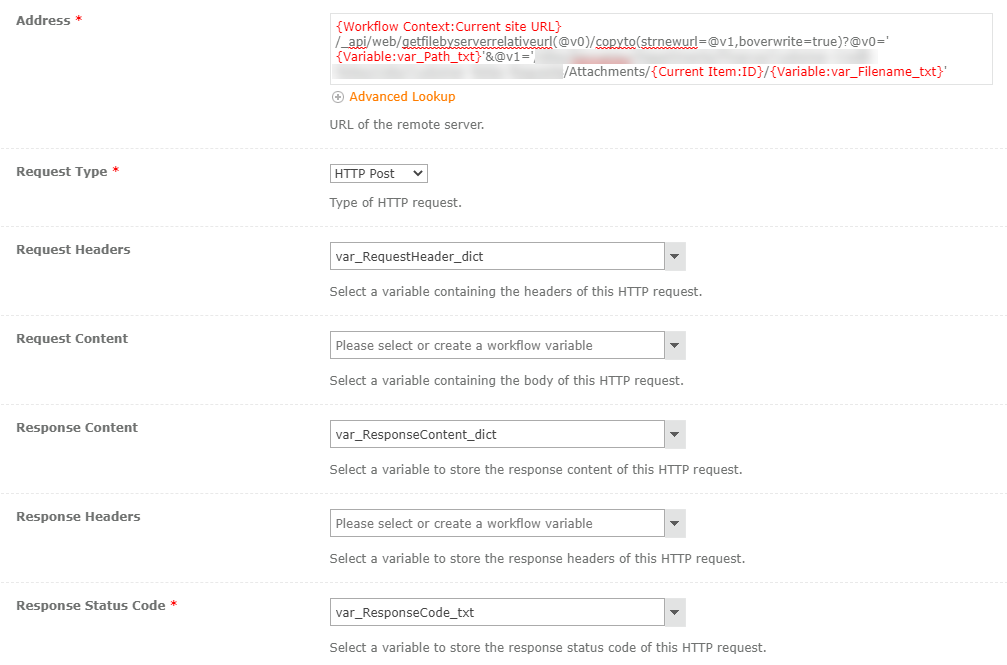
Wykonaj żądanie POST do poniższego adresu URL: {Workflow Context:Current site URL}/_api/web/getfilebyserverrelativeurl(@v0)/copyto(strnewurl=@v1,boverwrite=true)?@v0='{Variable:var_Path_txt}'&@v1='/SITE RELATIVE URL TO LIST/Attachments/{Current Item:ID}/{Variable:var_Filename_txt}'
I to wszystko! Załącznik zadania jest teraz dodany do listy załączników powiązanego elementu listy. Powodzenia!