En Mars 2023, Microsoft a introduit différents changements à Windows Autopilot permettant d’améliorer le comportement.
On retrouve notamment :
Un nouveau changement fonctionnel oblige à renommer le péri...(read more)
En Mars 2023, Microsoft a introduit différents changements à Windows Autopilot permettant d’améliorer le comportement. On retrouve notamment : Un nouveau changement fonctionnel oblige à reno mmer le périphérique pendant la phase du technicien pour le préapprovisionnement des périphérique Azure AD Join . Une fois que le technicien aura sélectionné le bouton de provisionnement, Microsoft effectuera immédiatement le renommage du périphérique et le redémarrage du périphérique, puis passe à l'ESP du périphérique. Au cours du flux d'utilisateurs, le renommage de l'appareil est alors ignoré, ce qui permet de conserver intactes les ressources qui dépendent du nom du périphérique (comme les certificats SCEP). Pour appliquer cette modification, pour Windows 10, vous devez installer la mise à jour de qualité KB5023773 ou une version plus récente. Pour Windows 11, vous devez installer la mise à jour de qualité KB5023778 ou une version plus récente. La page d'état d'inscription (ESP) prend désormais en charge les nouvelles applications du Microsoft Store pendant Windows Autopilot. Cette mise à jour permet une meilleure prise en charge de la nouvelle expérience Microsoft Store. Une nouvelle option est disponible dans le profil ESP (Enrollment Status Page) qui vous permet de choisir si vous voulez essayer d'installer les applications requises pendant la phase de pré-provisionnement (white glove) du technicien. Microsoft comprend que l'installation d'autant d'applications que possible pendant le préapprovisionnement est souhaitée pour réduire le temps d'installation de l'utilisateur final. Pour vous aider à installer autant d'applications que possible pendant le préapprovisionnement, Microsoft a mis en place une option permettant de tenter l'installation de toutes les applications requises attribuées à un appareil pendant la phase du technicien. En cas d'échec de l'installation d'une application, l'ESP se poursuit à l'exception des applications spécifiées dans le profil ESP. Pour activer cette fonction, modifiez votre profil de page d'état d'inscription en sélectionnant Oui dans le nouveau paramètre intitulé Only fail selected apps in technician phase (Échec de l'installation des applications sélectionnées en phase technicien). Ce paramètre n'apparaît que si vous avez sélectionné des applications bloquantes. Source : What's new in Autopilot | Microsoft Learn
La révolution du lieu de travail est en marche, avec la nécessité d’un environnement connecté, accessible et sécurisé. Plus de frontière entre le bureau et le lieu où le travail s’effectue réellement
Windows 10 Mobile 1709 (octobre 2017) est la dernière version publiée par l’éditeur de Redmond, son support prendra fin le 10 décembre 2019. Cette date de fin de support s’applique à tous les produits Windows 10 Mobile même à la version Entreprise. A partir de cette date, les utilisateurs de Windows 10 Mobile ne recevront […]
Matt Shadbolt de l’équipe Intune de Microsoft a récemment publié un article de blog expliquant comment via des règles de conformité Intune boquer certains fabricants de matériel. Microsoft envisagerait de permettre cette limitation de manière native dans les règles de conformité d’Intune. En attendant Matt nous propose une solution de contournement qui devrait donner des […]
Edit 01/06/2022 : updating this article to include Azure Virtual Desktop Windows 10 / Windows 11 multi-session enrollment command using Device Credential
——–
There are several ways to enroll a Windows 10 PC to Microsoft Intune:
Manually
During the Out-of-the-box Experience (OOBE), when starting a Windows 10 PC for the first time
In the Windows Settings, after the PC configuration
Manual enrollment will require that the user enters his Azure AD credentials.
Automatically
Using Azure AD Join + automatic Intune enrollment
Using Hybrid Azure AD Join + automatic Intune enrollment
Automatic enrollment can be triggered using a Group Policy, SCCM Co-Management or Windows AutoPilot.
Windows 10 automatic enrollment requires the creation of public DNS records enterpriseregistration and enterpriseenrollment. More info here.
However, sometimes it is possible that a Windows 10 PC is in an inconsistent enrollment state, with error “The sync could not be initiated“.
This can happen because:
The PC was shut down during a long time, and the Microsoft Intune certificate is expired (located in Local Machine / Certificates / Personal)
Someone manually deleted the Microsoft Intune certificate
The PC is enrolled in another Intune tenant
Prerequisites: check Hybrid Azure AD Join status
Before re-enrolling your device to Microsoft Intune, you need to make sure that the certificates for Hybrid Azure AD Join are not expired as well.
The easiest way to unenroll a Windows 10 PC from Microsoft Intune is to disconnect the work or school account.
Just go to All settings > Accounts > Access work or school, select your corporate account and click Disconnect.
Important: this menu is not available on Windows 10 / Windows 11 multi-session edition for Azure Virtual Desktop.
However, the problem with this is that all data and configuration pushed by Microsoft Intune will be deleted from the PC.
Method 2: Without data or configuration loss
There is a way to manually re-enroll your Windows 10 PC without loosing all the current configuration and apps deployed by Microsoft Intune.
This method is not officially supported by Microsoft
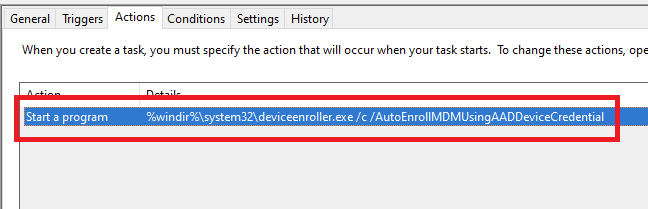
As you may know, automatic enrollment can be triggered either by a Group Policy Object or by the SCCM client on a co-managed device.
In both cases, the feature will basically create a scheduled task to enroll the PC at next logon. The command is different if you are trying to enroll Windows 10 / Windows 11 Enterprise multi-session devices from Azure Virtual Desktop (using Device Credential) or a regular Windows 10 / Windows 11 device using User Credential:
Windows 10 / Windows 11 Enterprise (with User Credential)
DO NOT delete registry keys that are not in the list above. They will be overwritten after the new enrollment.
Step 3: delete the Intune enrollment certificate
Follow the procedure:
Search for the option “Manage computer certificates” or use the command certlm.msc as an administrator.
Go to Personal > Certificates and delete the certificate issued by either “Microsoft Intune MDM Device CA” or “SC_Online_Issuing” (depending on the date of the enrollment).
Step 4: Restart the enrollment process
To be properly executed, the enrollment command must be entered in a SYSTEM context. We will use the PSExec tool for that purpose.
Microsoft vient d’annoncer la mise à disposition d’un nouvel ensemble de fonctionnalités pour Microsoft Intune.
Les fonctionnalités suivantes sont ajoutées :
Enregistrement des périphériques
[An...(read more)
Edit 01/06/2022 : updating this article to include Azure Virtual Desktop Windows 10 / Windows 11 multi-session enrollment command using Device Credential
——–
There are several ways to enroll a Windows 10 PC to Microsoft Intune:
Manually
During the Out-of-the-box Experience (OOBE), when starting a Windows 10 PC for the first time
In the Windows Settings, after the PC configuration
Manual enrollment will require that the user enters his Azure AD credentials.
Automatically
Using Azure AD Join + automatic Intune enrollment
Using Hybrid Azure AD Join + automatic Intune enrollment
Automatic enrollment can be triggered using a Group Policy, SCCM Co-Management or Windows AutoPilot.
Windows 10 automatic enrollment requires the creation of public DNS records enterpriseregistration and enterpriseenrollment. More info here.
However, sometimes it is possible that a Windows 10 PC is in an inconsistent enrollment state, with error “The sync could not be initiated“.
This can happen because:
The PC was shut down during a long time, and the Microsoft Intune certificate is expired (located in Local Machine / Certificates / Personal)
Someone manually deleted the Microsoft Intune certificate
The PC is enrolled in another Intune tenant
Prerequisites: check Hybrid Azure AD Join status
Before re-enrolling your device to Microsoft Intune, you need to make sure that the certificates for Hybrid Azure AD Join are not expired as well.
The easiest way to unenroll a Windows 10 PC from Microsoft Intune is to disconnect the work or school account.
Just go to All settings > Accounts > Access work or school, select your corporate account and click Disconnect.
Important: this menu is not available on Windows 10 / Windows 11 multi-session edition for Azure Virtual Desktop.
However, the problem with this is that all data and configuration pushed by Microsoft Intune will be deleted from the PC.
Method 2: Without data or configuration loss
There is a way to manually re-enroll your Windows 10 PC without loosing all the current configuration and apps deployed by Microsoft Intune.
This method is not officially supported by Microsoft
As you may know, automatic enrollment can be triggered either by a Group Policy Object or by the SCCM client on a co-managed device.
In both cases, the feature will basically create a scheduled task to enroll the PC at next logon. The command is different if you are trying to enroll Windows 10 / Windows 11 Enterprise multi-session devices from Azure Virtual Desktop (using Device Credential) or a regular Windows 10 / Windows 11 device using User Credential:
Windows 10 / Windows 11 Enterprise (with User Credential)
DO NOT delete registry keys that are not in the list above. They will be overwritten after the new enrollment.
Step 3: delete the Intune enrollment certificate
Follow the procedure:
Search for the option “Manage computer certificates” or use the command certlm.msc as an administrator.
Go to Personal > Certificates and delete the certificate issued by either “Microsoft Intune MDM Device CA” or “SC_Online_Issuing” (depending on the date of the enrollment).
Step 4: Restart the enrollment process
To be properly executed, the enrollment command must be entered in a SYSTEM context. We will use the PSExec tool for that purpose.