Vue normale

Il y a de nouveaux articles disponibles, cliquez pour rafraîchir la page.
À partir d’avant-hierFlux principal

Unlocking the Power of Microsoft Azure Storage Explorer: A Must-Have Tool for Azure Administrators


Microsoft Azure Storage Explorer version 1.39.1

Microsoft Azure Storage Explorer is a free, standalone application that streamlines how Azure Administrators interact with storage accounts. Whether you’re managing blobs, file shares, queues, or tables, this versatile tool brings consistency, speed, and clarity to every operation—far beyond what the Azure portal alone can provide.

Why Azure Storage Explorer Matters

Managing storage through the Azure portal is intuitive, but for heavy-duty or repetitive tasks, it falls short:

  • Manual clicks become tedious when transferring hundreds of files.
  • The web UI can feel sluggish on large containers.
  • Scripting small tasks often requires context switching between CLI and portal.

Azure Storage Explorer fills these gaps by offering:

  • A desktop client optimized for high-throughput transfers.
  • A unified interface for all storage types.
  • Built-in support for SAS tokens, Azure Active Directory, and emulator endpoints.

These capabilities translate into faster workflows and fewer mistakes.

Key Features and Advantages

  • Unified Storage View across Blob Containers, File Shares, Queues, and Tables.
  • High-Performance Data Transfers with parallel upload/download threads, drag-and-drop, and pause/resume support.
  • Fine-Grained Access Control via Azure AD, service principals, or SAS tokens.
  • Local Dev/Test Integration with Azurite and the legacy Storage Emulator.

Security and Compliance

Azure Storage Explorer adheres to Azure’s stringent security standards, ensuring your data remains protected at every stage:

  • Data Encryption
    • All data in transit is secured via HTTPS/TLS.
    • Data at rest uses Azure Storage Service Encryption (AES-256).
  • Authentication and Authorization
    • Native Azure Active Directory (AAD) integration for RBAC.
    • Support for service principals, managed identities, and SAS tokens.
    • Option to connect with access keys when needed.
  • Network Security
    • Compatible with private endpoints to restrict traffic to your Virtual Network.
    • Honors storage account firewall rules and trusted Microsoft services only.
  • Audit Logging and Monitoring
    • Leverage Azure Monitor’s diagnostic settings to capture Storage Explorer activity.
    • Integrate with Azure Sentinel or third-party SIEM tools for real-time alerts.
  • Compliance Certifications
    • Inherits Azure Storage’s compliance portfolio, including ISO, SOC, GDPR, and HIPAA standards.

Quick Comparison: Portal vs. Storage Explorer

Capability Azure Portal Azure Storage Explorer
Bulk Upload/Download Limited parallelism, manual UI High-performance parallelism
Authentication Methods Primarily Azure AD Azure AD, SAS, connection strings, emulator
Local Emulator Support Requires separate installation Native support for Azurite and emulator
CLI/Scripting Integration CLI or PowerShell separately Built-in scripting via PowerShell snippets
Cross-Subscription Browsing Tab per subscription All subscriptions in one pane

Real-World Scenarios

  1. Disaster Recovery Testing
    Quickly seed a secondary storage account from backups stored in local Azurite for non-production failover drills.
  2. Mass Data Migration
    Move terabytes of logs or media assets between subscriptions without crafting custom AzCopy scripts.
  3. Role-Based Troubleshooting
    Verify user permissions by connecting under different service principals, then audit and correct access policies on the fly.

Getting Started in Minutes

  1. Download & Install
    Grab the latest MSI/DMG from Microsoft’s official download page.
  2. Connect Your Account
    • Choose Azure AD for seamless single sign-on.
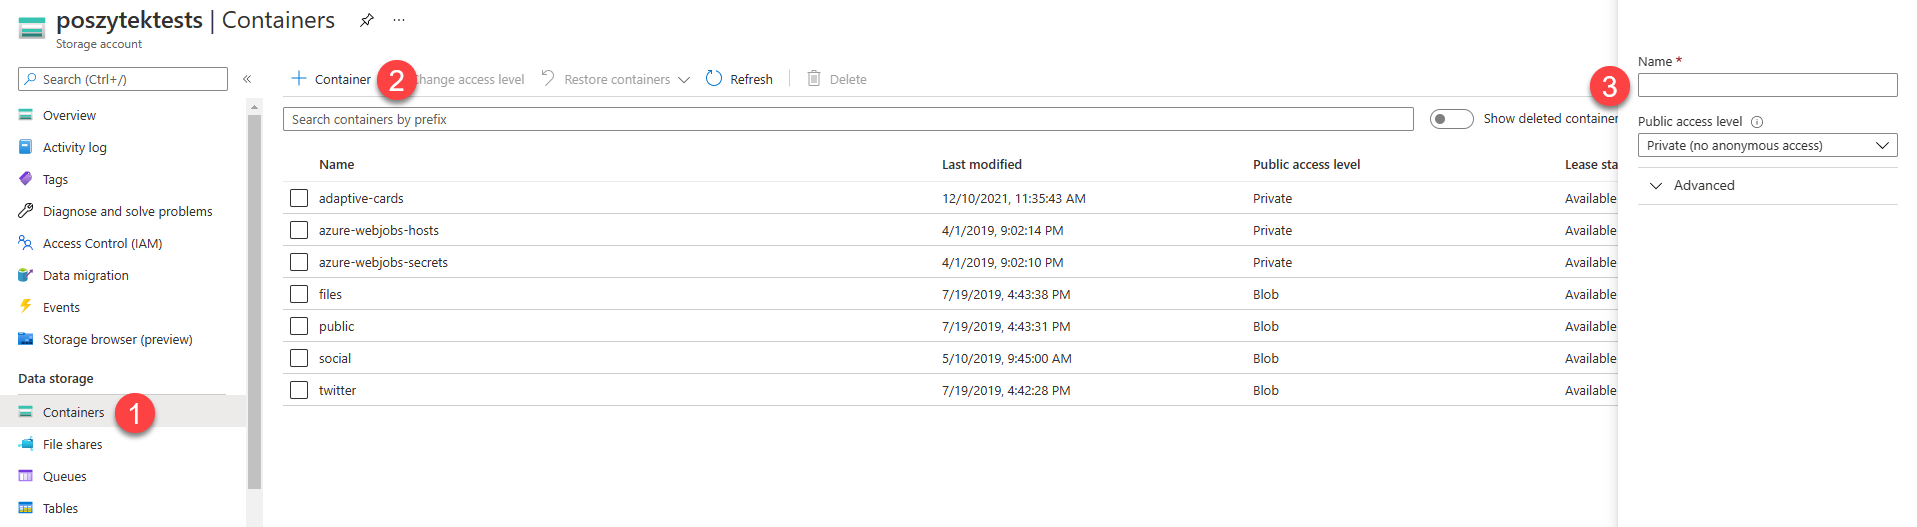
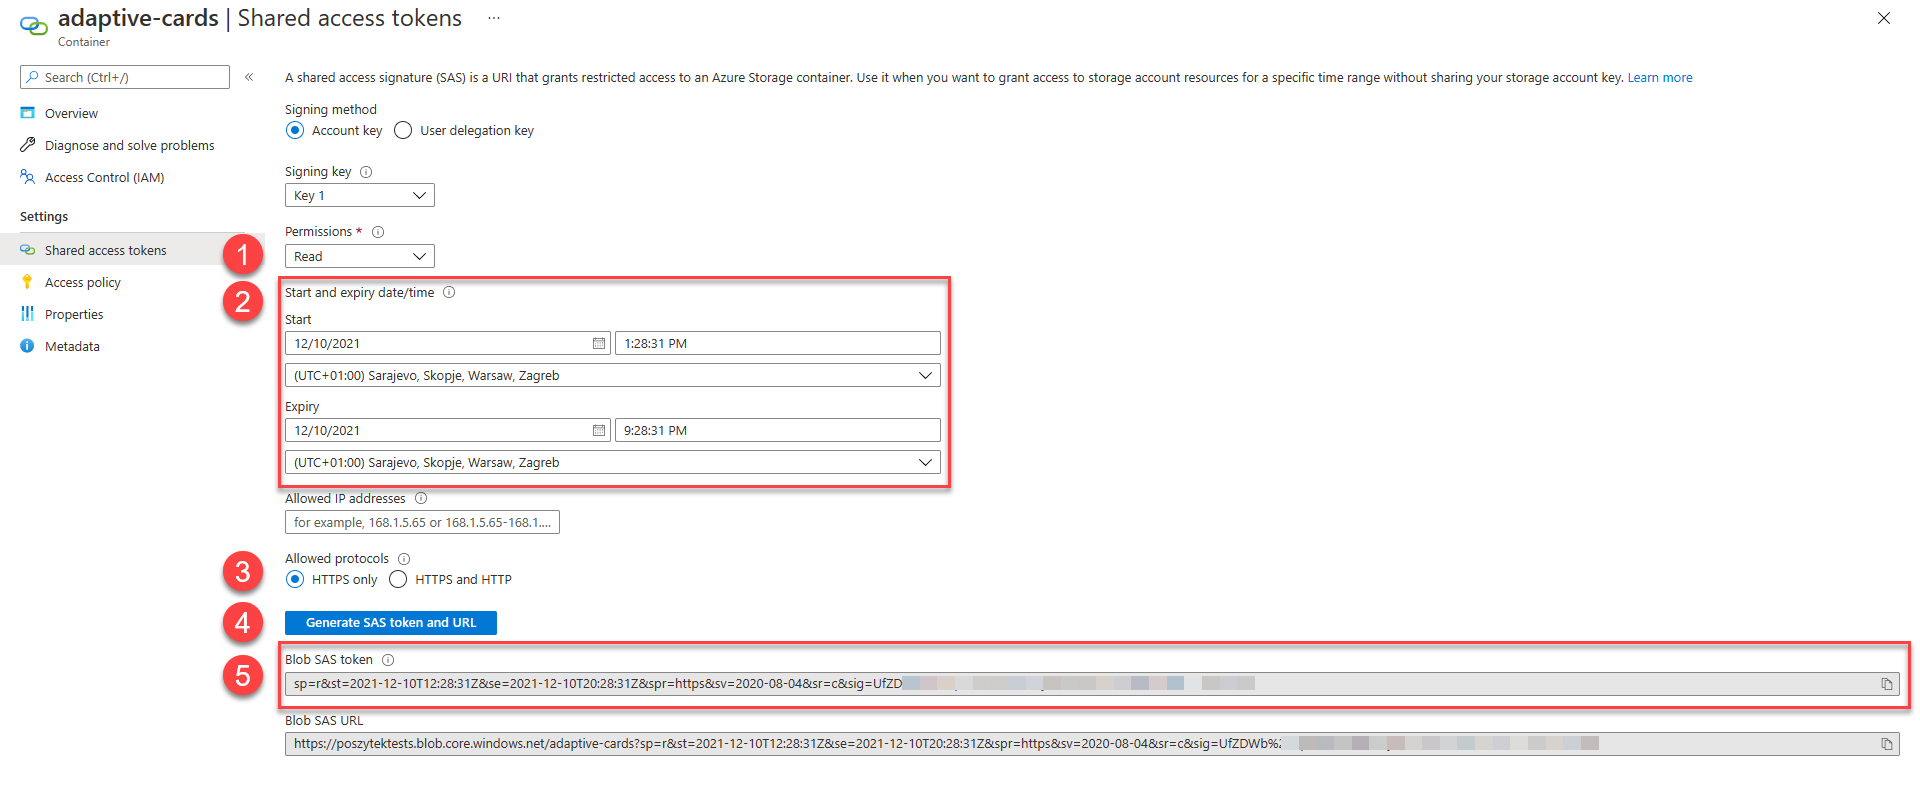
    • Or paste a SAS URL for granular, time-limited access.
  3. Explore & Operate
    • Expand subscriptions and storage accounts in the left pane.
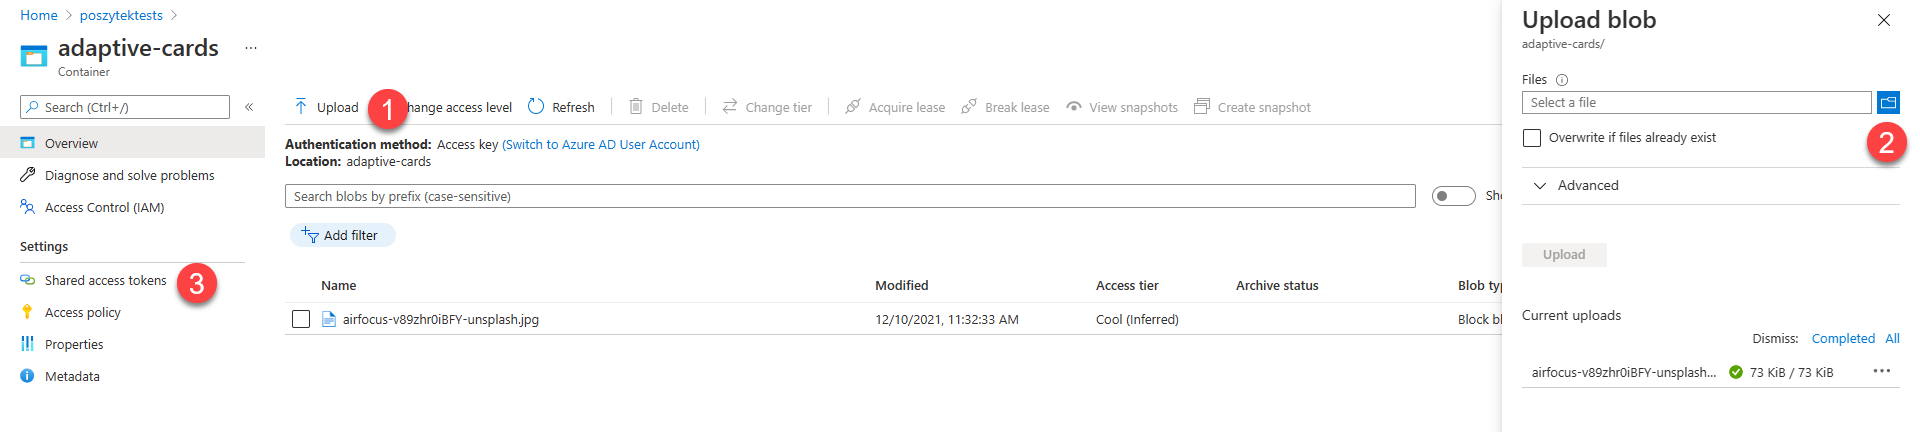
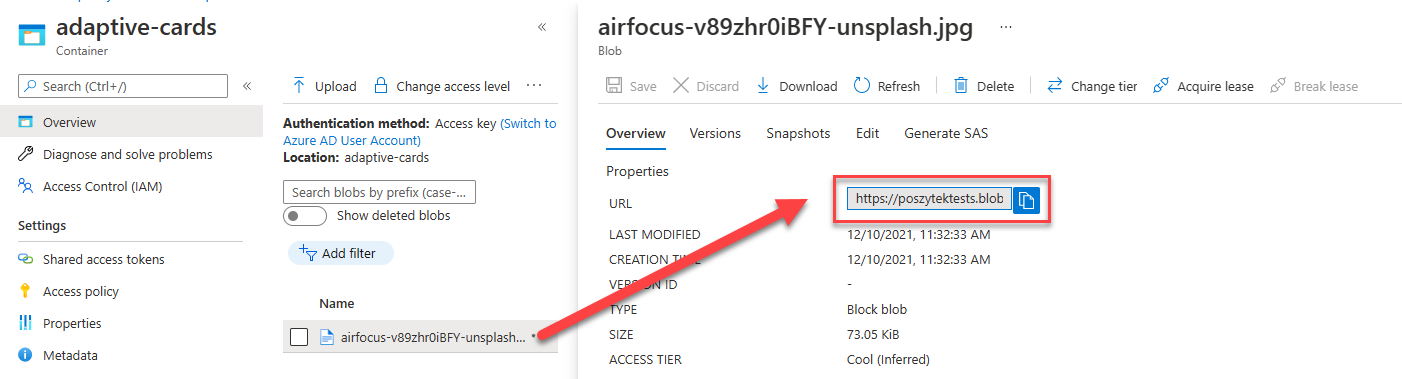
    • Drag files into blob containers or right-click tables to run C# or PowerShell snippets.
  4. Automate Common Tasks
    • Record frequent operations as scripts.
    • Export and share connection profiles with your team for consistent setups.

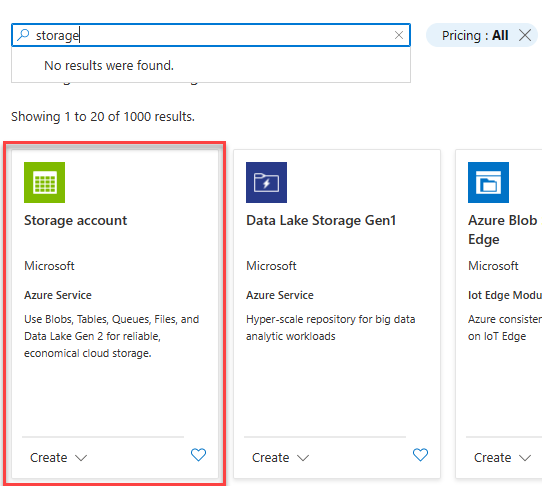
Here you see the simple installation steps of Azure Storage Explorer:

Download Microsoft Azure Storage Explorer

Right click the file and run as Administrator.

This is for me only, so I clicked on Install for me only

Accept the agreement and click on Install

An old installation was detected on my machine, Setup will uninstall it before continuing.
Click on Next

Select your folder or keep it default and click on Next

Click on Next
When you don’t want a start Menu Folder mark the box on the left.

Click on Finish

Microsoft Azure storage Explorer.

Sign in with your Azure Account.

Select your Azure Environment and click on Next

Microsoft Azure Storage Explorer connected with your Azure Subscription.


Tips & Best Practices

  • Use AzCopy integration for scripting large-scale migrations and include –recursive for deep folder copies.
  • Leverage table filtering to preview query results before exporting datasets.
  • Keep your Storage Explorer version up to date—the team delivers monthly enhancements and bug fixes.
  • Store connection profiles in source control (encrypted) so every teammate uses the exact same environment.

Conclusion

Azure Storage Explorer transforms tedious, repetitive storage tasks into a seamless, high-speed experience. For any Azure Administrator juggling blobs, files, queues, or tables, it’s the go-to tool to boost productivity, ensure security, and tame your data sprawl.

Next Steps

  • Download Azure Storage Explorer and connect a demo subscription today.
  • Explore built-in script samples to automate your top five storage tasks.
  • Join the Azure Storage community on GitHub to suggest features or report issues.

More information about Azure Storage Explorer on Microsoft Learn

Revolutionizing Hybrid Cloud Storage with Azure Container Storage Enabled by Azure Arc

In the dynamic world of cloud computing, Microsoft continues to innovate with solutions that empower organizations to manage hybrid and multi-cloud environments effectively. One such groundbreaking solution is Azure Container Storage enabled by Azure Arc. This technology is designed to simplify and enhance the management of persistent storage for Kubernetes clusters, providing a unified and adaptive approach to cloud storage.

What is Azure Container Storage Enabled by Azure Arc?

Azure Container Storage enabled by Azure Arc is a first-party storage system designed for Arc-connected Kubernetes clusters. It serves as a native persistent storage solution, offering high availability, fault tolerance, and seamless data synchronization to Azure Blob Storage. This system is crucial for making Kubernetes clusters stateful, especially for Azure IoT Operations and other Arc services.

Key Features and Benefits

  1. High Availability and Fault Tolerance: When configured as a 3-node cluster, Azure Container Storage enabled by Azure Arc replicates data between nodes (triplication) to ensure high availability and tolerance to single node failures.
  2. Data Synchronization to Azure: Data written to volumes is automatically tiered to Azure Blob Storage, including block blob, ADLSgen-2, or OneLake. This ensures that data is securely stored and easily accessible in the cloud.
  3. Low Latency Operations: Arc services, such as Azure IoT Operations, can expect low latency for read and write operations, making it ideal for real-time applications.
  4. Simple Connection: Customers can easily connect to an Azure Container Storage enabled by Azure Arc volume using a CSI driver to start making Persistent Volume Claims against their storage.
  5. Flexibility in Deployment: Azure Container Storage enabled by Azure Arc can be deployed as part of Azure IoT Operations or as a standalone solution, providing flexibility to meet various deployment needs.
  6. Platform Neutrality: This storage system can run on any Arc Kubernetes supported platform, including Ubuntu + CNCF K3s/K8s, Windows IoT + AKS-EE, and Azure Stack HCI + AKS-HCI and Azure Local.

Microsoft Azure Local solution


Azure Container Storage Offerings

Azure Container Storage enabled by Azure Arc offers two main storage options:

  1. Cache Volumes: The original offering, providing a reliable and fault-tolerant file system for Arc-connected Kubernetes clusters.
  2. Edge Volumes: The newest offering, which includes Local Shared Edge Volumes and Cloud Ingest Edge Volumes. Local Shared Edge Volumes provide highly available, failover-capable storage local to your Kubernetes cluster, while Cloud Ingest Edge Volumes facilitate limitless data ingestion from edge to Blob storage.

Use Cases and Applications

Azure Container Storage enabled by Azure Arc is particularly beneficial for organizations with hybrid and multi-cloud environments. It supports various use cases, including:

  • IoT Applications: Ensuring data integrity and synchronization in disconnected environments, making it ideal for IoT operations.
  • Edge Computing: Providing local storage for scratch space, temporary storage, and locally persistent data unsuitable for cloud destinations.
  • Data Ingestion: Facilitating seamless data transfer from edge to cloud, optimizing local resource utilization and reducing storage requirements.

Conclusion

Azure Container Storage enabled by Azure Arc represents the future of hybrid cloud storage, offering seamless onboarding, unified management, and adaptive capabilities. By leveraging this technology, organizations can overcome the challenges of hybrid and multi-cloud environments, streamline operations, and drive innovation.

Whether you’re just starting your cloud journey or looking to optimize your existing infrastructure, Azure Container Storage enabled by Azure Arc provides the tools and guidance you need to succeed. Embrace the power of this transformative solution and unlock new possibilities for your organization.

Jumpstart Drops is a good begin in your test environment, before you begin in production. Here you find a Jump start drop about “Create an Azure Container Storage enabled by Azure Arc Edge Volumes with CloudSync” by Anthony Joint.

More information:

Introducing Azure Local by Cosmos Darwin

Microsoft Adaptive Cloud

Announcement! Edge Storage Accelerator YouTube video. 

What is Microsoft Azure Arc Services?

Jarg – Une interface graphique pour Restic

Vous vous souvenez de Restic que je vous ai présenté en 2020 ?

Ce logiciel permet de faire des backup sous forme de snapshot (object storage) localement ou sur des services distants type AWS S3, OpenStack Swift, BackBlaze B2, Microsoft Azure Blob Storage ou encore Google Cloud Storage sans oublier via SFTP.

Sauf que Restic, et bien c’est de la ligne de commande et je sais que certains d’entre vous sont allergiques à ça. Heureusement, il existe une interface graphique (moche) nommée Jarg qui devrait vous aider à prendre ça en main.

Il vous faudra évidemment télécharger et installer Restic avant de pouvoir utiliser cette application.

Capture d'écran de l'interface graphique Jarg pour Restic

Lors de votre première utilisation de Jarg, un profil « par défaut » sera alors créé, ainsi qu’un « répertoire restic » dans votre dossier utilisateur et c’est votre dossier courant qui sera utilisé comme source pour la sauvegarde.

Jarg exécutera alors les commandes Restic correspondantes à ce que vous voulez et affichera les résultats affichés sur la droite de l’interface.

Notez que niveau sécurité, Jarg ne chiffre pas pour le moment les mots de passe et les secrets S3 donc soyez prudent avec la sécurité de votre ordinateur.

Jarg est dispo sous macOS, Windows et Linux (soit vous compilez, soit vous utilisez l’AppImage) en cliquant ici.

Built-In Closet Dresser

Built In Dresser Rogue Engineer 9

By Jamison Rantz

We recently replaced my daughters dresser with a storage unit for her toys. That meant we needed some drawers to house her clothes. We have always wanted to build a built-in dresser for her walk in closet and now it was go time. I decided to build a 5 drawer dresser with two smaller drawers at the top and three larger drawers below. This setup provides a ton of storage and while plywood is extremely high right now, I was still able to build this unit for a little over $400 which saved me thousands if we were to have it custom made. Read on to see exactly how we did it.

Built In Dresser Rogue Engineer 4

If you love this stuff as much as we do, you might want to consider following us on Instagram where we post sneak peeks and behind the scenes stuff in our stories. Also, did you know you can get tons of projects plans from all around the web when you follow us on Facebook and Pinterest!

Full Project Video

Wanna see how it all came together? Check out the full project video below and don’t forget to subscribe on YouTube so you won’t miss future videos!

Time to Complete

1 Wknd

Estimated Cost

~$400-500

Skill Level

Intermediate

Printable PDF

Download PDF

Materials

  • (3) 3/4” x 4’ x 8’ Pre-Finished Plywood
  • 3/4” x 4’ x 8’ Paint-Grade Plywood
  • (5) 18” Drawer Slides (pair)
  • Iron-on Edge Banding
  • (5) Drawer Pulls
  • 1-1/4” Pocket Screws
  • 3” Wood Screws
  • 1-1/4” Brad Nails or Staples
  • 1-1/4” Wood Screws
  • DAP WeldWood Wood Glue
  • DAP Premium Wood Filler
  • DAP Alex Flex
banner ad 1

Disclosure: This post is sponsored by DAP Products. As well, the links provided in the “materials” and “required tools” sections are affiliate links. If you would like to support our site and help keep our content free come find out more about how we can make money with no extra cost to you.

Dimensions

DIY Built In Closet Dresser Plans Dimensions

Cut List

DIY Built In Closet Dresser Plans Cut List

I would recommend breaking down the plywood as needed for this project. Some pieces will need to be cut to fit.

DIY Built In Dresser Plans Step 2

I also recommend breaking down plywood with a track saw or circular saw with straight edge guide into smaller pieces before moving to the table saw.

DIY Built In Dresser Plans Step 3

How to Build a Built-In Dresser for a Walk-In Closet

  1. Assemble Base

    DIY Built In Closet Dresser Plans Step 1
    DIY Built In Dresser Plans Step 1

  2. Drawer Box Assembly

    DIY Built In Closet Dresser Plans Step 3
    DIY Built In Dresser Plans Step 4

  3. Drawer Box Assembly

    DIY Built In Closet Dresser Plans Step 4
    DIY Built In Dresser Plans Step 5

  4. Install Drawers

    DIY Built In Closet Dresser Plans Step 4 1

    DIY Built In Dresser Plans Step 6

  5. Installation and Trim

    DIY Built In Closet Dresser Plans Step 5
    DIY Built In Dresser Plans Step 10

    DIY Built In Dresser Plans Step 11

  6. Cut and Install Top

    DIY Built In Closet Dresser Plans Step 6
    DIY Built In Dresser Plans Step 12

    DIY Built In Dresser Plans Step 13

  7. Finishing


    All of our drawer fronts were primed and painted before install.

    DIY Built In Dresser Plans Step 16

    Before primer and paint on the unit I filled and nail holes, joints or imperfections in the plywood with DAP Premium Wood Filler and sanded smooth. DAP recommends using a putty knife for wood filler application.

    DIY Built In Dresser Plans Step 7

    To give the unit a truly built-in look we needed to caulk it in place. We did so using DAP Alex Flex which is a crack-proof sealant formulated for trim. DAP recommends using a finishing tool for caulk application.

    DIY Built In Dresser Plans Step 8

    We applied this around the top and sides.

    DIY Built In Dresser Plans Step 9

    Then we applied primer and paint to the exposed wood.

    DIY Built In Dresser Plans Step 15

  8. Drawer Fronts and Hardware

    DIY Built In Closet Dresser Plans Step 8 1

    DIY Built In Dresser Plans Step 17

    DIY Built In Dresser Plans Step 18
    DIY Built In Dresser Plans Step 19

    DIY Built In Dresser Plans Step 20

Built In Dresser Rogue Engineer 8
Built In Dresser Rogue Engineer 5
Built In Dresser Rogue Engineer 6
Built In Dresser Rogue Engineer 9

Questions? Comments?

As always, if you have any questions don’t hesitate to comment below and especially don’t forget to post pictures of your finished products in the comments!

Continue reading at Built-In Closet Dresser.

Storage Unit with Beveled Edge

Storage Unit with Beveled Edges Rogue Engineer 3

By Jamison Rantz

Our daughter was in need of a storage unit in her room to help organize toys and books so we decided to build her an open storage unit with baskets. While it is a simple design, we wanted to add a little flare by installing beveled edges to the front of it rather than just standard plywood edge banding. With a few sheets of plywood we were able to make something that we think is pretty cool.

Storage Unit with Beveled Edges Rogue Engineer 6

If you love this stuff as much as we do, you might want to consider following us on Instagram where we post sneak peeks and behind the scenes stuff in our stories. Also, did you know you can get tons of projects plans from all around the web when you follow us on Facebook and Pinterest!

Disclosure: This project was sponsored by DAP Products however the design opinions are 100% my own.

Full Project Video

Wanna see how it all came together? Check out the full project video below and don’t forget to subscribe on YouTube so you won’t miss future videos!

Time to Complete

1 Wknd

Estimated Cost

~$150-250

Skill Level

Intermediate

Printable PDF

Download PDF

Materials

Sponsored by DAP Products

Disclosure: The links provided in the “materials” and “required tools” sections are affiliate links. If you would like to support our site and help keep our content free come find out more about how we can make money with no extra cost to you.

Dimensions

DIY Storage Unit with Beveled Edge Dimensions

Cut List

DIY Storage Unit with Beveled Edge Cut List
DIY Bedside Table Step 1

How to Build an Open Storage Unit

Time needed: 1 day.

  1. Assemble Unit


    DIY Storage Unit with Beveled Edge Step 1
    Storage Unit Step 11

  2. Install Additional Vertical Panels


    DIY Storage Unit with Beveled Edge Step 2

    Storage Unit Step 1

  3. Install Shelves


    DIY Storage Unit with Beveled Edge Step 3

    Storage Unit Step 5

  4. Cut Beveled Trim


    DIY Storage Unit with Beveled Edge Step 4

    Storage Unit Build Step 1

  5. Install Beveled Trim


    DIY Storage Unit with Beveled Edge Step 5

    Storage Unit Step 3

  6. Install Back


    DIY Storage Unit with Beveled Edge Step 6

    Storage Unit Step 7

    Storage Unit Step 8

  7. Caulk, Fill, Prime, and Paint


    We actually did this a little out of order. We started the finishing process before installing the shelves by first filling any wood joints adjacent to the trim with DAP Premium Wood Filler.

    Storage Unit Build Step 2

    Then, after a good sanding we applied the primer and paint to the unit, shelves and back. Since our unit is white, we applied caulk later. If going with a color you would want to complete assembly and caulk before painting.

    Storage Unit Step 4

    After completing the unit we then applied DAP Alex Ultra to all the cubbies and this not only makes those joints disappear, with their Anti-Shrink technology, it will make sure you don’t see any cracking in the caulk as the wood moves.

    Storage Unit Step 12

  8. Assemble Base


    DIY Storage Unit with Beveled Edge Step 7

    Storage Unit Step 9

  9. Install Base


    DIY Storage Unit with Beveled Edge Step 8

    Storage Unit Step 10

Storage Unit with Beveled Edges Rogue Engineer 3
Storage Unit with Beveled Edges Rogue Engineer 4
Storage Unit with Beveled Edges Rogue Engineer 1

Questions? Comments?

As always, if you have any questions don’t hesitate to comment below and especially don’t forget to post pictures of your finished products in the comments! ENJOY!

Continue reading at Storage Unit with Beveled Edge.

Wyświetlanie obrazków w Adaptive Cards

Obrazy zawsze wzbogacają projekty Adaptive Cards. Jednak w Microsoft Teams max. payload (rozmiar) wiadomości to tylko 25KB i obejmuje on również rozmiar JSON samej karty. Dlatego bardzo często nie jest możliwe wyświetlenie nawet najmniejszego obrazu w trybie inline. Jakie zatem są inne opcje?

Obrazki w Adaptive Cards

Zasadniczo obrazy są wyświetlane na kartach adaptacyjnych przy użyciu elementu „Image”. W jego właściwościach musisz wpisać adres URL do obrazu:

Ważne! Adres URL obrazu musi zaczynać się od https i być bezpośrednim linkiem do samego pliku (kończyć się na jpg, png, tiff itp.).

Ok, więc jakie są opcje wyświetlania obrazu

  1. Poprzez bezwzględne hiperłącze do samego pliku
  2. Poprzez data uri – zakodowana do formatu base64 zawartość pliku

Pierwsze podejście wyjaśniłem już powyżej. Jest bardzo proste. Drugie wymaga pobrania zawartości pliku i zakodowania jej za do stringu base64. Można to zrobić samodzielnie, korzystając z usług online, np. Base64 Image Encoder. Lub używając wyrażenia dataUri(zawartość pliku) w Power Automate:

dataUri expression in Power Automate

To, co jest zwracane, wygląda jak następujący ciąg: data:image/jpeg;base64,/9j/4AAJRgABAQ….QP//Z. Im dłuższy jest ten ciąg, tym większy jest plik. Na koniec ten ciąg (lub wyrażenie w Power Automate) należy umieścić jako wartość we właściwości Url elementu Image w projekcie karty adaptacyjnej.

Ważne! Rozmiar wiadomości Microsoft Teams może mieć rozmiar max. 25 KB na dzień dzisiejszy – wliczając w to JSON. Więc jeśli zakodujesz obraz w base64, łatwo zorientujesz się, że posiadanie tak wielu znaków spowoduje, że rozmiar z łatwością przekroczy ten limit. 25 KB to 25 000 bajtów, a jeden znak jest kodowany jako od 1 do 4 bajtów. Na przykład $ potrzebuje jednego bajtu, podczas gdy € potrzebuje 3 bajtów.

Gdzie przechowywać obrazy?

Zasadniczo obraz, który ma być wyświetlany, musi być dostępny anonimowo. Dzieje się tak, ponieważ karta Adaptive Card w MS Teams jest wyświetlana przez bota Teams, a nie konto uwierzytelnionego użytkownika. W związku z tym nie ma ono takich samych uprawnień dostępu jak użytkownik, który wyświetla kartę i najpewniej nie ma dostępu do pliku.

Wiedząc o tym, nie jest możliwe przechowywanie i wyświetlanie obrazów z SharePoint przy użyciu ścieżki bezwzględnej. Możesz spróbować, najpierw przekonwertować obrazy na data uri, jednak pamiętaj o rozmiarze wiadomości 🙂

Jakie inne sposoby są zatem możliwe?

  1. Anonimowy serwer FTP
  2. Usługi online do przechowywania obrazów, np.: Imgur
  3. WordPress
  4. Azure Blob Storage
  5. i inne, pozwalające na udostępnianie plików nie wymagajace uwierzytelnienia

OneDrive nie może służyć jako magazyn do przechowywania obrazów, ponieważ nawet jeśli zdecydujemy się udostępnić obraz komukolwiek:

Wygenerowany link nadal nie jest prawidłowym, bezwzględnym linkiem do samego pliku, ale do strony, która wyświetla obraz, więc gdy umieścisz go jako wartość Url, obraz nie zostanie wyświetlony:

Image shared through link from OneDrive will not work

Jak bezpiecznie przechowywać obrazy, ale nadal wyświetlać je w Adaptive Cards?

W takim przypadku należy poszukać usług, które pozwalają zabezpieczyć zawartość za pomocą connection string/ SAS (shared access signature), które można dodać do bezwzględnego adresu URL jako parametry url. Moim ulubionym jest Azure Blob Storage. Pokażę ci teraz jak.

  1. Zaloguj się do portalu Azure i utwórz Storage account:
  1. Gdy konto jest utworzone, przejdź do niego i:
    1. Kliknij na Containers
    2. Kliknij link do stworzenia nowego kontenera
    3. Wpisz jego nazwę i ustaw poziom dostępu na Private
  1. Teraz prześlij obraz, który chcesz wyświetlić w Adaptive Card:
    1. Kliknij link Upload
    2. Wybierz plik, który chcesz przesłać i określ wszystkie właściwości zgodnie z własnymi potrzebami
    3. Wreszcie po przesłaniu przejdź do strony Shared access tokens
  1. Na koniec wygeneruj token SAS, który możesz dołączyć do linku bezwzględnego do obrazu, aby udostępnić go do wyświetlenia.
    1. Zdefiniuj poziom uprawnień – w tym scenariuszu wystarczy tylko Read
    2. Zdefiniuj daty wygaśnięcia – kiedy token wygaśnie, a zasób ponownie stanie się niedostępny
    3. Wybierz tylko HTTPS, ponieważ tylko taki protokół obsługują karty Adaptive Card
    4. Kliknij, aby wygenerować token SAS i URL
    5. Skopiuj token SAS

Teraz możesz wrócić do zawartości kontenera, otworzyć szczegóły pliku, skopiować jego ścieżkę i dołączyć token SAS:

Następnie wklej taki adres URL z powrotem do właściwości Url elementu Image w Adaptive Card i voilla! Obraz zostanie prawidłowo wyświetlony:

Mam nadzieję, że ten krótki poradnik okaże się przydatny. Napisz w komentarzach, jakich innych dostawców używasz do bezpiecznego przechowywania obrazów i uzyskiwania do nich dostępu za pomocą SAS/ tokenów dostępu.

Artykuł Wyświetlanie obrazków w Adaptive Cards pochodzi z serwisu Tomasz Poszytek, Business Applications MVP.

Missing Site Nav Edit Link and Extraneous Icons

Another day, another weird SharePoint problem. We’re working on a client Intranet, and just launched it yesterday. Everything works great and the client is happy. But, as is often the case, we needed to make a few tweaks to the Site Nav based on user feedback. (An Intranet is never done, folks.)

If you look at the screenshot of the site banner below, you can see the issue. There are extraneous icons on the far right, and the Edit link is missing for the Site Nav. That means we can’t make any changes to the Site Nav. There’s no settings page for it and there’s no workaround that I could find.

That is, until I posted the quandary to my MVP channels and Cathy Dew (@catpaint1) gave me an obscure fix. (I shouldn’t need to know exactly who on the Product Team to contact when something like this happens. It’s a bug and it should be fixed. I feel for all of you out there who must go into support ticket hell to resolve these things.)

If you ever get yourself into this state – and if you use Edge, you may well get here – this will fix things for you. (Another option is to switch to Chrome, but that feels wrong.)

This may happen to you if the following things are true:

  • You use Edge as your browser
  • You’ve enabled Viva Connections
  • You’ve opened the Intranet in Microsoft Teams in the browser
  • You’re in any SharePoint site and want to edit the Site Nav

The people who manage the Intranet are the most likely to do all of these things, and in the sequence that causes the problem.

The fix is simple if you’re used to the tooling but may not be familiar to you if you haven’t used the Developer Tools. Trust me, it’s not as bad as it looks. Here are the steps.

  • Open the Developer tools in your browser by hitting the F12 key
  • If you haven’t ever done this before, you’ll get this dialog:
  • Click the Open DevTools button. If you’d like to avoid this dialog in the future, check the Remember my decision box first.
  • The Developer Tools will open on the right side of the screen (by default – if you’ve used them before, they will be wherever you last docked them).
  • Click the Console tab. If your screen isn’t very big, you may need to click on the >> to see the tab.
  • At the bottom of the panel, you’ll have a command prompt. (You may well see a whole bunch of errors and other junk in that panel. To be honest, Microsoft does a horrible job cleaning up their debugging messages and spurious errors. But that’s a diatribe for another day.)
  • Type localStorage.hostedApp and hit Enter. If you see the 'viva1p' value like I do below, that’s the culprit.
  • Type localStorage.hostedApp = null and hit Enter. You’ll see the value is now null.
  • Refresh the browser and all shall be good with the world – until the next time you open Microsoft Teams in the browser and navigate to the Intranet. (I’ve been sitting here toggling this back and forth to test it.)

What’s happening here is Microsoft Teams – the Viva Connections app in Teams, actually – is setting a value in the localStorage of your browser. That value for hostedApp tells SharePoint to render the page in a Teams-friendly way, with those extra icons on the right. When we go to the site in SharePoint instead, that value is still set, and the page renders with those icons. It also happens to break the Edit link for the Site Nav.

This fix ONLY sets the localStorage.hostedApp value in your browser to null. It doesn’t do anything dangerous or scary.

Note that this is a BUG. Microsoft knows about it, and one might hope they will fix it – soon. Until then, we have this fix.

❌
❌