A new month is already here and also a new update for the Office 365 For IT Pros has been released. As always, you can find all the updates we have added in our Web Site:
Office 365 evolves continuously adding new features and functionalities, what makes the writing team busy month by month to include all this new stuff.
Aunque ya es conocido desde hace varias semanas, me quería hacer eco de la actualización (subida) de precio que vamos a ver en las suscripciones de Microsoft 365 desde el 1 de julio de 2026 y que se justifica según Microsoft con la incorporación de nuevas capacidades de IA y Seguridad a los distintos planes. El resumen de estas nuevas capacidades lo podéis encontrar en la siguiente tabla:
Y la actualización de precios que es importante en la siguiente tabla:
A new month is already here and also a new update for the Office 365 For IT Pros has been released. As always, you can find all the updates we have added in our Web Site:
Office 365 evolves continuously adding new features and functionalities, what makes the writing team busy month by month to include all this new stuff.
In today’s inclusive and diverse workplace, it’s important to respect and affirm individuals’ gender identities and expressions, including their preferred pronouns. Pronouns are the words we use to replace someone’s name in a sentence, such as “he”, “she”, or “they” in English. Using correct pronouns is essential for creating an inclusive environment where everyone feels valued and respected.
Microsoft is adding a new feature for adding pronouns to the profile cards in Microsoft 365. Users in your organization will soon be able to add pronouns directly to their profile cards in Outlook on the web (OWA) and Microsoft Teams.
This new feature is associated with Microsoft 365 Roadmap ID 86382 (Microsoft Teams) and 115511 (Outlook on the web).
Pronouns will be shown next to the name in the top section of the profile card in Outlook on the web and Microsoft Teams. After a user adds pronouns to their profile, the pronouns will be visible to everyone in your organization (including guest accounts having account in your organization). Users can’t control who can see their pronouns in Microsoft 365 in your organization. So, it’s not possible to hide pronouns from certain users in your organization. However, pronouns aren’t visible to people outside the organization.
Turn Pronouns ON or OFF from Microsoft 365 admin center
The pronouns feature is OFF by default for your tenant and requires configuration to turn on. As a Global Microsoft 365 administrator, you can turn ON pronouns feature that lets all users in your organization add their pronouns on their profile cards in Microsoft 365 (Microsoft Teams and Outlook Web).
Follow below steps to turn the pronouns feature ON or OFF from the Microsoft 365 admin center:
Select Settings from left navigation and then select Org settings (If Settings option is not shown by default, click on … Show all first)
From Org settings page, select the Security & privacy tab
Select Pronouns
To turn ON the pronouns feature, select the Turn on and allow pronouns checkbox from Pronouns pane. To turn OFF the pronouns feature, clear the checkbox
Select Save
Turn Pronouns ON or OFF from Microsoft 365 admin center
Note
If you change the Pronouns settings, it can take up to 7 hours to take effect.
If you allow pronouns and stop allowing them later, saved pronouns by users will be deleted from Microsoft 365. The data deletion process could take up to 30 days to complete.
If you turn ON the pronouns feature again before 30 days, any hidden pronouns that haven’t yet been deleted from Microsoft servers will become visible in Microsoft 365 profile cards in Microsoft Teams and Outlook on the web (OWA).
Microsoft 365 stores user pronouns in a hidden folder in user’s Exchange Online mailbox along with other data.
You can only enter up to 30 characters (including spaces) in your pronouns.
Add, update, or delete pronouns on Microsoft 365 profile cards
Follow below steps to Add, update, or delete pronouns on Microsoft 365 profile cards in Microsoft Teams and Outlook on the web:
Open your profile card in Microsoft Teams or Outlook on the web (OWA). To open your profile card in Microsoft Teams, select your profile picture from the upper right corner of Teams. To open your profile card in Outlook on the web (OWA), select your name or profile picture in Outlook Mail.
From your profile card, select + Pronouns or the pronouns listed below your name:
To add or change your pronouns, select from the examples (only available in English), or enter your own. To delete, remove your pronouns. In the example below, Elvia Atkins has chosen She/Her. The preview window also shows the chosen pronouns:
Select Save and then Got it. Changes will be updated immediately.
And that’s it! Now you know how to add, update, or delete pronouns on your Microsoft 365 profile card in Microsoft Teams. By using this feature, you can ensure that your colleagues and team members can address you with the correct pronouns, promoting inclusivity and respect in the workplace.
When a user is deleted in Microsoft 365, the mailbox is removed as well. But what if someone still needs access to the mailbox and you forgot to share it first? Or maybe you have deleted the wrong user? In these cases, we can restore ... Read moreHow to Restore a Deleted Mailbox in Office 365
SharePoint has limits on the size of files that users can upload and store on the platform. Which can be an issue for those who work with larger files. There are also limitations when moving data between SharePoint sites. In this article, we will look ... Read moreSharePoint File Size Limits Explained
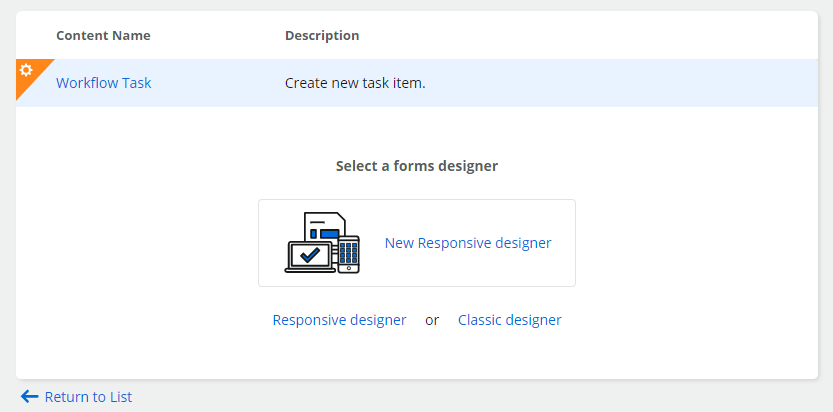
W tym krótkim poście pomogę Ci zbudować przepływ pracy w Nintex for Office 365, który pozwoli Ci skopiować załączniki, które zostały dodane do zadania, do załączników powiązanego elementu listy. Element listy jest oczywiście tym, wokół którego działa cały przepływ pracy.
Formularz zadania
Najpierw musisz zbudować formularz zadania.
To naprawdę nie ma znaczenia, który typ designera wybierzesz – każdy pozwala na użycie kontrolki załączników (zaś w „New responsive designer” – kontrolki nazwanej „File upload”):
Skonfiguruj formularz tak, jak potrzebujesz. Po zakończeniu wróć do akcji zadania.
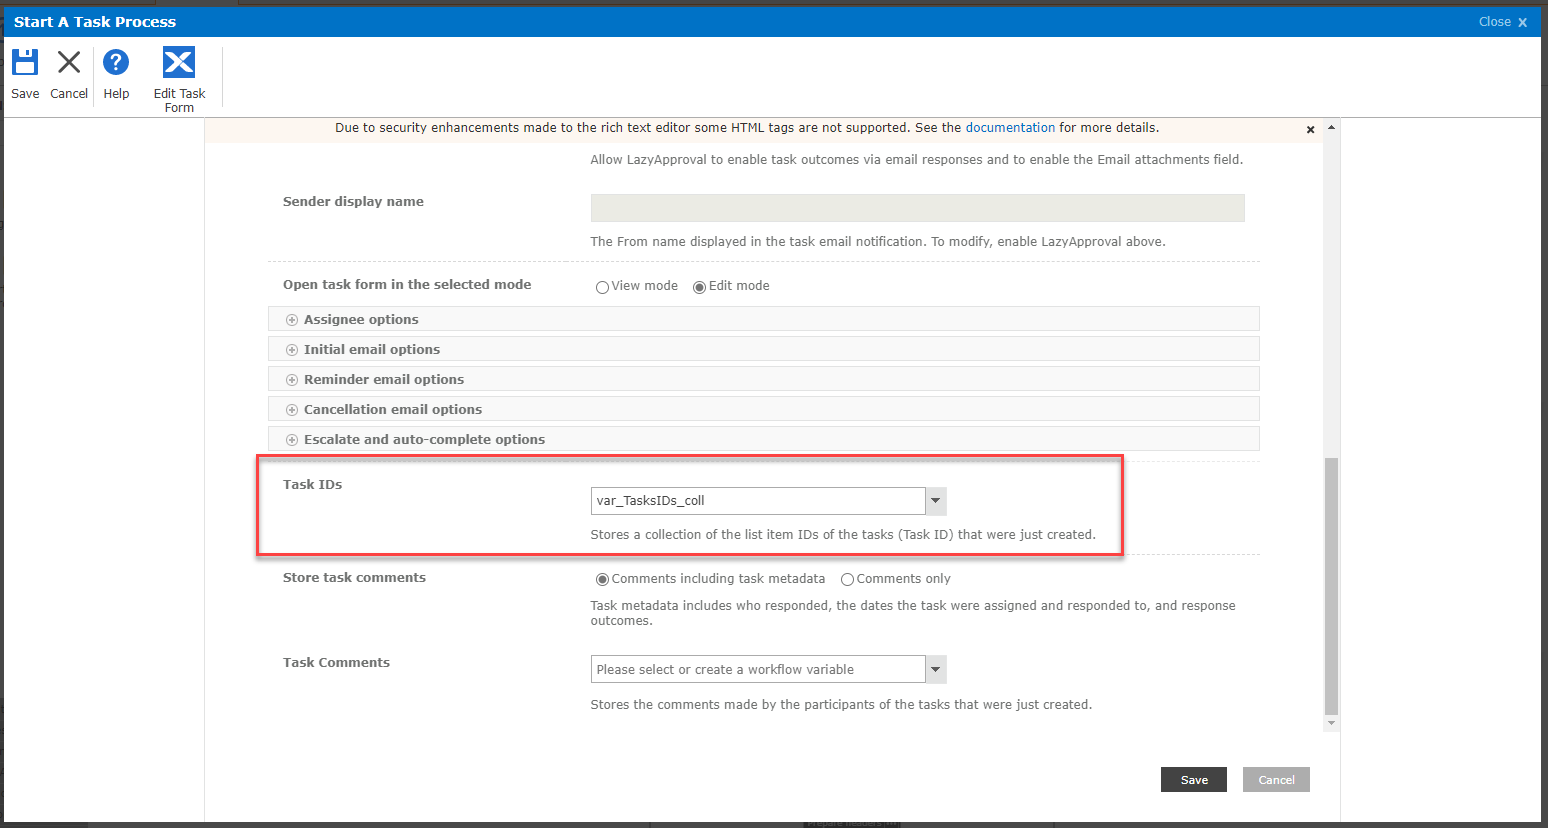
Akcja zadania
Niezależnie od tego, czy korzystasz z akcji „Assign a task”, czy „Start a task process”, musisz skonfigurować pole, które zwraca identyfikator zadania (lub zadań):
Później użyjesz tych identyfikatorów, aby pobrać załączniki z powiązanych zadań (lub zadania).
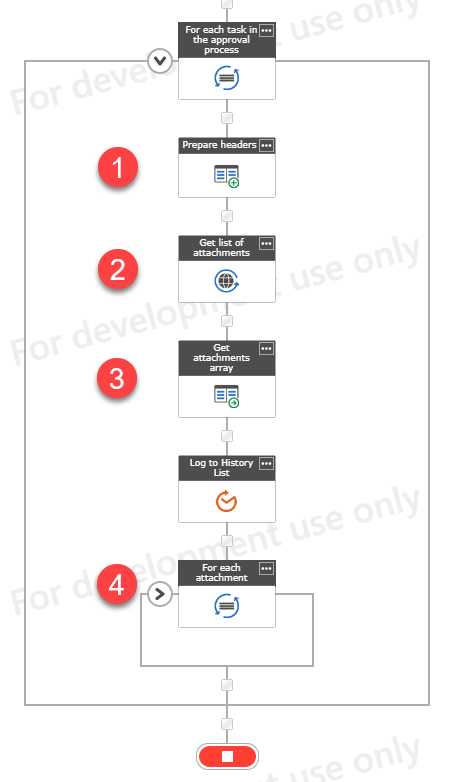
Workflow
Po zakończeniu zatwierdzania daj przepływowi pracy chwilę oddechu. Zauważyłem, że czasami workflow był wznawiany znacznie szybciej niż załączniki były ładowane do elementu zadania. W rezultacie wznowiony workflow posiadał info m.in. tylko o jednym załączniku z 3 przesłanych.
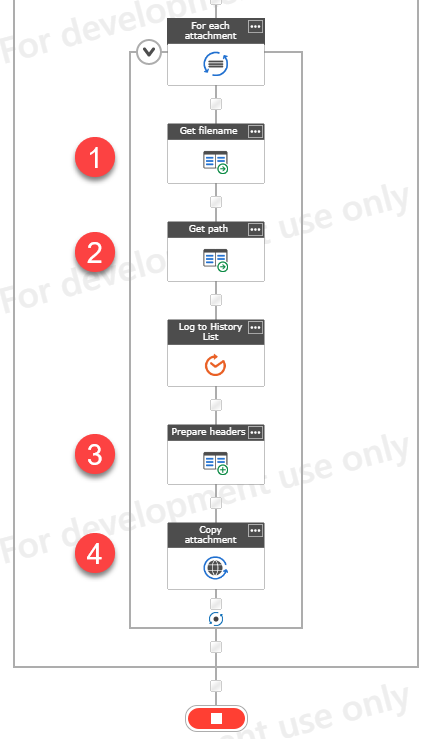
Następnie dla każdego zadania wykonaj poniższe kroki:
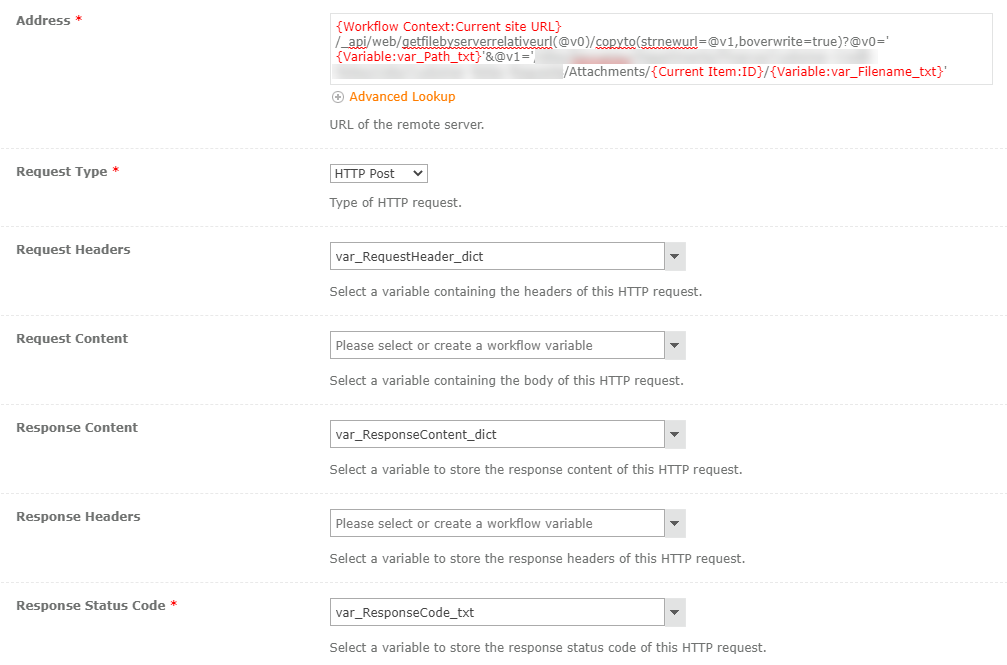
Przygotuj nagłówek żądania HTTP
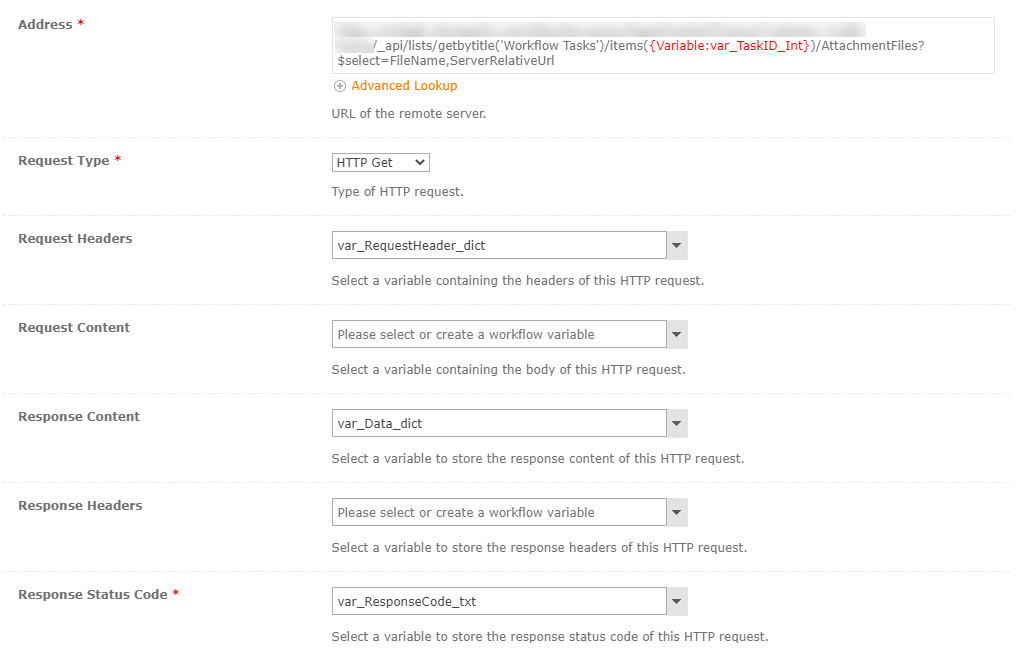
Wykonaj żądanie GET HTTP do poniższego adresu URL:
{ADRES URL WITRYNY}/_api/lists/getbytitle('Workflow Tasks')/items(TASK ID FOR CURRENT LOOP RUN)/AttachmentFiles?$select=FileName,ServerRelativeUrl
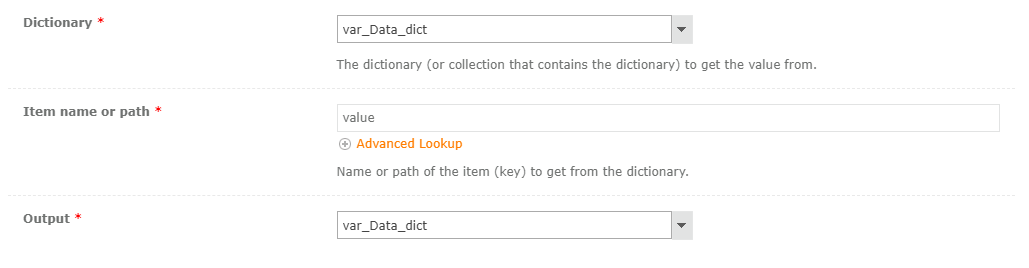
Zwrócony wynik będzie posiadać poniższą strukturę JSON: {"value": [{"FileName": "xyz.jpg", "ServerRelativeUrl": "somepath/xyz.jpg"}]} – musisz wyciągnąć jedynie tabelkę.
Następnie wykonaj poniższe kroki dla każdego elementu w tabelce.
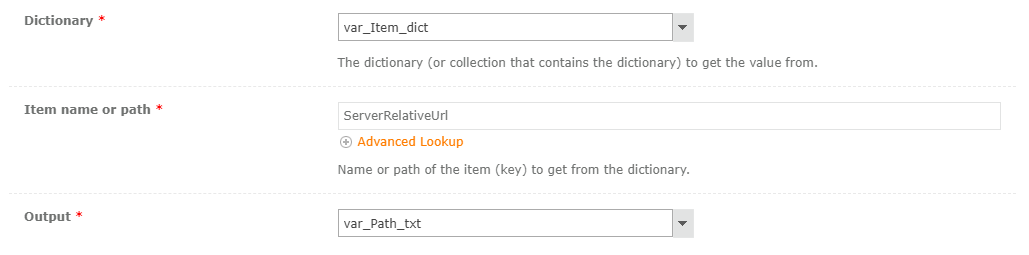
Następnie dla każdego wyodrębnionego załącznika (w pętli iteruj po słowniku var_Data_dict i zapisz element jako np. var_Item_dict):
Pobierz ze słownika nazwę pliku
Pobierz ze słownika ścieżkę
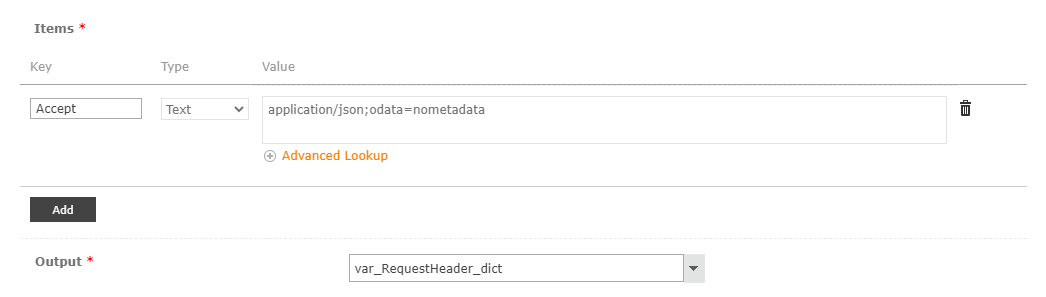
Przygotuj słownik z nagłówkiem żądania (jak powyżej, opcjonalnie możesz dodać linię z Content-Type: application/json)
Wykonaj żądanie POST do poniższego adresu URL: {Workflow Context:Current site URL}/_api/web/getfilebyserverrelativeurl(@v0)/copyto(strnewurl=@v1,boverwrite=true)?@v0='{Variable:var_Path_txt}'&@v1='/SITE RELATIVE URL TO LIST/Attachments/{Current Item:ID}/{Variable:var_Filename_txt}'
I to wszystko! Załącznik zadania jest teraz dodany do listy załączników powiązanego elementu listy. Powodzenia!
The Office Deployment Tool (ODT) has been around for many years now, although you may be unfamiliar with how it works and the tasks you can accomplish using it. In this article, I will focus on the uses of the ODT and the XML file itself rather than where it fits into a wider deployment process.
With Halloween coming up it’s nice to give your Microsoft Teams background a spooky Halloween feeling. You could of course style your whole room in a Halloween theme, but that might be a bit too much work. An easier option is to use one of ... Read moreBest Halloween Backgrounds for Microsoft Teams
Microsoft has released the new version of Microsoft Teams in public preview. The version of Teams is lighter, faster, and easier to use. The performance of Teams was always a problem with the current version, it was slow and it used a lot of resources ... Read moreNew Microsoft Teams – Everything you want to know
SharePoint Online comes with default permissions that we can choose from for the site’s owners, members, and visitors. In most cases, these permissions are more than enough, but sometimes you need to create a custom permission level in SharePoint. For example, when you want to ... Read moreHow to create Custom Permission levels in SharePoint Online