In today’s inclusive and diverse workplace, it’s important to respect and affirm individuals’ gender identities and expressions, including their preferred pronouns. Pronouns are the words we use to replace someone’s name in a sentence, such as “he”, “she”, or “they” in English. Using correct pronouns is essential for creating an inclusive environment where everyone feels valued and respected.
Microsoft is adding a new feature for adding pronouns to the profile cards in Microsoft 365. Users in your organization will soon be able to add pronouns directly to their profile cards in Outlook on the web (OWA) and Microsoft Teams.
This new feature is associated with Microsoft 365 Roadmap ID 86382 (Microsoft Teams) and 115511 (Outlook on the web).
Pronouns will be shown next to the name in the top section of the profile card in Outlook on the web and Microsoft Teams. After a user adds pronouns to their profile, the pronouns will be visible to everyone in your organization (including guest accounts having account in your organization). Users can’t control who can see their pronouns in Microsoft 365 in your organization. So, it’s not possible to hide pronouns from certain users in your organization. However, pronouns aren’t visible to people outside the organization.
Turn Pronouns ON or OFF from Microsoft 365 admin center
The pronouns feature is OFF by default for your tenant and requires configuration to turn on. As a Global Microsoft 365 administrator, you can turn ON pronouns feature that lets all users in your organization add their pronouns on their profile cards in Microsoft 365 (Microsoft Teams and Outlook Web).
Follow below steps to turn the pronouns feature ON or OFF from the Microsoft 365 admin center:
Select Settings from left navigation and then select Org settings (If Settings option is not shown by default, click on … Show all first)
From Org settings page, select the Security & privacy tab
Select Pronouns
To turn ON the pronouns feature, select the Turn on and allow pronouns checkbox from Pronouns pane. To turn OFF the pronouns feature, clear the checkbox
Select Save
Turn Pronouns ON or OFF from Microsoft 365 admin center
Note
If you change the Pronouns settings, it can take up to 7 hours to take effect.
If you allow pronouns and stop allowing them later, saved pronouns by users will be deleted from Microsoft 365. The data deletion process could take up to 30 days to complete.
If you turn ON the pronouns feature again before 30 days, any hidden pronouns that haven’t yet been deleted from Microsoft servers will become visible in Microsoft 365 profile cards in Microsoft Teams and Outlook on the web (OWA).
Microsoft 365 stores user pronouns in a hidden folder in user’s Exchange Online mailbox along with other data.
You can only enter up to 30 characters (including spaces) in your pronouns.
Add, update, or delete pronouns on Microsoft 365 profile cards
Follow below steps to Add, update, or delete pronouns on Microsoft 365 profile cards in Microsoft Teams and Outlook on the web:
Open your profile card in Microsoft Teams or Outlook on the web (OWA). To open your profile card in Microsoft Teams, select your profile picture from the upper right corner of Teams. To open your profile card in Outlook on the web (OWA), select your name or profile picture in Outlook Mail.
From your profile card, select + Pronouns or the pronouns listed below your name:
To add or change your pronouns, select from the examples (only available in English), or enter your own. To delete, remove your pronouns. In the example below, Elvia Atkins has chosen She/Her. The preview window also shows the chosen pronouns:
Select Save and then Got it. Changes will be updated immediately.
And that’s it! Now you know how to add, update, or delete pronouns on your Microsoft 365 profile card in Microsoft Teams. By using this feature, you can ensure that your colleagues and team members can address you with the correct pronouns, promoting inclusivity and respect in the workplace.
Viva Connections, part of Microsoft Viva, is your gateway to a modern employee experience. The Viva connections app incorporates a customizable dashboard, the feed, and relevant resources all in one experience in the Microsoft Teams desktop and mobile app.
This Public preview release includes the ability to:
Create, author, and manage a dashboard from the home site
Use Video news links to communicate announcements
Use the new Dashboard and Feed web parts on the home site
Brand the Viva Connections app for the desktop and mobile experiences for Android and iOS
Note: The preview is off by default and requires admin configuration to enable.
This message is associated with Microsoft 365 Roadmap ID: 86542
When this will happen
The Viva Connections Public preview release will begin rolling out starting September 9th and is expected to be completely rollout by September 20th.
Note: Many customers will notice that certain Viva Connections features will become available in SharePoint before the Viva connections app can be enabled in Teams. It’s recommended that you prepare for Viva Connections now but plan to enable the full experience in the Teams admin center after September 20th.
How this will affect your organization
The Viva connections app in Microsoft Teams will be blocked by default. A Teams admin can enable and customize the Viva Connections app in the Teams admin center once a home site in SharePoint has been designated and the dashboard has been published.
Set up the Viva Connections dashboard for the first time
Once you’ve set your home site, you can create the Viva Connections dashboard from the home site’s settings panel. Then, create custom dashboard cards that are targeted to help employees find relevant resources and complete essential tasks.
Microsoft also recommends use of the Viva Connections Extensibility for building even more engaging custom experiences for your dashboard.
Use Video news links to communicate with your organization
Videos are an engaging way to reach users in your organization. Videos hosted on SharePoint sites can be published as Video news links from any SharePoint organizational news site. Video news links will appear in the Viva Connections Feed. Learn more about Video news links.
Use Video news links to communicate with your organization
Use the new Dashboard and Feed web parts on the home site
Once you’ve set up the dashboard, you can use the Dashboard web part on the home site to surface Viva Connections content in SharePoint. Use the Feed web part on the home site to display a personalized list of conversations and news across the organization.
Use the new Dashboard and Feed web parts on the home site
Customize Viva Connections branding for the desktop and mobile experience
In the Teams admin center, upload the logo or icon your organization would like to use for the Viva Connections experience. This logo or icon will appear in the Teams app bar for both desktop and mobile. Clicking on that logo will launch the Viva connections experience.
Customize Viva Connections branding for the desktop and mobile experience
What you need to do to prepare
Viva Connections is an optional application that brings news, resources, and tasks into one place. Microsoft recommend that you plan to build and deploy your Viva Connections app as a part of your organization’s employee experience.
Review the Viva Connections overview where you will learn how to prepare your tenant and find step-by-step guidance on how to deploy Viva Connections for your organization.
Dans ce tutoriel je vais vous expliquer comment installer un serveur Remote App avec Windows Serveur 2022. Nous vous conseillons de lire le tutoriel pour installer un serveur RDS sur Windows Serveur 2022. Ce guide peut également être appliqué sur les anciennes versions de Windows Serveur (2016 et 2019) les interfaces sont identiques. Les principales […]
Dans ce tutoriel je vais vous montrer comment installer un client web en HTML5 pour votre serveur Remote APP. N'hésitez pas à lire mon tutoriel pour installer un serveur Windows Remote Gateway (ou Passerelle de services de bureau à distance). Pourquoi installer le Remote Desktop Web Client HTML5 ? Installez la fonctionnalité de passerelle de […]
In today’s inclusive and diverse workplace, it’s important to respect and affirm individuals’ gender identities and expressions, including their preferred pronouns. Pronouns are the words we use to replace someone’s name in a sentence, such as “he”, “she”, or “they” in English. Using correct pronouns is essential for creating an inclusive environment where everyone feels valued and respected.
Microsoft is adding a new feature for adding pronouns to the profile cards in Microsoft 365. Users in your organization will soon be able to add pronouns directly to their profile cards in Outlook on the web (OWA) and Microsoft Teams.
This new feature is associated with Microsoft 365 Roadmap ID 86382 (Microsoft Teams) and 115511 (Outlook on the web).
Pronouns will be shown next to the name in the top section of the profile card in Outlook on the web and Microsoft Teams. After a user adds pronouns to their profile, the pronouns will be visible to everyone in your organization (including guest accounts having account in your organization). Users can’t control who can see their pronouns in Microsoft 365 in your organization. So, it’s not possible to hide pronouns from certain users in your organization. However, pronouns aren’t visible to people outside the organization.
Turn Pronouns ON or OFF from Microsoft 365 admin center
The pronouns feature is OFF by default for your tenant and requires configuration to turn on. As a Global Microsoft 365 administrator, you can turn ON pronouns feature that lets all users in your organization add their pronouns on their profile cards in Microsoft 365 (Microsoft Teams and Outlook Web).
Follow below steps to turn the pronouns feature ON or OFF from the Microsoft 365 admin center:
Select Settings from left navigation and then select Org settings (If Settings option is not shown by default, click on … Show all first)
From Org settings page, select the Security & privacy tab
Select Pronouns
To turn ON the pronouns feature, select the Turn on and allow pronouns checkbox from Pronouns pane. To turn OFF the pronouns feature, clear the checkbox
Select Save
Turn Pronouns ON or OFF from Microsoft 365 admin center
Note
If you change the Pronouns settings, it can take up to 7 hours to take effect.
If you allow pronouns and stop allowing them later, saved pronouns by users will be deleted from Microsoft 365. The data deletion process could take up to 30 days to complete.
If you turn ON the pronouns feature again before 30 days, any hidden pronouns that haven’t yet been deleted from Microsoft servers will become visible in Microsoft 365 profile cards in Microsoft Teams and Outlook on the web (OWA).
Microsoft 365 stores user pronouns in a hidden folder in user’s Exchange Online mailbox along with other data.
You can only enter up to 30 characters (including spaces) in your pronouns.
Add, update, or delete pronouns on Microsoft 365 profile cards
Follow below steps to Add, update, or delete pronouns on Microsoft 365 profile cards in Microsoft Teams and Outlook on the web:
Open your profile card in Microsoft Teams or Outlook on the web (OWA). To open your profile card in Microsoft Teams, select your profile picture from the upper right corner of Teams. To open your profile card in Outlook on the web (OWA), select your name or profile picture in Outlook Mail.
From your profile card, select + Pronouns or the pronouns listed below your name:
To add or change your pronouns, select from the examples (only available in English), or enter your own. To delete, remove your pronouns. In the example below, Elvia Atkins has chosen She/Her. The preview window also shows the chosen pronouns:
Select Save and then Got it. Changes will be updated immediately.
And that’s it! Now you know how to add, update, or delete pronouns on your Microsoft 365 profile card in Microsoft Teams. By using this feature, you can ensure that your colleagues and team members can address you with the correct pronouns, promoting inclusivity and respect in the workplace.
Microsoft 365 Wiper malware is a category of threat where attackers penetrate a tenant and remove data. In this article, we discuss if Microsoft 365 Wiper malware could remove all the files from SharePoint Online sites and what actions tenant administrators can take to defend against the apps that might wreak such havoc.
OneDrive/SharePoint Share Control — Simplifying Link Settings
Creating sharing links is going to be clear and simple thanks to some changes in the Share Control window for OneDrive and SharePoint. Descriptions are simpler. See who is using a sharing link at a glance. This should simplify choosing the right type of link for sharing.
— OneDrive/SharePoint Share Control — Simplifying Link Settings — MC467240 — More Layout Options and Yammer Card Content for the Feed Web Part for Viva Connections — MC467626 — Editor Using Context IQ: Inline Search Within Documents in Word for the Web — MC467908 — Authenticator number matching to be enabled for all Microsoft Authenticator users — MC468492
Join Daniel Glenn and Darrell as a Service Webster as they cover the latest messages in the Microsoft 365 Message Center.
L’utilisation du langage JSON est de plus en plus présent au sein de l’environnement Microsoft 365. Je l’avais déjà évoquélors de mon article précédent. C’est pourquoi lors de notre dernière présentation avec Baptiste Mulot le samedi 6 juin 2021 lors des Power Saturday 2021, nous avons présenté l’utilisation de JSON pour présenter ses données. Nous y avons abordé la mise en forme de liste 365 avec ses nouveautés mais aussi la mise en place et l’utilisation des adaptives cards.
Je souhaitais vous partager quelques outils utilisés pendant cette conférence. Pour les listes Microsoft, vous pouvez :
Utiliser la solution sp-formatter pour synchroniser votre code entre Visual Code et votre liste SharePoint. Voici le lien vers de dépôt git https://github.com/pnp/sp-formatter. Cette manipulation permet de faciliter le développement de la mise en forme JSON. Il vous faudra installer un add-on in Edge ou chrome et une extension sur Visual Studio Code.
Utiliser le site https://adaptivecards.io/designer. Basez-vous sur les modèles proposés et adaptez-les en fonction de vos besoins. Pour cela cliquer sur New card.
J’espère que ces astuces vous serviront. Bon développement !
Kontrolka oceniania w Adaptive Cards była w planach. Dawno temu. Jednak żadne aktualizacje nie zostały opublikowane i nadal nie ma takiej kontrolki „z pudełka”. Mimo to nadal można ją zbudować, może nie idealną, ale na pewno działającą.
Być może kontrolka oceniania z użyciem gwiazdek, o której myślisz, wyświetla np. 5 ikon z rzędu i ma wypełnione gwiazdki od lewej strony, aż do tej, nad którą znajduje się kursor. A także zwraca dokładną wartość wybranej gwiazdki. Jak w przykładzie poniżej:
No cóż… To nie jest możliwe w Adaptive Cards W ramach rekompensaty mogę zaproponować Ci rozwiązanie, którego używam, wykorzystujące przyciski. Idź za mną krok po kroku, jak zawsze:
Krok 1 – zaprojektuj kartę
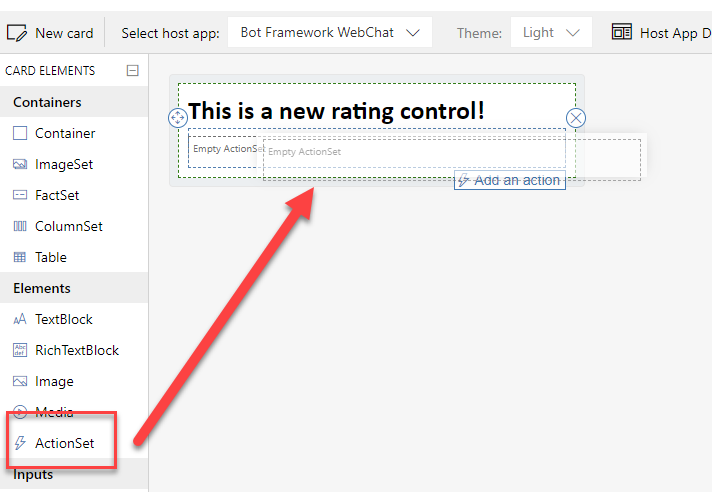
Najpierw zaprojektuj kartę i przeciągnij, i upuść element ActionSet w miejscu, w którym chcesz utworzyć kontrolkę oceny:
Następnie dodaj 5 akcji w Action.Submit:
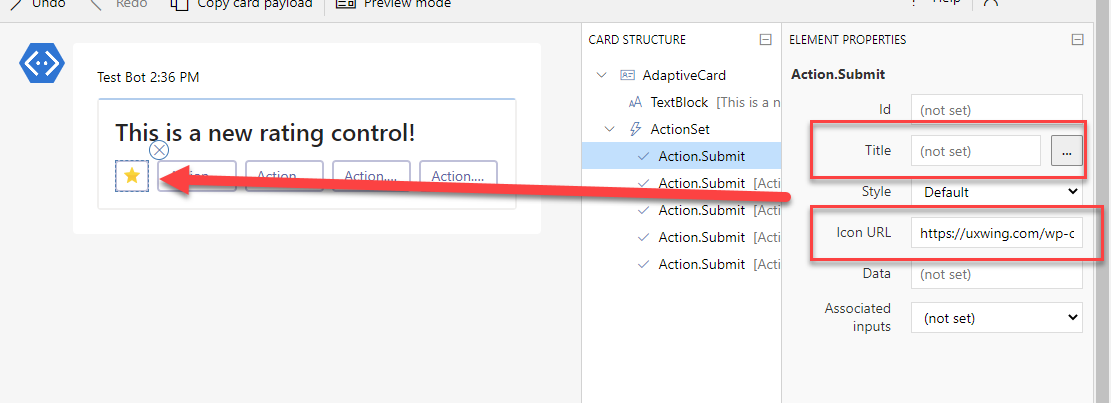
Po wykonaniu tej czynności skonfiguruj je w następujący sposób: usuń wartości Title i zamiast tego wypełnij właściwość Icon URL linkiem do ulubionej ikony gwiazdki:
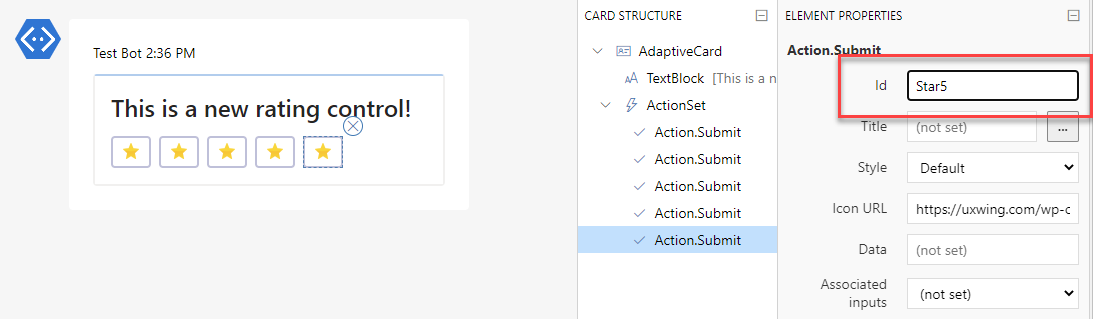
Co jest niezwykle ważne: wysyłając kartę do Microsoft Teams, zostanie zwrócony identyfikator klikniętego elementu, dlatego pamiętaj o wypełnieniu właściwości identyfikatora każdego przycisku. Wartości te muszą być unikalne!
Możesz później trochę pobawić się układem, jeśli potrzebujesz, ale w zasadzie ogólny pomysł jest gotowy! Kontrola oceny jest na miejscu:
Krok 2 – skopiuj kod JSON karty i wyślij do Teams
Następnym i zasadniczo ostatnim krokiem jest skopiowanie kodu JSON własnej karty i wklejenie go w akcji „Post adaptive card and wait for a response” w przepływie cloud flow, wraz z logiką obsługi wybranej gwiazdki i jej wartości:
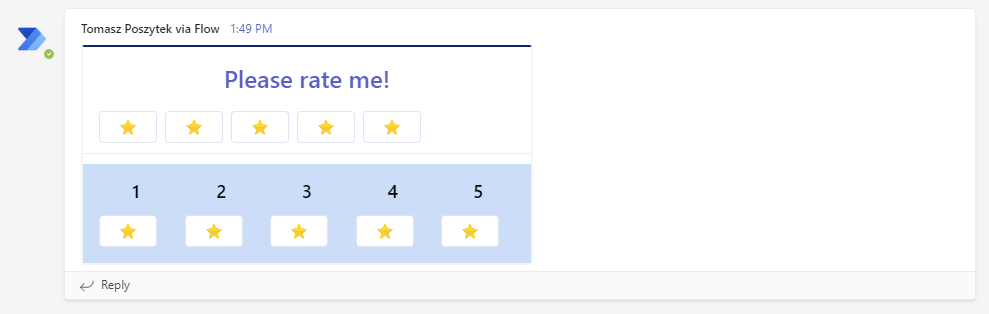
Po uruchomieniu przepływu będziesz mógł znaleźć swoją kartę w wybranym kanale lub rozmowie:
Po naciśnięciu dowolnej gwiazdki zauważysz, że akcja w przepływie zostaje wznowiona i zwracany jest identyfikator wciśniętego przycisku.
Krok 3 – wzbogać user experience
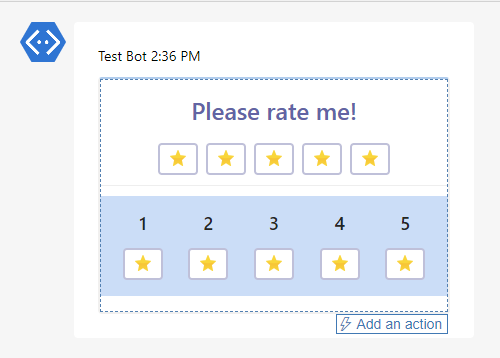
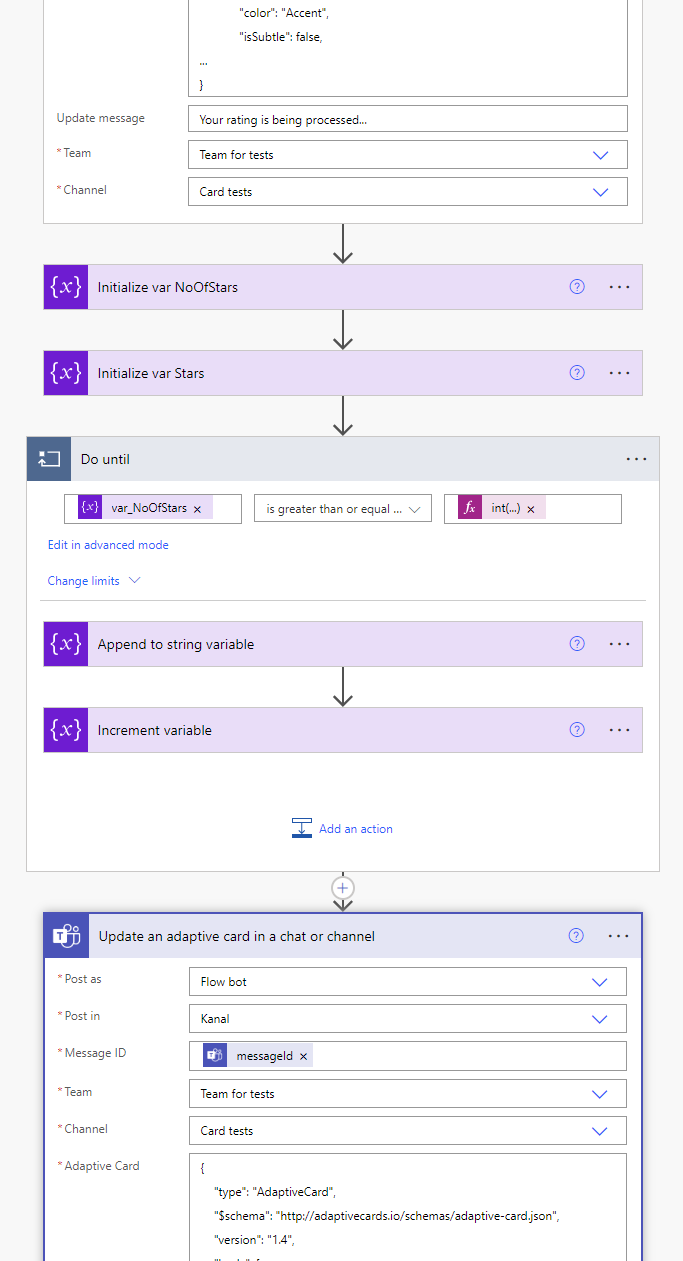
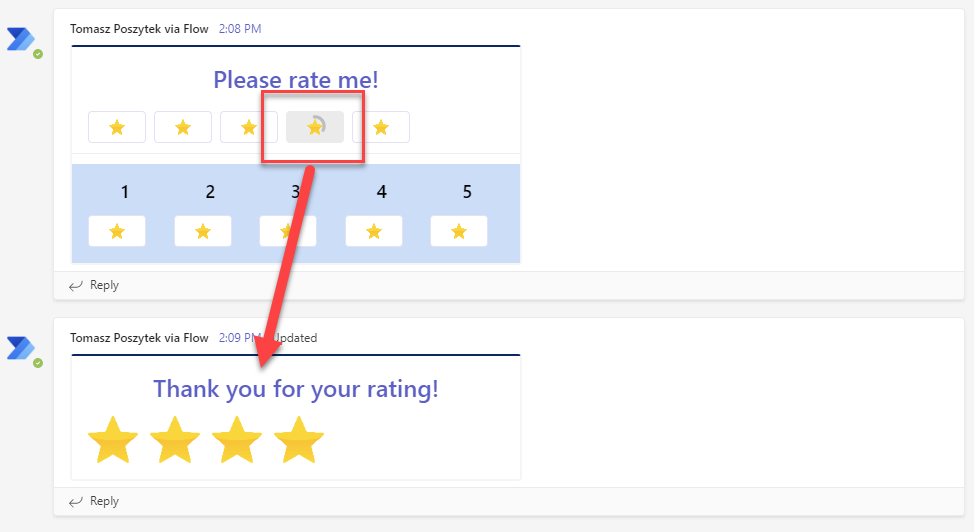
Możesz później użyć akcji „Update an adaptive card in a chat or channel”, aby zastąpić istniejącą kartę czytelnym potwierdzeniem:
Aby użytkownik sam zobaczył wybraną ocenę:
I to wszystko! Mam nadzieję, że Ci się spodoba i post ten okaże się przydatny.
W tym poście chciałbym podzielić się z Tobą moimi najnowszymi odkryciami na temat sposobów, w jakie można wzmiankować wszystko w Microsoft Teams wysyłając wiadomości z Power Automate, niezależnie od tego, czy jest to użytkownik, tag, kanał czy zespół.
Wbudowane wzmiankowanie
W Power Automate dostępne są dedykowane akcje, które pozwalają wzmiankować użytkownika lub tag.
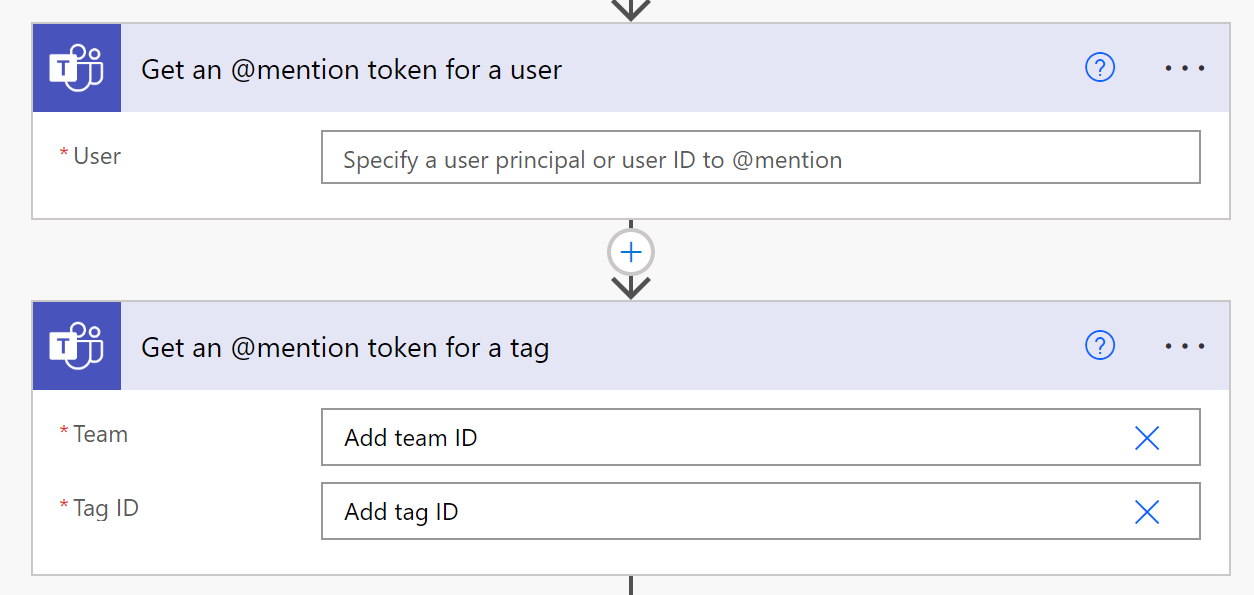
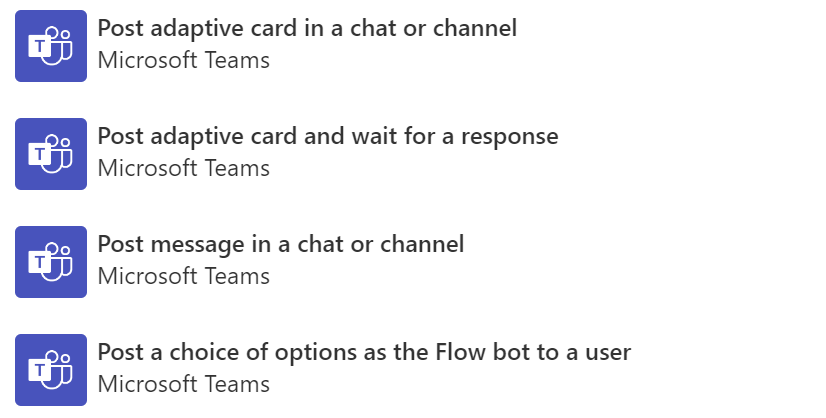
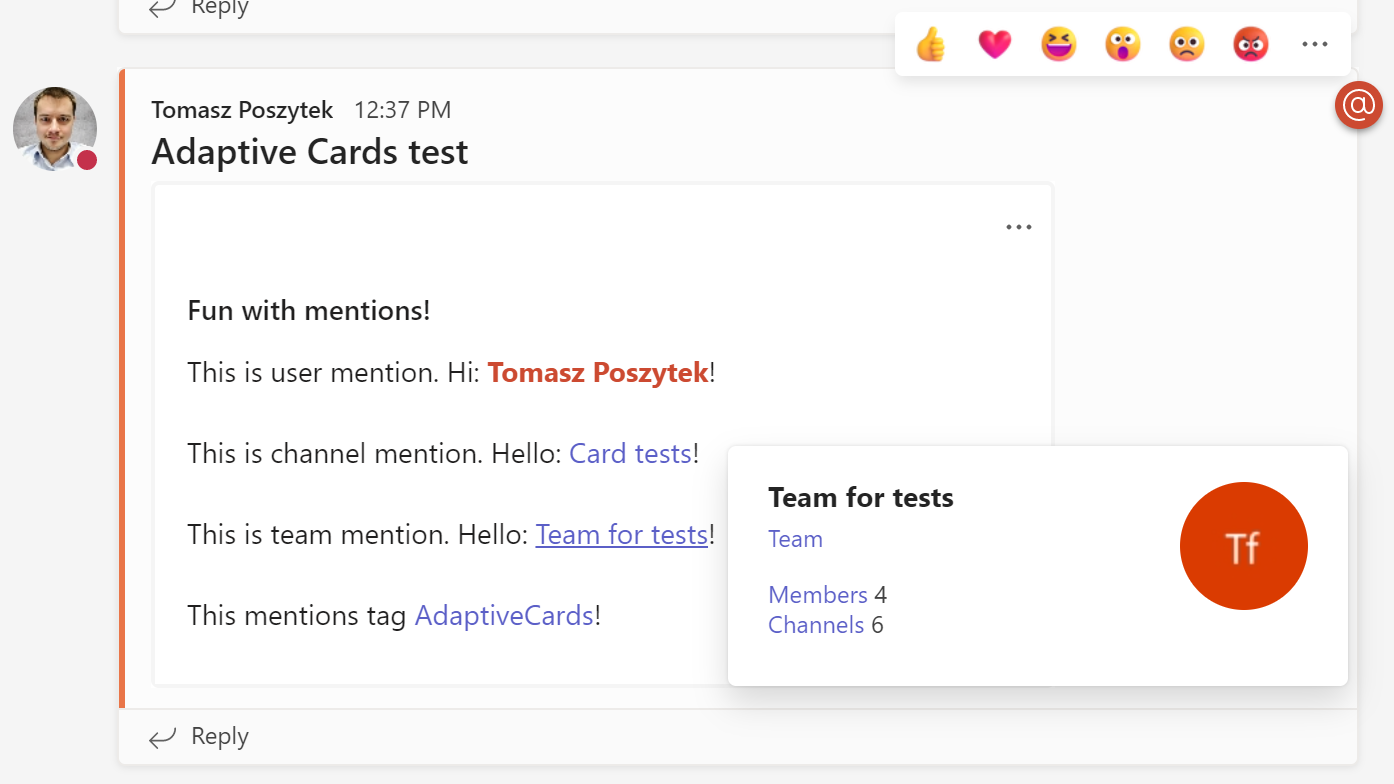
Akcje „Get an @mention token for a user” oraz „Get an @mention token for a tag”. Te dwie akcje zwracają tokeny, które można użyć w dowolnej innej akcji, która wysyła wiadomość do Microsoft Teams, na przykład „Post adaptive card in a chat or channel” lub „Post message in a chat or channel”:
Ważne! Token @mention dla tagu może być używany tylko wtedy, gdy karta adaptacyjna lub wiadomość są publikowane przy użyciu kontekstu użytkownika. Wzmiankowanie tagu nie będzie działać w kontekście bota.
Musisz tylko dodać tokeny do swoich kart lub wiadomości:
Wzmiankowanie korzystając z property msteams w Adaptive Card JSON
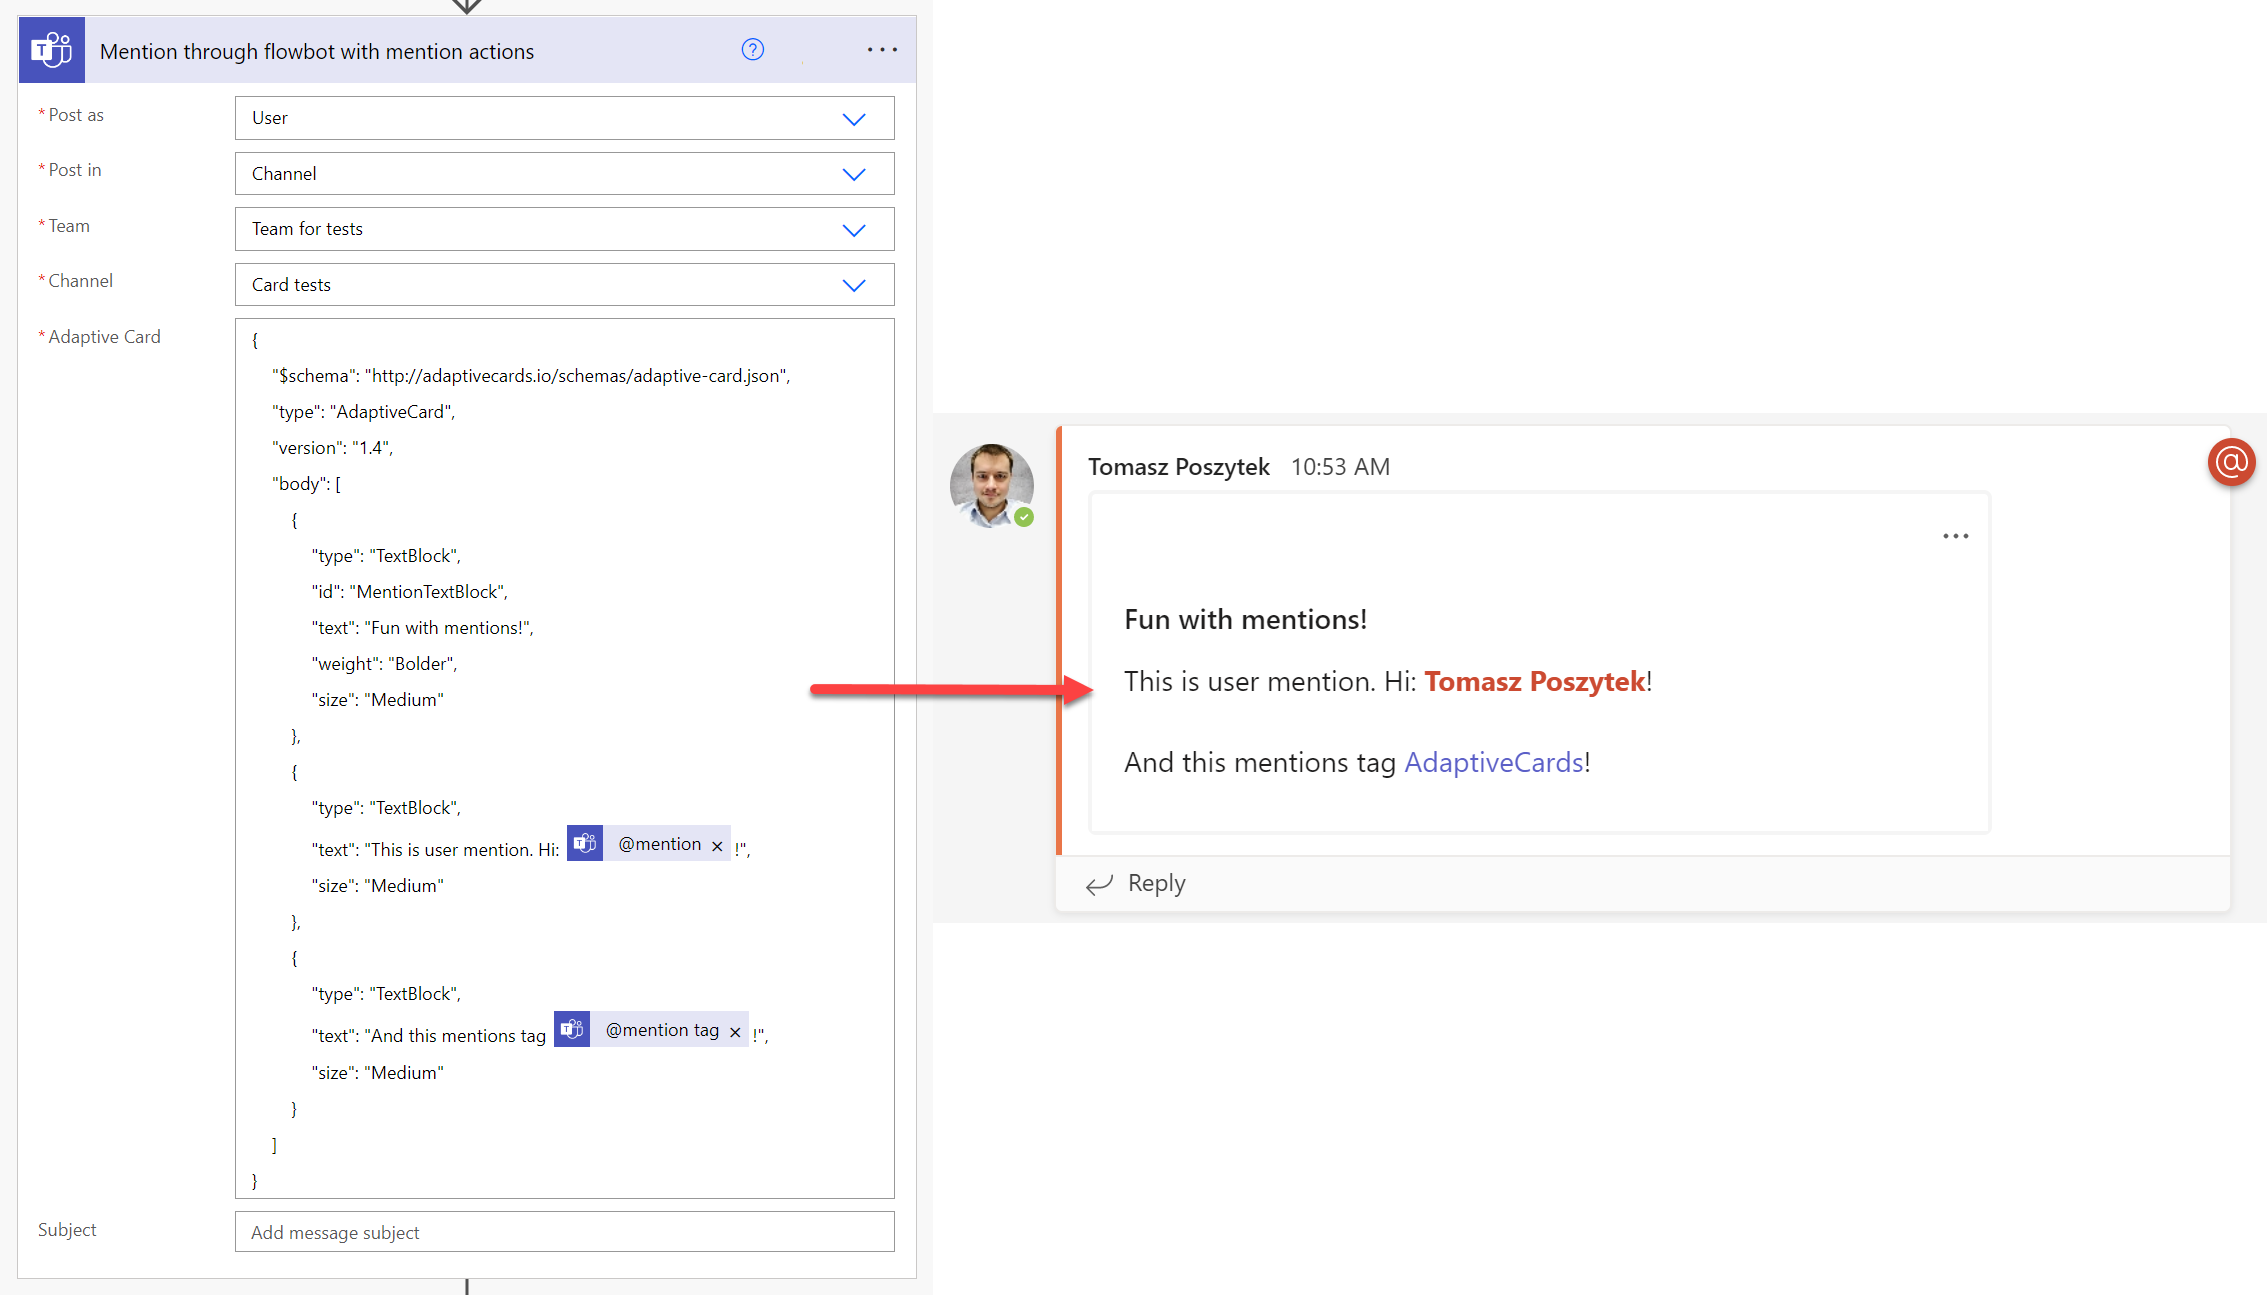
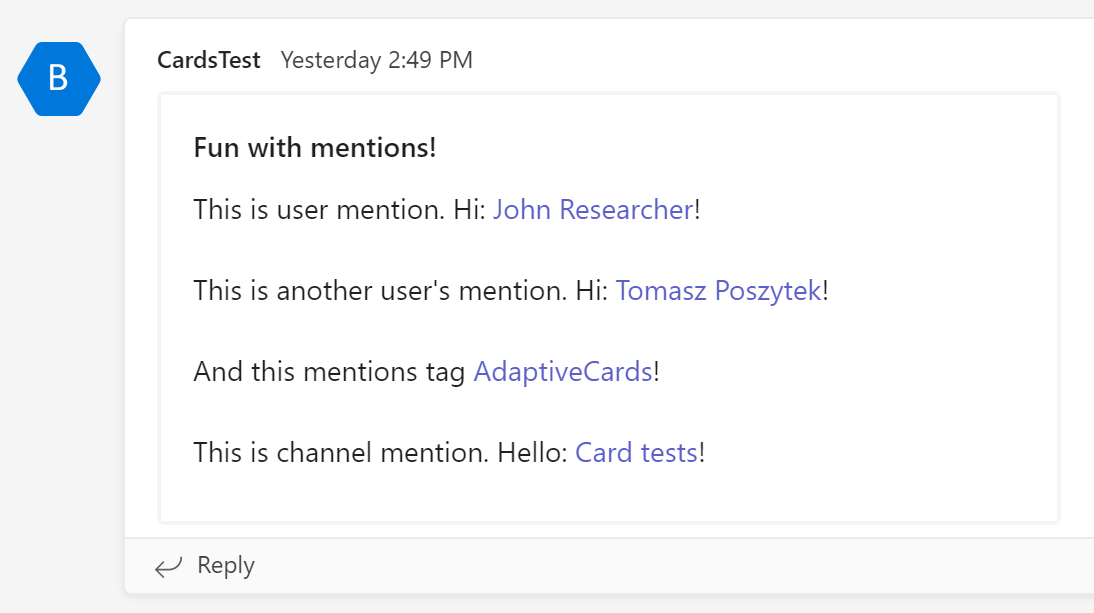
Drugim podejściem, którego możesz użyć, jest skorzystanie z właściwości msteams, którą można dodać na końcu karty adaptacyjnej wysłanej do Microsoft Teams. Przy okazji – ta właściwość może pomóc w wielu innych scenariuszach (źródło: Text formatting in cards – Teams | Microsoft Docs).
Dlaczego miałbyś to robić w ten sposób nie poprzez akcje @mention, nie wiem, ale podkreślam, że w ten sposób nie udało mi się wspomnieć o tagach, kanałach i zespołach. Chociaż „link” do kanału był wyświetlany na wysłanej karcie, nie zachowywał się prawidłowo, ponieważ najechanie kursorem nie rozwijało szczegółów kanału.
Ważne! By wzmiankować użytkownika musisz dodać prefix 8:orgid: przed wartością Azure AAD ID.
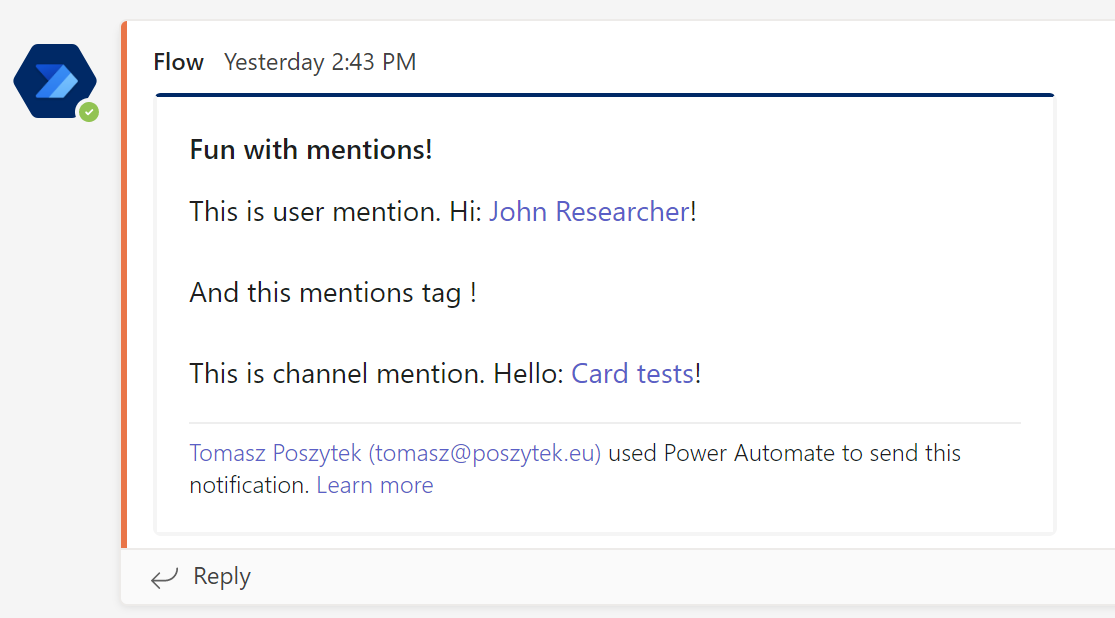
Co ważne, z powyższej metody mogłem skorzystać jedynie przy wysyłaniu kart w kontekście bota. Podczas korzystania z kontekstu użytkownika, akcja cały czas kończyła się błędem: „Message mention text needs to be specified.”. Bez względu na to, jak formatowałem obiekty wzmianek, nie mogłem tego rozwiązać. Więc się poddałem. Jeśli wiesz, jak sprawić by to zadziałało, napisz w komentarzach
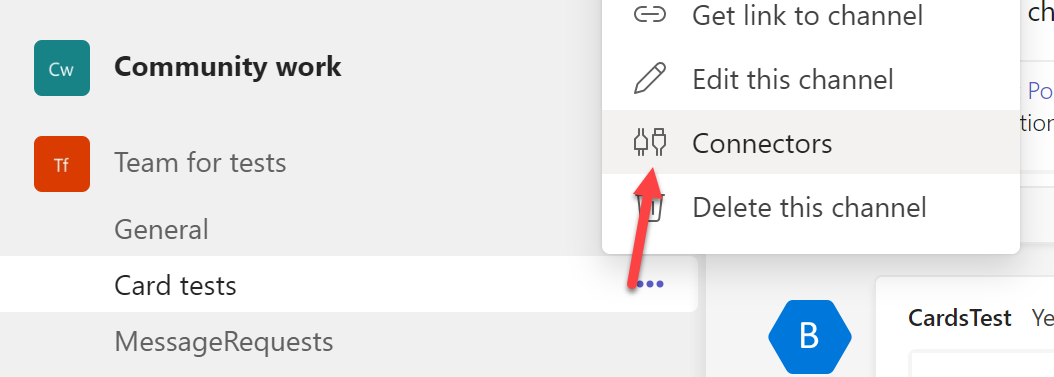
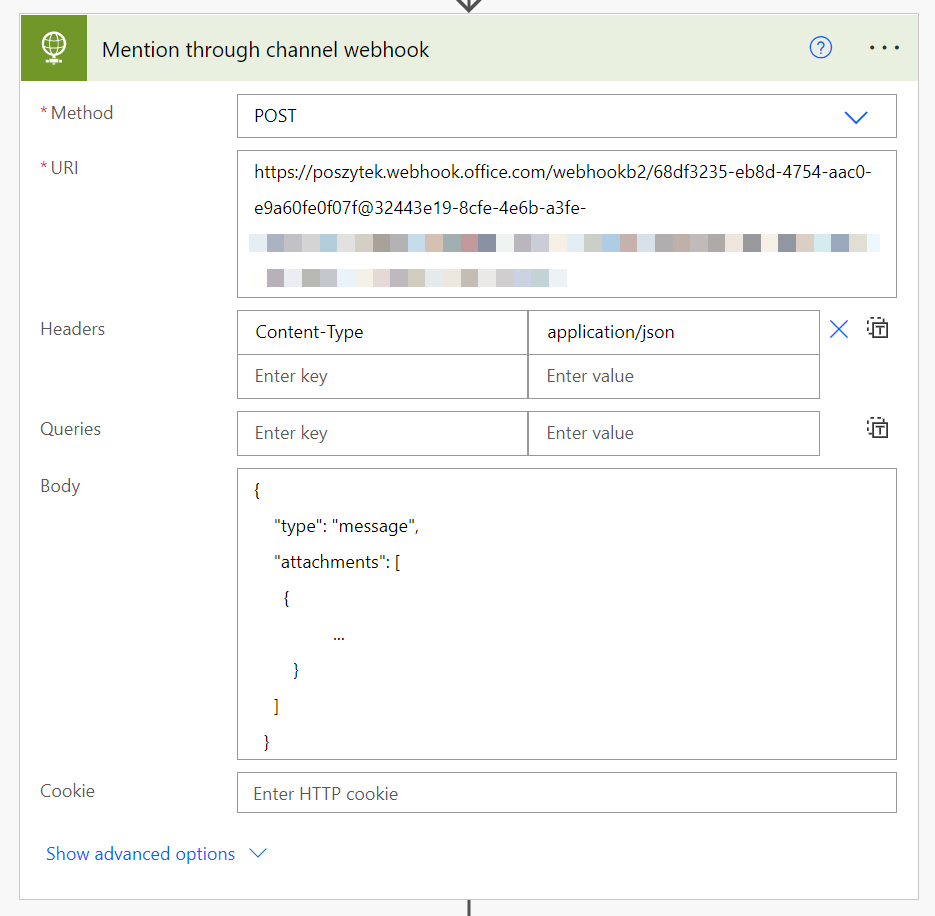
Wzmiankowanie korzystając z webhook kanału
Po pierwsze, aby utworzyć webhooka do kanału, musisz przejść do menu „Connectors” w obrębie kanału:
Następnie skonfiguruj webhooka i skopiuj jego adres URL. Gdy to zrobisz, możesz użyć i skonfigurować akcję HTTP:
Musi to być żądanie POST wysłane do webhooka kanału. A w kwestii zawartości:
Tutaj znowu, jak widać, używana jest właściwość msteams. W tym podejściu generowane są wszystkie wzmianki.
Mimo to moim zdaniem nie działają. Ponieważ kiedy najeżdżam na któryś z nich, nie wyświetla żadnych szczegółów, a wiadomość nie jest podświetlana jako wzmianka o mnie. Jeśli to dla Ciebie działa, daj mi proszę znać.
Ważne! Karty adaptacyjne wysyłane przez webhook nie pozwalają na wykonywanie żadnych czynności związanych z przesyłaniem (submit). Jeśli więc planujesz dodać formularz do karty, który użytkownicy mogą wypełnić i wysłać, przy takim podejściu nie będziesz w stanie odebrać odpowiedzi.
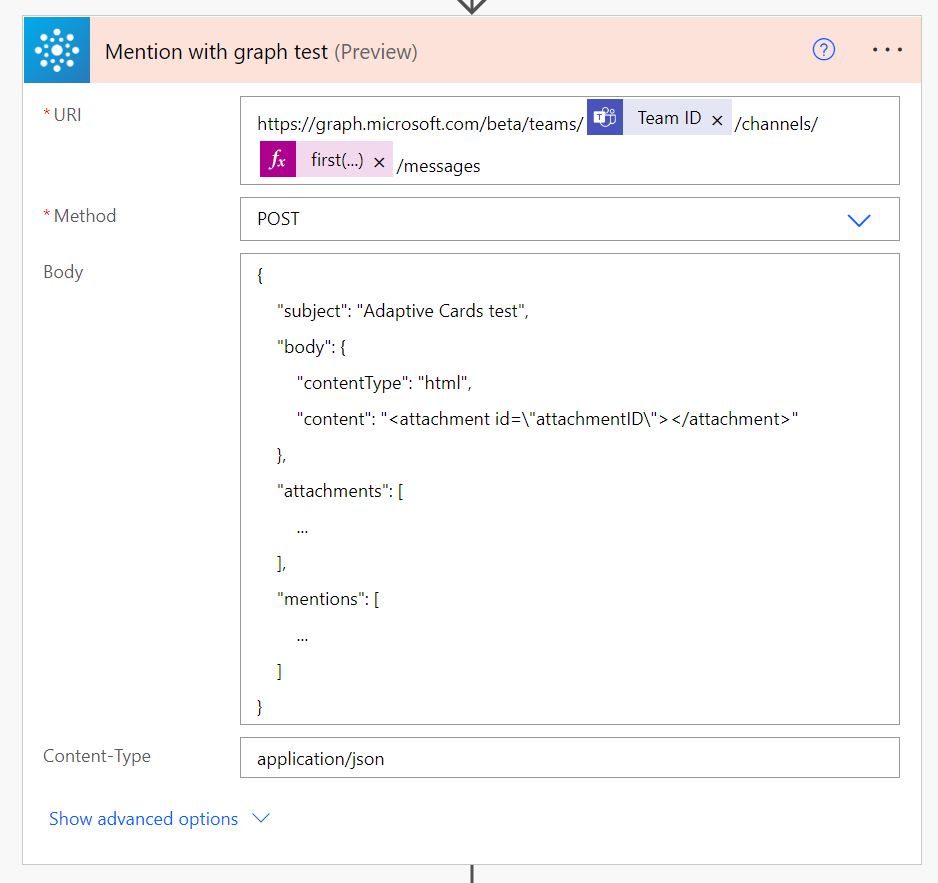
Robię to za pomocą akcji o nazwie „Send an HTTP request” z grupy akcji „Office 365 Groups”. Czemu? Ponieważ jest to czynność standardowa, więc nie wymaga dodatkowej licencji. Możesz osiągnąć to samo, używając akcji „Invoke an HTTP Request” z grupy „HTTP with Azure AD”. Jednak ta jest akcją premium.
Kod, który należy wysłać, składa się z następujących sekcji:
Body – zawiera strukturę HTML, w tym miejsce na załącznik, którym w tym przypadku będzie karta adaptacyjna.
Attachments – ta właściwość zawiera wyescapeowany kod JSON karty Adaptive Card.
Mentions – ta właściwość zawiera obiekty wzmianek, dla każdego identyfikatora wzmianki obecnego w treści karty adaptacyjnej lub we właściwości Body -> Content.
W ten sposób można naprawdę wzmiankować wszystko i działa to dla wszystkich typów wzmianek. A to dlatego, że akcja działa w kontekście użytkownika. Jeśli chcesz wysłać ją w kontekście aplikacji, musisz użyć akcji HTTP i podać szczegóły aplikacji usługi Azure AD, aby uwierzytelnić wywołanie.
Ważne! Wysłane w ten sposób karty adaptacyjne nie pozwolą na wykonanie akcji przesyłania (submit). Jeśli planujesz umożliwić użytkownikom przesyłanie formularzy wysłanych w Adaptive Cards, musisz wybrać inne podejście.
I to wszystko! Ufam, że uznasz to za przydatne.
Materiały
Kilka przydatnych linków, które pomogły mi lepiej zrozumieć jak wzmiankować w Microsoft Teams:
Ten post został zainspirowany wiadomością, którą Sergi Dominquez wysłał mi na Twitterze. Okazuje się, że gdy żądanie z Actionable Message w Outlooku jest wysyłane do serwera, Outlook czeka tylko określoną ilość czasu na odpowiedź.
1/2 Hey @TomaszPoszytek some days ago I opened a issue in the Adaptive Card github related to issue while trying to refresh the UI. Finally they inform that there are some Timeouts: Http Action – 15 Secs and Auto-invoke Http Action – 6 Secs, this is not already documented.
The timeouts are described in no official documentation. The only reason Sergi found out that is actually a case was an answer under his question posted on GitHub. Muthurathinam from Microsoft answered, that there are timeouts indeed:
Przekroczenia limitów czasu nie są opisane w żadnej oficjalnej dokumentacji. Jedynym powodem, dla którego Sergi dowiedział się, że tak naprawdę istniej, była odpowiedź na jego pytanie zamieszczone na GitHub. Muthurathinam z firmy Microsoft odpowiedział, że rzeczywiście istnieją takie ograniczenia:
Http Action – 15 sekund
Auto-invoke Http Action – 6 sekund (aczkolwiek podczas moich testów żądanie było kończone już po 4 sekundach)
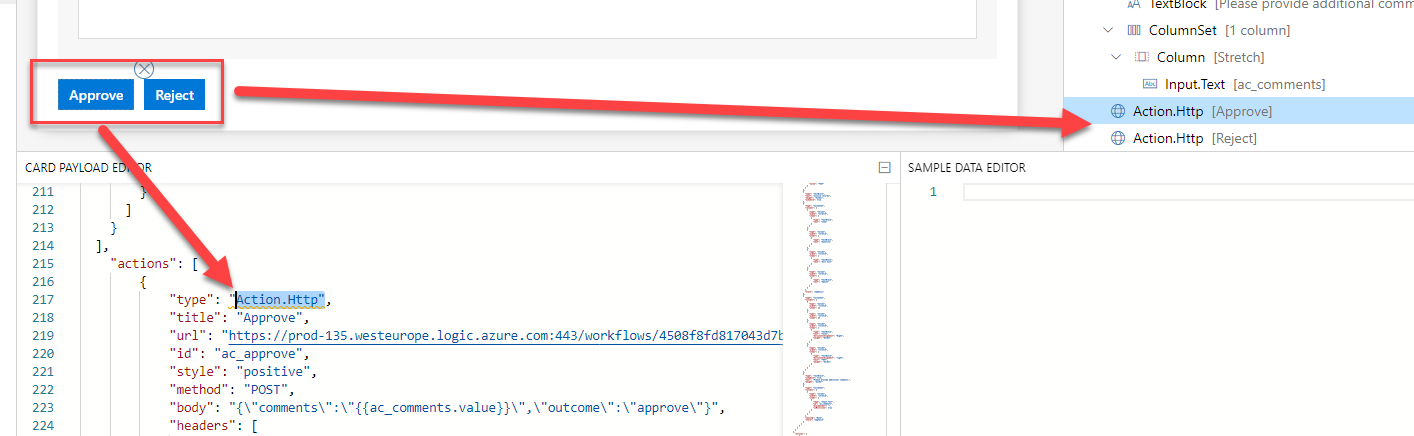
Http Action
Ta akcja jest używana w Actionable Messages, aby umożliwić użytkownikom wysyłanie danych z karty na serwer. Ta akcja jest wywoływana przez użytkownika po kliknięciu przycisku. Jak w poniższym przykładzie:
Akcja może służyć do wywołania zarówno żądania POST jak i GET.
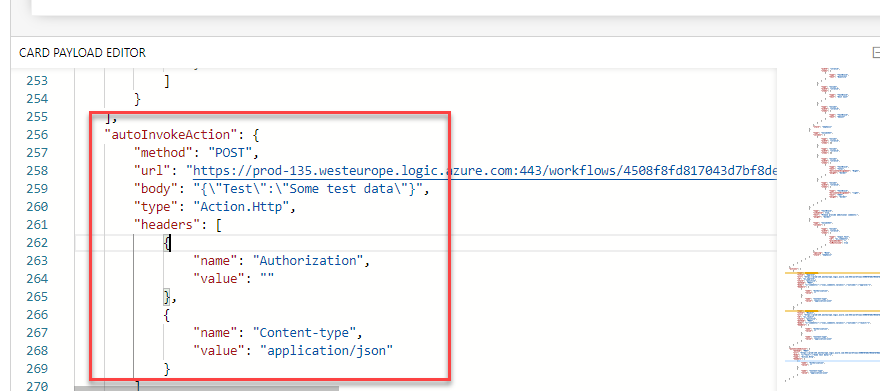
Ta akcja nie jest tak powszechnie znana. Jej celem jest umożliwienie wykonania akcji, gdy karta jest wyświetlana. Na przykład, aby odświeżyć kartę najnowszymi danymi do zatwierdzenia. Można ją dodać do kodu Actionable Message jako osobną właściwość (tak jak dodajesz Actions – pamiętaj o nagłówkach):
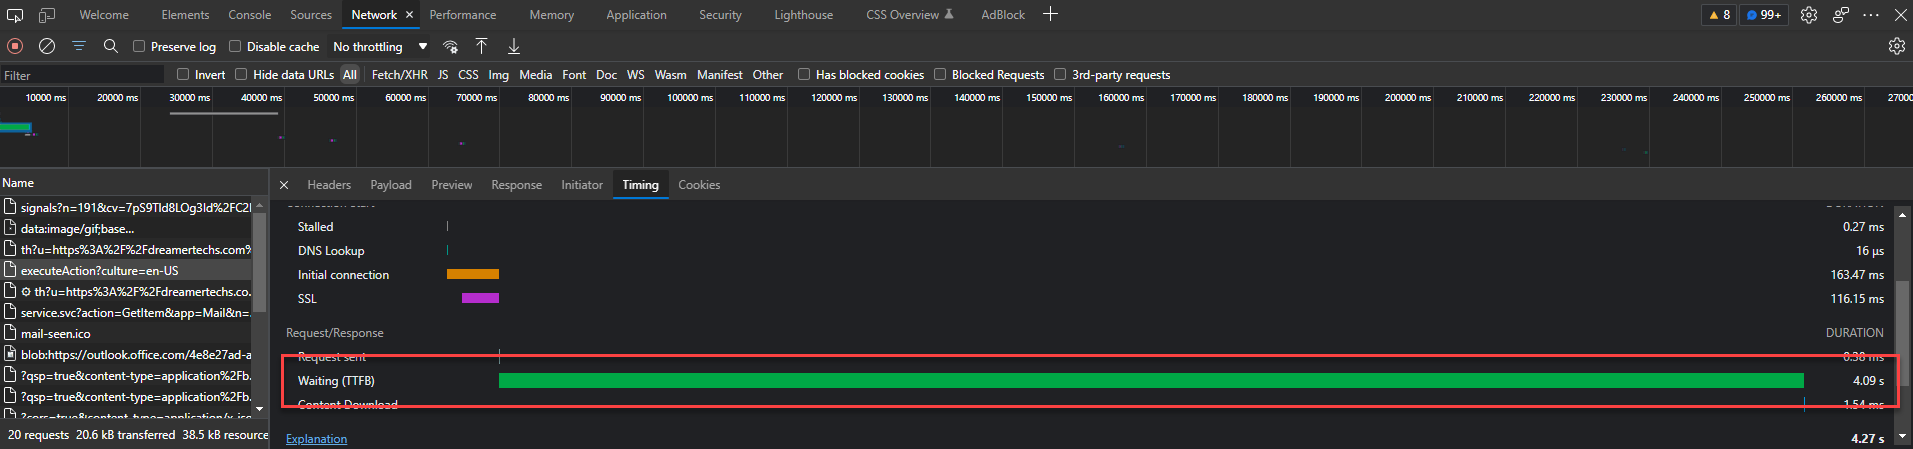
I tak, wykonałem swoje testy. Niestety, Muthurathinam miał rację. Dodałem „Delay” w przepływie, aby zatrzymać natychmiastowe wysyłanie odpowiedzi. Następnie wysłałem sobie Actionable Message, która zawierała zarówno akcję Auto-invoke, jak i zwykłą akcję HTTP.
W przypadku Auto-invoke, żądanie było kończone już po upływie zaledwie 4 sekund:
Żądanie nie było jednak anulowane ani nic w tym rodzaju. Z drugiej strony, w tym scenariuszu nasłuch na odpowiedź został faktycznie zakończony, ponieważ cloud flow nie mógł wysłać żadnych danych z powrotem do klienta:
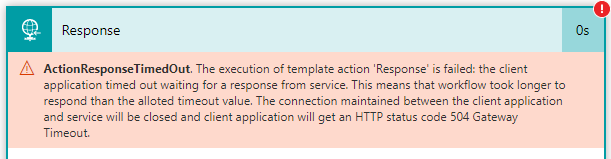
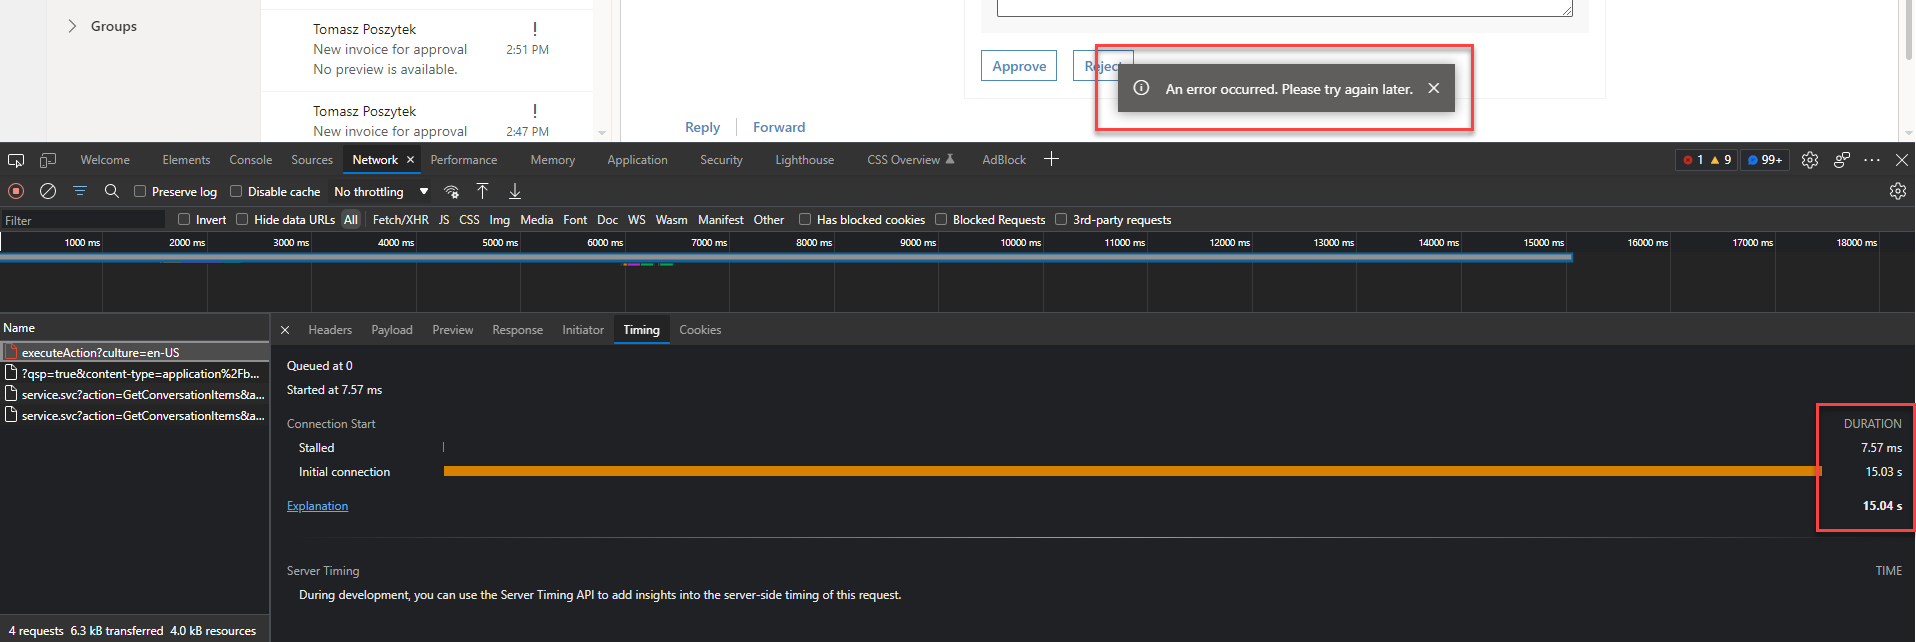
W przypadku Http Action, logi sieciowe pokazują, że Outlook faktycznie czekał aż 15 sekund, zanim anulował żądanie:
Jednak, co jest dziwne, cloud flow który miał wysłać odpowiedź, mógł to zrobić nawet po upłynięciu tego czasu. Co istotne jednak, karta mimo to nie została odświeżona. Zamiast tego, po 15 sekundach karta wyświetliła po prostu błąd:
Podsumowanie
Mogę w tym miejscu napisać tylko jedną rzecz. Upewnij się, że logika, która jest wykonywana przez akcje w Actionable Messages działa naprawdę szybko. Nikt nie lubi długo czekać na wynik wykonanej przez siebie akcji. Karty również Powodzenia!
W kartach adaptacyjnych istnieje wiele sposobów pokazywania i ukrywania treści w zależności od innych treści lub warunków, a nawet interakcji użytkownika. Ale mimo iż większość z nich jest dostępna już od wersji 1.2 (a więc dość wczesnej) potrzeba jest trochę wiedzy, jak je faktycznie zaimplementować.
Istnieją trzy główne sposoby na pokazywanie i ukrywanie zawartości w Adaptive Cards:
Action.ShowCard
Action.ToggleVisibility
Warunki zdefiniowane poprzez właściwość „Only show when”
Przyjrzyjmy się teraz każdej z powyższych metod.
Action.ShowCard
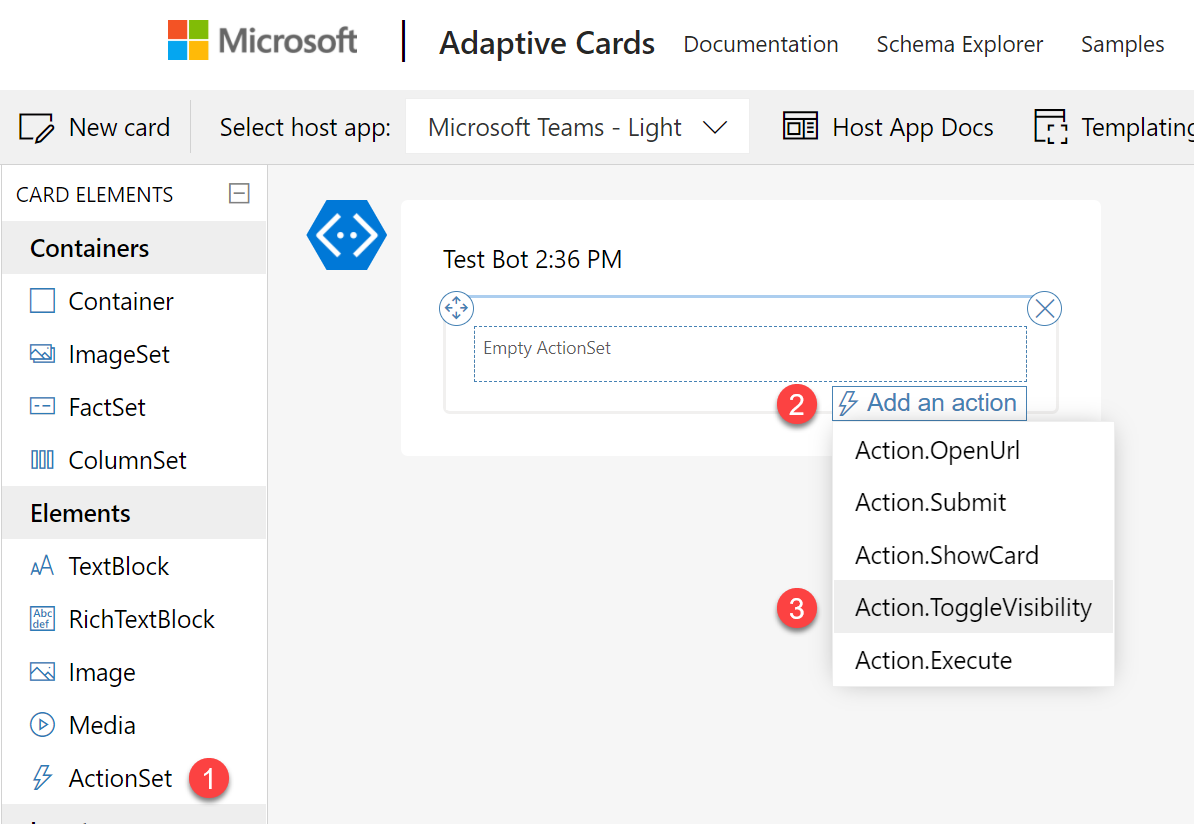
Aby z niego skorzystać należy najpierw dodać element „ActionSet” do kanwy projektanta, a następnie wybrać Action.ShowCard z listy dostępnych opcji:
Gdy to zrobisz, zdefiniuj właściwości przycisku w oknie „Element properties”, takie jak Title i Id.
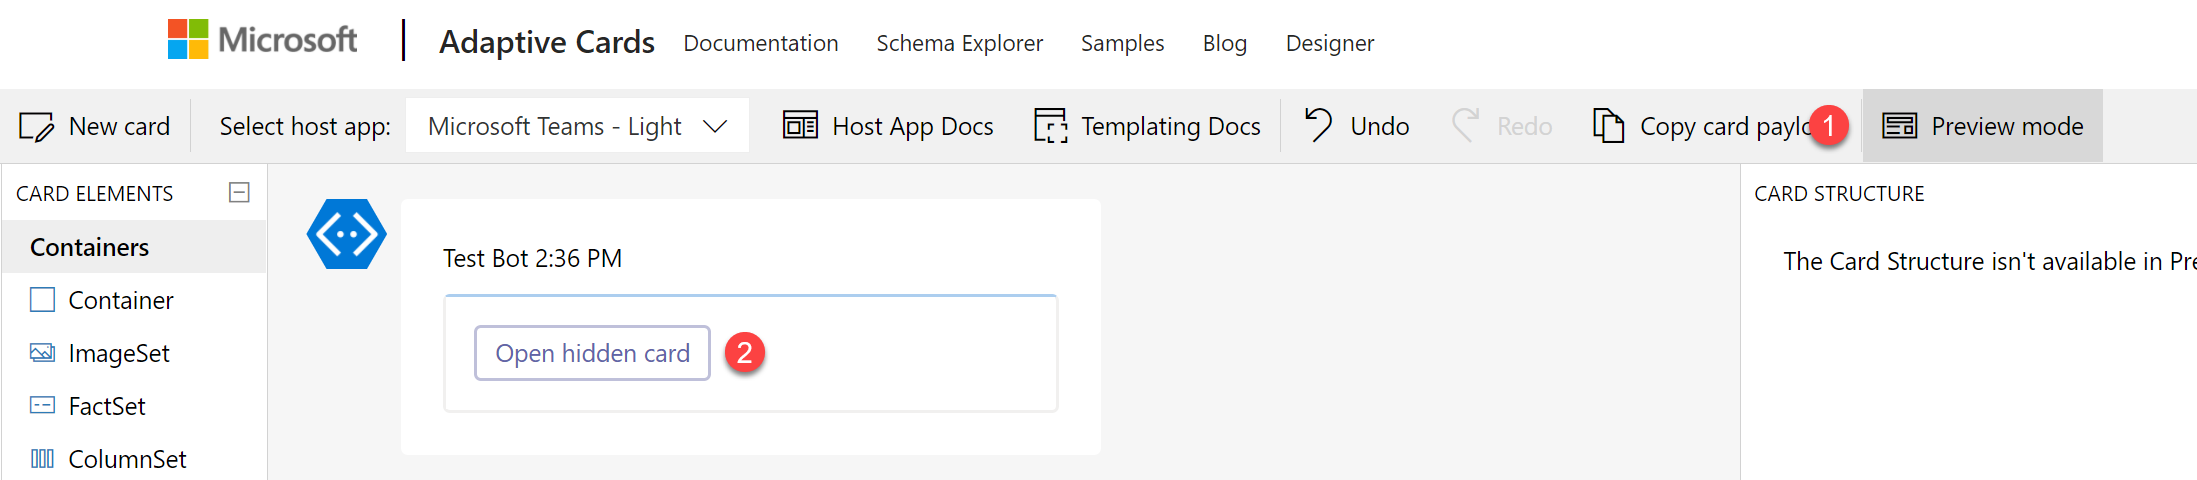
Wskazówka! Aby wyświetlić drugą kartę, która pojawi się po kliknięciu w dodany przycisk, kliknij ów przycisk dwukrotnie! Spowoduje to pojawienie się ukrytej karty, dzięki czemu możesz łatwo przygotować jej zawartość.
Następnie kliknij dwukrotnie przycisk, aby wyświetlić ukrytą kartę i przygotować jej zawartość:
Następnie przejdź do „Trybu podglądu” (Preview mode), aby zobaczyć, jak karta jest pokazywana i ukrywana po kliknięciu przycisku:
Ważne! Jeśli dodasz „Action.Submit” do ukrytej karty, wyśle ona dane ze wszystkich pól obecnych na tej karcie i „w górę” – a więc od wszystkich rodziców tej ukrytej karty. Przycisk „Action.Submit” na najwyższej karcie spowoduje wysłanie danych tylko z tej najwyższej karty.
Dane z kart są wysyłane od poziomu „rodzica” do „potomków”.
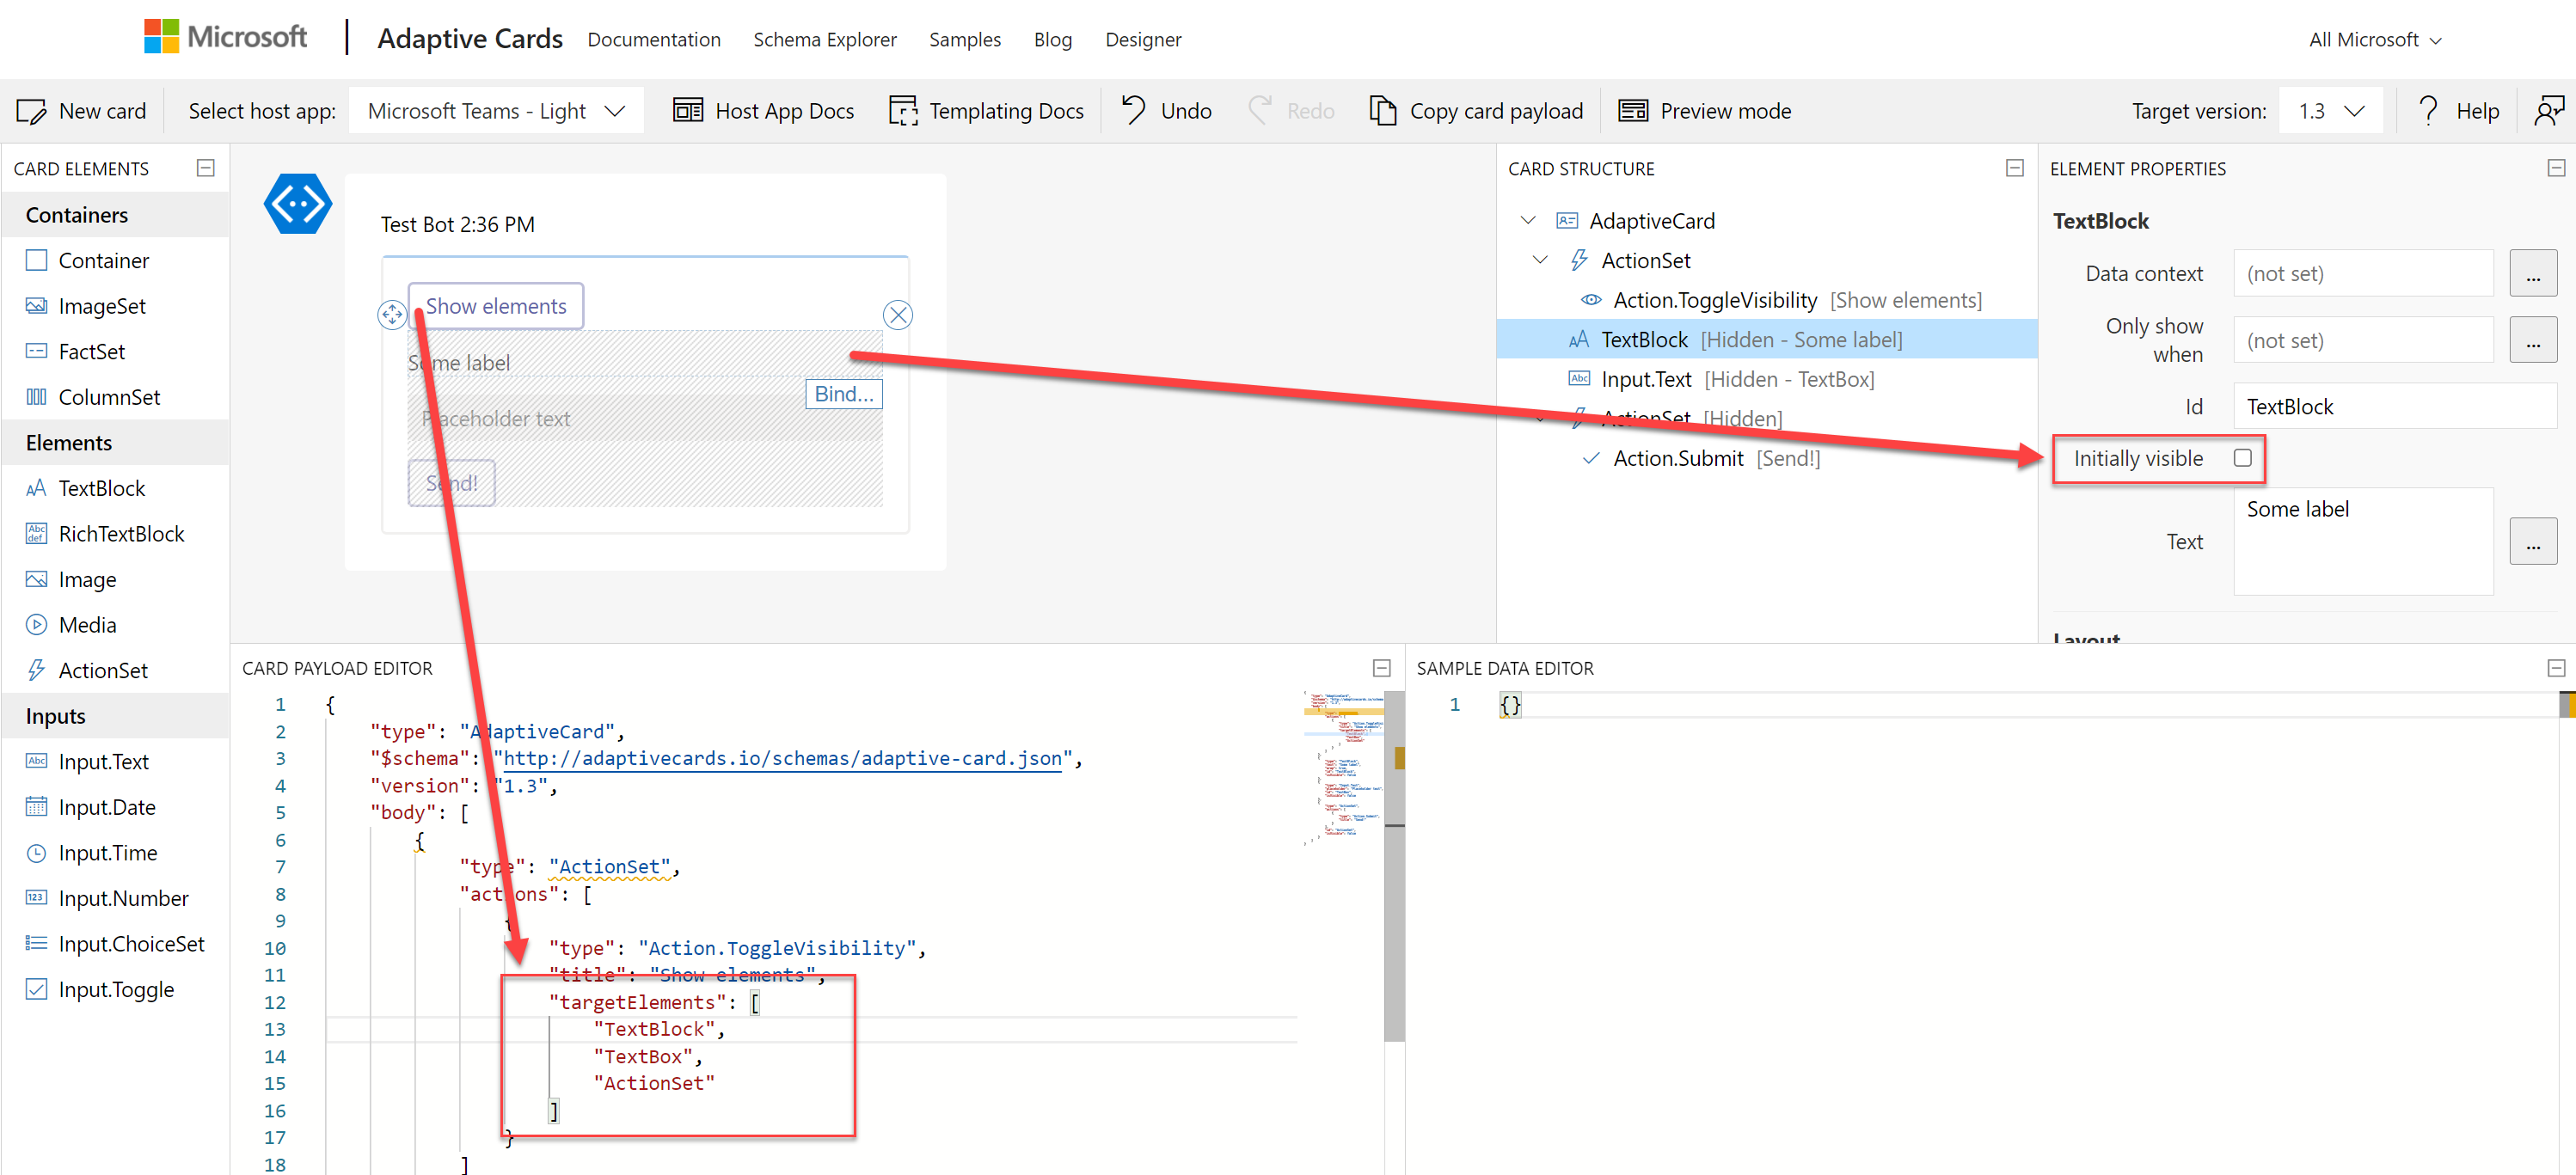
Action.ToggleVisibility
Aby z tej metody skorzystać należy najpierw dodać element „ActionSet” do kanwy projektanta, a następnie wybrać Action.ToggleVisibility z listy dostępnych opcji:
Następnie, podobnie jak w scenariuszu ShowCard, zdefiniuj właściwości dodawanego przycisku.
Ważne! W przeciwieństwie do ShowCard, ToggleVisibility wymaga wykonania pewnej pracy bezpośrednio w wygenerowanym JSON payload karty. Nie istnieje interfejs użytkownika, aby skonfigurować to w inny sposób.
Teraz dodaj do karty elementy, które chcesz pokazać i ukryć po kliknięciu przycisku. Następnie zdefiniuj ich właściwości:
Id – bezwzględnie wymagane jest zdefiniowanie unikalnych identyfikatorów dodawanych elementów. Identyfikatory służą do identyfikacji elementów i przełączania ich widoczności.
Initially visible – określ, czy elementy powinny być widoczne, gdy karta jest renderowana, czy ukryte. Przełączanie będzie albo je wówczas ukrywać lub pokazywać. Po odznaczeniu pola wyboru na element zostanie nałożony na szary wzór.
Teraz przejdź do kodu JSON i znajdź definicję przycisku ToggleVisibility. Dodaj tam następujący kod:
"targetElements": [ "colon delimited list of elements' Ids to toggle" ]
Ważne! Jedynym „minusem” tego podejścia jest, że w przypadku dodania zawsze widocznego przycisku „Submit”, wyśle on dane ze wszystkich pól, nawet jeśli są ukryte.
Ostatnim krokiem jest przetestowanie tego. Przełącz się w tryb „Podgląd” i sprawdź zachowanie swojej karty:
Only show when
Podejście to wykorzystuje „język szablonów kart adaptacyjnych”. Aby móc skorzystać tej metody należy najpierw zdefiniować Dane (Data), które będą powiązane z kartą. Kiedy już masz dane, możesz stworzyć warunek, który określi, kiedy element powinien być widoczny:
Możesz używać różnych typów porównań, zarówno do typów danych całkowitych, dat, logicznych, jak i stringów.
Ważne! W przeciwieństwie do „Toggle”, pokazywanie i ukrywanie elementów w oparciu o warunki ma miejsce podczas renderowania karty. Na dzień dzisiejszy dane, z których korzysta karta, są tylko statyczne, więc nie można ich zmienić po wyświetleniu karty. Oznacza to, że jeśli pole ma warunek uniemożliwiający jego wyświetlenie, nawet jeśli ma ustawioną wartość domyślną, jego wartość nie zostanie przesłana z karty, dopóki pole nie jest widoczne.
Na koniec wejdź w tryb „Podgląd”, aby zobaczyć, jak zachowuje się Twoja karta:
I to wszystko! Mam nadzieję, że ten tutorial okaże się przydatny. Jeśli masz jakieś uwagi, zapisz je poniżej. Dzięki!
Obrazy zawsze wzbogacają projekty Adaptive Cards. Jednak w Microsoft Teams max. payload (rozmiar) wiadomości to tylko 25KB i obejmuje on również rozmiar JSON samej karty. Dlatego bardzo często nie jest możliwe wyświetlenie nawet najmniejszego obrazu w trybie inline. Jakie zatem są inne opcje?
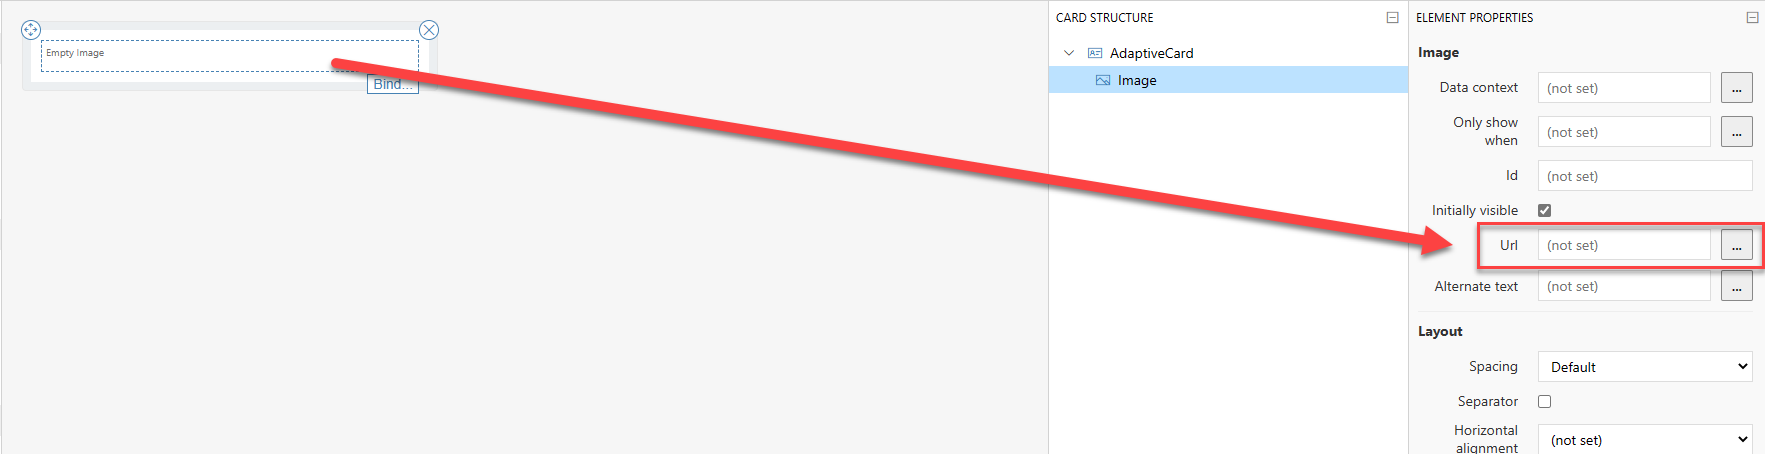
Obrazki w Adaptive Cards
Zasadniczo obrazy są wyświetlane na kartach adaptacyjnych przy użyciu elementu „Image”. W jego właściwościach musisz wpisać adres URL do obrazu:
Ważne! Adres URL obrazu musi zaczynać się od https i być bezpośrednim linkiem do samego pliku (kończyć się na jpg, png, tiff itp.).
Ok, więc jakie są opcje wyświetlania obrazu
Poprzez bezwzględne hiperłącze do samego pliku
Poprzez data uri – zakodowana do formatu base64 zawartość pliku
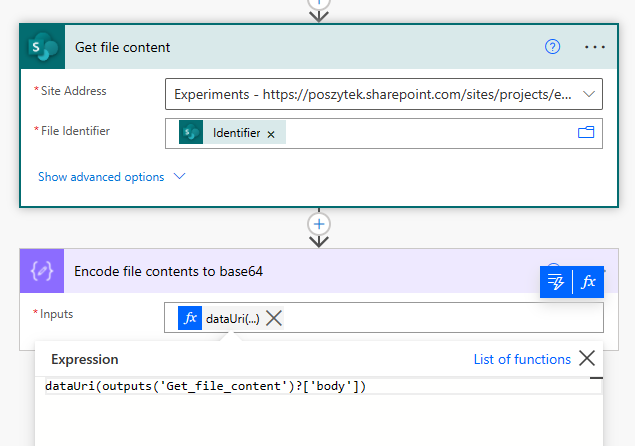
Pierwsze podejście wyjaśniłem już powyżej. Jest bardzo proste. Drugie wymaga pobrania zawartości pliku i zakodowania jej za do stringu base64. Można to zrobić samodzielnie, korzystając z usług online, np. Base64 Image Encoder. Lub używając wyrażenia dataUri(zawartość pliku) w Power Automate:
To, co jest zwracane, wygląda jak następujący ciąg: data:image/jpeg;base64,/9j/4AAJRgABAQ….QP//Z. Im dłuższy jest ten ciąg, tym większy jest plik. Na koniec ten ciąg (lub wyrażenie w Power Automate) należy umieścić jako wartość we właściwości Url elementu Image w projekcie karty adaptacyjnej.
Ważne! Rozmiar wiadomości Microsoft Teams może mieć rozmiar max. 25 KB na dzień dzisiejszy – wliczając w to JSON. Więc jeśli zakodujesz obraz w base64, łatwo zorientujesz się, że posiadanie tak wielu znaków spowoduje, że rozmiar z łatwością przekroczy ten limit. 25 KB to 25 000 bajtów, a jeden znak jest kodowany jako od 1 do 4 bajtów. Na przykład $ potrzebuje jednego bajtu, podczas gdy € potrzebuje 3 bajtów.
Gdzie przechowywać obrazy?
Zasadniczo obraz, który ma być wyświetlany, musi być dostępny anonimowo. Dzieje się tak, ponieważ karta Adaptive Card w MS Teams jest wyświetlana przez bota Teams, a nie konto uwierzytelnionego użytkownika. W związku z tym nie ma ono takich samych uprawnień dostępu jak użytkownik, który wyświetla kartę i najpewniej nie ma dostępu do pliku.
Wiedząc o tym, nie jest możliwe przechowywanie i wyświetlanie obrazów z SharePoint przy użyciu ścieżki bezwzględnej. Możesz spróbować, najpierw przekonwertować obrazy na data uri, jednak pamiętaj o rozmiarze wiadomości
Jakie inne sposoby są zatem możliwe?
Anonimowy serwer FTP
Usługi online do przechowywania obrazów, np.: Imgur
WordPress
Azure Blob Storage
i inne, pozwalające na udostępnianie plików nie wymagajace uwierzytelnienia
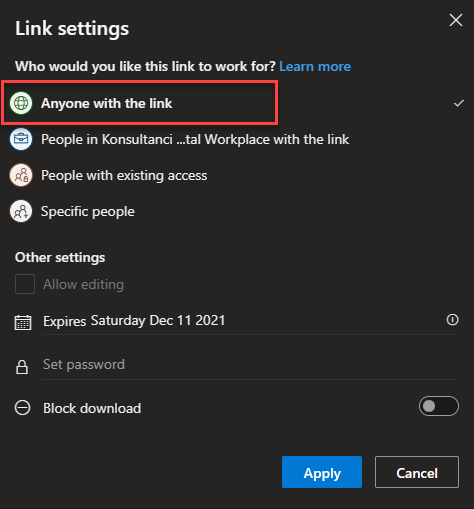
OneDrive nie może służyć jako magazyn do przechowywania obrazów, ponieważ nawet jeśli zdecydujemy się udostępnić obraz komukolwiek:
Wygenerowany link nadal nie jest prawidłowym, bezwzględnym linkiem do samego pliku, ale do strony, która wyświetla obraz, więc gdy umieścisz go jako wartość Url, obraz nie zostanie wyświetlony:
Jak bezpiecznie przechowywać obrazy, ale nadal wyświetlać je w Adaptive Cards?
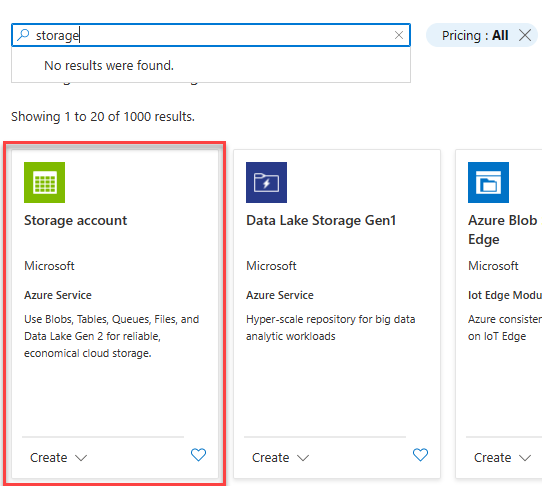
W takim przypadku należy poszukać usług, które pozwalają zabezpieczyć zawartość za pomocą connection string/ SAS (shared access signature), które można dodać do bezwzględnego adresu URL jako parametry url. Moim ulubionym jest Azure Blob Storage. Pokażę ci teraz jak.
Zaloguj się do portalu Azure i utwórz Storage account:
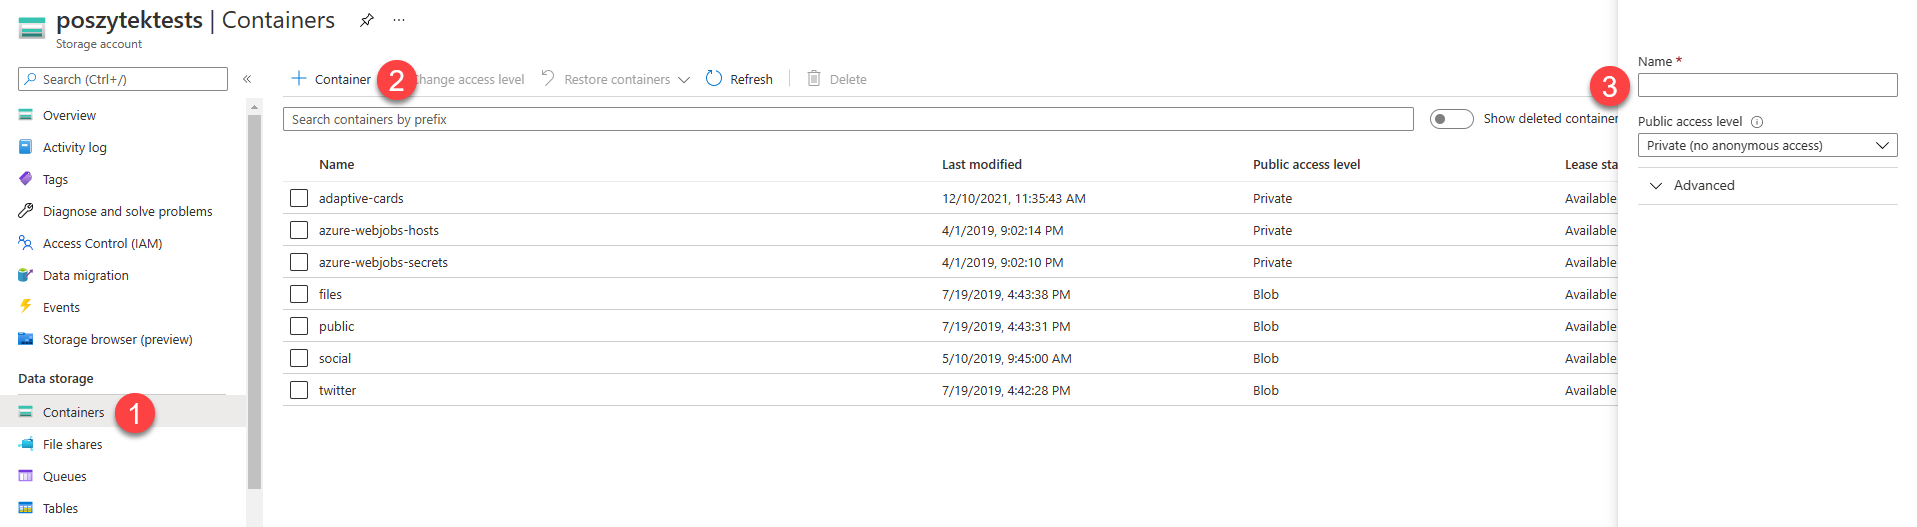
Gdy konto jest utworzone, przejdź do niego i:
Kliknij na Containers
Kliknij link do stworzenia nowego kontenera
Wpisz jego nazwę i ustaw poziom dostępu na Private
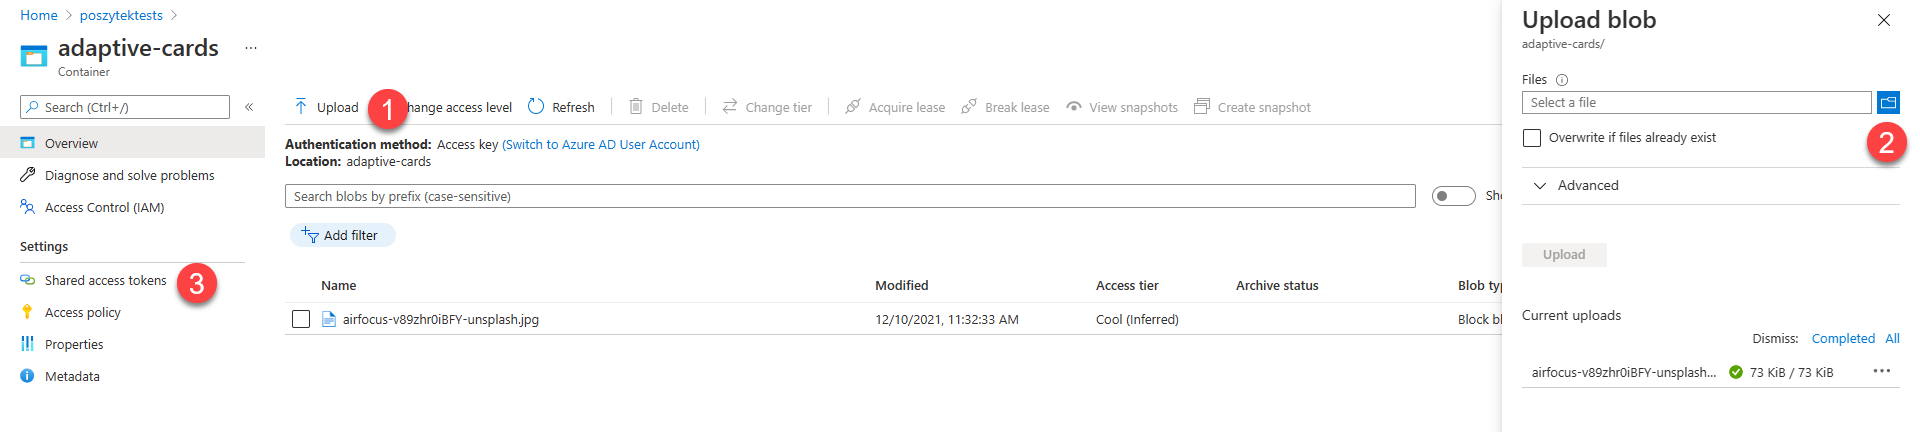
Teraz prześlij obraz, który chcesz wyświetlić w Adaptive Card:
Kliknij link Upload
Wybierz plik, który chcesz przesłać i określ wszystkie właściwości zgodnie z własnymi potrzebami
Wreszcie po przesłaniu przejdź do strony Shared access tokens
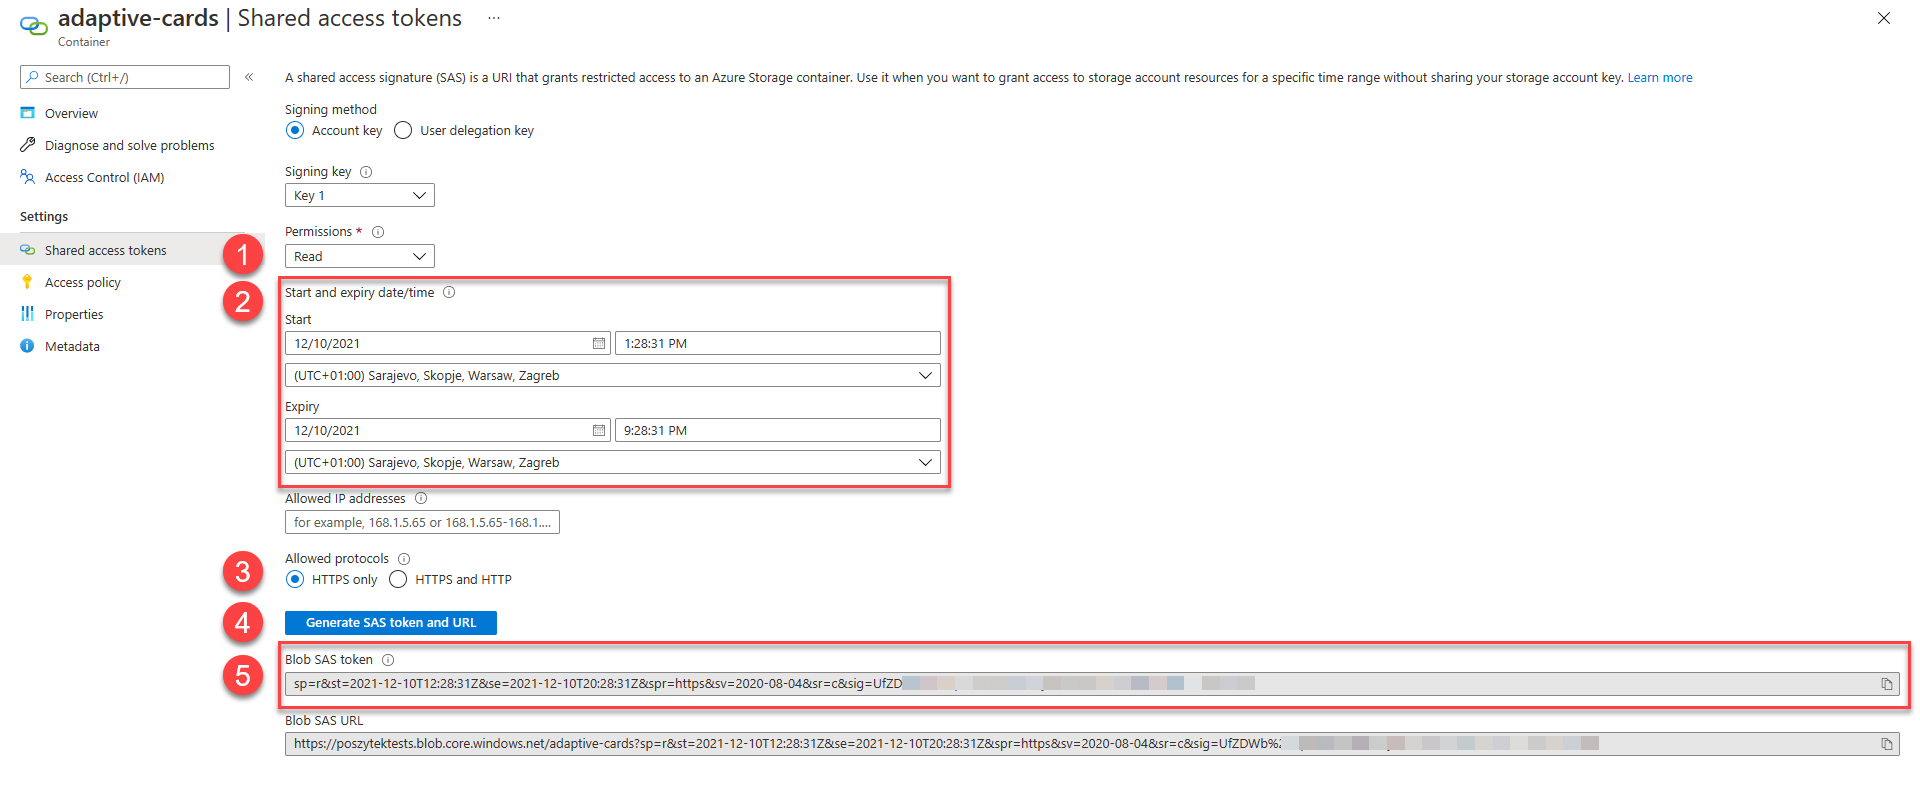
Na koniec wygeneruj token SAS, który możesz dołączyć do linku bezwzględnego do obrazu, aby udostępnić go do wyświetlenia.
Zdefiniuj poziom uprawnień – w tym scenariuszu wystarczy tylko Read
Zdefiniuj daty wygaśnięcia – kiedy token wygaśnie, a zasób ponownie stanie się niedostępny
Wybierz tylko HTTPS, ponieważ tylko taki protokół obsługują karty Adaptive Card
Kliknij, aby wygenerować token SAS i URL
Skopiuj token SAS
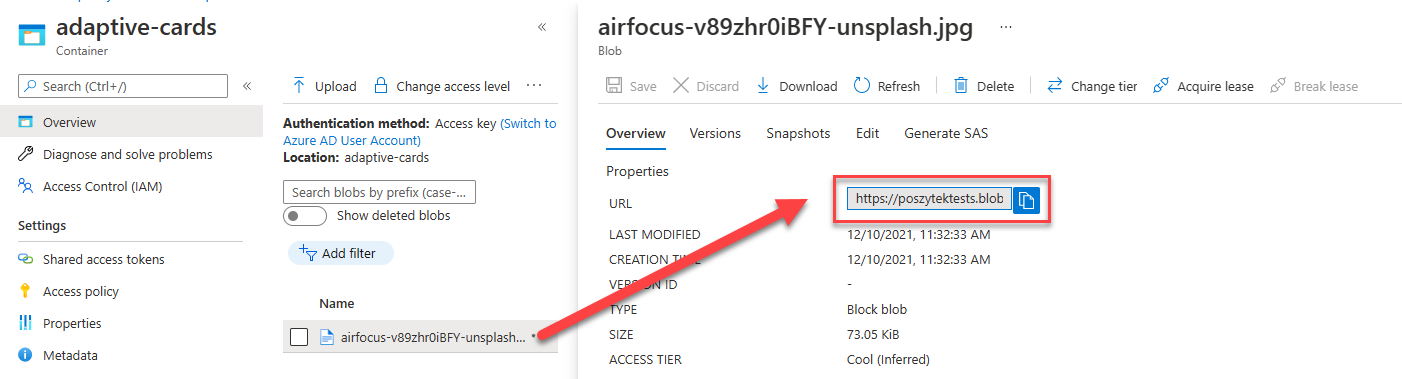
Teraz możesz wrócić do zawartości kontenera, otworzyć szczegóły pliku, skopiować jego ścieżkę i dołączyć token SAS:
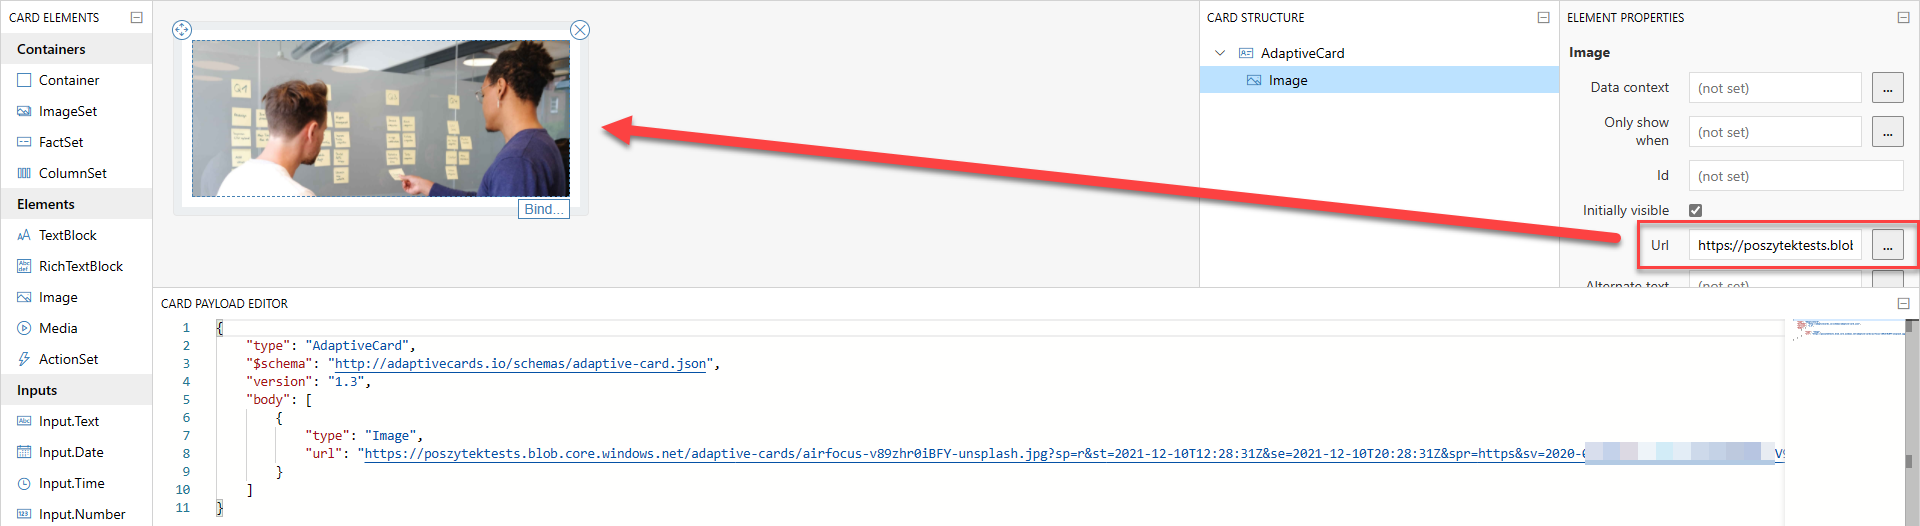
Następnie wklej taki adres URL z powrotem do właściwości Url elementu Image w Adaptive Card i voilla! Obraz zostanie prawidłowo wyświetlony:
Mam nadzieję, że ten krótki poradnik okaże się przydatny. Napisz w komentarzach, jakich innych dostawców używasz do bezpiecznego przechowywania obrazów i uzyskiwania do nich dostępu za pomocą SAS/ tokenów dostępu.