If you started using Project for the Web to manage projects within your organization, I am sure you encountered the mysterious Quick Look column that appears on every project schedule by default. In today’s post, I would like to explain the purpose of this column and what it does.
What is Project for the Web
Project for the Web is a web-based application that allows teams to manage tasks. Unlike its cousin Planner, Project for the Web allows teams to create more sophisticated task schedules, set dependencies on tasks, and manage effort and resources. To read more about Project for the Web and some of its capabilities, read this post.
Sample Project for the Web Schedule in Project for the Web
Quick Look Column in Project for the Web
When you create a new schedule within Project for the Web, you get to see the Quick Look field available within the task plan by default. It is a Read-only field that a user can’t fill out. So what is it? Let me explain.
The Quick Look field shows whether or not a given task has additional information not displayed on a task schedule. Here is the additional information you can fill out on a task and shown as an indicator in the Quick Look column:
By default, when you create new tasks, these fields will obviously be blank. However, if you click on the “i” Project Details panel and populate a task with some task notes, attach a file or utilize a checklist option, it will show you the appropriate indicators within the Quick Look column. Otherwise, the users reading or completing the task might miss this important additional information and might not even know it even exists.
In the below example, I added some notes, attached a file, and added a few items to the checklist within a task.
And this is how the task grid looks to the users once the information is populated.
In today’s article, I would like to continue to familiarize you with the Project for the Web application. Specifically, I want to explain the difference between subtasks and task checklists.
What is Project for the Web?
If you are new to Project for the Web application, I suggest you check out this post first, where I explain the relatively new application at a high level and tell you about its major features and capabilities.
Project for the Web Subtasks
One of the biggest advantages of Project for the Web compared to the Planner application is that you can organize tasks into multiple levels of categories and subcategories, just like you would see such an arrangement on a Gantt Chart Schedule. Below is an example of what I am talking about.
To achieve this level of organization, you would choose the parent category and create a subtask using the task below. You can create multiple levels of subtasks/categories/nested structures. So in other words, a subtask is a manageable effort/task that can be recorded, executed, and tracked on a project schedule.
Project for the Web Checklist
We never really had Checklist capability in the past, at least with the desktop version of the MS Project. However, now that we have Project for the Web, we can break down a task into smaller increments by using the Checklist functionality. This was probably copied from Planner, where we had this capability for quite some time.
If you click “i” on a given task in Project for the Web, it will open up a task details panel where you can create a checklist inside of a task.
Checklist Limitations
The checklist does not show up in the schedule (unless you display the Quick Look column indicator)
A checklist can’t be assigned resources, dates, duration, or effort (like a task)
Hard to track the status
Any given task can only have a max of 10 items in its checklist
Checklist or Subtasks?
From my experience, a checklist might be handy for really small tasks that do not require much tracking in terms of effort, resource assignment, or dates. It might be an excellent way to break a single task into smaller steps, without “polluting” your schedule/timeline. The only thing I want to clarify is that the checklist items should belong to the same individual(s) as those appearing on the task itself. If this is not the case, the checklist items should be their own task with their own user assignment. Otherwise, there is a really good chance those checklist items will never be completed 😊
There are a few ways to create a new schedule in Project for the Web application. So in today’s post, I would like to summarize them all.
What is Project for the Web?
Project for the Web is a Microsoft web-based application, one would use to manage projects. It is meant to be more sophisticated in terms of task management/project management capabilities and is intended to be a step up from the Planner application. Check out this post to learn more about the app.
Example of a schedule in Project for the Web
How to create a schedule in Project for the Web
There are several ways to create a new schedule in Project for the Web. To access all the options, first, navigate to https://project.microsoft.com/ or click on Project for the Web from the Microsoft App Launcher.
Option 1. Create from Blank
The first way to create a new schedule is to start from scratch.
From the Project for the Web Homepage, click New project
Next, click Blank project
A blank project schedule will then be created
You can then click on the title of the Project to change its default name from Untitled Project + change some other parameters about it (i.e., Start Date)
Option 2. Create from Template
Another way to start a new schedule is to create one from a template. Just like in Lists, we have the option to create a list based on a certain business use case, we do have the same capability in Project for the Web. Microsoft has a few templates available to give you some ideas about tasks/dependencies based on certain use cases. For example, there are sample schedules for construction projects, software development, etc.
From the Project for the Web Homepage, click New project
Next, on the pop-up that appears, choose a template from the ones presented on a screen
Once you choose a given template, it will show you a preview of it. Click the Use template button.
The schedule with sample tasks will now be created in the Project for the Web. You can change it/customize to your process from there.
Option 3. Import from MS Project .mpp file
This option is great if you have used MS Project (the desktop version) in the past and have some schedules already created there. This option allows you to (almost) seamlessly import a desktop .mpp file to Project for the Web. I blogged about this method in this article a bit earlier. The article mentioned above also discusses some of the limitations you will encounter with the import process.
Option 4. Copy from existing schedule
Finally, we have an option where you can take an existing schedule and copy it over to a new schedule. This option is great when you or someone else has already created a Project Schedule in Project for the Web, and you need to copy it for a similar project.
On a given project, click three dots in the upper-right-hand-corner, then choose Copy project
This will create a copy of the Project. You can then change its name and customize it further.
It is important to note that if the original Project you copied was already part of a certain Microsoft 365 group, the copied Project would not be part of that same group. You will need to manually associate that new schedule with the same group or another group.
At Rapid Circle, we utilise a framework known as the Enterprise Operating System (EOS), and to help achieve this we use a tool called Bloom Growth (formerly known as Traction Tools).
I won’t get into the specifics of how it works, but one of the things that comes out of our weekly “L10” team meetings is tasks get allocated to people. (This isn’t rocket science, and is possible with many other systems, but Bloom Growth is what we and many organisations use.)
The Challenge
The only issue with tasks being created in Bloom Growth is that they stay in Bloom Growth. If you want to update them or mark them as complete — you need to log into Bloom Growth to do that. Additionally, the only way you’re reminded of the tasks is a daily email — which for many people gets lost in their sea of other reminder emails.
Effective users of the Microsoft 365 platform will use To Do for managing their tasks as it does a great job of individual task lists, shared task lists, and synchronising tasks with Planner.
So how do we connect the two together?
The Solution — v1
As soon as I started using Bloom Growth and was assigned a task, I immediately looked for any form of integration to be able to bring the tasks to where I work — in Microsoft 365. Unfortunately nothing existed that I could find.
The initial solution I built was for myself only using two workflows.
Flow #1
Triggered based on a daily schedule
Connects to Bloom Growth with my account
Checks for any open tasks under my account
Checks to make sure the tasks don’t already exist in To Do
Creates tasks in a specific To Do task list with the Bloom Growth ID appended to the task title (required for Flow #2)
Flow #2
Triggered when a task in the specific To Do list was updated, using a trigger condition to only run for completed tasks
Connects to Bloom Growth with my account
Looks for a task in Bloom Growth that matches the ID in the task title
Marks the task as complete in Bloom Growth
While a few of my colleagues made copies of these workflows for themselves, I heard some of the managers lamenting that their staff were not completing tasks on time for the reasons mentioned above. And while I could go with the approach of walking people through setting it up, ultimately it’s a lot of separate solutions, running under each employee — which can be challenging to support.
Enter…
The Solution v2
While discussing this with one of my colleagues who was using a copy of my two flows, we wondered if there was a way we could do this at scale.
At the time, the Graph documentation for Microsoft To Do did not reflect that application permissions were supported for the endpoints, but I thought I’d try it anyway… and it worked.
So, without further ado, here is how to synchronise tasks from Bloom Growth with Microsoft To Do for large amounts of staff.
This solution utilises 3 workflows:
Create a “L10 Tasks” folder for users
Check for tasks assigned to them, add them to To Do
Check for completed tasks in To Do, mark them as complete in Bloom Growth
Solution Requirements
There are 3 requirements we need for this to work:
Requirement #1: Bloom Growth access
For this solution to work, we need an account with administrator-level access in Bloom Growth, so that it can see the tasks of every single member.
Requirement #2: Azure AD App Registration
In order to be able to read/write everyone’s task lists, we need an Azure AD App Registration with the following permissions:
Create a client secret, and that’s it!
Requirement #3: Table to store user-specific information
For my solution, I used a SharePoint list out of convenience. However, you could use a Dataverse table or something else if you like.
All we need to store in this list is:
User Principal Name (UPN)
Bloom Growth ID
Task list ID
Workflows
Workflow #1: Create the “L10 Tasks” list in To Do
This workflow runs on a regular basis and performs the following functions:
Get members of a security group (so we only apply this to valid users)
Find their Bloom Growth user ID
Create the task list in To Do
Record the details in a table
Of course we need some basic error checking to handle if they already have an existing task list, and secondly whether they actually exist in Bloom Growth.
Sure the workflow is not necessarily as elegant as it could be, but it only takes about 2–3 minutes to run for about 80 users, so I don’t feel the need to optimise it at this point.
Workflow #2: Check for new tasks in Bloom Growth and create them in To Do
This workflow is timed to run after the first workflow, and performs the following functions:
Get the users to run the sync against
For each user, find tasks assigned to them in Bloom Growth
Check if those tasks already exist in the “L10 Tasks” list (using the Bloom Growth task ID as a reference)
If not found, create the task in To Do with the Bloom Growth task ID in the title (used by the previous step, and the next workflow)
Again, this workflow could be more elegant, but it also only takes a whopping 2–3 minutes to run for the 80 users.
Workflow 3: Check for completed tasks in To Do and update their status in Bloom Growth
The first part is the same as Workflow 2, but what it does within the Apply to each is different.
Within the scope we retrieve the Bloom Growth ID of the task from title of the To Do task:
Then we check if the task is still open in Bloom Growth or not (as someone may have already marked it as complete directly in the web portal, and we don’t want to get an error):
The Final Result
Here’s what my tasks look like in Bloom Growth:
And in To Do:
So let’s mark one of these tasks as complete in To Do:
There are several different ways to create a new Project Schedule in the Project for the Web applicaiton and one of the options is to import an existing Microsoft Project file. I would like to explain how to do just that in today’s post.
What is Project for the Web
If you are new to Project for the Web, it is a task management application available within Microsoft 365 ecosystem. Unlike Planner, which is an informal, Kanban-style task management tool, Project for the Web allows you to set dependencies on the tasks, populate tasks with effort, and create custom fields. I introduced you to this wonderful application in an earlier article of mine.
An example of the Project for the Web application
How to import a Microsoft Project schedule into Project for the Web
Suppose you are considering switching to Project for the Web. In that case, the chances are, you probably already used a desktop version of the Microsoft Project and happen to have some schedules created in that application. Luckily, Microsoft made the transition of switching to the cloud version of the application easy, by allowing us to import a desktop version .mpp file into Project for the Web. So in today’s article, I would like to explain how this works and explain some limitations associated with the import process.
For this post, I will use the simple schedule I have in MS Project below.
Existing MS Project schedule
To import an .mpp project schedule to Project for the Web, do the following:
Navigate to Project for the Web application by clicking Microsoft 365 App Launcher > Project
Click New project Button
Then, choose the Import project button
From the next pop-up, click Choose .mpp file button
Browse to the location of your .mpp file and click Open
It will then go ahead and import the file and provide you with a summary of unsupported items that were not imported (more on this later in this post). Click OK.
Your schedule will now appear in Project for the Web! Mazel Tov!
Limitations on the .mpp project schedule import to Project for the Web
You can only import an .mpp file into a new Project for the Web Schedule, not an existing one.
You can only import an .mpp file into a schedule once. If you made a change to the .mpp file after the initial import, you would need to import to a brand new schedule
Since Project for the Web is a lightweight version of the desktop application, some fields and information that exist in the desktop version of the application will not be imported to Project for the Web. Some examples include: Assigned Resources, custom fields, and certain types of dependencies. For a complete list of the columns that are not supported/imported, check out this Microsoft article.
Currently, Project for the Web only supports a maximum number of 500 tasks. So if you have a sophisticated and extensive schedule in MS Project, it will not be imported to Project for the Web. Check out this post for a complete list of Project of Project for the Web limitations.
Planner Grid View and Repeating Tasks Arrive Together
First announced in message center notification MC428511 (Sept 2022, Microsoft 365 roadmap item 98104), Planner’s much-awaited grid view has finally made its appearance in tenants, roughly a month late from the adjusted date Microsoft set in November. The January 10 Planner blog post is full of excitement but does nothing to explain why the pace of change in Planner is so slow. This isn’t the first long-delayed feature release. Adding the ability for Planner to generate compliance records is another example of slow delivery.
To be fair to the Planner developers, the update also includes the ability to add repeating (recurring) tasks, something that isn’t included in any message center notification that I can find. The feature showed up in preview in some tenants last October and now it’s available to all. Nice as it is to have an extra feature show up by surprise, the lack of communication is something that the folks who are pushing for better and more comprehensive communication with customers through the Microsoft 365 message center might look into.
Biggest Planner Update Since 2020
Planner hasn’t changed its views since the 2018 introduction of the Schedule view., but Grid view is probably the biggest update since Planner expanded the set of labels available in a plan from six to 25 in 2020. As such, I was disappointed to find that I couldn’t sort tasks by clicking on column headings. Instead, Planner uses the same filter mechanism as available with its other views to select the set of tasks displayed in the view (Figure 1).
Figure 1: The new Planner grid view lists tasks for a plan
It’s logical to want Planner grid view to use the same filter component as the other Planner views. However, once the grid is populated (with or without a filter), it becomes much more useful if you can sort the data by tapping a column heading.
Items in the grid are editable. You can open the full task or edit properties inline. For instance, you can edit a task name, set new dates for task, assign new people to tasks, or move tasks between buckets. The inline editing capability of the grid is especially useful. If you’re used to the Planner web interface, there’s nothing difficult to master in grid view.
The Grid Conundrum
What’s surprising about the time taken for Microsoft to introduce grid view for the Planner web app is that they’ve had a perfectly good example to work from since the debut of the Tasks by Planner app for Teams (Figure 2) in 2020. Even odder, the Teams app allows users to sort tasks by clicking on column headings.
Figure 2: Planner Grid View in the Teams app
The Teams app is not perfect. Once a plan spans more than a couple of hundred tasks, the app slows down discernibly and it becomes easy to make mistakes, such as marking the wrong task as complete because of unpredictable scrolling in the task list. Nevertheless, it’s a nice way of browsing tasks to update those that need refinement and remove those that are complete.
Recurring Tasks
The implementation of recurring tasks is interesting. A task exists as a single instance, so each occurrence of a recurring task is a separate task. After creating a new task, you can edit its properties to set a start date, end date, and interval (Figure 3). This task exists until you complete it. At that time, Planner creates a new task and adjusts the start and end dates by the set interval.
Figure 3: Making a Planner task into a recurring task
If you remove the due date for a task, it loses its recurring status because Planner cannot advance the next iteration of the task to a new due date. If you delete the active instance of a recurring task, you can delete the task or all future tasks. Deleting the current task deletes the task and creates the next task in the series. It’s a simple and effective mechanism.
Planner Graph APIs
From a development perspective, Microsoft tweeted that application permissions for the Planner Graph APIs are rolling out and should be available to all tenants by the end of January. Up to now, the Planner API only supported delegated permissions, which meant that an account had to be a member of a plan before it could access task information. This made scenarios such as reporting very difficult (you could make the account used to generate reports a member of every plan in the tenant, but that’s not realistic). It will be interesting to see what kind of solutions appear based on the new APIs.
Insight like this doesn’t come easily. You’ve got to know the technology and understand how to look behind the scenes. Benefit from the knowledge and experience of the Office 365 for IT Pros team by subscribing to the best eBook covering Office 365 and the wider Microsoft 365 ecosystem.
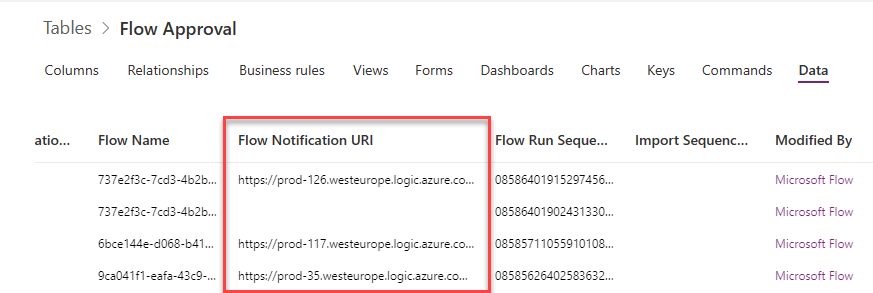
Pisząc mój poprzedni post dotyczący pracy z zadaniami w Power Automate, zdałem sobie sprawę, że w tabeli Flow Approval istnieje kolumna o nazwie Flow Notification URI, której do tej pory naprawdę nie doceniałem. Pokażę teraz, jaka drzemie w niej moc!
Do dziś byłem prawie pewien, że nie da się automatycznie ukończyć zadania w Power Automate/Microsoft Teams, a także wznowić procesu, który czeka na zatwierdzenie. Okazuje się, że naprawdę się myliłem.
Trochę podstaw
Za każdym razem, gdy przepływ pracy zawierający akcję, która przypisuje zadanie i czeka na jego zakończenie, jest wykonywany, nie tylko tworzy wpisy w tabelach Approval i Approval Request, ale także w Flow Approval. Co więcej, każdy wpis w tej ostatniej tabeli zawiera wartość w kolumnie o nazwie Flow Notification URI, który po wywołaniu z żądaniem POST po prostu kończy oczekiwanie i wznawia przepływ:
Adres URL jest zbudowany z następujących składowych (większość z nich pochodzi z innych kolumn tabeli Flow Approval):
https://[instancja].westeurope.logic.azure.com/workflows/[Flow Id]/runs/[Flow Run Sequence Id]/actions/[Nazwa akcji czekającej na zakończenie]/run?api-version=2016-06-01&sp=%2Fruns%2F[Flow Run Sequence Id]%2Factions%2F[Nazwa akcji czekającej na zakończenie]%2Frun%2C%2Fruns%2F[Flow Run Sequence Id]%2Factions%2F[Nazwa akcji czekającej na zakończenie]%2Fread&sv=1.0&sig=[klucz podpisujący żądanie]
Co dalej?
Wiedząc, że wysłanie żądania POST do tego adresu URL kończy oczekiwanie i wznawia przepływ, otwiera zupełnie nowy zakres scenariuszy, które można zbudować wokół podstawowych zadań akceptacji, na przykład przy użyciu niestandardowych aplikacji Power Apps. Wyobraź sobie tylko niektóre z nich:
Zatwierdzanie w imieniu innej osoby,
Oczekiwanie na większość odpowiedzi, nie wszystkich,
Kończenie zatwierdzania w dowolnym momencie,
I wiele, wiele innych!
Celem jest, aby najpierw zapisać i zaktualizować dane we wszystkich innych tabelach, z których korzystają Approvals (o których mowa w moim poście tutaj), uzyskać wszystkie informacje potrzebne do wysłania w odpowiedzi, a następnie wykonać POST do Notification URI.
Ponadto, wykonując taki POST, upewnij się, że jest zgodny z oczekiwanym formatem JSON i że umieściłeś „Content-Type: application/json” jako nagłówek:
{
   "responses":[
      {
         "responder":{
            "id":"GUID z tabeli Users",
            "displayName":"Imię kończącego zadanie",
            "email":"Mail kończącego zadanie",
            "tenantId":"Tenant ID",
            "userPrincipalName":"Principal name kończącego zadanie"
         },
         "requestDate":"Timestamp",
         "responseDate":"Timestamp",
         "approverResponse":"Wynik zadania",
         "comments":"Komentarz"
      }
   ],
   "responseSummary":"Tekst będący zlepkiem informacji o każdym zadaniu, kto, kiedy i z jakim wynikiem.",
   "completionDate":"Timestamp",
   "outcome":"Ogólny wynik zatwierdzania",
   "name":"Approval ID z tabeli Approval",
   "title":"Nazwa zadania",
   "details":"Opis zadania",
   "requestDate":"Timestamp",
   "expirationDate":"Timestamp"
}
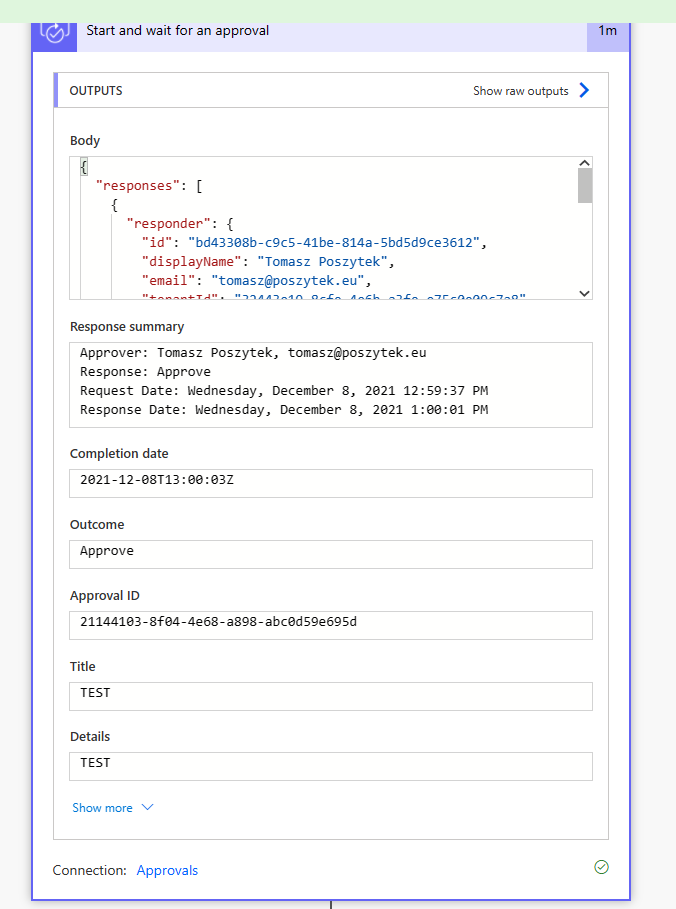
Po wysłaniu takiego POST akcja zakończy oczekiwanie i wyświetli wszystkie dane jako dynamiczne wyniki, tak jakby została zakończona za pomocą interfejsu zadania:
Mam nadzieję, że ten post cię tak saom podekscytował, jak mnie, gdy odkryłem tę możliwość. Daj znać w komentarzach, jakie scenariusze jesteś w stanie teraz zrealizować!
This topic is dear to my heart as I am a huge fan of Planner Application. Planner was not necessarily spoiled with a flood of new features like we are accustomed to with Teams, SharePoint, and other applications. So any new capabilities/new features within Planner are welcome and celebrated. One feature we recently got was the ability to create recurring tasks in Planner. So let me explain how they work.
Background
Up until now, we could only create one-time tasks. However, sometimes you have tasks that need to be recurring (occur regularly). For example, you need everyone on the team to submit project updates/Project Status Reports to the Project Manager every Friday and want to make sure this task appears in a Project plan and is visible to all the project members. So in this post, I would like to explain how to achieve recurring tasks in Planner.
How to create recurring tasks in Planner
Create a task like you normally would in Planner
Once the task is created, click on it to edit it, and you will notice a new field called Repeat. Click on it and choose the recurring frequency. Your choices are: Does not repeat (default), Daily, Weekdays, Weekly, Monthly, Yearly, and Custom (where you can assign your own recurring frequency scenario).
Choose the desired recurring frequency (i.e., Weekly)
How Recurring tasks appear in Planner
Board View
In a Board View, the recurring task will appear with a “recurring” symbol next to it. It will only show one upcoming instance (next due date only, not all instances at once).
Schedule View
If you opt for the Schedule View, which shows the tasks overlayed over the monthly calendar, it will show all the tasks instances.
How to complete recurring Planer tasks
If you click on a recurring task and mark it completed, it will only complete the next upcoming instance, not the task series. For example, I had a recurring task set for every Friday, and the next Friday date was December 2, 2022. I marked it completed, and it left the task on the Board, and changed the due date to the following Friday, December 9, 2022.
How to stop recurring Planner tasks?
Since marking recurring tasks completed just completes the upcoming instance, how do we then stop them completely? There are two options available:
Option 1: Stop the recurrence
The first option to get rid of recurrence would be to set the repeat field to the “Does not repeat” option
Option 2: Delete the task
Another option you have is to delete the task.
Once you choose “Delete” above, it will ask you whether you want to delete just the next upcoming task instance or the whole series. If you choose “This and all future tasks in series,” it will only delete upcoming recurring tasks but will leave the completed instances from the past on a Board/Plan.