Vue normale

Il y a de nouveaux articles disponibles, cliquez pour rafraîchir la page.
À partir d’avant-hierInformatique

Mastering SharePoint Modern Lists: Tips and Tricks for Efficient Usage and Formatting

SharePoint modern lists are one of the most powerful tools that allow you to create, manage, and share information with your team in a highly customizable manner. With the latest updates, it has become even easier to use SharePoint modern lists and customize them to suit your needs. In this blog post, we will take a look at some tips and tricks for using SharePoint modern lists efficiently and formatting them to your liking.

Tips for Using SharePoint Modern Lists Efficiently

Use Custom Views

One of the most efficient ways to use SharePoint modern lists is to create custom views. Custom views allow you to filter, sort, and group your data to suit your needs. For example, if you have a large list of sales data, you can create a custom view that only shows sales from a particular region or salesperson. This makes it easier for you to analyze your data and identify trends.

Use Quick Edit Mode

SharePoint modern lists come with a built-in Quick Edit mode that allows you to edit data directly in the list. This is a faster and more efficient way to update your data, especially if you need to make multiple changes at once. To use Quick Edit mode, simply click on the Quick Edit button on the toolbar.

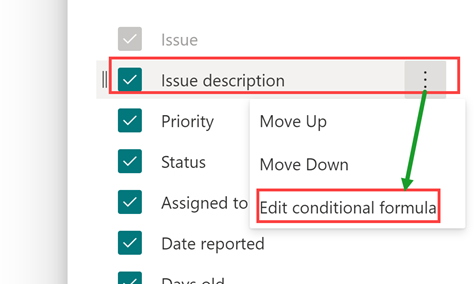
Use Column Formatting

Column formatting allows you to customize the appearance of your list columns. You can use column formatting to change the font size, color, and background color of your data, as well as add icons and images. This makes it easier for you to visualize your data and identify important information at a glance.

Formatting SharePoint Modern Lists

Use the Column Settings Menu

To format your SharePoint modern list, you can use the Column Settings menu. The Column Settings menu allows you to modify the display settings of your list columns, such as the column name, data type, and default value. You can also use the Column Settings menu to create custom validation rules and set up calculated columns.

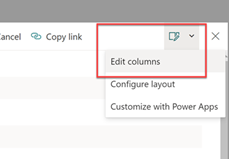
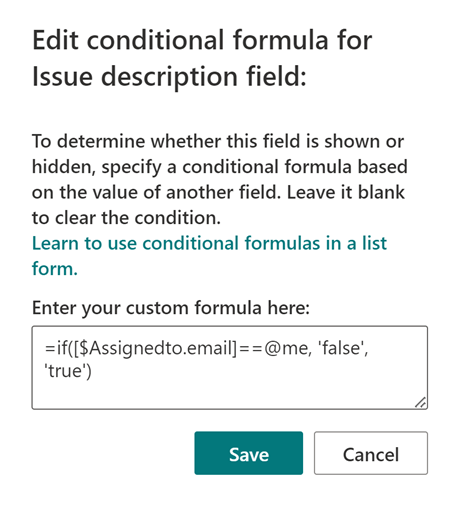
Use JSON Customization

JSON customization allows you to create highly customized SharePoint modern lists. With JSON customization, you can modify the appearance and behavior of your list, such as changing the background color, font size, and alignment of your data. To use JSON customization, you will need to have some programming knowledge, but there are many resources available online that can help you get started.

Use Power Apps

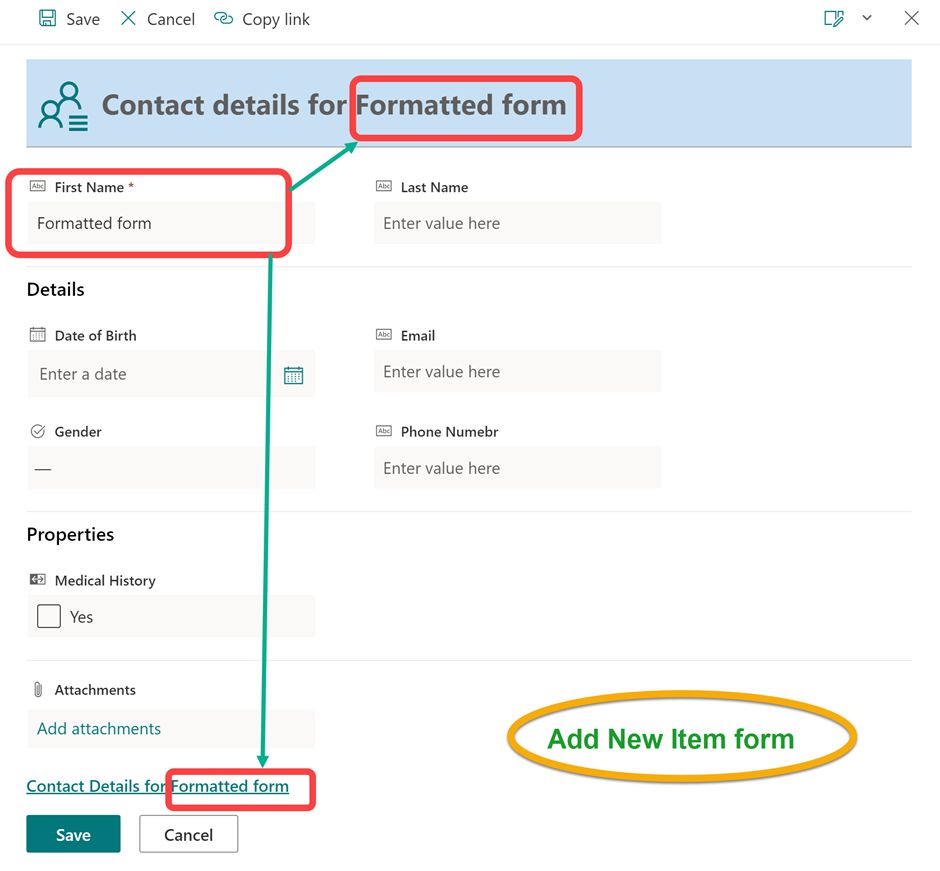
Power Apps is a powerful tool that allows you to create custom apps and forms for your SharePoint modern lists. With Power Apps, you can customize the appearance and behavior of your list to suit your needs. For example, you can create a custom form that only shows certain fields based on the user’s role, or create a custom app that allows users to view and edit data on their mobile devices.

SharePoint modern lists are a powerful tool that can help you manage and share information with your team. By using custom views, Quick Edit mode, and column formatting, you can use SharePoint modern lists more efficiently. And by using the Column Settings menu, JSON customization, and Power Apps, you can customize the appearance and behavior of your list to suit your needs. With these tips and tricks, you can become a master of SharePoint modern lists and take your team’s productivity to the next level.

The post Mastering SharePoint Modern Lists: Tips and Tricks for Efficient Usage and Formatting appeared first on MS Technology Talk.

SharePoint List form show hide fields based on conditional formula

In this blog post I am going to show you that to show or hide fields on a list form based on the valued from other columns using JSON formatting. JSON is a very powerful way of formatting a SharePoint list/library form where you can also apply conditional formatting based on selected values in a list form on the run time. Follow my blog post on formatting details on SharePoint list forms for more details.

Scenario

I have a custom Patient info list which is used to takes the patient information. There are two column Patient History and History Details. Patient History is Boolean field and if its yes then show the History Details field, otherwise History Detail field should not be visible.

Implementation

Select any list item / document from the SharePoint list or library and expand the Edit Form button click on the Edit Columns.

This will show you complete list of Columns from the list, you can hide few columns form here and can change the order of the columns. Click on the three dots next column name and select Edit conditional formula.

A dialog will be opened, now you need to enter a formula to hide the field if Medical History option is selected.

=if([$MedicalHistory] == true, 'true', 'false')

Here I am applying the formula on a Boolean field, you can change the formula based on field type. And you can add multiple formulas based on your business need. Now on my form, when I am adding or editing a list item, the History detail field is not showing if the medical history field is not selected.

The post SharePoint List form show hide fields based on conditional formula appeared first on MS Technology Talk.

Customizing SharePoint List Add/Edit form layout using JSON

In Modern SharePoint Lists and Libraries, we can change the layout of the default list form using JSON or by modifying the list forms in Power Apps. JSON formatting is still new and you can do a user friendly interface with a little code under standing. Even if you donot have any expertise on coding side you can still use the available json formats. In Past, we can do the form customizations using Infopath or by modifying the list Form using SharePoint designer.

In this blog post, I am going to share any easy way to format list form using a simple JSON format. In a SharePoint List / library form, there are three areas in the form where you can customize the formatting.

  • Header
  • Footer
  • Body

To customize , just select any of the list item or file to view the details, it will show the display form on right side, expand the Edit Form icon and select Configure Layout.

In above picture, you can see that when I have selected the Configure layout button, it opened the format pane, and showing a dropdown to select Header, Body and Footer sections.

Header Format

I am sharing a sample format which you can use format the header section. I have copied the JSON format from Configure the list form and did some customization to change the icon and background of the header section.

{
    "elmType": "div",
    "attributes": {
        "class": "ms-borderColor-neutralTertiary ms-bgColor-communicationTint20"
    },
    "style": {
        "width": "99%",
        "border-top-width": "0px",
        "border-bottom-width": "1px",
        "border-left-width": "0px",
        "border-right-width": "0px",
        "border-style": "solid",
        "margin-bottom": "16px",
        "padding-left": "10px"
    },
    "children": [
        {
            "elmType": "div",
            "style": {
                "display": "flex",
                "box-sizing": "border-box",
                "align-items": "center"
            },
            "children": [
                {
                    "elmType": "div",
                    "attributes": {
                        "iconName": "contactlist",
                        "class": "ms-fontSize-42 ms-fontWeight-regular ms-fontColor-themePrimary",
                        "title": "Details"
                    },
                    "style": {
                        "flex": "none",
                        "padding": "0px",
                        "padding-left": "0px",
                        "height": "36px"
                    }
                }
            ]
        },
        {
            "elmType": "div",
            "attributes": {
                "class": "ms-fontColor-neutralSecondary ms-fontWeight-bold ms-fontSize-24 ms-bgColor-communicationTint20"
            },
            "style": {
                "box-sizing": "border-box",
                "width": "100%",
                "text-align": "left",
                "padding": "21px 12px",
                "overflow": "hidden"
            },
            "children": [
                {
                    "elmType": "div",
                    "txtContent": "='Contact details for ' + [$Title]"
                }
            ]
        }
    ]
}

Footer Format

I have copied the JSON format from Configure the list form and haven’t done any customization but you can add your customization as per requirements.

Body Format

Select the Body from Apply Formatting to dropdown and copy below JSON for changing the layout of your list form body. I have created sections (groups)  in the body layout and you can also divide columns in different groups and can name accordingly.

{
    "sections": [
        {
            "displayname": "",
            "fields": [
                "Title",
                "LastName"
            ]
        },
        {
            "displayname": "Details",
            "fields": [
                "DateofBirth",

                "Email",

                "Gender",

                "PhoneNumber"
            ]
        },
        {
            "displayname": "Properties",
            "fields": [
                "MedicalHistory"
            ]
        }
    ]
}

You can also preview the changes by hitting the preview button. Save the changes and now you have a customize layout for your list forms. This layout would be available for your Add / Edit and view forms. In Below screenshot you can see the Add new item form showing the First Name value in Form header and footer.

The post Customizing SharePoint List Add/Edit form layout using JSON appeared first on MS Technology Talk.

Microsoft Lists, enable disable fields based on logged In user

There are requirements to show hide fields or enable/ disable fields based on business requirements for selected values. Today I am going to share how can we can show hide field in a SharePoint list form based on logged in user.

How to

I have a issue tracker list created using Issue tracking list template which I will be using for logging issues. I will hide issue discovery field on the SharePoint list form if logged in user is the same as Assigned To field so that user cannot modify Issue Description field.

 Select any list item / document from the SharePoint list or library and expand the Edit Form button click on the Edit Columns.

This will show you complete list of Columns from the list, you can hide few columns form here and can change the order of the columns. Click on the three dots next Issue Description column name and select Edit conditional formula.

A dialog will be opened, now you need to enter a formula to hide the field if Issue Description option is selected.

=if([$Assignedto.email] == @me, ‘false’,’true’)

Once you hit the save the button, the issue description field will be greyed out because it has the formula. Now you can test it by accessing the list view or edit form.

The post Microsoft Lists, enable disable fields based on logged In user appeared first on MS Technology Talk.

❌
❌