Vue normale

Il y a de nouveaux articles disponibles, cliquez pour rafraîchir la page.
À partir d’avant-hierFlux principal

Un avant goût de Microsoft 365 Copilot dans Excel…

Il y a quelques semaines, nous vous en parlions sur le blog, Microsoft a annoncé la fonctionnalité Copilot pour Microsoft 365. Avec un objectif :  permettre aux utilisateurs d’accéder à l’IA générative pour aider à automatiser des tâches dans, par exemple, les feuilles de calcul Excel. Actuellement, Microsoft 365 Copilot est en beta très restreinte dans quelques rares entreprises. 

Néanmoins aujourd’hui l’entité « Garage » de Microsoft qui travaille en amont sur pas mal de fonctionnalités et dépend directement de la R&D Microsoft propose un outil : Excel Lab  qui permet d’utiliser les fonctions d’IA générative dans Excel.

Il s’agit en fait d’une version améliorée d’un ancien complément appelé Advanced Formula Environment, qui, selon Microsoft, permet aux utilisateurs d’Excel de « créer, modifier et réutiliser plus facilement des formules complexes et les fonctions LAMBDA« .

Le nouveau complément Excel Labs combine les fonctionnalités de l’ancien programme Advanced Formula Environment avec la nouvelle fonction personnalisée LABS.GENERATIVEAI. Microsoft indique qu’il utilise de grands modèles de langage d’OpenAI pour permettre aux utilisateurs de taper des prompts directement dans une feuille Excel afin d’obtenir des résultats.

Alors je vous propose de regarder cela ensemble dans cette nouvelle petite vidéo :

Pour faire fonctionner ce complément vous aurez besoin de la version Excel 365 sur PC ou Mac. Vous devez avoir un compte OpenAI avec une souscription pour l’usage de l’API. C’est payant mais très peu onéreux dans la pratique.

Première chose à faire, installer le composant :

  • Allez sur insérer,
  • puis compléments,
  • Télécharger des compléments.
  • Une fois le store ouvert, recherchez Excel Labs,
  • Installez la composante
  • Ce dernier apparait alors dans votre ruban et vous pouvez y accéder.

Vous devez ensuite donner votre clé OpenAI pour accéder à l’API. Et c’est tout.

Dans l’exemple qui est pris ici, imaginons que j’ai besoin d’analyser simplement les évaluations laissées sous forme de texte par des stagiaires. Je dispose d’un tableau avec le prénom de la personne et son évaluation. Je voudraisun résumé m’indiquant si au global le commentaire est positif, négatif ou neutre.

Je vais pour cela utiliser la fonction LABS.GENERATIVEAI comme cela :

=LABS.GENERATIVEAI(« Synthétise le sentiment global de ce texte comme ‘Positif’, ‘Neutre’ ou ‘Négatif’ : « &[@Evaluation])

En ajoutant donc la colonne « Evaluation » de mon tableau comme source.

Nous obtenons le résultat après un bref temps de calcul… Pas si mal non ? Alors oui c’est pas parfait, parfois pas si évident, mais globalement le résultat est tout de même impressionnant.

stephanesabbague

Get more than 256 rows from an Excel file in Power Automate

“I’m trying to turn my Excel file into a csv, but the Power Automate flow exports only the first 256 rows, how do I get the rest…?”


Microsoft Excel is still one of the commonly used data storage when using Power Automate. You have a file with many rows, lots of data, and a flow that’ll do some operations over it. But with a lot of rows comes also a small limitation – the ‘List rows…’ action will return only 256 of them. What if it’s not enough? If there’re more rows to process and Power Automate just ignores them?

Use filter to reduce the number of rows…

One solution might be to reduce the number of rows. If you don’t necessarily need all of them, you can filter only the ones you want using a filter.

… or turn on pagination

If you need all of them then you’ll have to turn on the pagination. It’s not enough to increase the ‘Top Count’ as when getting only 100 SharePoint items. For the ‘List rows…’ action you must go into the action settings…

…turn on the ‘Pagination’ and set a threshold to a higher number.

Power Automate Excel 256 rows

Click the ‘Done’ button and you’re done. The ‘List rows…’ action will now return all the rows you want.

Summary

Returning only 256 rows from an Excel file is very often a problem for Power Automate users. While you might think that it’s enough to increase the ‘Top Count’ as in the ‘Get items’ action it’s not, and it can cause your flow to not work properly in the future. That’s why you should always consider whether there’s a possibility of more than 256 rows in your Excel file and deal with that in the way explained above.

Turn on the pagination in the action settings and increase the number of rows, and don’t forget to use a filter whenever possible.


Do you struggle with the various expressions, conditions, filters, or HTTP requests available in Power Automate?

I send one email per week with a summary of the new solutions, designed to help even non IT people to automate some of their repetitive tasks.

All subscribers have also access to resources like a SharePoint Filter Query cheat sheet or Date expressions cheat sheet.

Zero spam, unsubscribe anytime.

The post Get more than 256 rows from an Excel file in Power Automate appeared first on Let's POWER Automate.

Un avant goût de Microsoft 365 Copilot dans Excel…

Il y a quelques semaines, nous vous en parlions sur le blog, Microsoft a annoncé la fonctionnalité Copilot pour Microsoft 365. Avec un objectif :  permettre aux utilisateurs d’accéder à l’IA générative pour aider à automatiser des tâches dans, par exemple, les feuilles de calcul Excel. Actuellement, Microsoft 365 Copilot est en beta très restreinte dans quelques rares entreprises. 

Néanmoins aujourd’hui l’entité « Garage » de Microsoft qui travaille en amont sur pas mal de fonctionnalités et dépend directement de la R&D Microsoft propose un outil : Excel Lab  qui permet d’utiliser les fonctions d’IA générative dans Excel.

Il s’agit en fait d’une version améliorée d’un ancien complément appelé Advanced Formula Environment, qui, selon Microsoft, permet aux utilisateurs d’Excel de « créer, modifier et réutiliser plus facilement des formules complexes et les fonctions LAMBDA« .

Le nouveau complément Excel Labs combine les fonctionnalités de l’ancien programme Advanced Formula Environment avec la nouvelle fonction personnalisée LABS.GENERATIVEAI. Microsoft indique qu’il utilise de grands modèles de langage d’OpenAI pour permettre aux utilisateurs de taper des prompts directement dans une feuille Excel afin d’obtenir des résultats.

Alors je vous propose de regarder cela ensemble dans cette nouvelle petite vidéo :

Pour faire fonctionner ce complément vous aurez besoin de la version Excel 365 sur PC ou Mac. Vous devez avoir un compte OpenAI avec une souscription pour l’usage de l’API. C’est payant mais très peu onéreux dans la pratique.

Première chose à faire, installer le composant :

  • Allez sur insérer,
  • puis compléments,
  • Télécharger des compléments.
  • Une fois le store ouvert, recherchez Excel Labs,
  • Installez la composante
  • Ce dernier apparait alors dans votre ruban et vous pouvez y accéder.

Vous devez ensuite donner votre clé OpenAI pour accéder à l’API. Et c’est tout.

Dans l’exemple qui est pris ici, imaginons que j’ai besoin d’analyser simplement les évaluations laissées sous forme de texte par des stagiaires. Je dispose d’un tableau avec le prénom de la personne et son évaluation. Je voudraisun résumé m’indiquant si au global le commentaire est positif, négatif ou neutre.

Je vais pour cela utiliser la fonction LABS.GENERATIVEAI comme cela :

=LABS.GENERATIVEAI(« Synthétise le sentiment global de ce texte comme ‘Positif’, ‘Neutre’ ou ‘Négatif’ : « &[@Evaluation])

En ajoutant donc la colonne « Evaluation » de mon tableau comme source.

Nous obtenons le résultat après un bref temps de calcul… Pas si mal non ? Alors oui c’est pas parfait, parfois pas si évident, mais globalement le résultat est tout de même impressionnant.

stephanesabbague

Add unique ID to rows in Excel file for your Power Automate flow

“There’s no unique ID in my Excel file making it hard to use in Power Automate flow, is there an easy way to add such ID?”


When you work with data in rows, let it be SharePoint, Dataverse, or Excel rows, you always need some unique identifier. While Dataverse and SharePoint have such ID by default, Excel does not. And that can be a problem as without ID there’s no way to identify a specific row to select, update, or remove it.

Is there a way to add such unique ID also to Excel rows? Some solution without entering it manually for each new row?

Add a column with a simple formula

One of the functions available in Excel is ROW(): if you use it in a cell it’ll return the row number. That’s the function you can use in your Excel table. Add a new column and set its value to:

=ROW()

Since the tables used in Power Automate must have headers, remove the first rows from the numbering.

=ROW()-1
Power Automate Excel unique ID

Expand the formula to the all existing rows to assign the unique ID, the new rows added to the table will get the next ID automatically. Just make sure that you don’t rewrite the value in this cell when creating/updating a row!

Once you have the id you can use it to find/update/delete the row.

Summary

Having a unique ID for each Excel row will make your Power Automate life so much easier. And as you can see, it’s very easy to add such ID, all you need is a simple function in one of the columns. Since all data processed by Power Automate must be in a table, you don’t have to worry about updating the column. Just use the function and each new row will continue with the numbering.


Do you struggle with the various expressions, conditions, filters, or HTTP requests available in Power Automate?

I send one email per week with a summary of the new solutions, designed to help even non IT people to automate some of their repetitive tasks.

All subscribers have also access to resources like a SharePoint Filter Query cheat sheet or Date expressions cheat sheet.

Zero spam, unsubscribe anytime.

The post Add unique ID to rows in Excel file for your Power Automate flow appeared first on Let's POWER Automate.

How to find Excel rows missing in SharePoint list (Power Automate)

“I have a Power Automate flow that’s adding rows from Excel into SharePoint on regular basis, but it’s so slow, is there a quicker way to find the missing rows?”


While Excel file is still a common way to store data, it’s often not the best tool to work with. Once you start building a flow based on the rows, it might get slower and slower until it’s unbearable. That’s why it might be a good idea to move some of the data into SharePoint and do the automation there. But it’s not easy to synchronise Excel with SharePoint list. How do you find the new rows? The rows that were added since the last synchronisation job? Do you compare all the rows with the SharePoint items, one by one?

Don’t use an ‘Apply to each’

While you might be tempted to take all the rows and check if there’s already a SharePoint item, don’t do that. You don’t want a loop over all the rows, it could run for ages.

Power Automate Excel rows missing SharePoint

Use ‘Select’ and ‘Filter array’ instead

It’s much better (and faster) to use the ‘Filter array’ action as when comparing two arrays. The Excel rows and SharePoint items are just two arrays after all.

List all rows in the Excel file and all items in the SharePoint list first.

‘Select’ only the unique values that connect the SharePoint items with the rows.

Add ‘Filter array’ that’ll take all the Excel rows, and filter only the those where the ‘Select’ output (SharePoint unique IDs) does not contain the unique values from the Excel file. Here you might need an expression to get to the column.

Power Automate Excel rows missing SharePoint

And that’s it, the output of ‘Filter array’ will be only the rows that don’t exist in the SharePoint list yet. Loop through these remaining rows and create them in the SharePoint list.

Summary

Comparing two arrays is one of the most time consuming operation if done wrong (using a loop). But if you use my favourite Power Automate actions ‘Select’ and ‘Filter array’ it doesn’t have to be so, and finding Excel rows missing in a SharePoint list is a matter of seconds!


Do you struggle with the various expressions, conditions, filters, or HTTP requests available in Power Automate?

I send one email per week with a summary of the new solutions, designed to help even non IT people to automate some of their repetitive tasks.

All subscribers have also access to resources like a SharePoint Filter Query cheat sheet or Date expressions cheat sheet.

Zero spam, unsubscribe anytime.

The post How to find Excel rows missing in SharePoint list (Power Automate) appeared first on Let's POWER Automate.

How to open Office files in the desktop application by default

If you are accessing Office documents from within SharePoint and Teams and not Windows Explorer, I am sure you noticed that by default, MS Office file types (Word, Excel, PowerPoint, OneNote) always open up in the browser. It is quick and straightforward, but you probably need a full desktop experience majority of the time (for formatting in Word, additional functionalities in Excel, etc.). Luckily, we have a way to change the default. In this article, I would like to summarize the available options we have – the one you choose depends on how and where you open files from.

To change the default in SharePoint

If you primarily access Office files from the SharePoint site/interface, you would be better off adjusting a setting on a document library that I describe in this post.

open Office files in the desktop application

Important Notes

  • This change will affect everyone using this site/document library
  • If you access the same files from the Teams interface, this change will not affect it

To change the default in Teams

If you primarily access Office files from the Teams interface, you can do the following.

  1. In the upper-right-hand-corner of Teams, click three dots > Settingsopen Office files in the desktop application
  2. Under Settings, click on the Files sectionopen Office files in the desktop application
  3. Change the default to Desktop appopen Office files in the desktop application

Important Notes

  • This change will only affect you, and not the other members of the team
  • This change does not affect how files are opened from SharePoint
  • This setting can only be adjusted in the Teams Desktop application – you will not be able to adjust this in Teams if you access Teams via Browser
  • Sometimes this setting might not be available – for the above to work you must purchase and install Office application via the same licensed subscription you have with Teams (check out this article from Microsoft for additional information)

The post How to open Office files in the desktop application by default appeared first on SharePoint Maven.

Créer une liste déroulante dans Excel

Savoir créer une liste déroulante dans Excel vous servira à de nombreuses occasions. La liste déroulante permet d’économiser du temps de saisie mais surtout de restreindre les valeurs d’une cellule à une liste de choix spécifique. Cet article s’applique à toutes les versions récentes Excel que cela soit 2013, 2016, 2019 ou Office 365.

Saisie des entrées de la liste déroulante

Ouvrez le document Excel.

Saisissez dans une colonne la liste des entrées de la liste. Attention ! Il ne doit pas y avoir de cellules vides! Dédiez de préférence une feuille à la saisie de vos entrées, et ceux pour des raisons de clarté.

Créer une liste dans Excel 2013

Nommage de liste déroulante

Sélectionnez la plage de données composant la liste de choix.

Cliquez sur l’onglet Formules puis cliquez sur Définir un nom.

On donne un nom à la liste

Nommez la liste déroulante, par exemple “MaListe1”, puis cliquez sur OK.

La liste déroulante est nommée

Affectation de la liste déroulante à une cellule.

Voila la liste est prête, il n’y à plus qu’à l’affecter à la cellule de votre choix.

Pour cela sélectionnez la cellule sur laquelle sera appliquée la liste.

La liste est affectée à une celule

Depuis le bandeau sélectionnez l’onglet Données et cliquez sur Validation des données pour ouvrir la boite de dialogue associée.

Sélectionnez l’onglet Options puis sélectionnez Liste dans la zone Autoriser.

Dans la zone Source tapez puis le nom de la liste déroulante (par exemple “=MaListe1”)

Assurez vous que Liste déroulante dans la cellule est bien cochée.

Pour autoriser une cellule vide par défaut cochez la case Ignorer si vide.

Vous pouvez consultez l’article Créer une liste déroulante dans Excel 2007 afin d’avoir plus de détails sur les options disponibles. En effet les changements de la version sont mineurs concernant les listes de choix.

Cliquez sur OK pour valider votre choix.

Validation des données

Votre liste déroulante est alors créée.

La liste déroulante est opérationnelle

Et après!

Pour progresser d’avantage sur votre tableur préféré et avoir toutes les astuces à portée de main je vous recommande de consulter mes autres articles sur Excel et de faire l’acquisition d’un ouvrage spécialisé comme Excel Pour Les Nuls. Vous pouvez également rechercher mes autres tutoriels sur Excel en cliquant simplement sur le Tag correspondant. Pensez également à vous abonnez si vous souhaitez être informé de la parution d’un nouvel article.

Cet article original intitulé Créer une liste déroulante dans Excel a été publié la première sur SysKB.

Building a time tracking solution using Power Automate flow

“I’d like to keep tracking of the time I spend on various tasks, is there maybe a way to build such solution using Power Automate flow?”


One of the goals for using Power Automate is to make your life easier. To remove repetitive tasks, or at least make them as easy as possible. Instead of doing a series of steps you can just start a flow and let it do all the work for you. One example could be the tracking of your work time. Instead of checking the time, typing it down, doing the work, checking the time again, typing it down again, and calculating the duration you can build a simple flow that’ll do it on a click of a button.

Prepare the data storage

Since you must store the information somewhere, the first step is to prepare the data storage. You can use an Excel file or a SharePoint list, but in both cases it’ll need at least 4 columns – start time, end time, duration, and description.

In this example we’ll use SharePoint list, rename the Title column to “Description” and add two Date and Time columns “Start” and “End”, and a number column “Duration”.

Build the start flow

The starting flow is very straightforward as all you need is to create a new item in the list with the start date and time. Create it as a manually started flow with a single action ‘Create item’.

Power Automate time tracking

Build the end flow

The end flow is a bit more complicated as it must do a few more steps. It must find the last open item and update the end date. It must also calculate the task duration, the difference between the two dates/times, and the task description.

Start again from the manual trigger, but this time add a manual input “Description”.

Search for the last item using ‘Get items’ action with the Order By and Top Count fields.

That’s the item to update, the one that contains the start time. Use it to calculate the difference between the start time and the end time – utcNow(). Minutes will be a good unit for the result.

div(sub(ticks(utcNow()),ticks(first(outputs('Get_items')?['body']?['value'])?['Start'])),600000000)

Finish the flow by adding the ‘Update item’ action where you update the end time, duration, and the description you enter when you start the flow.

Power Automate time tracking

If you then follow the sequence “StartWork” and “EndWork” you’ll end up with an evidence of your work.

Power Automate time tracking

Summary

As you can see, you can use Power Automate to build even some applications, e.g. to keep tracking your time. Instead of doing some work you can just press a button, which is even better if you use the mobile application. Click one button to start tracking the time, click another one to stop it, get the duration, and log the work information.


Do you struggle with the various expressions, conditions, filters, or HTTP requests available in Power Automate?

I send one email per week with a summary of the new solutions, designed to help even non IT people to automate some of their repetitive tasks.

All subscribers have also access to resources like a SharePoint Filter Query cheat sheet or Date expressions cheat sheet.

Zero spam, unsubscribe anytime.

The post Building a time tracking solution using Power Automate flow appeared first on Let's POWER Automate.

Create a virtual table from Excel using the Virtual Connector Provider

Virtual tables enable integrating data from external data sources by seamlessly representing that data as tables in Microsoft Dataverse, without data replication

Virtual Connector Providers currently available are:

  • SQL Server
  • Sharepoint
  • Excel

In this article I will go step by step on how to connect your excel sheet to Dataverse:

  1. Download and Install the virtual connector from this URL
  2. Click on Get Free , Sign in to your account and choose your environment, you can check the progress of installation and once it is installed you can proceed to step3.

3. Go to Power Apps (make.powerapps.com), and select the environment in which you would like to set up the virtual table.

4. In the left navigation pane, select Dataverse > Connections, and then select New connection.

5. Select the Microsoft Excel Online (Business) from the list of connections and create new connection

6. You’ll be asked to provide additional details to connect to the data source.

Note: Your excel file should be saved in OneDrive of the person whose the connection belongs to and the table should be formatted as table.

7. Select Create, your current signed-in credentials will be used.

8. Go to solutions -> Create new Solution and Select New Connection reference.

9. Choose the Connector and the connection and click Create

10. Go to Advanced setting by selecting the Gear Icon

11. Navigate to settings – > Administration and select virtual entity data sources

12. Click on New

13. Select Virtual Connector Data Provider and Click OK.

14. Set the Name of your Data Source, Select the connection we have created in step 9 and the file name in your onedrive:

15. Once you save an entity catalogue will be created, Entity Catalogue will be used to help you create your virtual tables

16. Go to Tables -> Filter by Virtual and then you can see your entity catalogue

17. Next you need to proceed to creating your virtual table based on your entity Catalogue so you need to create a new app and add the entity catalogue to it.

18. Navigate to Apps and Click New App and add the Entity Catalogue to it.

19. Click Add Page from the left navigation and select the entity catalouge

20. Save and Publish, then Play to open the app

21. Select Table 1 or any table from the tables defined in your datasource.

22. Select the Name , the primary key and the primary name and set Create or Refresh Entity to yes and save and now you can see your virtual table in the list of Dataverse Tables.

Moving Solution to other Environment:

  1. Make sure you have installed the Dataverse Virtual Connector on your target environment before importing your solution.
  2. Make sure you have created the required connection step No. 5 on the target environment.
  3. You will need to add the Virtual table Data Source through the solution components -> Developer

miraghaly

Create a virtual table from Excel using the Virtual Connector Provider

Virtual tables enable integrating data from external data sources by seamlessly representing that data as tables in Microsoft Dataverse, without data replication

Virtual Connector Providers currently available are:

  • SQL Server
  • Sharepoint
  • Excel

In this article I will go step by step on how to connect your excel sheet to Dataverse:

  1. Download and Install the virtual connector from this URL
  2. Click on Get Free , Sign in to your account and choose your environment, you can check the progress of installation and once it is installed you can proceed to step3.

3. Go to Power Apps (make.powerapps.com), and select the environment in which you would like to set up the virtual table.

4. In the left navigation pane, select Dataverse > Connections, and then select New connection.

5. Select the Microsoft Excel Online (Business) from the list of connections and create new connection

6. You’ll be asked to provide additional details to connect to the data source.

Note: Your excel file should be saved in OneDrive of the person whose the connection belongs to and the table should be formatted as table.

7. Select Create, your current signed-in credentials will be used.

8. Go to solutions -> Create new Solution and Select New Connection reference.

9. Choose the Connector and the connection and click Create

10. Go to Advanced setting by selecting the Gear Icon

11. Navigate to settings – > Administration and select virtual entity data sources

12. Click on New

13. Select Virtual Connector Data Provider and Click OK.

14. Set the Name of your Data Source, Select the connection we have created in step 9 and the file name in your onedrive:

15. Once you save an entity catalogue will be created, Entity Catalogue will be used to help you create your virtual tables

16. Go to Tables -> Filter by Virtual and then you can see your entity catalogue

17. Next you need to proceed to creating your virtual table based on your entity Catalogue so you need to create a new app and add the entity catalogue to it.

18. Navigate to Apps and Click New App and add the Entity Catalogue to it.

19. Click Add Page from the left navigation and select the entity catalouge

20. Save and Publish, then Play to open the app

21. Select Table 1 or any table from the tables defined in your datasource.

22. Select the Name , the primary key and the primary name and set Create or Refresh Entity to yes and save and now you can see your virtual table in the list of Dataverse Tables.

Moving Solution to other Environment:

  1. Make sure you have installed the Dataverse Virtual Connector on your target environment before importing your solution.
  2. Make sure you have created the required connection step No. 5 on the target environment.
  3. You will need to add the Virtual table Data Source through the solution components -> Developer

Power Automate: Office 365 Excel – Update a Row action

Although Excel is known for being a standalone application, there’s a lot that we can do with Power Automate and tasks that we can automate. Today we’ll explore how to automate the update of rows in an Excel file by using the “Update a Row” action. This action works for files in SharePoint, Teams , or OneDrive for Business so let’s look at how to use it.

Where to find it?

You can find it under “Standard”.

Pick “Excel Online”. You may see or need to expand the list depending on your suggestions.

Select the “Update a Row” action:

Here’s what it looks like.

Pro Tip:
Power Automate tends to save the most common actions in the main screen, so check there before going through the full hierarchy. Also, you can use the search to find it quickly.

Now that we know how to find it let’s understand how to use it.

Fields

You can find some fields to configure before using the “Update a row” action, so let’s look at them individually.

Location

As mentioned before, we can use SharePoint, Teams, or OneDrive For Business to find our Excel files. To do it, select the location where you want to find the data. For example, for OneDrive For Business:

As you see above, you have a lot of “Groups” sites that are commonly Microsoft Teams sites.

If you’re looking for SharePoint sites, they are commonly displayed like this:

Since they all behave the same way, I’ll refer only to SharePoint sites from now on, but keep in mind that you can also use Microsoft Teams and OneDrive For Business. I’ll highlight the differences when appropriate.

Document Library

Since SharePoint sites can have multiple document libraries, we need to pick them from the list.

There’s always one created by default called “Documents” or something different depending on your language, but since it’s a mandatory field, you need to pick it; otherwise, you won’t be able to choose the file from the following field.

The same behavior occurs for OneDrive For Business, even if it’s not possible to create document libraries. Microsoft creates a document library that you can pick from the list.

File

Now that we have the locations defined, let’s look at a file. You can pick the file in the “File Browser”.

Or you can provide the path yourself, although I discourage this. Although you can do it, Power Automate sometimes returns strange errors related to the path, especially if the file has special characters. It’s always recommended that you can, of course, select the file directly in Power Automate’s UI.

Table

Power Automate requires the information inside an Excel table to access the data. To find the table, you can go to your Excel file, select a row and then check if you have a “Table Design” tab in the ribbon.

If you don’t, then chances are that you need to create a table in Excel before you can continue. Select the table in the dropdown.

The Excel file can have multiple tables, so it’s essential to define the one you want to manipulate the data. Finally, you can provide the table’s name as a “dynamic field,” but to ensure that your Flows always work, I recommend picking it from the dropdown.

Key Column

Now that we have a file, we need to tell Power Automate how to identify the row we want to update. Since there could be multiple tables in Excel, Microsoft required a key column that identifies the row we want to update inside the defined table. If you don’t have one, you can use the “Add a key column to a table” action that will do it for you.

Since we provided the path before, Power Automate checks the file and gives us a list of the columns in the provided table.

Notice that once we defined those fields, Power Automate added in the background additional fields for us to add information. This is only possible because we are not dynamically providing any of the fields, allowing Power Automate to access the file, get the columns, and add them as fields.

Please be aware that if you dynamically define the path, table, or file, you need to provide the “key column” name since Power Automate won’t find the list of columns before the Flow runs.

In case you don’t know what “Key Columns” are, I have an article here that explains them in a lot of detail.

Key Value

Finally, we need a key value that identifies the row we want to update from the table. Notice that we’re updating the item by providing an identifier, not the row number, since the same row can be inside multiple tables. The key value needs to be unique within the “key column” and should be a number.

Usage

Let’s look at a test file with anonymous employee information.

Let’s say we want to promote a person and update their salary to another value. Here’s what it looks like:

After we run, here’s what the Excel looks like:

Be careful to ensure that you have proper error handling, especially after this action, since the action will fail if the ID cannot be found with an exception like this:

No row was found with Id '3'.

Advanced Properties

As you can see, there are also advanced properties that we can take advantage of. When you toggle it, you get an additional field as follows:

This field will define, for the dates fields, how the date should be provided. Remember that Excel internally stores the dates in a numeric format, even if it’s presented to you differently. So Power Automate enables us to define the format of the data with two options:

The “Serial Number” is the “native” way that Excel stores the date, meaning that if you want to provide a date, you need to provide a number. With “ISO 8601” you give a date that makes more sense to us but in a fixed format. Functions in Power Automate , like the utcNow() function, return the date already in that format. Still, if you have a date in a string, you can use the formatDateTime function to format it correctly.

Non-intuitive behaviors

If you leave the values empty, it doesn’t mean you want to delete the values in Excel for that column. It means that you don’t want to make changes to that field. Notice the example above where I only filled in the “Salary” field since that was the only one I wanted to update.

If you want to remove the value from a column, please use the “null” special value that will signal to Power Automate that the information should be removed from the selected item.

Limitations

It could have been a temporary problem, but I got a lot of issues with some key column names, like “identifier”, for example. If you’re having issues with Flow returning strange error messages, consider changing to something like “Key Column”.

At this point should not be considered a limitation anymore, the “Update a row” action will only support Excel Workbook (xlsx) files, so you need to convert your Excel file before you can use the action.

Recommendations

Here are some things to keep in mind.

Name it correctly

In this case, the name is super important to provide the context of what we’re updating. Always build the name so that other people can understand what you are using without opening the action and checking the details.

Always add a comment

Adding a comment will also help avoid mistakes since we can indicate why that row is updated in Excel. Also, if you’re adding any elements dynamically, it’s a good practice to explain how the values are obtained. Indicate where the path comes from, for example, if it’s calculated and how. It’s essential to enable faster debugging when something goes wrong.

Always deal with errors

Have your Flow fail graciously and notify someone that something failed. It’s horrible to have failing Flows in Power Automate since they may go unlooked-for a while or generate even worse errors. I have a template that you can use to help you make your Flow resistant to issues. You can check all details here. Remember that if the “Key Value” doesn’t exist in the “Key Column,” the action will return an error, so it’s essential to have a parallel branch that catches these cases.

Am I missing something? Leave a comment or interact on Twitter. Let’s work together to make this reference as complete as we can

Back to the Power Automate Action Reference.

Photo by Peter Herrmann on Unsplash


Power Apps Create Collection Using Excel [Complete Guide]

In this Power Apps Tutorial, we will go through different types of examples of how to create a collection using an Excel sheet within the Power Apps based on various scenarios.

While using the Power Apps canvas app for the most recent project, we received a request to create a Power Apps collection using the Excel sheet inside the Power Apps environment.

It will also be discussed how to work with the Power Apps collection using Excel, which contains the following items:

  • Power Apps creates a collection from an Excel table
  • Power Apps creates a collection of Excel Syntax
  • Show Power Apps collection value from Excel
  • Power Apps collection Excel items count
  • Power Apps collection Excel rename column
  • Power Apps collection Excel delete column
  • Power Apps collection Excel sorts a column
  • PowerApps collection Excel sort multiple columns

Before building a Power Apps collection using an Excel sheet, we need to connect the Excel sheet to the Power Apps canvas app. For this, the following steps are applicable:

  • Open Excel and prepare an Excel sheet with some data. Suppose We have an Excel sheet named Country Details having columns such as Country, Captial, Population, Currency, and Continent.
Power Apps create collection Excel
Power Apps creates collection Excel
  • Format the above Excel sheet to the table.
Power Apps create collection from Excel
Power Apps creates a collection of Excel
  • On the Power Apps, create a canvas app. Import the Excel table as a data source. For this, navigate to Add Data > Search Excel Online (Business) > Choose your connection > Select data set > document library > Select the Excel table > Connect. Once we connect the Excel table, we can see that within the Power Apps Data section.
Import an Excel table to the Power Apps

This is how to import an Excel table to the Power Apps.

Also Read: Power Apps Collection Using SharePoint List

Power Apps creates a collection from an Excel table

Once the Excel table has been imported into the Power Apps, we can create galleries, data tables, and collections that make it possible to deal with the data. As per our requirement, we will see how to create a collection from the excel table within the Power Apps.

What is the syntax to create a Power Apps collection from an Excel

To create the collection from the excel table, the syntax is:

Collect(<Collection Name>, <ExcelSheetName>)

Where,

  1. Collect: This Power Apps function allows the creation of a collection.
  2. Collection Name: Provide a new or existing collection name
  3. ExcelSheetName: Provide the excel sheet name.

Let’s implement this syntax in our app to create a collection from the Excel table. The required steps are:

  • On the Power Apps screen, add a button control.
  • Set the Text property as “Create Collection”.
  • Insert the below expression on the button’s OnSelect property to create a collection within the Power Apps.
OnSelect = Collect(CollCountry, Table1)

Where CollCountry is the name of the new collection and Table1 is the name of the Excel table.

PowerApps create collection from Excel table
PowerApps create a collection from an Excel table

Once we click on the button, we can see a collection named CollCountry will be created in the Power Apps collection section shown below:

PowerApps create collection from Excel
PowerApps create a collection of Excel

This is how to create a PowerApps collection from an Excel table.

Check out: Power Apps Timer Control Examples

How to show Power Apps collection value from Excel

In the above example, we have seen how to create a Power Apps collection from an Excel table. Now, we will see how to show this collected value within the Power Apps screen. For this, the following steps are:

  • On the Power Apps screen, add a data table.
  • Set the Items as the created collection name i.e., CollCountry.
  • On the data table properties panel, go to Fields > Edit fields > Add fields > Select the desired fields to display on the data table.
Show Power Apps collection value from Excel

Similarly, we can use a vertical gallery to display the collected data within the Power Apps screen. This is how to show Power Apps collection value from Excel.

Power Apps collection Excel items count

We occasionally may question how to count the number of items in the Power Apps collection, which was created from an Excel table.

So in this section, we will see how to count the Power Apps collection items created from Excel. To calculate the item count, we will use the above collection that we have created from an Excel table and the following steps are:

  • Add a Text Label control to the above Power Apps screen and place it near the data table.
  • Insert the below expression on the label’s Text property.
Text = "The total count of Items is: " & CountRows(CollCountry)

Where CollCountry indicates the name of the already-existing collection that we made in the example above.

Once the formula is applied to the label control, we can see it will display the total count of the collection’s Items shown below:

Power Apps collection Excel items count

This is how to count the Power Apps collection using Excel.

Read: Power Apps Notify() function [How to use with examples]

Power Apps collection Excel rename column

Power Apps allows us to rename the column(s) within a collection that was created from an Excel data source.

Consider that we wish to rename the columns in a new collection that we will build using the Excel data mentioned above. Where we will rename the Country to Nation, Capital to Metropolis, Population to Birthrate, and keep the other columns the same i.e., Currency, Continent.

For this, the following steps are:

  • On the Power Apps screen, add a button control.
  • Give a name or set the button’s Text property as per your need (Ex: Rename Collection)
  • Insert the below expression on the button’s OnSelect property.
OnSelect = ClearCollect(
    CollNewCountry,
    RenameColumns(
        Table1,
        "Country",
        "Nation",
        "Capital",
        "Metropolis",
        "Population",
        "Birthrate"
    )
) 

Where,

  • CollNewCountry is the name of the new collection.
  • Table1 is the name of the Excel table.
  • Country“, “Capital”, and “Population” is the name of the Excel column.
  • “Nation”, “Metropolis”, and “Birthrate” is the new names of the columns.
Power Apps collection Excel rename column
  • While clicking on the button, it will create a collection by renaming the columns within the Power Apps collection section.
  • Add a data table, and set the Items property as “CollNewCountry “. Also, add the fields to the Power Apps screen in order to display the acquired data.

Now, we can see the collected data will visualize within the data table by renaming the columns shown below:

PowerApps collection Excel rename column

This is how to rename columns in the PowerApps collection from Excel.

Check: Power Apps Filter With Date Picker

Power Apps collection Excel delete column

In this section, we will see how to remove or delete the column(s) from a Power Apps collection that was created from Excel. That means we will create a collection by removing certain columns using the Excel table such as Population, and Continent.

  • On the Power Apps screen, add a button control. Set the Text as Remove Collection.
  • Insert the below expression on the button’s OnSelect property.
OnSelect = ClearCollect(CollColumn, DropColumns(Table1,"Population","Continent"))

Where,

  • CollColumn is the name of the new collection to store data.
  • Table1 is the name of the Excel table.
  • “Population”, and “Continent” are the name of the excel columns.
Power Apps collection Excel delete column

Let’s click on the button while clicking on the Alt Key. We can see a collection named CollColumn will be created on the collection sections by removing the specified columns.

PowerApps collection Excel delete column

We can display these data via a Power Apps data table on the screen. This is how to create a Power Apps collection from an Excel table by deleting columns.

Have a look: How To Set Default Date in Power Apps Date Picker

Power Apps collection Excel sorts a column

In this section, we will see how to sort a Power Apps collection column that is retrieved from an Excel Table.

To work with this requirement, we are going to use the above-existed collection named CollCountry. By using this collection, we will create a collection where the Population is sorted by Ascending order. The following steps are:

  • On the Power Apps screen, add a button control. Give a Text to the button. Ex- Sort Column.
  • Insert the below expression on the button’s OnSelect property.
OnSelect = ClearCollect(CollSortPopulation, Sort(CollCountry,Population,Ascending));

Where,

  1. CollSortPopulation is the name of the new collection
  2. CollCountry is the name of the existing collection
  3. Population is the name of the collection column
  4. Ascending indicates sorting order
Power Apps collection Excel sort a column
Power Apps collection Excel sorts a column

Now click on the button to create the collection. Next, insert a data table control to the Power Apps screen, set the Items property as CollSortPopulation, and add the fields to display the sorted data.

As we can see, the data table displays the collected data in ascending order by ascending the Population column.

PowerApps collection Excel sort a column
PowerApps collection Excel sorts a column

This is how to sort a Power Apps collection column created from an Excel table.

Check out: How to disable Power Apps date picker

PowerApps collection Excel sort multiple columns

Similarly, in this section, we will see how to sort multiple columns of a Power Apps collection that build from Excel data.

Assume we’re going to use the CollCountry collection from above. Using this collection, we will create another collection also with Capital and Population columns sorted in ascending and descending order. To fulfill this requirement, the following steps are:

  • On the Power Apps screen, add a button control.
  • Give a text to the button (Ex- Sort Multiple columns).
  • Insert the mentioned expression on the button’s OnSelect property.
OnSelect = ClearCollect(CollSortColumns, SortByColumns( CollCountry,"Capital",Ascending,"Population",Descending))

Where,

  1. CollSortColumns is the name of the new collection name.
  2. CollCountry is the name of the existing collection.
  3. “Capital” and “Population” is the name of the collection columns.
  4. Ascending, Descending is indicating to the sorting orders.
PowerApps collection Excel sort multiple columns

Let’s click on the button while clicking on the Alt key. Insert a data table into the screen and add the fields to display the collected data.

Power Apps collection Excel sort multiple columns

We can see the collection’s columns are sorted in ascending as well as descending order within the above data table. This is how to sort multiple columns within the Power Apps collection build from Excel data.

Conclusion

From this Power Apps tutorial, we learned how to build a Power Apps collection using an Excel table. Also, we have covered things such as:

  • Power Apps creates a collection from an Excel table
  • Power Apps creates a collection of Excel Syntax
  • Show Power Apps collection value from Excel
  • Power Apps collection Excel items count
  • Power Apps collection Excel rename column
  • Power Apps collection Excel delete column
  • Power Apps collection Excel sorts a column
  • PowerApps collection Excel sort multiple columns

Additionally, you may like some more Power Apps Tutorials:

Power Automate: Office 365 Excel – Get a Row action

Although Excel is known for being a standalone application, there’s a lot that we can do with Power Automate and tasks that we can automate. Today we’ll explore getting a row in an Excel file using the “Get a row” action. This action works for files in SharePoint, Teams, or OneDrive for Business so let’s look at how to use it.

Where to find it?

You can find it under “Standard”:

Pick “Excel Online”:

Select “Get a Row” action:

Here’s what it looks like.

Pro Tip:
Power Automate tends to save the most common actions in the main screen, so check there before going through the full hierarchy. Also, you can use the search to find it quickly.

Now that we know how to find it let’s understand how to use it.

Fields

You can find some fields to configure before using the “Get a row” action, so let’s look at them individually.

Location

As mentioned before, we can use SharePoint, Teams , or OneDrive For Business to find our Excel files. To do it, select the location where you want to find the data. For example, for OneDrive For Business:

As you see above, you have a lot of “Groups” sites that are commonly Microsoft Teams sites.

If you’re looking for SharePoint sites, they are commonly displayed like this:

Since they all behave the same way, I’ll refer only to SharePoint sites from now on, but keep in mind that you can also use Microsoft Teams and OneDrive For Business. I’ll highlight the differences when appropriate.

Document Library

Since SharePoint sites can have multiple document libraries, we need to pick them from the list.

There’s always one created by default called “Documents” or something different depending on your language, but since it’s a mandatory field, you need to pick it; otherwise, you won’t be able to choose the file from the following field.

The same behavior occurs for OneDrive For Business, even if it’s not possible to create document libraries. Microsoft creates a document library that you can pick from the list.

File

Now that we have the locations defined, let’s look at a file. You can pick the file in the “File Browser”.

Or you can provide the path yourself, but I discourage this. Although you can do it, Power Automate sometimes returns strange errors related to the path, especially if the file has special characters. It’s always recommended that you can, of course, select the file directly in Power Automate’s UI.

Table

Power Automate requires the information inside an Excel table to access the data. To find the table, you can go to your Excel file, select a row and then check if you have a “Table Design” tab in the ribbon.

If you don’t, then chances are that you need to create a table in Excel before you can continue. Select the table in the dropdown.

The Excel file can have multiple tables, so it’s important to define the one you want to manipulate the data. Finally, you can provide the table’s name as a “dynamic field,” but to ensure that your Flows always work, I recommend picking it from the dropdown.

Key Column

Now that we have a file, we need to tell Power Automate how to identify the row we want to get. Since there could be multiple tables in Excel, Microsoft required a “Key Column” that identifies the row we want to get inside the defined table. If you don’t have one, you can use the “Add a key column to a table” action that will do it for you.

Since we provided the path before, Power Automate checks the file and gives us a list of the columns in the provided table.

Please be aware that if you dynamically define the path, table, or file, you need to provide the “Key Column” name since Power Automate won’t find the list of columns before the Flow runs, so it can’t present you with a list.

In case you don’t know what “Key Columns” are, I have an article here that explains them in a lot of detail.

Key Value

Finally, we need a key value that identifies the row we want to get from the table. Notice that we’re getting the item by providing an identifier, not the row number, since the same row can be inside multiple tables. The key value needs to be unique within the “Key Column” and should be a number.

Usage

Let’s look at a test file with anonymous employee information.

Let’s say you want the information for the employee with ID “2”. For our example, we’ll use OneDrive for Business, so here’s what it looks like:

After we run, we get the following information:

Be careful to ensure that the ID that you’re picking exists in the table otherwise, you’ll get an error. For example, if we don’t have the ID “3” in the table, we’ll get the following exception:

No row was found with Id '3'.

You can find the fields in the “Dynamic Fields” tab if you want to access them. For example, let’s use a compose action:

Please note that you won’t be able to do this if you use dynamic fields for any of the elements, like the path, for example. Since Power Automate can only know the structure of the file while it’s running, it’s not possible to add the fields as a preview to pick them in the UI.

Finally, notice that the values returned are not formatted and, in some cases, don’t have the format you would expect. For example, dates are returned as numbers, so if you want to convert the Excel number dates into “real” dates, here’s an article on how to do it. Or if you need to check this article to convert the dates up until the second. There’s also an article that shows you how to format the date and show information in other languages.

Please also consider that numbers don’t contain formatting like currency or custom Excel formats that you define. If you want to configure the numbers in other formats, you need to use the “Format Number” action after you get the data.

Limitations

At this point should not be considered a limitation anymore; the “Get a row” action will only support Excel Workbook (xlsx) files, so you need to convert your Excel file before you can use the action.

Recommendations

Here are some things to keep in mind.

Name it correctly

In this case, the name is super important to provide the context of what we’re trying to get. For example, if you’re trying to get information about an employee, mention that in the name of the action. Always build the name so that other people can understand what you are using without opening the action and checking the details.

Always add a comment

Adding a comment will also help avoid mistakes since we can indicate the reason for getting the Excel file row. Also, if you’re adding any elements dynamically, it’s a good practice to explain how the values are obtained. Indicate where the path comes from, for example, if it’s calculated and how. It’s essential to enable faster debugging when something goes wrong.

Always deal with errors

Have your Flow fail graciously and notify someone that something failed. It’s horrible to have failing Flows in Power Automate since they may go unlooked-for a while or generate even worse errors. I have a template that you can use to help you make your Flow resistant to issues. You can check all details here. Remember that if the “Key Value” doesn’t exist in the “Key Column,” the action will return an error, so it’s essential to have a parallel branch that catches these cases.

Back to the Power Automate Action Reference.

Photo by Becca Tapert on Unsplash


Filtrowanie danych w Excel z użyciem Power Automate Desktop

W tym poście pokażę, jak filtrować dane w tabeli w programie Microsoft Excel.

Proces jest naprawdę prosty i łatwy. Wszystko kręci się wokół akcji o nazwie „Send keys” z ustawieniami mówiącymi akcji, aby wysłać je do określonego okna. Po pierwsze, kiedy otwierasz plik Excel, musisz włączyć filtrowanie. Można to zrobić, wysyłając skrót klawiaturowy Ctrl+Shift+L. To w PAD powinno być wyrażone jako {Control}({Shift}(L)).

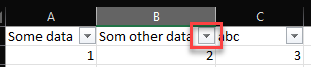
Następnie musisz ustawić focus na komórce, która zawiera nagłówek kolumny, którą chcesz filtrować (lub innymi słowy – gdzie widoczny jest mały przycisk do otwierania okna filtrowania).

Po ustawieniu fokusu musisz wysłać kolejny skrót klawiaturowy, tym razem: Alt+strzałka w dół. W PAD byłoby to: {Alt}({Down}).

Następnie użyj „UI selector”, aby uzyskać elementy interfejsu użytkownika określonych części okna dialogowego filtra, np. pole wyszukiwania i przycisk OK. Gdy już je masz, po prostu zbuduj wokół nich logikę, na przykład wypełnij pole wyszukiwania terminem, którego musisz użyć do filtrowania, a następnie naciśnij przycisk OK.

I to wszystko!

Poniżej znajdziesz kod, który po skopiowaniu i wklejeniu do PAD-a zamieni się w 7 akcji wraz z selektorami, dzięki czemu możesz spróbować sam. Powodzenia!

Excel.LaunchExcel.LaunchAndOpen Path: $'''C:\\Users\\USER\\Downloads\\book.xlsx''' Visible: True ReadOnly: False LoadAddInsAndMacros: False Instance=> ExcelInstance
Excel.SelectCellsFromExcel.SelectCells Instance: ExcelInstance StartColumn: $'''A''' StartRow: 1 EndColumn: $'''A''' EndRow: 1
MouseAndKeyboard.SendKeys.FocusAndSendKeysByInstanceOrHandle WindowInstance: ExcelInstance TextToSend: $'''{Control}({Shift}(L))''' DelayBetweenKeystrokes: 10 SendTextAsHardwareKeys: True
Excel.SelectCellsFromExcel.SelectCells Instance: ExcelInstance StartColumn: $'''B''' StartRow: 1 EndColumn: $'''B''' EndRow: 1
MouseAndKeyboard.SendKeys.FocusAndSendKeysByInstanceOrHandle WindowInstance: ExcelInstance TextToSend: $'''{Alt}({Down})''' DelayBetweenKeystrokes: 10 SendTextAsHardwareKeys: True
UIAutomation.PopulateTextField TextField: appmask['Window \'book.xlsx - Excel\'']['Edit \'Type field name to search for\''] Text: 2 Mode: UIAutomation.PopulateTextMode.Replace ClickType: UIAutomation.PopulateMouseClickType.SingleClick
UIAutomation.PressButton Button: appmask['Window \'book.xlsx - Excel\'']['Button \'OK\'']

# [ControlRepository][PowerAutomateDesktop]
{
  "ApplicationInfo": {
    "Name": "ClipboardControlRepository",
    "Version": "1.0"
  },
  "Screens": [
    {
      "Controls": [
        {
          "AutomationProtocol": "uia3",
          "ElementTypeName": "Edit",
          "InstanceId": "85bbf960-d360-4df5-97e7-49f73a6e04fe",
          "Name": "Edit 'Type field name to search for'",
          "SelectorCount": 1,
          "Selectors": [
            {
              "CustomSelector": null,
              "Elements": [
                {
                  "Attributes": [
                    {
                      "Ignore": false,
                      "IsOrdinal": false,
                      "Name": "Class",
                      "Operation": "EqualTo",
                      "Value": "NetUIToolWindow"
                    },
                    {
                      "Ignore": true,
                      "IsOrdinal": false,
                      "Name": "Enabled",
                      "Operation": "EqualTo",
                      "Value": true
                    },
                    {
                      "Ignore": true,
                      "IsOrdinal": false,
                      "Name": "Id",
                      "Operation": "EqualTo",
                      "Value": ""
                    },
                    {
                      "Ignore": true,
                      "IsOrdinal": false,
                      "Name": "Name",
                      "Operation": "EqualTo",
                      "Value": ""
                    },
                    {
                      "Ignore": true,
                      "IsOrdinal": true,
                      "Name": "Ordinal",
                      "Operation": "EqualTo",
                      "Value": -1
                    },
                    {
                      "Ignore": true,
                      "IsOrdinal": false,
                      "Name": "Visible",
                      "Operation": "EqualTo",
                      "Value": true
                    }
                  ],
                  "CustomValue": null,
                  "Ignore": false,
                  "Name": "Menu 'NetUIToolWindow'",
                  "Tag": "menu"
                },
                {
                  "Attributes": [
                    {
                      "Ignore": false,
                      "IsOrdinal": false,
                      "Name": "Class",
                      "Operation": "EqualTo",
                      "Value": "NetUIDismissBehavior"
                    },
                    {
                      "Ignore": true,
                      "IsOrdinal": false,
                      "Name": "Enabled",
                      "Operation": "EqualTo",
                      "Value": true
                    },
                    {
                      "Ignore": true,
                      "IsOrdinal": false,
                      "Name": "Id",
                      "Operation": "EqualTo",
                      "Value": ""
                    },
                    {
                      "Ignore": true,
                      "IsOrdinal": false,
                      "Name": "Name",
                      "Operation": "EqualTo",
                      "Value": ""
                    },
                    {
                      "Ignore": true,
                      "IsOrdinal": true,
                      "Name": "Ordinal",
                      "Operation": "EqualTo",
                      "Value": -1
                    },
                    {
                      "Ignore": true,
                      "IsOrdinal": false,
                      "Name": "Visible",
                      "Operation": "EqualTo",
                      "Value": true
                    }
                  ],
                  "CustomValue": null,
                  "Ignore": false,
                  "Name": "UI Custom 'NetUIDismissBehavior'",
                  "Tag": "custom"
                },
                {
                  "Attributes": [
                    {
                      "Ignore": false,
                      "IsOrdinal": false,
                      "Name": "Class",
                      "Operation": "EqualTo",
                      "Value": "NetUITextbox"
                    },
                    {
                      "Ignore": true,
                      "IsOrdinal": false,
                      "Name": "Enabled",
                      "Operation": "EqualTo",
                      "Value": true
                    },
                    {
                      "Ignore": true,
                      "IsOrdinal": false,
                      "Name": "Id",
                      "Operation": "EqualTo",
                      "Value": ""
                    },
                    {
                      "Ignore": true,
                      "IsOrdinal": false,
                      "Name": "Name",
                      "Operation": "EqualTo",
                      "Value": "Type field name to search for"
                    },
                    {
                      "Ignore": true,
                      "IsOrdinal": true,
                      "Name": "Ordinal",
                      "Operation": "EqualTo",
                      "Value": -1
                    },
                    {
                      "Ignore": true,
                      "IsOrdinal": false,
                      "Name": "Visible",
                      "Operation": "EqualTo",
                      "Value": true
                    }
                  ],
                  "CustomValue": null,
                  "Ignore": false,
                  "Name": "Edit 'Type field name to search for'",
                  "Tag": "edit"
                }
              ],
              "Ignore": false,
              "IsCustom": false,
              "IsWindowsInstance": false,
              "Order": 0
            }
          ],
          "Tag": "edit"
        },
        {
          "AutomationProtocol": "uia3",
          "ElementTypeName": "Button",
          "InstanceId": "509b6bbb-8b91-4426-81a1-459b9be42b3e",
          "Name": "Button 'OK'",
          "SelectorCount": 1,
          "Selectors": [
            {
              "CustomSelector": null,
              "Elements": [
                {
                  "Attributes": [
                    {
                      "Ignore": false,
                      "IsOrdinal": false,
                      "Name": "Class",
                      "Operation": "EqualTo",
                      "Value": "NetUIToolWindow"
                    },
                    {
                      "Ignore": true,
                      "IsOrdinal": false,
                      "Name": "Enabled",
                      "Operation": "EqualTo",
                      "Value": true
                    },
                    {
                      "Ignore": true,
                      "IsOrdinal": false,
                      "Name": "Id",
                      "Operation": "EqualTo",
                      "Value": ""
                    },
                    {
                      "Ignore": true,
                      "IsOrdinal": false,
                      "Name": "Name",
                      "Operation": "EqualTo",
                      "Value": ""
                    },
                    {
                      "Ignore": true,
                      "IsOrdinal": true,
                      "Name": "Ordinal",
                      "Operation": "EqualTo",
                      "Value": -1
                    },
                    {
                      "Ignore": true,
                      "IsOrdinal": false,
                      "Name": "Visible",
                      "Operation": "EqualTo",
                      "Value": true
                    }
                  ],
                  "CustomValue": null,
                  "Ignore": false,
                  "Name": "Menu 'NetUIToolWindow'",
                  "Tag": "menu"
                },
                {
                  "Attributes": [
                    {
                      "Ignore": false,
                      "IsOrdinal": false,
                      "Name": "Class",
                      "Operation": "EqualTo",
                      "Value": "NetUIDismissBehavior"
                    },
                    {
                      "Ignore": true,
                      "IsOrdinal": false,
                      "Name": "Enabled",
                      "Operation": "EqualTo",
                      "Value": true
                    },
                    {
                      "Ignore": true,
                      "IsOrdinal": false,
                      "Name": "Id",
                      "Operation": "EqualTo",
                      "Value": ""
                    },
                    {
                      "Ignore": true,
                      "IsOrdinal": false,
                      "Name": "Name",
                      "Operation": "EqualTo",
                      "Value": ""
                    },
                    {
                      "Ignore": true,
                      "IsOrdinal": true,
                      "Name": "Ordinal",
                      "Operation": "EqualTo",
                      "Value": -1
                    },
                    {
                      "Ignore": true,
                      "IsOrdinal": false,
                      "Name": "Visible",
                      "Operation": "EqualTo",
                      "Value": true
                    }
                  ],
                  "CustomValue": null,
                  "Ignore": false,
                  "Name": "UI Custom 'NetUIDismissBehavior'",
                  "Tag": "custom"
                },
                {
                  "Attributes": [
                    {
                      "Ignore": false,
                      "IsOrdinal": false,
                      "Name": "Class",
                      "Operation": "EqualTo",
                      "Value": "NetUIButton"
                    },
                    {
                      "Ignore": true,
                      "IsOrdinal": false,
                      "Name": "Enabled",
                      "Operation": "EqualTo",
                      "Value": true
                    },
                    {
                      "Ignore": true,
                      "IsOrdinal": false,
                      "Name": "Id",
                      "Operation": "EqualTo",
                      "Value": ""
                    },
                    {
                      "Ignore": false,
                      "IsOrdinal": false,
                      "Name": "Name",
                      "Operation": "EqualTo",
                      "Value": "OK"
                    },
                    {
                      "Ignore": true,
                      "IsOrdinal": true,
                      "Name": "Ordinal",
                      "Operation": "EqualTo",
                      "Value": -1
                    },
                    {
                      "Ignore": true,
                      "IsOrdinal": false,
                      "Name": "Visible",
                      "Operation": "EqualTo",
                      "Value": true
                    }
                  ],
                  "CustomValue": null,
                  "Ignore": false,
                  "Name": "Button 'OK'",
                  "Tag": "button"
                }
              ],
              "Ignore": false,
              "IsCustom": false,
              "IsWindowsInstance": false,
              "Order": 0
            }
          ],
          "Tag": "button"
        }
      ],
      "ElementTypeName": "Window",
      "InstanceId": "2497b5ce-8aac-4541-b166-85d9d2dfed34",
      "Name": "Window 'book.xlsx - Excel'",
      "SelectorCount": 1,
      "Selectors": [
        {
          "CustomSelector": null,
          "Elements": [
            {
              "Attributes": [
                {
                  "Ignore": true,
                  "IsOrdinal": false,
                  "Name": "Class",
                  "Operation": "EqualTo",
                  "Value": "XLMAIN"
                },
                {
                  "Ignore": true,
                  "IsOrdinal": false,
                  "Name": "Enabled",
                  "Operation": "EqualTo",
                  "Value": true
                },
                {
                  "Ignore": true,
                  "IsOrdinal": false,
                  "Name": "Id",
                  "Operation": "EqualTo",
                  "Value": ""
                },
                {
                  "Ignore": false,
                  "IsOrdinal": false,
                  "Name": "Name",
                  "Operation": "EqualTo",
                  "Value": "book.xlsx - Excel"
                },
                {
                  "Ignore": true,
                  "IsOrdinal": true,
                  "Name": "Ordinal",
                  "Operation": "EqualTo",
                  "Value": -1
                },
                {
                  "Ignore": false,
                  "IsOrdinal": false,
                  "Name": "Process",
                  "Operation": "EqualTo",
                  "Value": "EXCEL"
                },
                {
                  "Ignore": true,
                  "IsOrdinal": false,
                  "Name": "Visible",
                  "Operation": "EqualTo",
                  "Value": true
                }
              ],
              "CustomValue": null,
              "Ignore": false,
              "Name": "Window 'book.xlsx - Excel'",
              "Tag": "window"
            }
          ],
          "Ignore": false,
          "IsCustom": false,
          "IsWindowsInstance": false,
          "Order": 0
        }
      ],
      "Tag": "window"
    }
  ],
  "Version": 1
}

Artykuł Filtrowanie danych w Excel z użyciem Power Automate Desktop pochodzi z serwisu Tomasz Poszytek, Business Applications MVP.

Export to Excel now Works in Chrome. Open with Project doesn't work anywhere :)

So.. some good news for the majority of people.

This scope of this post is all about SharePoint Online.


The most popular browser in the world nowadays is Chrome... and we've had the pain of not being able to use the "Export to Excel" functionality on SharePoint lists for a while... I've even implemented HTML buttons in CEWP in order for people to download a pre-saved .iqy file and get the same functionality in any browser. From last week, the OOB button on the ribbon seems to work fine in Chrome! It also works in FireFox (not sure since when) and IE and Edge had this working traditionally.

Now the bad news...

The Open with Project button that was working fine in any browser traditionally...now doesn't work. In any browser. So the only way to open your Project (.mpp) files that are synced to SharePoint task list is to go to Site Contents -> Site Assests and then open the file from there.

While this has been aknowledged by Microsoft like 2 weeks ago, there's still no fix and no ETA on a fix...

How to create a survey from SharePoint and OneDrive using Forms for Excel

As I mentioned numerous times in my blog, Microsoft Forms is a great way to create a quick survey/questionnaire on the fly. The primary method of doing so is navigating to the Forms application and creating either a personal or a Group Form. Today, I want to share another technique that has some fantastic benefits. There is also a way to create a survey from SharePoint and OneDrive using Forms for Excel. Let me explain.

The primary way to create a new Form

The primary way to create a new Form (unless you are creating a quick poll) is via the Forms application. I explained the steps in this article before.

The issue with the above method

One major downside of the above method is that if you want to navigate to the survey results, you have to navigate to the Form you created, click on Responses Tab and click on the Open in Excel link.

Moreover, whenever you want to review the refreshed results, it always downloads a new Excel file which you then need to move to SharePoint or OneDrive if you’re going to save a record of it.

How to create a survey from SharePoint and OneDrive using Forms for Excel

Luckily, we also have another cool option to alleviate the abovementioned issue. It is available from the New drop-down choice in SharePoint Document Library or OneDrive for Business Web App.

Forms for Excel within a Document Library on a SharePoint site

Forms for Excel

Forms for Excel within OneDrive for Business

Here are the steps to create a Survey from the SharePoint document library and OneDrive using Forms for Excel.

  1. From either a SharePoint Document Library or OneDrive Web App, click the New drop-down and choose Forms for ExcelForms for Excel
  2. Give your Excel file a name (which is essentially the name of your survey as well) and click Create
  3. It will create a Form/Survey, and you will be able to add questions to it

What happens when you create a survey from SharePoint and OneDrive using Forms for Excel

You might be wondering what’s so cool about this method. Here are a few advantages of this method compared to creating Forms from the Forms Application:

  1. Forms created from OneDrive for Business become Personal forms, and forms created from the SharePoint document library become Group forms. To understand the difference between the two, check out this post.
  2. Survey responses are automatically saved in a SharePoint Document Library Excel Document if you created the Survey from the SharePoint Document LibraryForms for Excel
  3. Survey responses are automatically saved in your OneDrive Web App Excel document if you created the Survey from the OneDrive Web Application
  4. There is no need to refresh the data or download new responses – they are automatically saved into Excel Document within a document library (or OneDrive)
  5. If you click Open in Excel from within the Forms Responses, it does not download a new Excel document every single time. Instead, it opens the Excel file you created from either the document library or OneDrive.Forms for Excel
  6. If you decide to move a personal form to a Microsoft 365 Group (I described the process here), the Excel with survey responses is automatically copied to an associated Team Site default document library!
  7. If you need to edit the Form, you can also do it from the convenience of the Excel Web App by clicking Insert > Forms > Edit FormForms for Excel

Forms for Excel and Communication Sites

You won’t find Forms for Excel in any document libraries within a Communication Site. And there is a reason for it. Since the Form can either be Personal (responses stored in OneDrive for Business) or Group (responses stored on an associated Team Site), Forms can not be associated with a Communication Site (since it is not a Team Site connected to a group).

New Drop-down on a document library on a Communication Site

The post How to create a survey from SharePoint and OneDrive using Forms for Excel appeared first on SharePoint Maven.

❌
❌