SharePoint Online offers powerful web parts and features that enhance the visual appeal of your sites, including the ability to search for external images on the web while using web parts like Image, Hero, Image Gallery, Quick links, etc. While this feature can be valuable in various contexts, there are scenarios where organizations prefer to disable or hide the option to search for external images especially when they have created organization assets libraries in the SharePoint tenant.
In this blog post, we’ll explore how to hide/disable the “Web search” feature in SharePoint using SharePoint Online PowerShell, PnP PowerShell and CLI for Microsoft 365.
Using SharePoint Online PowerShell
Use below SharePoint Online PowerShell script to disable or enable external image “Web Search” feature in SharePoint Online tenant:
# SharePoint online admin center URL $adminCenterUrl = Read-Host -Prompt "Enter your SharePoint admin center site URL (e.g https://contoso-admin.sharepoint.com/)"
# Connect to SharePoint online admin center Connect-SPOService -Url $adminCenterUrl
You can use below PnP PowerShell script to hide/disable external image “Web Search” feature in SharePoint Online:
# SharePoint online admin center URL $adminCenterUrl = Read-Host -Prompt "Enter your SharePoint admin center site URL (e.g https://contoso-admin.sharepoint.com/)"
# Connect to SharePoint online admin center Connect-PnPOnline -Url $adminCenterUrl -Interactive
Disabling or hiding the web search for external images in SharePoint Online is a strategic choice for organizations that prioritize content security, brand consistency and compliance. By following the methods outlined in this blog post, you can tailor your SharePoint environment to align with your organization’s policies and enhance the overall governance of your digital assets.
SharePoint Online provides a powerful search engine that enables users to quickly find the information they need. However, the quality of search results depends largely on how well the site is optimized for search. In this blog post, we’ll explore some best practices for optimizing your SharePoint Online site for better search results and also discuss PowerShell scripts that can help you achieve this.
Use Managed Metadata:
Managed metadata is a hierarchical collection of centrally managed terms that can be used to tag content in SharePoint Online. By using managed metadata, you can ensure that your content is consistently labeled, which can improve the accuracy of search results. PowerShell script can be used to create and manage term sets and terms.
Customize Search Refiners:
Search refiners are used to filter search results based on specific criteria such as file type, author, or date. By customizing search refiners, you can make it easier for users to find the information they need. PowerShell script can be used to create custom refiners based on managed metadata.
Optimize Page Titles and Descriptions:
The page titles and descriptions are used by the search engine to index the content of the page. By optimizing these elements with relevant keywords, you can improve the visibility of your pages in search results. PowerShell script can be used to update page titles and descriptions.
Use Friendly URLs:
Friendly URLs are human-readable web addresses that are easy to remember and type. By using friendly URLs, you can make it easier for users to find your content and improve the visibility of your site in search results. PowerShell script can be used to set friendly URLs for pages and sites.
Enable Searchable PDFs:
PDF files are a common format for documents, but they are not always searchable by default. By enabling the searchability of PDF files, you can ensure that their content is included in search results. PowerShell script can be used to enable PDF search in SharePoint Online.
By following these best practices and using PowerShell scripts, you can optimize your SharePoint Online site for better search results. PowerShell scripts can help you automate the process of managing and optimizing your site for search, making it easier and more efficient to achieve your search optimization goals.
Some time ago, I introduced you to the ability to alter SharePoint search settings in modern SharePoint. There are a few ways to customize search results, and one of the things you can adjust is a Search Vertical. So in today’s post, I would like to explain what a Search Vertical is and how to configure Search Verticals on a SharePoint site.
What is a SharePoint Search Vertical
A search vertical is a subset of search results you get when you search for something in SharePoint. You know, when you search for something on Google and get a bunch of results, you can filter them into different types by clicking on different tabs available under the search box (i.e., News, Images, Videos, etc.)
We have the same capability in SharePoint as well. When you search for something in SharePoint, you get a bunch of results. However, you can also separate them into more relevant categories (Files, Sites, News, Images) by clicking on appropriate tabs. So, for example, if I am searching for a keyword and just want to limit results to files, I will click on the Files tab. If I want only to search for news and announcements, I will click on the News Tab.
To summarize, SharePoint Search Verticals are tabs that allow you to filter results and present results based on some filter/parameter/scope.
Where can you configure SharePoint Search Verticals?
Just as I mentioned in an earlier post, you can configure SharePoint search in two places:
SharePoint Site
Tenant (Global) Level
Since the steps for both locations are almost identical, I will demonstrate how to configure SharePoint Search verticals at the site level. So if you are a Site or Team Owner, you can easily follow the below instructions.
To alter SharePoint Search Verticals at the global (tenant) level, you would need to adjust those verticals within the Search & Intelligence Admin Center, and you also need to be a global Microsoft 365 Administrator to do so.
An example of a Search Verticals Customization area within the Global Search & Intelligence Center
How to configure Search Verticals on a SharePoint site
Make sure you are the Site Owner of a given site. If you are a regular site member, you would be unable to customize this.
On a given SharePoint Site, click Gear Icon > Site Information
Click View all site settings
Click Configure search settings under Microsoft Search
Once you click on the Configure search settings, it will show you the default Microsoft Search Settings page and will default to the Insights page. Click on the Verticals tab to get into the Verticals customization page.
Once you click on the Verticals Tab, it will show you the default Vertical Tabs available when a user searches for something on a SharePoint site
How to disable the default Search Vertical
By default, it shows the 5 verticals shown above. However, you can disable some of them if necessary. Here is how to achieve this:
Double-click on a vertical you would like to disable
Click on the Edit button
Click on the State toggle to disable the vertical, then click on the Update vertical button
Click Done
The table of SharePoint verticals will now display your customizations. For example, in my case, I disabled Sites and Images Verticals.
It might take 1-2 hours for a change to take place. Here is the end result (all the disabled vertical tabs are gone when the user executes the search at the site level)
Just a note, there are other ways to configure and customize the vertical. For example, you can customize the default vertical by adding a custom filter. I will demonstrate how to do so below, where I provide instructions on creating a custom vertical.
How to create a custom search vertical on a SharePoint site
You might also have a scenario where you would like to create a custom search vertical that will filter for a certain type of results. To take advantage of this capability, you must get familiar with Keyword Query Language and Managed Properties. It can get pretty sophisticated in terms of custom verticals you can create so that I will use a simple example for this demo. I would like to create a custom search vertical that will only show/filter results that are PDF file type and only contain the word “blue” in the file name.
Navigate to the Microsoft Search Settings screen, as shown earlier in the post
Click + Add button
To create a vertical, you must supply several pieces of information. The first one is the name of the Vertical (Tab) you are creating. Give it a name and click Next.
Next, choose the source of the content. Just click the radio button next to SharePoint, then click Next. There are ways to bring in other, non-SharePoint sources (i.e., 3rd party databases, CRMs, etc.), but this is pretty advanced and is a task for your IT Team. In our case, we will bring content just from SharePoint.
Next, you need to specify a KQL query that will filter the results to certain ones. Again, I suggest you get familiar with Keyword Query Language (KQL) and managed properties to see what is possible. To help you understand which properties can be used for the KQL query string, it actually lists all the managed properties under the Queryable properties section.
In my case, the KQL String looks like this: filetype:PDF AND filename:*blue*, which limits results to PDFs and only searches filenames containing the word “Blue.” Click Next.
On the next screen, you can choose to add an optional filter. It is not mandatory, you can skip this step, but just so that you know which filter we are talking about, it is a filter drop-down that appears under the search results, allowing users to filter results even further.
If you would like to add an optional filter, click Add a filter
It will list various properties/managed properties you can filter by. In our case, let’s add LastModifiedTime so users can filter further by the last modified date. Click Next.
Next, you can add a custom name to the filter above, then click Add
You can add multiple filters, but in our case, let’s just stick to one. Click Next.
On the next screen, review the changes you made. Make sure to enable the vertical (it is disabled by default), so click on the State radio button to ensure it says Enabled. Click Create Vertical button.
You will get a Vertical created Confirmation Message. Click Done.
This is what the end result will look like in the Verticals configuration screen
It might take a few hours for the Vertical Tab to appear when you/users execute a search. Here is the end result. You will notice a custom tab created when I do a keyword search. Since we customized our search to only show PDFs and files that contain the word “Blue” – that is precisely what appears when you click on the custom vertical Tab. In addition, we also have the Last Modified Filter as well.
Important Notes about Search Verticals on a SharePoint site
You cannot delete default verticals/tabs (All, Files, Sites, News, Images); you can only disable them. You can only delete custom (new) verticals/tabs created by you.
As indicated earlier in this article, you can also create a custom search vertical in Search & Intelligence Admin Center that will impact global search results. But this requires you to be a Microsoft 365 Global Admin role.
Présentée en Février 2015 lors des Microsoft Techdays, S-Energy est une solution de monitoring des ressources énergétiques (eau, électricité et gaz) connectée dans Constellation conçue fin 2014 suite à une fuite d’eau sur ma chaudière. Avec Constellation, la plateforme d’interconnexion des objets connectés, applications et services, cela me permet d’afficher les consommations en temps sur […]
After crunching the numbers, little change has been found in ransomware attacks since 2019. Source: Unsplash
Emsisoft has published the state of ransomware report for 2022, providing a synopsis of ransomware attacks that occurred in the US last year. The report categorizes the attacks by the areas they affected — local government, education, and healthcare. Overall, 106 local governments, 44 universities, 1,981 schools, and 290 hospitals faced ransomware attacks. Information in the report came from various sources, including the dark web, press reports, third-party feeds, and disclosure statements.
Despite the US government’s best efforts and awareness campaigns since 2019, the ransomware attack figures have remained mostly the same in the years following. The report acknowledged its estimations don’t consider the attacks repelled by government efforts. Since accurate ransomware data collection can be tricky, the report indicated that its findings are on the minimum-range side.
“When it comes to cybersecurity incidents, it has always been hard to get accurate statistical information. What data is available is based largely on publicly available reports, but not all incidents are made public, even in the public sector and, consequently, the true number of incidents in all sectors of the economy is and has always been higher than reported,” read the official blog.
Emsisoft State of Ransomware Report: Local Governments
The report categorizes ransomware data into three categories: local governments, education, and healthcare. Source: Pexels
Cyberattacks targeting local governments have jumped from 77 in 2021 to 105 in 2022. However, the figures for this year also include the cyberattack in Miller County, Arkansas. In this incident, a single malware spread to 55 different counties.
A single large-scale incident like that can tip the scales and warp estimations. For example, if you exclude the Arkansas incident, cybercriminals stole data in about 54% of the cases. If you include the incident, the number is down to about 26%.
Only one local government paid ransom to cybercriminals this year: Quincy of Massachusetts paid USD 500,000 in ransom to retrieve stolen files. Five million dollars was the highest local government ransom demanded in 2022 in Wheat Ridge, Colorado.
The following year-by-year comparison shows that the incident figures have remained quite consistent since 2019:
Teachers and students should be made aware of how ransomware attacks happen and learn about basic cybersecurity principles. Source: Pexels
The attack on the Los Angeles Unified School District, affecting 1,300 schools and 500,000 students, was the most significant of 2022. The total number of education institutions targeted doubled from the previous year: 1,043 to 1,981. This figure includes 45 school districts and 44 colleges. In these attacks, cybercriminals extracted data in 65% of incidents, up from 50% in the previous year.
Out of all the attacks targeting educational institutions, at least three paid the ransom. This includes the USD 400,000 ransom Glenn County Education Office in California paid. Like the figures of local government attacks, the attacks on educational institutions have also remained stable since 2019:
2019 — 89
2020 — 84
2021 — 88
2022 — 89
Attacks on educational institutions carry other costs as well. These attacks bring university operations to a halt and delay module progression. Activities like test markings, accessing online lectures, and submitting assignments are all consequences of ransomware attacks.
Such costs are unbearable for institutions. They would also require proper awareness among both teachers and students about how ransomware attacks happen. Students are susceptible to clicking on malware and Trojans, which can lead to ransomware. In response to the recent breaches, Berkeley has recommended cybersecurity training for all its students and professors.
Emsisoft State of Ransomware Report: Healthcare
Healthcare remains an easy and juicy target for cybercrime gangs. Source: Pexels
The healthcare sector, with its vast, sensitive information collections, remains a favorite target of cybercrime gangs. Administrators in healthcare can’t afford the information leaking out, which forces them to give in to the criminals’ demands. The Emsisoft report revealed that the number of cyberattacks in the healthcare sector is huge. Yet, the industry lacks transparent reporting.
Emsisoft reported 24 healthcare ransomware incidents in 2022, potentially affecting 289 hospitals. In 71% of the cases, cybercriminals exfiltrated Protected Health Information (PHI) and other data. Due to a lack of disclosure, Emsisoft couldn’t ascertain the extent of its reported breaches. However, the most significant cybersecurity incident concerning healthcare in 2022 was the attack on CommonSpirit Health — which operates 150 hospitals.
More recently, a Hive ransomware attack on the Lake Charles Memorial Health System (LCMHS) in Louisiana affected over 270,000 patient records. Leaked information from the Hive attack included patient names, addresses, dates of birth, medical record or patient identification numbers, health insurance information, payment information, and/or limited clinical information regarding care received at LCMH.
The report focuses on public sector breaches because of the lack of transparency in private organizations. In particular, the lack of transparency around disclosing information related to ransomware or other breaches. Yet, private companies that suppress information related to ransomware and breaches still need to bolster their defenses. This is especially the case since cyberattacks have increased in complexity and extent.
All commercial entities should implement the most highly recommended cybersecurity practices to protect against and mitigate cyberattack aftershocks. These measures include multifactor authentication across all services, regular and automated patching, high-quality antivirus and malware detection tools, and employee awareness campaigns. Penetration testing is also an excellent way to find weaknesses in any network.
Ransomware is here to stay, despite public and private organizations’ best efforts to curb it. In fact, ransomware attacks are growing in sophistication. To counter the new ransomware attacks and to spread awareness about them, Emsisoft first recommends calling them by names that more accurately describe the nature of these attacks. Suggested terms include “data extortion events,” “encryption-based data extortion,” and “exfiltration-based data extortion.”
This could set quite a worrying precedent, as the cybersecurity industry benefits from quick communication regarding the most recent cybercrime breaches. With more sophisticated threats on the horizon, companies can benefit from information sharing and updated defense mechanisms.
Use a Historical Message Trace to Find Inbound Email Delivered to Shared Mailboxes
A question in the Facebook group for Office 365 Technical Discussions (no YouTube videos or marketing posts accepted) asked how to check shared mailboxes for email received from external senders over the past sixty days. The check should look for email received from a specific domain and report details of those messages.
Given the number of shared mailboxes that might be used in a tenant and the volume of email that these mailboxes might receive, running a manual check is not feasible. You would have to sign into each mailbox and review their content. This is a tiresome process that wouldn’t detect messages received from the specific domain that users subsequently deleted (or messages removed by a retention policy).
Exchange Historical Message Traces
Exchange Online historical message traces can go back a maximum of 90 days, so they can be used to search the data logged by Exchange Online when it delivers messages to mailboxes. A single historical message trace can cover up to 100 mailboxes. If a tenant wants to check more mailboxes, they can split the check across multiple searches and combine the results.
It all sounds so easy to script. Run the Start-HistoricalSearch cmdlet to submit the message trace. Check the output. Find and report problem messages. Easy. But as is so often the case, some complexity lurks under the surface.
Submit a Historical Message Trace and Wait
The PowerShell code to automate the check must be split into two scripts. The first creates and submits the historical message trace job. The second analyzes the results of the trace. The two cannot be connected because Exchange Online runs historical message trace jobs in the background as service resources allow. If you’re lucky, a message trace might complete in less than twenty minutes. More often, it will take an hour or so.
Here’s the code I used to submit the job. It finds the set of shared mailboxes, sets the search period, and creates the parameters for the Start-HistoricalSearch cmdlet to process. As noted above, a historical message trace can process up to 100 mailboxes, so a check is there to make sure that we don’t attempt to schedule a job for more than this number of mailboxes.
# Find all shared mailboxes
[array]$SharedMailboxes = Get-ExoMailbox -RecipientTypeDetails SharedMailbox If ($SharedMailboxes.Count -gt 100) { Write-Host ("Too many shared mailboxes found - we can't do a message trace for {0} mailboxes" -f $SharedMailboxes.Count) ; break }
$RecipientAddresses = $SharedMailboxes.PrimarySmtpAddress
$SharedMailboxesScan = '"{0}"' -f ($RecipientAddresses -join '","')

# Look back 60 days
$Now = Get-Date
$StartDate = Get-Date($Now).AddDays(-60)

# Submit historical search (maximum of 250 per day)
$Command = 'Start-HistoricalSearch -RecipientAddress ' + $SharedMailboxesScan + ' -StartDate "' + $StartDate + '" -EndDate "' + $Now + '" -ReportType MessageTrace -ReportTitle "Report Shared Mailbox Scan ' + $Now + '"'

$Status = Invoke-Command -ScriptBlock {$Command}
Although you could code a loop to use the Get-HistoricalSearch cmdlet to check the progress of the search job and resume when the job completes, a further complication is that Exchange Online stores the message trace results in Azure storage. There’s no way for PowerShell to download the data for processing. Instead, an Exchange administrator goes to the Mail flow section of the Exchange admin center to view the status of historical message trace jobs and download the results if the job to scan for shared mailbox traffic is complete (Figure 1).
Figure 1: Downloading the report for a historical message trace
Processing Historical Message Trace Results
Exchange Online downloads the message trace results using a URL like:
The result is a CSV file in the Downloads folder with a name with a “MTSummary_Report” prefix followed by the historical message trace name and an identifier. For instance:
Occasionally, the data generated by Exchange Online doesn’t import properly into PowerShell using the Import-CSV cmdlet. To make sure that everything works, I open the downloaded file with Excel and save it to a known location, like c:\temp\MessageTraceResults.csv. The save seems to cure any lingering data formatting problems.
We can now process the data by first searching the records to find if any originated from the domain of interest. For the purpose of this exercise, I’ll search for messages originating from Practical365.com:
[array]$MessageData = Import-CSV c:\temp\MessageTraceResults.CSV
[array]$ProblemItems = $MessageData | Where-Object {$_.Sender_Address -like "*practical365.com"}
If (!($ProblemItems)) { Write-Host "No email found from Practical365.com - exiting" ; break }
Creating a report from the discovered items is simple:
Figure 2 shows the report of the messages received from Practical365.com.
Figure 2: Messages from a domain found by a historical message trace
Getting the Job Done
Some organizations extract and move message trace data to external repositories like Splunk to make it easier to perform this kind of tracing. An external repository usually allows for long-term storage and is more flexible in terms of its search capabilities. However, the basic tools built into Exchange Online can do the job, even if the PowerShell processing is split into two tasks. It would be nice if Microsoft allowed tenants to download the message trace data with PowerShell to avoid the messing around with CSV files, but that’s just a small complaint.
Learn how to exploit the data available to Microsoft 365 tenant administrators through the Office 365 for IT Pros eBook. We love figuring out how things work.
It would seem like the simplest thing in the world: show results in the PnP Modern Search Results Web Part in alphabetical order. My wanting to do this led to multiple conversations with my search guru Mikael Svenson (@mikaelsvenson) and the uncovering of some really useful variants on RefinableString in the SharePoint Online Managed Properties.
The new(ish? – it’s not clear how long they have been there) pre-created Managed Properties which are variants of RefinableString are now documented in Manage the search schema in SharePoint – SharePoint in Microsoft 365 | Microsoft Learn. Until I offered some updates recently, these variants weren’t in the article. I’m not sure I’d ever found this article before, but it seems to be the canonical list of Refinable Managed Properties, along with a lot of useful information about the Search Schema.
The new (to me, anyway) ones are in the last four rows of the following table in that article:
Managed property type
Count
Multi
Query
Search
Retrieve
Refine
Sort
Managed property name range
Notes
Date
10
–
Query
–
–
–
–
Date00 to Date09
Date
20
Multi
Query
–
Retrieve
Refine
Sort
RefinableDate00 to RefinableDate19
Date
2
–
Query
–
Retrieve
Refine
Sort
RefinableDateInvariant00 to RefinableDateInvariant01
*
Date
5
–
Query
–
Retrieve
Refine
Sort
RefinableDateSingle00 to RefinableDateSingle04
Decimal
10
–
Query
–
–
–
–
Decimal00 to Decimal09
Decimal
10
Multi
Query
–
Retrieve
Refine
Sort
RefinableDecimal00 to RefinableDecimal09
Double
10
–
Query
–
–
–
–
Double00 to Double09
Double
10
Multi
Query
–
Retrieve
Refine
Sort
RefinableDouble00 to RefinableDouble09
Integer
50
–
Query
–
–
–
–
Int00 to Int49
Integer
50
Multi
Query
–
Retrieve
Refine
Sort
RefinableInt00 to RefinableInt49
String
200
Multi
Query
–
Retrieve
Refine
Sort
RefinableString00 to RefinableString199
String
40
Multi
Query
–
Retrieve
Refine
Sort
RefinableStringFirst00 to RefinableStringFirst39
*
String
10
Multi
Query
–
Retrieve
Refine
Sort
RefinableStringLn00 to RefinableStringLn09
**
String
50
–
Query
–
Retrieve
Refine
Sort
RefinableStringWbOff00 to RefinableStringWbOff49
***
String
50
Multi
Query
–
Retrieve
Refine
Sort
RefinableStringWbOffFirst00 to RefinableStringWbOffFirst49
*, ***
* Mappings to crawled properties – Include content from the first crawled property that is not empty, based on the specified order. ** Language neutral word breaker *** Complete Matching
As you can see, each of the additional RefinableString* Managed Properties has something a little different about it, as indicated in the Notes.
Need to know more? Feel free to ask your questions in the comments.
Last week, we had a client wondering why they saw this in the Search & Intelligence Admin Center.
Not only was Top queries showing “No data”, but there was “No data” for No results queries and Abandoned queries, too. This was the case even when we changed the filter from the last 31 days to the last 12 months. Surely people were searching for something!
We decided to try putting in a ticket with Microsoft to find out why it wasn’t working. At least it wasn’t working in such a way where we could get any “intelligence” from it.
After about a week, I finally got past the first line of defense at Microsoft (who told me to try a different account, etc. – nothing useful) to find out why we weren’t seeing much in the Search & intelligence stats. Unfortunately, the answer isn’t a good one.
It seems like the search queries are generated only when the searches are made on the Sharepoint Landing Page and not within the Sharepoint site search. Here is the information for your reference.
“You can get the tenant level usage analytics reports in Microsoft Admin center under Settings> Search and Intelligence> Insights to access the 5 usage analytics reports (top queries, abandoned queries, no result queries, query volume, and Impression distribution) aggregated over SharePoint home (This only covers searches made from the SharePoint landing page) and office.com workloads.”
(And yes, he spelled SharePoint wrong.) I vaguely remember learning this from Mikael Svenson (@mikaelsvenson) long ago. I probably blocked it out of my mind.
Rereading the articles in the References section below – with a fine-toothed comb- I see the answer was there, too.
With data only coming from “SharePoint Home (the site with URL ending in /SharePoint.aspx), Office.com, and Microsoft Search in Bing work tab search boxes”, we get barely a slice of the searches people actually do, and there’s very little intelligence we can get from such narrowly scoped analytics. Now that the Microsoft 365 search box is at the top of almost every page in Microsoft 365, I’d expect we could see all the search queries people do. I’m hoping this isn’t a permanent state.
As an Intranet manager, one of the most valuable things you can know is what people are searching for. It tells you what content is missing or where you haven’t done a good job in building the navigation or other parts of the information architecture. Unfulfilled searches mean content is missing entirely or maybe the permissions aren’t set right on content which is available. Setting up search isn’t a “one and done” thing. Monitoring and mining search should be a role at every organization with electronic content. Without good tools to do so, we’re driving blind.
Today I started to work on a mock-up of a People Directory which is not utilizing anything else, but a Content Search Web Part due to the easy customization Display Templates and the powerful features it offers. It already has som good templates like Large picture for example, that will be all I need + Department and Job Title (which will be managed properties, linked to a term set).
Even though this Web Part is heavily promoted and is supposed to enhance/replace the good old CQWP, it doesn't work right away as you'd expect (at least in SharePoint Online).
Let's imagine you create a blank page and you add the Web Part.
You then configure your query - it'll be very simple "@*onmicrosoft.com" so that I can get all the people from my demo tenant
As you can see, the query is tested and it simply works. Then you save your Web Part and get this:
Some people suggested that this Web Part is not available in SharePoint Online Plan 1 and they've been in touch with Microsoft Support .... which I have to use in production... but I couldn't find an official source stating that. I think that's old information, I think the web part was not even available in SharePoint Online in the beginning. I know it's definitely not available on-premise if you don't have the Enterprise version.
I've also tested this on my demo tenant which is on SharePoint Online Plan 2... and I got the same results. Turns out pretty simple, I just had to enable the Cross Site Publishing feature on the site collection and the web part works.
+ a little bit of CSS = a sample of my desired outcome:
The next thing is to find out which properties we want displayed in these boxes, if they're custom ones they should be mapped to a managed property first before we can stick them in here.
How many of you faced this strange behavior of SharePoint 2013 designer?
When trying to use User Profile as a Data Source in a workflow. Something similar to the screen shot below:
Try looking in google did not give me the expected solution. A lot of people suggested to grant permissions of the web app pool account to the search service database. But what actually that means? I granted read permissions to all search related databases, but as you expect the problem was still persisting.
So many articles were referring to Search I was start thinking that the problem is really there. But all of the explanations were not exactly correct. The right way to make it working is:
Go to Central Admin
Go to Manage Service Applications
Select Search Service Application, but don't click on it
Select Administrators
Add the application pool account of the web application
Grant "Read (Diagnostic Pages Only)" permission and click OK
Afterwards everything should work normally.
For now I don't have exact explanation why these settings are necessary. Will try to find out and post here as a comment.
Federated search is when you aim to receive search result from separate SharePoint (on-premises) by performing a search query in a separate on-premise SharePoint farm.
If you have done such configuration probably you have seen the official documentation for setting it up. This procedure will work in most of the cases.
However, this will not work if you do not have outbound connectivity from the remote farm that will receive the search query (ReceivingFarm) to the farm that is sending the query (SendingFarm).
In that case the federated search will be possible as long as the SendingFarm can access the ReceivingFarm, vice versa is not required, but you should take a bit different approach when building the trust since the SendingFarm web app metadata end point will not be available.
The first thing that needs to be done is to export the root and the token signing certificates from the SendingFarm and also get the Issuer Name (NameIdentifier) of the SendingFarm STS .
## Export Root Certificate$rootCert=(Get-SPCertificateAuthority).RootCertificate$rootCert.Export("Cert")|Set-Content"C:\SendingFarmRoot.cer"-Encodingbyte## Export Signing Certificate$stsCert=(Get-SPSecurityTokenServiceConfig).LocalLoginProvider.SigningCertificate$stsCert.Export("Cert")|Set-Content"C:\SendingFarmSTS.cer"-Encodingbyte## Get the STS Issuer Name$issuerName=(Get-SPSecurityTokenServiceConfig).NameIdentifier
The difference from the official procedure will be how we are going to create the trusted token issuer and the trusted root authority in the ReceivingFarm, this is step 3 in the official procedure.
First copy the SendingFarm certificated to the ReceivingFarm.
Having above done you can create the trusted security token issuer and the trusted root authority in the ReceivingFarm.
## Read SendingFarm Signing certificate$stsCert=Get-PfxCertificate"C:\Install\Certs\SendingFarmSTS.cer"## Read SendingFarm root certificate$rootCert=Get-PfxCertificate"C:\Install\Certs\SendingFarmRoot.cer"# Create a trusted security token issuer$i=New-SPTrustedSecurityTokenIssuer-Name"SendingFarm"`
-Certificate$stsCert`
-IsTrustBroker:$false`
-RegisteredIssuerName"<SendingFarm IssuerName>"# Configure trust of the token-signing certificate'# by adding the trust used to sign oAuth tokens'# to the list of trusted root authorities'# in ReceivingFarmNew-SPTrustedRootAuthority-Name"SendingFarm"`
-Certificate$rootCert
Now, you can continue with the trust configuration as it is described in the documentation.
Indexing of file shares is a common requirement if you have legacy file share that hasn't been migrated to SharePoint or you are using file share for archiving purposes. SharePoint Search can provide this functionality.
SharePoint also support search result trimming for file share content. That means that if the user does not have permission to a certain content on the file share, the user will not see the content appearing in the search results.
If you are using Windows integrated authentication the security trimming does not require anything special, it will just work. This is not the case if your users are using ADFS to authenticate against SharePoint. If you are using ADFS it is mandatory to have two more claims in order to make the security trimming working.
Those claims are Primary SID and Primary Group SID. In some articles you can find that the Primary SID is required in S2S authentication scenario, but nothing about the Primary Group SID. The Primary SID is the User object SID and the Primary Group SID is the SID of the Domain's primary group
In this post I will demonstrate how to setup it up in ADFS and SharePoint. I have tested it with ADFS 4.0 and SharePoint Server 2016.
On the ADFS side you will need to create two Issuance Transformation rules using template "Pass Through or Filter an Incoming Claim".
You can use below rules to append your rule file and import it to your SharePoint Relying Party Trust(s).
But first, you will have to export your current rules by using below command.
On the SharePoint side you will have to create the claim type mappings for the two new claims. You can use the example script below.
Add-PSSnapin*SH*$sts=Get-SPTrustedIdentityTokenIssuer$sts.ClaimTypes.Add("http://schemas.microsoft.com/ws/2008/06/identity/claims/primarygroupsid")$sts.ClaimTypes.Add("http://schemas.microsoft.com/ws/2008/06/identity/claims/primarysid")$sts.Update()$map=New-SPClaimTypeMapping`
-IncomingClaimType"http://schemas.microsoft.com/ws/2008/06/identity/claims/primarygroupsid"`
-IncomingClaimTypeDisplayName"Primary group SID"-SameAsIncoming$map2=New-SPClaimTypeMapping`
-IncomingClaimType"http://schemas.microsoft.com/ws/2008/06/identity/claims/primarysid"`
-IncomingClaimTypeDisplayName"Primary SID"-SameAsIncomingAdd-SPClaimTypeMapping-Identity$map-TrustedIdentityTokenIssuer$stsAdd-SPClaimTypeMapping-Identity$map2-TrustedIdentityTokenIssuer$sts
And that's is all you need to do. If everything is fine you will see values for the two new claims and the security trimming should work for the ADFS users.
If you are wondering how to see the claims, I am using one of the many SharePoint Claims Viewer web parts found on the internet. I am also using LDAPCP for claims provider. Above requirement and scripts will be the same if you are using the OOTB claims provider.
A couple of weeks ago I worked with a client that had this requirement for their search center in SharePoint Online. They had a repository with different research documents and these documents had a Publishing Date date/time field with values up to 30 years ago.
The client wanted to build a result page for this documents and have a slider bar refiner with custom intervals up to 10 years ago.
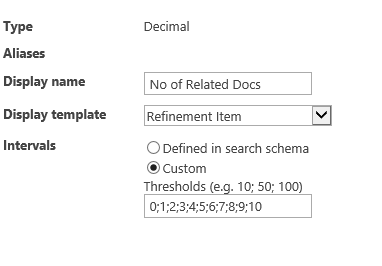
If we have a numeric based managed property we can specify a custom refiner interval like the one below.
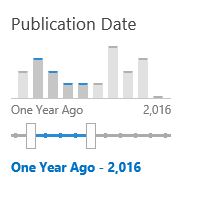
Unfortunately the Custom option is missing for date and time datatype. We have predefined intervals that are up to one year ago and "Defined in search schema" which I am not sure what is suppose to mean, but this will be the error you will get if you select this option.
For this Display Template you must specify custom intervals for the values that will be shown. Please change the refinement settings to use custom intervals.
It really does not tell us much if you don't have an option to specify custom interval in the UI.
Luckily if you export the Refinement webpart you can see more refiner settings. All selected refiners are represented as JSON and below are the settings of our Publication Date refiner(formatted).
There are two settings that grab the attention and they are highlighted in the picture above. They are "useDefaultDateIntervals", which obviously means if the default intervals that cover only one year should be used and "intervals" that should represent the custom intervals. After some research on the web I found that the intervals value should be array of integers that are representing the intervals in days. I came up with these intervals for my client: Ten Years Ago, Five Years Ago, Three Years Ago, One Year Ago, Six Months Ago, Three Months Ago, One Month Ago, 7 days Ago and Today. This will be set with flowing intervals value:
[-3650,-1825,-1095,-365,-180,-90,-30,-7,0]
The first step will be to update the values for "useDefaultDateIntervals" and "intervals". Set the "useDefaultDateIntervals" to false and for "intervals" use your interval array like the picture below.
Then you will need to import the webpart and use it in your page. The result is below.
We have our custom intervals and they are working as we expect(at least with me). However we can see one big issue and it is that the intervals are not labeled appropriately. This should be fixed in the refiner display template.
As it is not a good practice or practical in this case to edit the out of the box display template I created a new display template based on the out of the box "Slider with bar graph".
In the new template I have specified values for the Label and the NextIntervalLabel of all "filter boundaries". In this example we are going to have 10 boundaries. NextIntervalLabel is used when you move the mouse over the bar and the Label is used for boundary label in the slider. You can see the entire template below.
On line 104 we can see how to get all boundaries and their values for Label and NextIntervalLabel.
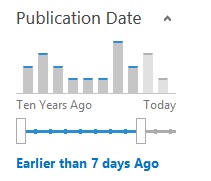
After deploying and setting the new display template we can see that the labels are much more accurate.
There is small detail that should be updated and it is the start and end labels of the bar graph.
Unfortunately my solution to that is to change the text by selecting the elements by class name and this is not the most elegant solution if you have more than one slider bar refiners, in that case you will need to change the index number to get the correct elements. You can see the code below.
With this final touch this is how our custom slider bar graph refiner looks like.
It looks really cool and useful. If you check the refiner settings in the UI now you will see that "Defined in search schema" is selected. I found this misleading since I have done nothing special in the search schema. I hope that this was helpful!
I have been waiting for a long time to write this post. Back in SharePoint classic days, we used to configure the SharePoint search page where we could add custom filters and refiners and promote certain search results. In other words, we had the power to alter the search experience for end users. After Microsoft modernized SharePoint, this ability kind of went away for a while. We could not alter the search results at all. However, thanks to the recent release of new capabilities, we can alter the end users’ search experience. So in this article, I would like to introduce you to the available search settings and ways you can alter the search verticals.
SharePoint Search Settings in Classic SharePoint
For those of you who have used SharePoint for quite some time and remember SharePoint Classic (SharePoint on-premises) – you might recall that we had the ability to alter the default search experience by introducing custom search filters and promoting certain queries/results over the others. Below are a few images showing that capability.
Example of a SharePoint Classic Search Experience with custom search refiners
Example of the ability to configure Classic SharePoint search results and refiners
With the modernization of SharePoint, we now have modern flat architecture and a totally different set of site templates and pages. On top of that, a classic search was based on the hierarchy – site collections/subsites structure. In contrast, Modern Search relies on user activities, SharePoint usage, and Artificial Intelligence (AI), where results are presented to users based on user activities and not the physical architecture of sites and libraries. Long story short – the old methods of SharePoint search customizations are no longer relevant.
Where can you alter SharePoint search settings in Modern SharePoint?
Although Microsoft changes the algorithm of how search results are now presented, you still want to have some control over it. For example, you might want to promote certain results over others. A typical example could be a user typing in a query on how to change a password and, instead of getting hundreds of results matching certain keywords within documents, getting the top result, written and promoted by the IT Team, with the exact instructions on how to change the password.
There are two places where you can alter the SharePoint Search Results/adjust SharePoint Search settings: Site level and Global Admin (Tenant) Level.
Location 1: Configure Search Settings at the Site Level
Click Gear Icon > Site Information
Click on View all site settings
On the page that appears, click on Configure search settings under Microsoft Settings
You will then see the below page that, by default, shows you some search statistics (insights) available to you at the site level
At the top of the page, you will see a few options you can adjust (Verticals and Result Types)
If you click on the Verticals tab, you will be able to adjust the Vertical tabs you always get to see on top of the SharePoint Search Results Page that help you filter your results by different types (i.e., Files, Sites, Images). You can edit the built-in out-of-the-box Verticals, and you can also create custom Verticals as well. I will be writing a separate post down the road on this topic.
If you click on the Result types tab, you can configure Result Types. Result Types let you adjust the presentation and layout of search results on SharePoint Search Results Pages. Once again, this is definitely an item for another post down the road.
Important Notes about SharePoint Site Level Search Settings
To alter search settings at the site level, you need to be the Site Owner of a given site
Any changes to the SharePoint site-level search settings only impact queries/searches executed from that particular site – no other sites will be impacted
Location 2: Configure Search Settings at the Global (Tenant) Level
Click on Microsoft 365 App Launcher > Admin
Under Admin centers, choose All admin centers
Click on Search & intelligence Admin Center
Just like with site-Level, you will see Insights (Search Analytics), but this time, it is analytics for the whole tenant, not just a given SharePoint site
The Insights Tab contains a few analytics-related options – I will expand on those further in the future blog posts
The Answers tab allows you to promote specific results and provide answers to the most common queries a user might have (i.e., How to change a password). This is a cool and easy-to-configure option, and I will write an article on it down the road.
The Data sources tab allows you to bring the other sources into SharePoint search. For example, you can connect CRM application or some other 3rd-party databases and applications such that their content will also be searchable from SharePoint
The Customizations tab allows you to alter Verticals and Result Types (like on a site level described above). However, the changes apply to the whole tenant (Org-wide search) this time.
Configurations Tab allows for some additional customization options (i..e ability for SharePoint search results to appear in Bing web search)
Example of SharePoint Search Results appearing in regular Bing Web Search
Example of SharePoint Search Results appearing in regular Bing Web Search
Example of SharePoint Search Results appearing in regular Bing Web Search
Example of SharePoint Search Results appearing in regular Bing Web Search
Important Notes about SharePoint Global Level Search Settings
To alter search settings at the global level, you need to be a Microsoft 365 Global Administrator
Any changes to the SharePoint Global level search settings impact queries/search executed only from SharePoint Start Page or a Home Site. In both cases above, the search is global and queries all sites and user’s OneDrive.
The changes described above do not impact searches from Hub Sites – the site also has to be registered as Home Site to search the whole universe of sites in the tenant.